background image

step 2

step 1

operation

page 12

Showerbuddy SB3T

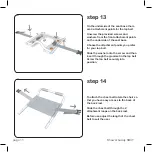
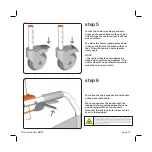
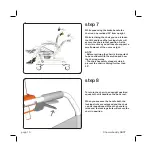
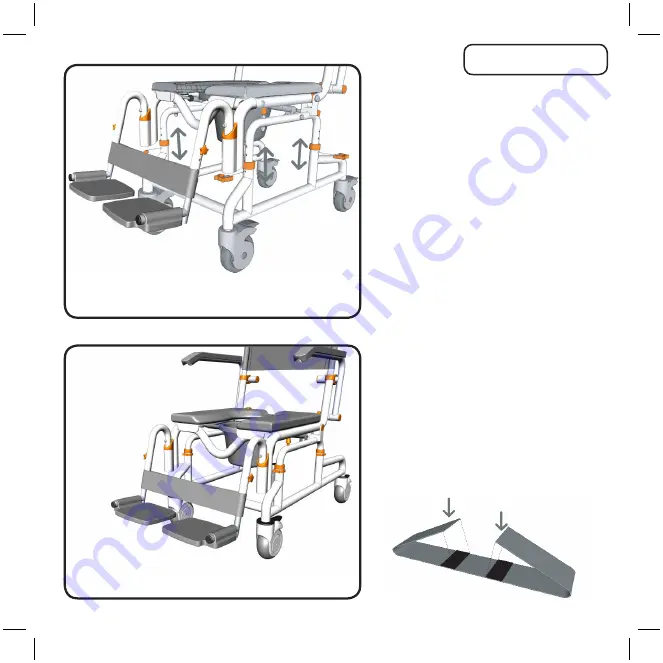
To adjust the seat height remove the 
securing clips and slide the height 
adjustment tubes up or down to the 
required height.

Secure both height adjustment tubes at 
the required height using 1 large securing 
clip on each base leg.

NOTE 
- Each height adjustment hole raises the 
seat base 1”. 
- Check to ensure all securing clips are 
fully inserted. 
- Ensure both height adjustment tubes are 
aligned at the same height. 

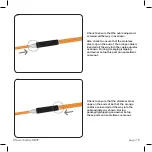
To attach the calf  strap to the footrests 
wrap the end of  the calf  strap around the 
outside of  the footrest. Connect the velcro 
strip which is attached to the end of  the 
calf  strap to the velcro strip in the centre. 
Ensure the velcro strips are on the back 
side of  the calf  strap. 

Repeat this process to attach the other 
side of  the calf  strap to the footrest.

Summary of Contents for SB3T

Page 1: ...elimination through innovation SB3T Owners Manual...

Page 2: ...ealth problems are unable to stand and or walk and so they need an assistance device to maintain some or all daily hygienic tasks CONTRADICTIONS This type of device must not be used by a disabled pers...

Page 3: ...xploded Parts 3 Parts List 4 Roll InBuddy Tilt Assembly 5 Roll InBuddy Tilt Operation 12 Strut Adjustment 17 Cleaning Maintenance 20 Safety Instructions 21 Warranty Information 24 Registration Form 26...

Page 4: ...ded parts page 3 Showerbuddy SB3T 1 90 500 254 500 268 25 69 12 500 259 500 268 500 253 96 81 3 32 39 27 38 37 34 36 35 33 41 76 40A 28 94 80 93 31 95 500 267 500 266 30 75 73 71 70 42 74 72 23 73 A A...

Page 5: ...the location of parts Arm Rest Cap 38 Arm Rest Knob 39 Back Rest Frame 40A Back Rest Fabric 41 Hand Grips 42 69 Rolling Base Legs 70 Neck Rest 71 Neck Rest Height Adjustment Tube Neck Rest Attachment...

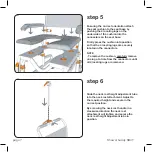
Page 6: ...sition in the arm rest clip Slide the arm rest lock over the arm rest clip to lock the arm rest in position step 2 Showerbuddy SB3T page 5 step 1 assembly Insert the back rest frame into the seat base...

Page 7: ...the armrest NOTE The armrest locks should always be used when the armrests aren t in the swing away position The armrests can be easily swung away when required Unlock the armrest by sliding the armr...

Page 8: ...ocating lugs are securely located in the connectors NOTE To remove the cushion carefully remove one lug at a time from the connectors until all 4 locating lugs are removed Slide the neck rest height a...

Page 9: ...tion By screwing the neck rest handle in a clockwise direction the neck rest height adjustment tube connector will tighten and secure the neck rest in position NOTE The neck rest should always be used...

Page 10: ...e slot and spin the leg away WARNING DO NOT STAND ON FOOTRESTS Chair will be unstable and tip forward if body weight is applied to footrests After unlocking the footrests rotate the footrests outwards...

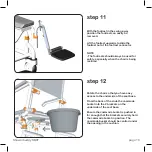
Page 11: ...he commode bucket is pushed in far enough that the brackets securely hold the commode bucket in position The commode bucket should be centred under the opening in the cushion With the footrest in the...

Page 12: ...just the length of the chest belt to suit the user On the underside of the seat base there are 4 attachment points for the lap belt Unscrew the provided screws and washers from the front attachment po...

Page 13: ...raises the seat base 1 Check to ensure all securing clips are fully inserted Ensure both height adjustment tubes are aligned at the same height To attach the calf strap to the footrests wrap the end...

Page 14: ...the neck rest handles NOTE Ensure both handles are securely tightened prior to use to prevent the neck rest moving After adjusting the neck rest you can adjust the position of the neck rest handle to...

Page 15: ...the chair in that position page 14 To lock the castor wheels press down firmly on the end of brake with your foot This will lock the castor so that it will not move or rotate To unlock the castor whee...

Page 16: ...small amount of the users weight NOTE Before reclining the chair is it important to be confident with the motion and how the chair operates The chair has safety stoppers which prevent the chair recli...

Page 17: ...the chair in position While returning the chair to the up right position you will initially need to support a small amount of the users weight WARNING Do not place hands or fingers around the outer e...

Page 18: ...turn to position freely use a screw driver to slightly loosen the screw on the tilt handle This will allow the handle to move freely and will also make the handle easier to squeeze Check to ensure tha...

Page 19: ...orange cable is inserted all the way into the cable adjustor as shown During packaging shipping and owner setup this part can sometimes come out Check to ensure that the stainless steel caps on the e...

Page 20: ...shown During packaging shipping and owner setup this part can sometimes come out Check that there is one nut on the outside of the strut bracket and one nut on the inside as shown If you are still ex...

Page 21: ...corrosion resistance but it is not stain or rust proof Regular maintenance will keep stainless steel clean and free of contaminants In most applications stainless steel will not rust or stain even aft...

Page 22: ...racticed Individuals who have not learned these skills must have assistance during transfers Do not use the Showerbuddy shower chair for any application outside of the manufacturers intended use this...

Page 23: ...chniques and options The wheel locks on the castors are designed to prevent the castor wheels from rotating when the shower chair is stationery in use These DO NOT and CANNOT prevent the wheels from s...

Page 24: ...y and effortlessly attached Important ADJUSTMENTS SHOULD NEVER BE ATTEMPTED WITH THE USER S IN THE CHAIR Your authorized Showerbuddy dealer can help you with any adjustments you may want to make on yo...

Page 25: ...serial number tag is removed or altered The warranty is VOID if the unit sustains damage from unnatural causes The warranty is VOID if the unit is used to hold more than the weight limit of 350lbs 160...

Page 26: ...the sole discretion of Showerbuddy The original warranty term will not be extended due to such a unit exchange and a return unit will become the property of Showerbuddy For all USA Canada Warranties...

Page 27: ...bout You Salutation Name First Last Your Date of Birth Month Day Year Address Street Address City State Province Zip Postal Code Country Phone Email About Your Product Type of Product Purchased Serial...

Page 28: ...howerbuddy LLC 12405 Montague Street Pacoima CA 91331 U S A Email info myshowerbuddy com Phone 877 7MY BUDDY 769 2833 Fax 888 312 3645 For all Other Countries Warranties Register online at www showerc...

Page 29: ...page 28 Showerbuddy SB3T notes...

Page 30: ...page 29 Showerbuddy SB3T...

Page 31: ...d to install new wheels seat and backrest for every new user of the device All lose bolts and nuts must be tightened The product must be precisely cleaned and disinfected Every new owner must receive...

Page 32: ...01 and TGA Australian Government Department of Health and Ageing Therapeutic Goods Administration certified International Office Showerbuddy Global Limited PO Box 494 Waikanae 5250 New Zealand Email i...

Reviews: