background image

Assembly

5.1


Setting the soft limits with the remote control unit. 

• Plug in the Remote control.

• Hoist the HiSpeed Roll-Up system up to the desired height.

•  Roll  the  screen  down,  using  the “Up/Down”  button  on  the  remote-unit  until  the 
screen is at the desired bottom point. Now press the “STORE” button (blue) and keep it 
pressed in. Confirm the position by pressing on “Enter” button (green).

Attention:

 Do not release the “STORE” button.

• First go to the top position without releasing the “STORE” button.

• Then, press the “ENTER” button when you reach the desired top position. 
Now you can release the “STORE” button.

• Both soft limits are now set at the correct height. Go to step 6.

5


Setting the soft limits 

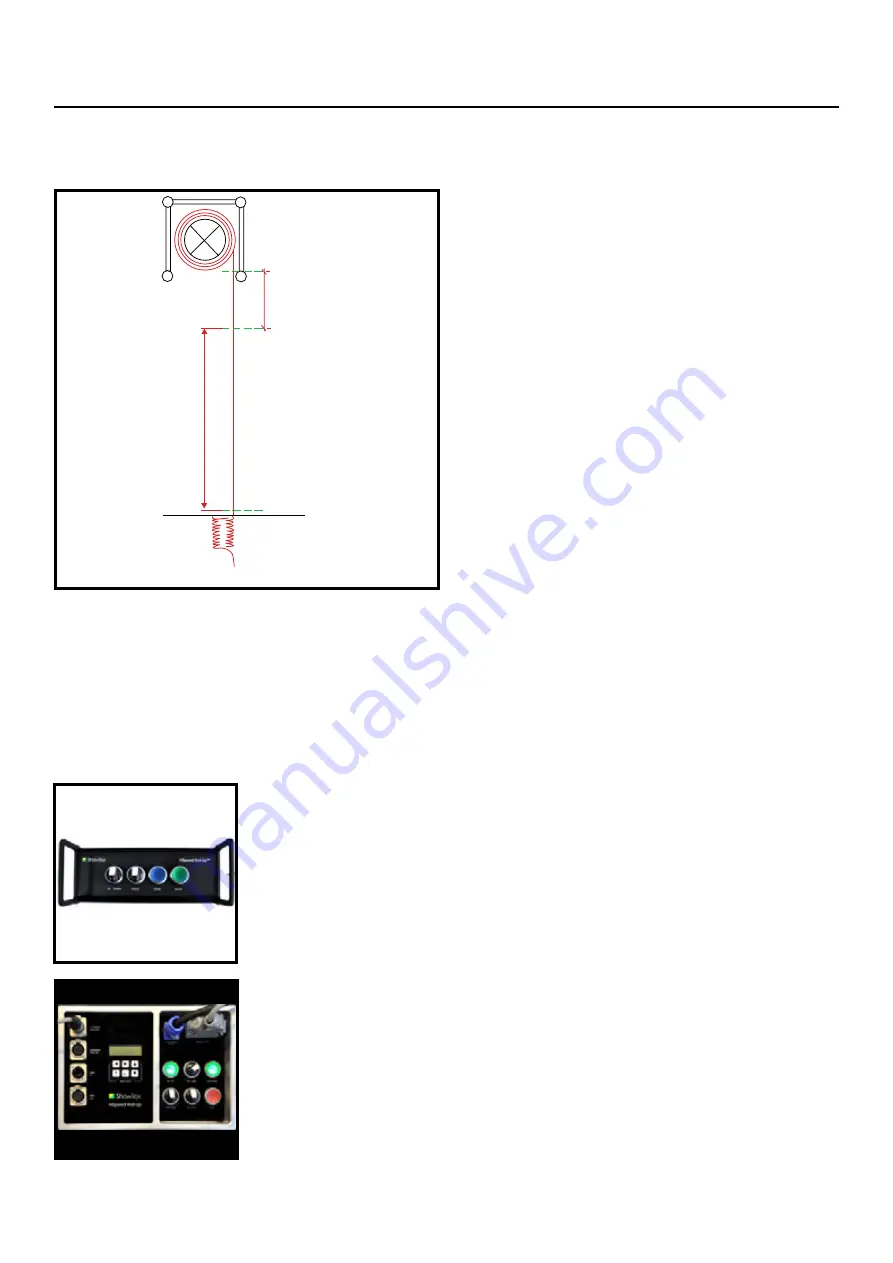
• The system has soft limits and hard limits. The hard 
limits determine the absolute safe limits (UP/DOWN) 
allowed by the system. The soft limits are always within 
the boundaries of the hard limits and are determined 
and set by the user.

• The hard limits have been set by the manufacturer 
during installation of the screen or curtain on the 
roller. When the curtain or screen is adjusted or replaced, 
please contact our technical dept. for advice to prevent 
damage to the hard limits.

• When adjusting the soft limits make sure the screen 
or curtain never rolls up into the truss, reaching the top 
hard limit. If this happens, the system will not respond 
to DMX. In this case use the manual control by adjusting 
the “Up/Down” button on the motor-unit. The standard 
soft limit is at 30cm below the truss.

30 cm

Hard Limit UP

( default settings)

Soft Limit UP

Soft limit DOWN

Hard limit DOWN

(default settings)

DMX-Range

Attention: 

The soft limits should only be considered when the system is connected to DMX. In case of manual operation, 

make sure the system doesn’t surpass the hard limits. If this should occur, roll out the screen to 1m length to release 
the hard limits.

There are 2 ways to set the soft limits: by using the remote control or on the control panel of the motor-unit.

       10 

ShowTex User Manual HSRU


Summary of Contents for HiSpeed Roll Up

Page 1: ...ShowTex User Manual HiSpeed Roll Up ...

Page 2: ...up 07 3 Connect the cables 08 4 Power up the HSRU system 09 5 Set the soft limits 10 5 1 Program with the remote unit 10 5 2 Program with the control panel on the motor unit 11 6 Switch to DMX 11 7 Test the general system operation 12 8 Uninstall the HSRU system 12 Care and Maintenance 13 Trouble shooting 14 02 ShowTex User Manual HSRU ...

Page 3: ...20 40 truss The screen height extends to 15m The unique step less positioning system is compatible with DMX easy to install and handy for touring When trusses are connected together the cylinders can be connected through built in axis connectors When used in the Venetian configuration the width can be extended every 3m or 6m and steered by one motor ShowTex User Manual HSRU 03 ...

Page 4: ... to move people animals or any other heavy objects Make sure that no people or objects are in the area under the system during use The operator must keep eye contact with the system during use Do not hang lighting or any other heavy weight objects on the truss The truss is for mounting the HiSpeed Roll Up only 04 ShowTex User Manual HSRU ...

Page 5: ...The HSRU system consists of the following parts HSRU System Motor Unit Truss Emergency Unit Remote Unit Power Supply Cable Emergency Stop Cable DMX Cable Isolation Transformer Truss Trolley ShowTex User Manual HSRU 05 ...

Page 6: ...le 8150 0912 0027 0 41 kg piece Length 2 m Emergency Stop Cable 8140 7202 1000 0 87 kg piece Length 10 m Verlengkabel 8140 7202 2500 2 64 kg piece Length 25 m Verlengkabel DMX Cable 8050 7220 5107 0 69 kg piece Length 10m 8050 7220 5127 0 85 kg piece Length 12 5 m Isolation Transformer 8140 7260 0010 40 40 kg piece Truss Trolley 8140 6050 0407 15 20 kg piece For 30 cm and 40 cm trusses including 5...

Page 7: ...on the spigot opening to the front to ensure an easy fit of the safety R spring 1 Connect the motor to the axis 1 Attach the roll up system to the hoists with steel cables or clamps at the position of the motor on one side and insert in the opening provided and on the other side at the position of the bearing Attention If the span of het roller is larger than 3m then the steel cables or clamps mus...

Page 8: ...power cable to the isolation transformer and connect the isolation transformer to the power source The DMX may only be connected after the soft limits have been set When several motors are used the Emergency Stop Unit can be connected by means of the Emergency Stop Link socket 7 pin XLR 3 Connecting the cables Emergency Stop Input Emergency Stop Link DMX In DMX Out Power Input Remote Control On Of...

Page 9: ...l light up The Enable button serves as a safety mechanism to stop the roller immediately when the screen is rolling up or dropping By pushing the button again the roller will continue to the programmed position Attention The emergency stop may only be used in case of emergency Wait 30 seconds before releasing the emer gency stop to prevent regulator damage 3 If the screen is still suspended inside...

Page 10: ...etermined and set by the user The hard limits have been set by the manufacturer during installation of the screen or curtain on the roller When the curtain or screen is adjusted or replaced please contact our technical dept for advice to prevent damage to the hard limits When adjusting the soft limits make sure the screen or curtain never rolls up into the truss reaching the top hard limit If this...

Page 11: ...t the desired height and that no one is standing under the load Always keep the Emergency Stop control within arm s length When you activate the Enable button on the Emergency Stop unit the roll up will respond to DMX Attention The third channel speed must always be at least 5 open Otherwise speed will be set to 0 and the system won t respond 6 Switching to DMX 5 2 Setting the soft limits with the...

Page 12: ...RU system 1 Set the switch on the motor unit to manual 2 Position the screen to the transport position To do this roll up the screen to its top hard limit by using the Up Down button 3 Disengage the Enable button of the emergency stop controller 4 Push the On Off button of the motor unit to disengage the motor 5 Now the rest of het system can be safely disassembled 12 ShowTex User Manual HSRU ...

Page 13: ...Each mechanical part should be used at least once a week In this way residue and dirt can t collect in the bearings and irregular noises can be discovered in time More frequent maintenance is recommended in case of frequent use or in case the system is installed in a space with a high degree of moisture dust or differences in temperature When necessary disassemble the system in the same way it was...

Page 14: ...een has reached the hard limits perform the following steps The system may only be operated manually in this case see STEP 4 Roll out 1m of screen to release the hard limits see STEP 4 Reset the soft limits STEP 5 Attention The soft limits should only be considered when the system is connected to DMX The emergency stop was activated and the system stopped responding Wait 30 seconds before releasin...

Page 15: ...www showtex com ...

Reviews: