background image

Follow mode 

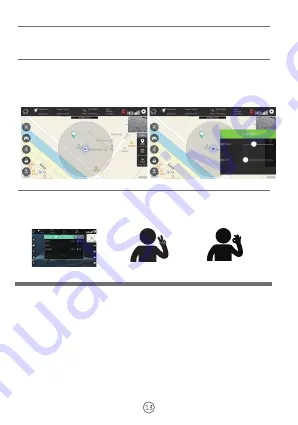
Gesture recognition and photographing mode 

Rotation around a point mode 

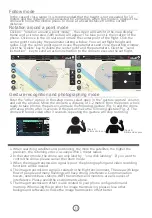
(Figure 2)

Gesture video pose

(Figure 1)

Gesture photo pose

In the case of close range (it is recommended that the height is not exceeded for 10 

meters and the distance is not exceeded for 20 meters), when this mode is opened, the 

drone will follow the mobile phone to move at a fixed distance from the current 

distance.

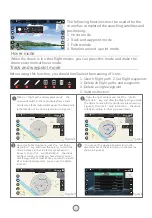
Click on “rotation around a point mode”, the screen will switch to the map display 

frame and a circular area (50m radius) will appear. The blue point is the location of the 

phone. Click once in the circular area to mark the center point of the flight. Click the 

center point to display the parameter setting window. You can set flight height and 

radius. Click the center point again to save the parameters and close the setting window. 

Click the "Delete" key to delete the center point and the parameters. Click the “send 

instruction” key to send an action instruction to the drone to execute the set flight.

1. When searching satellites and positioning, the more the satellites, the higher the 

precision, the returning error is usually within 1 meter radius.

2. In the return mode, the drone can only land by “one-click landing”. If you want to 

control the drone, please cancel the return mode.

3. When the image transmission signal is poor, the photographing and video recording 

functions will be invalid.

4. The image transmission signal is related to the flight environment. The area with large 

flow of people and many buildings will have strong interference. Communication 

towers, network base stations, WIFI transmitters and monitors are all sources of 

interference. Please avoid the environments above. 

5. The image transmission effect is also related to your phone configuration and 

memory. When using this product for image transmission, please close other 

background softwares to make the image transmission effect better.

Enter the "other" option in the setup menu, select open in the "gesture capture" column, 

and exit the window. Move the drone to a distance of 1-2 meters from the person who is 

ready to take photos, the person can made the following gesture (Fig. 1) and the drone 

will take a photo after 3 seconds. If the person make the following gesture (Fig. 2). The 

drone will record video after 3 seconds, repeating the gesture will stop recording.

Summary of Contents for H1GPS

Page 1: ...ease read the Operation Instruction carefully and conduct operation and usage according to the Operation Instruction Please keep this User Manual for your reference when conducting daily maintenance and adjustment INSTRUCTION GPS GLOBAL POSITIONING ...

Page 2: ...e battery The drone must be used with the original batteries 8 if the drone will not be used for a long time please take the batteries out of the remote control unit 9 do not cause a short circuit during the charging 10 if you do not use the drone for more than 10 days please discharge the battery of drone to 40 50 flight for a certain time In this way the life of battery will be extended greatly ...

Page 3: ...loading APP Opening and connecting the software on your phone 13 13 Advanced Function Common matters needing attention Hover mode Track and waypoint mode Follow mode Set circle mode Gesture recognition and photographing mode 14 14 15 15 15 15 Advanced Flight Function Speed gear adjustment Photographing and video recording One click return One click stop Headless mode Altitude hold mode Safety meas...

Page 4: ...ognition surround flight track flight follow flight One click return head free flight mode etc it is also with many safety measures such as propeller blade stuck protection low battery alarm automatic low battery return height and flight fence restrictions Connect the battery of this product to the USB charging cable and connect the USB charging cable to the computer or adapter of smart phone 5v 1...

Page 5: ... of propeller which needs to be replaced And press the handle of the opener to take down the propeller 3 Referring to Figure 4 distinguish between type A and type B propellers and press the propeller vertically to install them on the motor shaft The mark can be found on the rotor It is extremely important to use the correct propeller A or B for replacement Using the incorrect propeller will make t...

Page 6: ...l lever leftward the drone will rotate counterclockwise Push the control lever rightward the drone will rotate clockwise Push the control lever upward the drone will be level flight forward Push the control lever downward the drone will be level flight backward Push the control lever leftward the drone will be level flight leftward Push the control lever rightward the drone will be level flight ri...

Page 7: ...on taking off If the drone is in a state of stationary frequency pressing this button it will taking off One button landing If the drone is in a state of flight pressing this button it will landing Video Connecting the drone to APP then press the video button the drone will recording video and saving into APP One button return Pressing this button the drone will fly back and sound deep press again...

Page 8: ...te flight environment when using the product Preflight Inspection Please inspect the following items before flying 1 Whether the drone and remote control are both with fully battery power 2 Whether the propellers are installed correctly and without any damage 3 Whether the propellers can ran normally when the produce is started Linking Remote Control and the Drone 1 Place the drone on the level gr...

Page 9: ...the drone can begin to search satellites Please complete calibration of compass and head free flight direction each time Press the No 12 key on remote control unit for 2 seconds when the four indicator lights on the drone flash quickly on the same time and then return to flash slowly or light on state it means that the operation is completed Note Please put the drone on the level ground or flat su...

Page 10: ...repeat the operation above for 1 2 seconds the motors will be stop The drone will have no reaction if you push the levers after this operation The motor should be re started if you want to play again Push left control lever forward the drone ascends vertically Pull left control lever rearward the drone descends vertically Push left control lever rightward the drone spins clockwise Push left contro...

Page 11: ...ne to misjudge the return point If you want to switch back GPS mode from the altitude hold mode please take back the drone and place it on the ground then restart the GPS press No 11 key again and the motor Safety Measures 1 Signal loss protection Signal loss protection means that the drone will automatically return to the takeoff point if it has successfully searched satellites and positioned bef...

Page 12: ...of drone Level speed Number of satellites Signal level for image transmission It is a reference value based on the distance and speed of the flight Function definition 1 Return to the home page 2 Select the flight mode 3 Turn the control remote on or off Only available in the mobile phone takeover mode please refer to the function of the left and right control levers of remote control unit in the ...

Page 13: ... switch to the map display frame and a circular area 50m radius will appear The blue point is the location of the phone as shown in Figure 1 Open the right setup menu click the set flight waypoints key and draw the points you want the drone to move in the circular area as shown in Figure 3 then click send instruction the drone will fly according to what you have drawn You can set 24 waypoints at m...

Page 14: ...ites the higher the precision the returning error is usually within 1 meter radius 2 In the return mode the drone can only land by one click landing If you want to control the drone please cancel the return mode 3 When the image transmission signal is poor the photographing and video recording functions will be invalid 4 The image transmission signal is related to the flight environment The area w...

Page 15: ...Right Right Side Tail Flying Backward backward SWEEP THE QR CODE WATCHING FLIGHT TEACHING VIDEOS REFUSED TO LOSE REFUSED TO LOSE CONTACT Geomagnetism Calibration Course Out Of Control Return Course Electronic fence Course Low voltage Return Course Identification Of The Drone ...

Page 16: ... control delay may appear At this time the remote controller should be kept electrically waiting for the signal to be reconnected or press the key to return 4 in case of emergency press the one button stop button and the propeller will stop immediately and start to fall 5 it is recommended to open headless mode in outdoor flight to identify direction 6 charging must use the cable supplied to preve...

Reviews: