background image

23

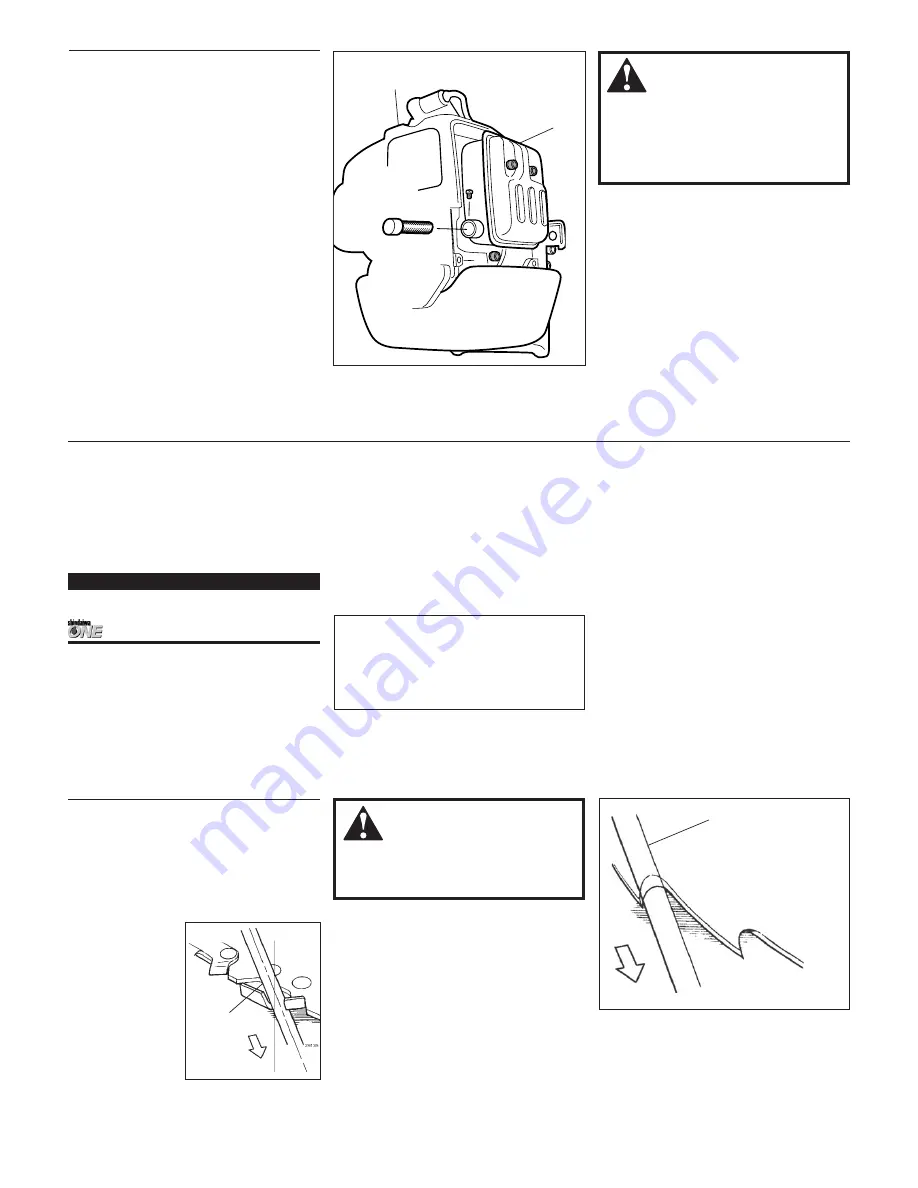
Muffler

Hard starting or a gradual loss of perfor-

mance can be caused by carbon deposits 

lodged in the muffler’s spark arrester 

screen. 
In such cases, performance can usually be 

restored by removing the arrester screen 

and giving it a thorough cleaning with a 

stiff bristle brush.
If carbon deposits are severe or if no per-

formance improvement is noted, your 260 

unit should be returned to your Shindaiwa 

dealer for inspection.

Spark Arrester 

Screen

Muffler

 WARNING!

Never operate this unit with a damaged 

or missing muffler or spark arrester! 

Operating with missing or damaged 

exhaust components is a fire hazard, 

and could also damage your hearing.

ALL UNITS

27028

  Figure 45

Long Term Storage

Whenever the unit will not be used for 30 

days or longer, use the following proce-

dures to prepare it for storage:

  Clean external parts thoroughly and 

apply a light coating of oil to all metal 

surfaces.

  Drain all the fuel from the fuel tank.

IMPORTANT!

All stored fuels should be stabilized with  

a fuel stabilizer such as STA-BIL™, if  

           oil with fuel stabilizer is not used.

  Remove the spark plug and pour about 

1/4 ounce of 2-cycle mixing oil into the 

cylinder through the spark plug hole. 

Slowly pull the recoil starter 2 or 3 times 

so oil will evenly coat the interior of the 

engine. Reinstall the spark plug.

  Before storing the unit, repair or replace 

any worn or damaged parts.

  Remove the air cleaner element from the 

carburetor and clean it thoroughly with 

soap and water. Let dry and reassemble 

the element.

  Store the unit in a clean,  

dust-free area.

CAUTION!

Gasoline stored in the carburetor for 

extended periods can cause hard start-

ing, and could also lead to increased 

service and maintenance costs.

To remove the remaining fuel from the 

fuel lines and carburetor and with the fuel 

drained from the fuel tank. 
1.  Prime the primer bulb until no more fuel 

is passing through.

2.  Start and run the engine until stops run-

ning.

3.  Repeat steps 1 and 2 until the engine will 

no longer start.

Blade Sharpening

When the cutting edges of the blade be-

come dull, they can be resharpened with a 

few strokes of a file.
In order to keep the blade in balance, all 

cutting edges must be sharpened equally.

Shindaiwa Tornado

 Blade

To sharpen the cut-

ters on a Shindaiwa 

Tornado Blade, 

use a 7/32-inch 

round file. File 

the leading edge 

of each tooth to a 

razor edge. The 

top plate of each 

tooth should angle 

back 30°.

 WARNING!

Sharpen only the cutting teeth of a 

blade. DO NOT alter the contour of the 

blade in any way. 

Multiple-tooth Circular Blade

Use a round file to maintain a radius of 0.04 

to 0.06" (1 to 1.5 mm) at the base of each 

tooth. Cutting edges must be offset equally 

on each side.

Round 

File

30°

Round 

File

  Figure 46

  Figure 47

Summary of Contents for C260

Page 1: ...RIMMER LE260 LAWN EDGER C260 BRUSHCUTTER Part Number 62710 94310 Rev 8 05 Minimize the risk of injury to yourself and others Read this manual and familiarize yourself with the contents Always wear eye and hearing protection when operating this unit WARNING C260 T260 LE260 T260X ...

Page 2: ...ion to make alterations to units previously manufactured Contents WARNING The engine exhaust from this product contains chemicals known to the State of California to cause cancer birth de fects or other reproductive harm Throughout this manual are special Attention Statements IMPORTANT The operational procedures described in this manual are intended to help you get the most from your unit and to p...

Page 3: ...lose to the engine muffler NEVER run the engine without the spark arrester screen in place General Safety Instructions Always wear a harness when operating a unit equipped with a blade Wear appropriate footwear non skid boots or shoes do not wear open toed shoes or sandals Never work barefooted Wear hearing protection devices and a broad brimmed hat or helmet Wear close fitting clothing to protect l...

Page 4: ...e from your local authorized Shindaiwa dealer Read Operator s Manual Protect eyes and hearing Keep bystanders at least 50 ft away Use handlebar when operating with a blade Wear harness when operating with a blade Beware of blade thrust Do not operate under influence of alcohol drugs or medication 61843 T260 LE260 This label indicates the minimum distance between front handle and rear grip per ANSI...

Page 5: ...erating in rocky terrain or near electric wires or fences use extreme caution to avoid contacting such items with the cutting attachment Be constantly alert for objects and debris that could be thrown either from the rotating cutting attachment or bounced from a hard surface If contact is made with a hard object stop the engine and inspect the cutting attachment for damage Reduce the risk of bysta...

Page 6: ...pacity 600 cc 20 3 oz Carburetor Type TK DPN diaphragm type Ignition Fully electronic transistor controlled Spark Plug Champion CJ8Y for EMC compliance use NGK BMR6A Air Filter Non reversible flocked filter element Starting Method Recoil Stopping Method Slide switch Transmission Type Automatic centrifugal clutch w bevel gear EPA Emission Compliance Period Category A The EPA emission compliance refer...

Page 7: ...tube and mainshaft Clamp must fit next to line on outer tube decal T260 T260X LE260 Powerhead Outer Tube Decal C260 Brushcutter Mainshaft Clamp Screw Throttle Assembly Tube Clamp Clamp Figure 6 Figure 5 Spark Plug C260 Slide the outer tube into the powerhead until the installation decal aligns with the tube clamp 5 Tighten the clamp screw firmly Assembly Handle T260 Handle Socket head Cap Screw Oute...

Page 8: ...n the handle and throttle assem bly See Figure 8 7 Secure the hanger with the nut and bolt as shown in Figure 8 Outer Tube Socket head Caps Screws Handle Barrier Bar Throttle Assembly Figure 8 Handle Positioning Label Bolt Nut Hanger Nuts Assembly Handle LE260 1 Remove both screws from the handle 2 While spreading the handle at the mounting hole position the handle on the outer tube as shown 3 Rei...

Page 9: ...outer tube forward of Handle Positioning Label as shown in Figure 10 The handlegrips must face up with the throttle lever to the right hand side as shown in Figure 10 2 Attach the handle mounting bracket from below using the two socket head cap screws washers and lock washers Tighten both screws FINGER TIGHT ONLY at this time 3 Locate the handle in the best position for operator comfort usually ab...

Page 10: ...position 6 Using finger pressure only gently push the red and black ignition wires onto the connectors underneath the throttle assembly 7 Slide the throttle assembly back to its original position and then replace and tighten the throttle lever clamp screw A Install the Throttle Cable C260 Assembly Throttle Linkage and Ignition Leads C260 Insert ignition wires onto connectors not color coded Handleb...

Page 11: ...he outer tube and loosely install the four socket head cap screws See Figure 13 3 Tighten the four socket head cap screws to secure the cutting attachment shield WARNING The line cutter is very sharp Wear gloves to protect your hands when handling To Change Position of Line Cutter 1 Remove the 2 hex screws with a 4 mm hex wrench See Figure 13A 2 Rotate line cutter See Figure 13A 3 Reinstall the tw...

Page 12: ...rews assembled in Step 3 then firmly tighten each nut IMPORTANT The three hex head screws must be firmly tightened before installing and tightening the nuts 23031 23029 Assembly Cutting Attachment Shield LE260 The LE260 Edger should now be completely assembled 23030 Cutting Attachment Shield Gearcase Flange Hex head screws and washers Holder A Edger Blade Lock the shaft Holder B Shaft Bolt Bolt Guar...

Page 13: ...wise to install 6 Remove the hex wrench Assembly Trimmer Head T260 1 2 3 Remove Protector Position Tool Holder Align Notches Install trimmer head Install the Trimmer Head The T260 grass trimmer should now be completely assembled and ready for use as a grass trimmer For instructions on installing a blade on a C260 or T260X see page 14 C260 T260X WARNING A standard T series unit should NEVER be oper...

Page 14: ...de onto the flange on Holder A and lock the blade in place with the safety clip Mount the Saw Blade 341011 Install the Safety Clip Off center 341013 Slip the Saw Blade In Place Slide the Safety Clip Back Assembly Brushcutter Blade C260 T260X Shaft Bolt Bolt Guard Holder B Output Shaft Holder A Hex Wrench Figure 18 Blade Holder B Brush Blade Hex Wrench Tighten the Assembly BLADE NOT SHOWN FOR CLARIT...

Page 15: ...cohol based gasoline may also reduce the lubricating qualities of some 2 cycle mixing oils Never use any type of gasoline containing more than 10 alcohol by volume Generic oils and some outboard oils may not be intended for use in high performance 2 cycle type engines and should never be used in your Shindaiwa engine Use only fresh clean unleaded gasoline with a pump octane of 87 or higher Mix wit...

Page 16: ... Figure 23 26032 Choke Lever 26032 Choke Lever WARNING Never start the engine from the operating position WARNING The cutting attachment may rotate when the engine is started When the Engine Starts After the engine starts allow the engine to warm up at idle 2 or 3 minutes before operating the unit After the engine is warm pick up the unit and clip on the harness if so equipped See page 17 Advancin...

Page 17: ...e de vices harness stop switch blade retention clip etc removed Use only authorized Shindaiwa parts and accessories with your Shindaiwa trimmer brushcutter or lawn edger Do not make modifications to the unit without the writ ten approval of Shindaiwa Inc ALWAYS make sure the cutting attach ment is properly installed and firmly tight ened before operation NEVER use a cracked or warped cutting at tach...

Page 18: ...ng the trimmer head being used Available trimmer head styles include Semi automatic Trimmer line is indexed when the operator taps the trim mer head on the ground during opera tion Manual The operator indexes line man ually with the grass trimmer stopped CAUTION Do not push the rotating line into trees wire fences or any material that could tangle or break line ends CAUTION Operation at low RPM ca...

Page 19: ...houlder strap gives significant support and comfort to help ensure safe and ef ficient operation When operating a T260X or C260 with a blade make sure both the handle and har ness are adjusted to the size of the operator using the unit Engine Operating Speeds Operate the unit at full throttle while cut ting Best fuel efficiency is obtained by releasing the throttle when swinging back after a cut To p...

Page 20: ...y inspect the blade for damage NEVER OPERATE THE EDGER WITH A DAMAGED BLADE Figure 36 Do not move the edger into the work so fast that the engine or blade bogs down Regular and frequent use of the edger will make a neater lawn and a frequently trimmed edge will be easier to maintain The edger s depth of cut is controlled by a combination of operator height blade wear and the positioning of the edg...

Page 21: ...make sure the engine and cutting attachment are completely stopped Disconnect the spark plug wire before performing service or maintenance work IMPORTANT MAINTENANCE REPLACEMENT OR REPAIROFEMISSIONCONTROLDEVICES AND SYSTEMS MAY BE PERFORMED BY ANY REPAIR ESTABLISHMENT OR INDIVIDUAL HOWEVER WARRANTY REPAIRS MUST BE PERFORMED BY A DEALER OR SERVICE CENTER AUTHORIZED BY SHINDAIWA KOGYO CO LTD THE USE...

Page 22: ...nd clean the shaft thorough ly in solvent 5 Inspect the shaft carefully and discard if worn or damaged Gearcase Index Screw Shaft Tube Flexible Shaft ALL UNITS LE260 CAUTION Make sure you do not pierce the fuel line with the end of the hooked wire The line is delicate and can be dam aged easily Figure 40 Figure 42 Filter Element Hooked Wire ALL UNITS Figure 41 Removeandreplacethefilterelement Befor...

Page 23: ... interior of the engine Reinstall the spark plug Before storing the unit repair or replace any worn or damaged parts Remove the air cleaner element from the carburetor and clean it thoroughly with soap and water Let dry and reassemble the element Store the unit in a clean dust free area CAUTION Gasoline stored in the carburetor for extended periods can cause hard start ing and could also lead to i...

Page 24: ...ndaiwa Premium 2 cycle mixing oil at a 50 1 gasoline oil ratio Clean as required Restart Move switch to I ON position and re start Consult with an authorized servicing dealer Crank the engine with the plug removed reinstall the plug and restart Clean and regap the plug to 0 024 0 6 mm Restart Replace the plug with a Champion CJ8Y or equivalent type spark plug of the correct heat range For EMC comp...

Page 25: ... 2 750 250 RPM min 1 Reset the switch and restart Refuel See page 15 Replace filter Drain replace with clean fuel See page 15 Clean or replace spark plug with a Champion CJ8Y or equivalent type spark plug of the correct heat range For EMC compliance use NGK BMR6A Tighten the terminal Consult with an authorized servicing dealer Test and replace as required Replace spark plug with a Champion CJ8Y or ...

Page 26: ...rized by Shindaiwa Kogyo Co Ltd during a warranty repair alteration accident failure to use the recommended fuel and oil or not performing required maintenance services b the replacement parts used for required maintenance services c consequential parts used for required maintenance services d diagnosis and inspection fees that do not result in eligible war ranty service being performed and e any ...

Page 27: ...27 Notes ...

Page 28: ...w shindaiwa com Shindaiwa Kogyo Co Ltd Head Office 6 2 11 Ozuka Nishi Asaminami Ku Hiroshima 731 3167 Japan Telephone 81 82 849 2220 Fax 81 82 849 2481 2005 Shindaiwa Inc Part Number 62710 94310 Revision 8 05 Shindaiwa is a registered trademark of Shindaiwa Inc Specifications subject to change without notice ...

Reviews: