background image

3

Product description

3.1

Product ID

3.1.1

Type label

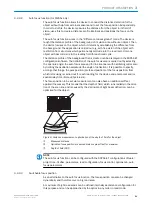
The type label gives information for identification of the device. An existing UL certifica‐
tion can be found on the type label.

1443 0297

S/N:

DC 10...30V    5.0W

1

2
3
4
5

Manufactured:

D-79276 Reute

Made in Germany

λ = 655nm

Pmax=1.5mW

P<1.0mW average
Pulse duration <300µs

Imax=700mA

P/N:

1068608

CLV610-C000

MAC 

6

Figure 3: Type label design for the device, illustration may differ from actual type label

1

Type designation

2

Part number

3

Serial number

4

Laser output data

5

MAC address

6

Date of manufacture

25

3.1.2

Type code

The devices of the CLV63x, CLV64x, and CLV65x product families are arranged accord‐
ing to the following type code:

CLVxyz-abcde

CLV

x

y

z

-

a

b

c

d

e

1

2

3

4

5

6

7

8

9

Table 2: Type code

Position

Description

Characteristic

1

Code reader

V-principle

2 - 3

Product family

63: CLV63x
64: CLV64x
65: CLV65x

PRODUCT DESCRIPTION 

3

8019588/129Z/2019-02-07 | SICK

O P E R A T I N G   I N S T R U C T I O N S | CLV63x, CLV64x, CLV65x

13

Subject to change without notice

Summary of Contents for CLV63 Series

Page 1: ...O P E R A T I N G I N S T R U C T I O N S CLV63x CLV64x CLV65x Bar code scanner ...

Page 2: ...le within the limits of the legal determination of Copyright Law Any modifica tion abridgment or translation of this document is prohibited without the express writ ten permission of SICK AG The trademarks stated in this document are the property of their respective owner SICK AG All rights reserved Original document This document is an original document of SICK AG 25 2 O P E R A T I N G I N S T R...

Page 3: ... description 13 3 1 Product ID 13 3 2 Product characteristics 15 4 Transport and storage 26 4 1 Transport 26 4 2 Transport inspection 26 4 3 Storage 26 5 Mounting 27 5 1 Overview of mounting procedure 27 5 2 Scope of delivery 27 5 3 Preparation for mounting 28 5 4 Mounting location 31 5 5 Mounting the device 34 5 6 Mounting with shock mounts optional 34 5 7 Mounting external components 37 6 Electr...

Page 4: ...us log 66 10 4 SICK Support 67 11 Decommissioning 68 11 1 Disassembly and disposal 68 11 2 Returning devices 68 12 Technical data 70 12 1 Optics 70 12 2 Performance 71 12 3 Interfaces 71 12 4 Mechanics electronics 73 12 5 Ambient data 74 12 6 Reading field diagrams 74 13 Accessories 96 13 1 Additional accessories 96 14 Annex 97 14 1 Notes on PROFINET 97 14 2 EU declaration of conformity Certificat...

Page 5: ...on about this refer to the operating instruc tions of the specific machine 1 2 Scope These operating instructions serve to incorporate the device into a customer system Instructions are given by stages for all actions required These instructions apply to all available device variants of the device More detailed information for the identification of the available device type see Type code page 13 A...

Page 6: ...ing field diagrams EU declaration of conformity for the product family Dimensional drawings and 3D CAD dimension models in various electronic formats Reading field diagrams These operating instructions are available in German and other languages Other publications related to the devices described here Publications dealing with accessories 1 4 1 Supplementary documents Information about configurati...

Page 7: ...WARNING Danger due to improper use Any improper use can result in dangerous situations Therefore observe the following information Device should be used only in accordance with its intended use All information in these operating instructions must be strictly observed 2 3 Internet protocol IP technology NOTE SICK uses standard IP technology in its products The emphasis is placed on availability of ...

Page 8: ...gned to them and about potential dangers arising from improper action Skilled personnel have the specialist training skills and experience as well as knowledge of the relevant regulations to be able to perform tasks delegated to them and to detect and avoid any potential dangers independently Electricians have the specialist training skills and experience as well as knowl edge of the relevant stan...

Page 9: ...ly exposed to the radiation for up to 0 25 sec onds Exposure to the laser beam for longer periods of time may cause damage to the retina The laser radiation is harmless to human skin Do not look into the laser beam intentionally Never point the laser beam at people s eyes If it is not possible to avoid looking directly into the laser beam e g during com missioning and maintenance work suitable eye...

Page 10: ...in combination with the type label on the rear of the device In addition to other information the type label of the device in use also contains the laser output data This consists of Laser output power maximum average wave length or wavelength range and pulse time duration The data is located on the lower section of the type label see Type label page 13 2 SAFETY INFORMATION 10 O P E R A T I N G I ...

Page 11: ...ol if the pulse has stopped for too long e g the conveyor system has stopped In this case the current internal reading interval of the device remains open Depending on the selected parameterization type the laser timeout can be set as fol lows Using the SOPAS ET configuration software on the Illumination Control device page During GSD configuration with the 10_Object Trigger Ctrl module Profinet P...

Page 12: ...on was paid to achieving the smallest environ mental impact possible Apart from the housing the device contains no materials using silicon 2 10 Repairs Repair work on the device may only be performed by qualified and authorized person nel from SICK AG Interruptions or modifications to the device by the customer will inval idate any warranty claims against SICK AG 2 SAFETY INFORMATION 12 O P E R A ...

Page 13: ...stration may differ from actual type label 1 Type designation 2 Part number 3 Serial number 4 Laser output data 5 MAC address 6 Date of manufacture 25 3 1 2 Type code The devices of the CLV63x CLV64x and CLV65x product families are arranged accord ing to the following type code CLVxyz abcde CLV x y z a b c d e 1 2 3 4 5 6 7 8 9 Table 2 Type code Position Description Characteristic 1 Code reader V ...

Page 14: ... M12 plug connector 7 Interfaces 0 RS 232 RS422 485 CAN digital IOs 2 Ethernet RS 232 RS422 485 CAN digital input 3 Ethernet RS 232 RS422 485 CAN digital IOs 8 Front screen material 0 Glass 1 Plastic 9 Application environment Without label Ambient temperature 0 C 40 C F0 With mounted external heating Ambient temperature 35 C 35 C Without label Protection class IP 65 S01 IP 69k in the special housi...

Page 15: ...65x Figure 4 Device variants from top to bottom reading window on front oscillating mirror read ing window on side PRODUCT DESCRIPTION 3 8019588 129Z 2019 02 07 SICK O P E R A T I N G I N S T R U C T I O N S CLV63x CLV64x CLV65x 15 Subject to change without notice ...

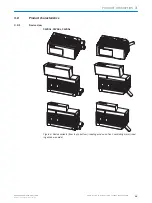
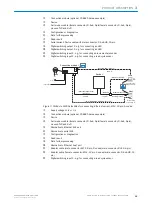
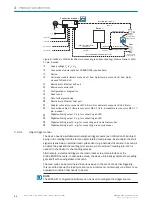
Page 16: ...n 6 Bar graph display 7 LEDs for indicating the status 8 Swivel connector 9 Central position of the deflected laser beam in the V shaped aperture angle ß Male connector M12 12 pin or 17 pin A coded à Female connector M12 4 pin D coded Ethernet á Cable with male connector D Sub HD 15 pin 3 PRODUCT DESCRIPTION 16 O P E R A T I N G I N S T R U C T I O N S CLV63x CLV64x CLV65x 8019588 129Z 2019 02 07 ...

Page 17: ... the device to call up preset functions without connecting a computer Buzzer which can be switched off to confirm the device function Read operation modes Start stop operation one bar code bearing object per read pulse Tracking operation CLV65x x8300A Read cycle Pulse sources for start switching inputs data interface command auto pulse free CAN Pulse sources for stop read pulse source switching in...

Page 18: ... result of the V shaped light emission The light pattern reflected from the bar code is recorded processed and decoded External sensors deliver information about the read cycle and conveyor speed incre ment to control this process The read results are output to the device data interfaces and forwarded to a host PC Detailed wiring of the device and the connections to the host PC and the external se...

Page 19: ...232 Aux 1 5 Ethernet Aux 2 6 VS 1 Ethernet Reading result 8 Ethernet Ethernet Further data processing 9 Cable 4 Cable à Cable á Figure 7 CLV63x to CLV65x facilities for connecting Ethernet variant M12 12 pin A coded 1 Supply voltage VS VS UV 2 Connection module optional CDB620 here as example 3 Device 4 Null modem cable female connector D Sub 9 pin female connector D Sub 9 pin crossed TxD and RxD ...

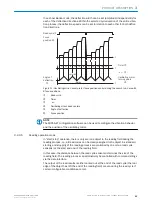
Page 20: ...l switching output 1 e g for connecting an LED ä Digital switching input 2 e g for connecting an incremental encoder å Digital switching input 1 e g for connecting a read cycle sensor 3 2 3 1 Object trigger control The device needs a suitable external signal trigger source as notification of an object being in the reading field to start an object related read process As standard the start signal i...

Page 21: ...e angle of deflection It is possible to specify among other things the park position preferred position of the focus position from which refocusing is carried out for each reading for the device and a temporal and or spatial delay time timeout hysteresis The focus position to be set via measurement can also have an additional offset applied if necessary This means that the depth of field which run...

Page 22: ...mable assignment table NOTE The SOPAS ET configuration software can be used to configure the focus position Project tree CLV6xx parameters read configuration Project tree CLV6xx parameters read configuration oscillating mirror Project tree CLV6xx parameters read configuration focus control 3 2 3 4 Oscillating mirror control In the case of a line scanner with oscillating mirror the position of the ...

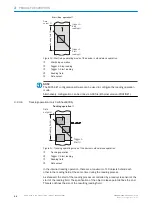
Page 23: ... position of the oscillating mirror 3 2 3 5 Reading operation mode In start stop operation there is only ever one object in the reading field during the reading process i e all read codes can be clearly assigned to the object As standard starting and stopping of the reading process are controlled by one or two read cycle sensor s at the start and end of the reading field In this case the distance ...

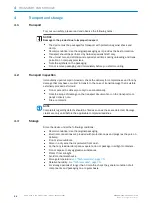
Page 24: ...r 1 Start 2 Reading field 3 Data output 4 Figure 13 Tracking operating mode of the device in stand alone operation 1 Tracking operation 2 Trigger 1 Start reading 3 Reading field 4 Data output In the internal tracking operation there are a maximum of 10 objects behind each other in the reading field at the same time during the reading process As standard the start of the reading process is controll...

Page 25: ... down when there is a high load with lots of objects to convey is therefore also recorded An internal pulse generator in the device alternatively allows for operation at a conveyor speed that is always constant A gap of at least 50 mm is necessary for clear separation of successive objects The issuing of the read result for an object is carried out after the rear edge of the object passes the obje...

Page 26: ...onally Note the scope of damage on the transport documents or on the transport com pany s delivery note File a complaint NOTE Complaints regarding defects should be filed as soon as these are detected Damage claims are only valid before the applicable complaint deadlines 4 3 Storage Store the device under the following conditions Recommendation Use the original packaging Electrical connections are...

Page 27: ...or cable itself 5 2 Scope of delivery The delivery of the device includes the following components Table 4 CLV63x CLV65x scope of delivery No of units Component Notes 1 Device in the version ordered Without bracket IP65 standard housing Ethernet variant M12 female connector sealed with tightly screwed on protective plugs Without connecting cables IP69K protective housing Both M12 connections seale...

Page 28: ... is not in use Matching O ring 11 0 mm x 4 0 mm Associated components not contained in the delivery Table 6 CLV63x CLV65x scope of delivery other components Component Notes SOPAS ET configuration software and device description file sdd file for SOPAS ET for the CLV63x CLV64x or CLV65x Available online at www sick com SOPAS_ET Combined CLV63x CLV65x operating instructions as PDF in English German ...

Page 29: ...t supplied by the user Screw length is dependent on the mounting base wall thickness of the bracket When using an optional SICK bracket the screws for mounting the device are included in the scope of delivery for the bracket Tool and tape measure 5 3 2 Mounting device The device is mounted on the bracket using at least two M5 blind hole threads that are in pairs on both of the narrow sides of the ...

Page 30: ...brackets SICK accessories Illustration of the device may differ 1 Plastic insulation panes User supplied brackets The brackets should meet the following requirements Stable mounting device Alignment of the device in the x and y axes can be adjusted The mounting device must be able to bear the weight of the device and con necting cables without shock Two or three M5 screws for mounting the device T...

Page 31: ...e 5 Middle position default 5 4 2 Reading distance to the bar code and aperture angle α The maximum distance from the reading window of the device to the bar code may not exceed the design values for the device Because of the V shaped deflection of the beams the usable length of the scan line for evaluation reading field height depends on the reading distance In the specification diagrams the heig...

Page 32: ...ack is received To prevent this effect the device must be mounted so that the light emitted is tilted relative to the vertical NOTE Optimum results are achieved when the scan line tilts approx 15 from the vertical In devices with an oscillating mirror these values relate to the central position of the scan field Line scanner 1 Line scanner 1 Line scanner with oscillating mirror 2 front reading win...

Page 33: ... determining the RA CW value identical bar codes code type code length and data content can be separated and the bar code data can be assigned based on its posi tion on the object Line or raster scanner 1 Line or raster scanner 1 Line scanner with oscillating mirror 2 front reading window 3 side reading window 4 side reading window 4 Figure 19 Counting direction of the reading angle RA in the scan...

Page 34: ...re that the rear side with the laser warning label points in the direction of the observer and is aligned as near as possible to being parallel to the bar code surface For a device with the reading window at the side ensure that the side panel with the LEDs points in the direction of the observer and is aligned almost parallel to the bar code surface In a device with oscillating mirror the wide si...

Page 35: ...orption only for device vari ants with front reading window Figure 20 Device with mounting bracket top bracket Figure 21 Device with mounting bracket bottom bracket Permissible installation variants The following installation variants can be selected 1 Mounting line scanner horizontal reading line mounting bracket with integrated vibration shock absorption for suspended horizontal mounting above t...

Page 36: ...ation b Dimension the length of the leads according to the duty stroke to ensure strain relief Figure 24 Mounting with mounting bracket Taking into account the duty stroke When mounting a bracket with shock mount ensure that the holding plate mounting bracket is screwed directly to the device and the attenuation is attached as closely as possible to the device The shock mount must always be mounte...

Page 37: ...external components 5 7 1 Mounting the connection module If the device activation is carried out via a connection module then this must be mounted near to the device NOTE If the PC with the SOPAS ET configuration software accesses the Aux interface RS 232 57 6 kBd of the device via the connection module the connection module should not be mounted more than 3 m of cable length away from the device ...

Page 38: ...l encoder is required for the tracking function CLV65x x8300A The incremental pulses must originate from the area of the conveying line on which the device is reading 1 Mount the suitable incremental encoder in the vicinity of the device Ideally the incremental encoder is mounted in front of the device and against the running direction of the conveying line 2 Create direct and secure contact with ...

Page 39: ...s with twisted pair wires Implement the screening design correctly and completely To avoid interference e g from switching power supplies motors clocked drives and contactors always use cables and layouts that are suitable for EMC Do not lay cables over long distances in parallel with power supply cables and motor cables in cable channels The specified IP enclosure rating for the device is only ac...

Page 40: ...illed electricians should be permitted to carry out work on the electrical sys tem If the cable insulation is damaged disconnect the voltage supply immediately and have the damage repaired Ensure that the ground potential is the same at all grounding points Where local conditions do not meet the requirements for a safe earthing method take appropriate measures e g ensuring low impedance and curren...

Page 41: ...ithin a widely distributed system covering several buildings Remedial measures The most common solution to prevent equipotential bonding currents on cable shields is to ensure low impedance and current carrying equipotential bonding If this equipo tential bonding is not possible the following solution approaches serve as a suggestion NOTICE We expressly advise against opening up the cable shields ...

Page 42: ... isolates the ground loop Within the islands a stable equipotential bonding prevents equalizing currents on the cable shields Measures for small system installations For smaller installations with only slight potential differences insulated mounting of the device and peripheral devices may be an adequate solution U System Controller Power Supply SICK Device 8 6 5 2 1 3 4 7 9 ß Figure 29 Example Pr...

Page 43: ...es with twisted pair wires Follow the wiring notes precisely NOTE Preassembled cables can be found online at www sick com CLV63x www sick com CLV64x www sick com CLV65x All electrical connections of the device are configured as M12 round connectors or as a cable with D Sub HD male connector depending on the type The IP65 IP69K enclo sure rating is only achieved with screwed plug connectors or prot...

Page 44: ...t 2 Digital switching output function can be set 14 Sensor 1 Digital switching input for external reading cycle 15 SensGND Common ground for switching inputs Screen Device connections with connector Ethernet version 1 4 3 2 Figure 31 Female connector M12 4 pin D coding Table 9 Ethernet version Pin assignment on the 4 pin M12 female connector Pin Signal Function 1 TD Sender 2 RD Receiver 3 TD Sende...

Page 45: ...0 12 16 11 Figure 33 Male connector M12 17 pin A coding Table 11 Ethernet version Pin assignment on 17 pin M12 male connector Pin Signal Function 1 GND Ground 2 DC 18 30 V Supply voltage 3 CAN L CAN bus IN OUT 4 CAN H CAN bus IN OUT 5 TD RS 422 485 Host interface sender 6 TD RS 422 485 TxD RS 232 Host interface sender 7 TxD AUX AUX interface sender 8 RxD AUX AUX interface receiver 9 SensGND Sensor...

Page 46: ...15 pin male connector D Sub HD Here CDM420 0001 or CDM420 0006 1 Device 2 Interfaces 3 USB not required for CLV62x 4 Connection module 5 Configuration or diagnostics 6 Further data processing 7 External switching outputs 8 Supply voltage VS 9 External switching inputs ß CMC600 parameter memory module is required to be able to use the additional external switching inputs and outputs of the device h...

Page 47: ...ctor M12 Here CDM420 0001 or CDM420 0006 1 Device 2 Interfaces 3 USB not required for CLV62x 4 Connection module 5 Configuration or diagnostics 6 Further data processing 7 External switching outputs 8 Supply voltage VS 9 External switching inputs ß CMC600 parameter memory module is required to be able to use the additional external switching inputs and outputs of the device highlighted in gray à O...

Page 48: ...tching inputs ß CMC600 parameter memory module is required to be able to use the additional external switching inputs and outputs of the device highlighted in gray à Other functions á Application dependent alternative stop reading cycle e g photoelectric sensor or travel increment incremental encoder â Start Stop reading sensor e g photoelectric sensor 6 5 2 Connecting connection modules to device...

Page 49: ...V GND 24 V GND PD1 24 V GND NC CLV SWITCH UIN 24 V GND CDM HEATER 1 2 1 1 2 2 5 3 4 6 7 8 Figure 37 Supply voltage wiring for device and heating in CDM420 0001 connection module 1 Supply voltage 2 GND 3 GND black 4 Supply voltage red 5 15 pin cable 6 CLV switch brown 7 Supply voltage red 8 GND black Control cabinet ELECTRICAL INSTALLATION 6 8019588 129Z 2019 02 07 SICK O P E R A T I N G I N S T R ...

Page 50: ...able parallel switching of several CDM420 0001 modules with connection devices with heating Using connection module CDB620 001 When connecting a device with heating to a CDB620 001 connection module the sup ply lines of the supply voltage to the CDB620 001 are to be protected at the customer site by a 3 A fuse in the control cabinet A separate fuse is to be used for every connection module and dev...

Page 51: ...ply voltage to devices without heating The device must be connected to a power supply unit with the following properties Supply voltage DC 24 V 20 stabilized safety extra low voltage SELV as per cur rently valid standards Electricity source with at least 30 W power Additional 0 5 W output power when using the optional CMC600 parameter mem ory module in the corresponding connection modules ELECTRIC...

Page 52: ... SICK connection module or the customer s voltage supply 6 6 2 Wiring the data interfaces Wiring Ethernet interface 1 Connect the device to the Ethernet connection of the PC via the adapter cable 2 Set up communication via SOPAS ET configuration software NOTE The Ethernet interface of the device has an Auto MDIX function This automatically adjusts the transmission speed as well as any necessary cr...

Page 53: ... used must be followed 6 6 4 Wiring digital switching inputs Physical switching inputs on the device The physical switching inputs can be used for starting and or ending the reading pulse or for feeding an incremental signal Depending on the device there are different number of switching inputs available on the connections see Pin allocation of the connections page 43 Table 13 Characteristic data ...

Page 54: ...NP sensor 1 PNP sensor 2 Supply voltage VS UV 3 Input signal 4 Switching input Sensor 1 or Sensor 2 5 Input voltage Vin For pin assignment see respective device Extension additional logical switching inputs in the device in the case of physical external switching inputs on the optional connection module Thanks to the optional CMC600 parameter memory module the two external switching inputs Externa...

Page 55: ...stalling SOPAS ET NOTE The configuration software SOPAS ET the current system prerequisites for the PC and the instructions for downloading can be found online at b www sick com SOPAS_ET 1 Start the PC and download the current version from www sick com SOPAS_ET 2 If installation does not start automatically launch setup exe from the download directory 3 Follow the operating instructions to complet...

Page 56: ... of a structured data security concept it is recommended to save and therefore archive the current parameter set using a project file Sopas file with configuration data under a meaningful name on the PC External optional parameter memory components outside of the device s internal para meter memory allow for direct parameter cloning In case of defects it is possible to exchange the device quickly ...

Page 57: ...ion NOTE Exchanging the device without losing the configuration data only makes sense if a defective device is replaced with an exchange unit of the same type In order to quickly exchange a defective device with an exchange unit an optional CMC600 must be present beforehand in the connected connection module of the defective device or a memory card must be present beforehand in the device If a mem...

Page 58: ...content Functions such as evaluation window percentage evaluation code configuration and adjusting tool are available via the Quickstart Application wizard The application wizard Wand icon supports device configuration both as a stand alone device and as a master or as a slave for a master slave combination based on the CAN bus Evaluation window The evaluation window shows the code content the obj...

Page 59: ...e Tree Parameters Reading Configuration Ethernet interface Use the Ethernet page to make adaptations to the IP address and the subnet mask Device tree Parameters Network Interfaces IOs Ethernet Object trigger control If the device is to be operated with an additional read pulse sensor for example a pho toelectric sensor on the Sensor 1 switching input select the setting Sensor 1 Device tree Parame...

Page 60: ...buttons are used for manually calling up device functions without using a PC The second level of the LEDs signal the selectable functions 1 Press the return key for about 3 s The device interrupts the current read mode switches off all LEDs and the bar graph and switches into button operating mode Starting now the device ignores all external reading cycles The device does not output any read resul...

Page 61: ...g rapidly Read diagnosis Percentage evalua tion started TeachIn Flash ing slowly TeachIn match code selected Reads a match code which is used as a reference object for additional readings Flash ing rapidly TeachIn match code started Auto setup Flash ing slowly Auto setup selected Sets the most important parameters of the device using a default bar code Note Present the reference bar code at the ma...

Page 62: ...ngs can be obtained from SICK on request Centrally by the PROFINET controller via PROFINET using the GSD configuration Protection of the parameter set as a configuration file in the PROFINET controller Each time the PROFINET is restarted the device is reconfigured Profile programming by reading a set of printed configuration bar codes Can be generated with the SOPAS ET configuration software The S...

Page 63: ...is especially relevant in harsh operating environments dust abrasion damp fingerprints etc The reading window lens must be kept clean and dry during operation NOTICE Equipment damage due to improper cleaning Improper cleaning may result in equipment damage Only use recommended cleaning agents Never use sharp objects for cleaning Cleaning the reading window NOTICE Damage to the Reading Window Reduc...

Page 64: ...e cleaning operation If this is not possi ble use suitable laser protection goggles These must absorb radiation of the device s wavelength effectively b Glass lens Remove dust from the reading window using a soft clean brush If nec essary also clean the reading window with a clean damp lint free cloth and a mild anti static glass cleaning agent b Plastic lens Clean the reading window only with a c...

Page 65: ...rom the optical effect surfaces of external sensors Figure 44 Cleaning the external optical sensors read pulse encoder MAINTENANCE 9 8019588 129Z 2019 02 07 SICK O P E R A T I N G I N S T R U C T I O N S CLV63x CLV64x CLV65x 65 Subject to change without notice ...

Page 66: ...e device The statuses that can be read from the device LEDs on the device housing see Oper ating and status indicators page 60 include Operational readiness Ready Reading result status Good Read or No Read Hardware fault Firmware download status Connection status of the device The LED display can indicate possible errors or faults Further information on this can be found in the System Information ...

Page 67: ... must not be repaired by the user Interrupting or modifying the device will invalidate any warranty claims against SICK AG Rapid replacement of a device by the user is however possible see Disassembly and disposal page 68 b Where a fault cannot be rectified make contact with the SICK Service department To find your agency see the final page of this document NOTE Before calling make a note of all t...

Page 68: ...l microSD memory card is inserted into the device or an optional CMC600 parameter memory module is inserted into the CDB620 CDM420 con nection module the exchanged device automatically adopts the saved parameter set from the memory card or from the CMC600 into its permanent memory If a memory card and a CMC600 are present at the same time the device adopts the parameter set from the CMC600 OR With...

Page 69: ...include the following when making a return Details of the contact person Description of the application Description of the fault that occurred DECOMMISSIONING 11 8019588 129Z 2019 02 07 SICK O P E R A T I N G I N S T R U C T I O N S CLV63x CLV64x CLV65x 69 Subject to change without notice ...

Page 70: ...window orientation On the front or to the side light emission at 105 rela tive to the longitudinal axis of the device 2 Aperture angle 50 Focus Fixed focus Dynamic focus adjustment Auto focus dynamic focus adjustment Scanning fre quency 400 Hz 1 200 Hz 600 Hz 1 000 Hz Light source Laser diode visible red light λ 655 nm Laser diode visi ble red light λ 658 nm Light spot Circular oval depending on t...

Page 71: ...essey Print ratio 2 1 3 1 No of codes per scan 1 20 standard decoder 1 6 SMART decoder No of codes per read ing interval 1 1 50 auto discriminating No of characters per code reading interval Max 50 characters max 5000 characters across all bar codes per reading gate 500 characters for multiplexer function CAN Number of multiple readings 1 99 1 Reading interval The time window generated internally ...

Page 72: ...arameter memory module in the CDB650 connection module Digital switching outputs PNP Iout max 100 mA short circuit protected pulse duration adjustable static 10 1 000 ms Management 2 Result 1 Result 2 optionally with 2 additional outputs via CMC600 parameter memory module in the connection module 1 12 pin Ethernet No output optionally with 2 outputs via CMC600 para meter memory module in the conne...

Page 73: ...se polarity protected Power consump tion 1 devices without heating Line or grid scan ner Typically 5 W at DC 24 V 10 Line or grid scan ner Typically 5 5 W at DC 24 V 10 Line scanner Typically 8 5 W at DC 18 30 V Line scanner with oscillating mirror typically 9 5 W Power consump tion devices with heating Max 40 W max 2 4 A Housing Aluminum die cast stainless steel unpainted IP69K Housing color Ligh...

Page 74: ...ss reading window 3 Identifier see Type code page 13 4 Swivel connector protrudes by 15 mm 12 5 Ambient data CLV63x CLV64x CLV65x Electromagnetic com patibility EMC Radiated emission Acc to EN 61000 6 3 2007 01 electromagnetic immunity Acc to EN 61000 6 2 2005 08 Vibration resistance EN 60068 2 6 2008 02 Shock resistance EN 60068 2 27 2009 05 Ambient operating temperature Device without heating 0 ...

Page 75: ... 200 7 87 300 11 81 400 15 75 0 Reading field height in mm inch 1 a b c For devices with plastic reading window the depth of field is reduced by approx 10 3 Figure 45 Reading field diagram CLV630 long range reading window on front 1 Reading field height in mm inch 2 Reading distance in mm inch 3 The depth of field is reduced by approx 10 for devices with plastic lenses 4 Solution TECHNICAL DATA 12...

Page 76: ... 94 100 3 94 200 7 87 300 11 81 400 15 75 0 Reading field height in mm inch 1 Figure 46 Reading field diagram CLV630 long range reading window on front oval light spot 1 Reading field height in mm inch 2 Reading distance in mm inch 3 The depth of field is reduced by approx 10 for devices with plastic lenses 4 Solution 12 TECHNICAL DATA 76 O P E R A T I N G I N S T R U C T I O N S CLV63x CLV64x CLV...

Page 77: ...mm inch 3 Solution 800 31 5 600 23 62 400 15 75 200 7 87 0 Reading distance in mm inch 2 Resolution 3 a 0 35 mm 13 8 mil c 1 0 mm 39 4 mil b 0 50 mm 19 7 mil 400 15 75 300 11 81 200 7 87 100 3 94 100 3 94 200 7 87 300 11 81 400 15 75 0 Reading field height in mm inch 1 a b c Figure 48 Reading field diagram CLV630 long range oscillating mirror reading window on side 1 Reading field height in mm inc...

Page 78: ...devices with plastic reading window the depth of field is reduced by approx 10 3 Figure 49 Reading field diagram CLV630 long range oscillating mirror oval light spot 1 Reading field height in mm inch 2 Reading distance in mm inch 3 The depth of field is reduced by approx 10 for devices with plastic lenses 4 Solution 12 TECHNICAL DATA 78 O P E R A T I N G I N S T R U C T I O N S CLV63x CLV64x CLV65...

Page 79: ...7 200 7 87 400 15 75 500 19 69 100 3 94 300 11 81 100 3 94 300 11 81 200 7 87 100 3 94 200 7 87 Figure 50 Oscillating mirror deflection width diagram CLV630 long range oscillating mirror 1 Deflection width in mm inch 2 Reading distance in mm inch 3 Solution TECHNICAL DATA 12 8019588 129Z 2019 02 07 SICK O P E R A T I N G I N S T R U C T I O N S CLV63x CLV64x CLV65x 79 Subject to change without not...

Page 80: ... 2 Reading distance in mm inch 3 The depth of field is reduced by approx 10 for devices with plastic lenses 4 Solution 500 19 69 300 11 81 400 15 75 200 7 87 100 3 94 0 Reading distance in mm inch 2 Resolution 3 a 0 25 mm 9 8 mil c 0 50 mm 19 7 mil b 0 35 mm 13 8 mil 100 3 94 200 7 87 100 3 94 200 7 87 0 Reading field height in mm inch 1 a b c Figure 52 Reading field diagram CLV631 mid range readi...

Page 81: ... mm inch 3 The depth of field is reduced by approx 10 for devices with plastic lenses 4 Solution Deflection range in mm inch 1 Reading distance in mm inch 2 40 20 c b a Resolution 3 a 0 25 mm 9 8 mil c 0 50 mm 19 7 mil b 0 35 mm 13 8 mil 100 3 94 0 0 400 15 75 200 7 87 200 7 87 400 15 75 500 19 69 100 3 94 300 11 81 100 3 94 300 11 81 200 7 87 100 3 94 200 7 87 Figure 54 Oscillating mirror deflect...

Page 82: ... a b c For devices with plastic reading window the depth of field is reduced by approx 10 3 Figure 55 Reading field diagram CLV632 short range reading window on front 1 Reading field height in mm inch 2 Reading distance in mm inch 3 The depth of field is reduced by approx 10 for devices with plastic lenses 4 Solution 12 TECHNICAL DATA 82 O P E R A T I N G I N S T R U C T I O N S CLV63x CLV64x CLV6...

Page 83: ...mm inch 3 Solution 300 11 81 180 7 09 240 9 45 120 4 72 60 2 36 0 Reading distance in mm inch 2 Resolution 3 a 0 20 mm 7 9 mil c 0 50 mm 19 7 mil b 0 35 mm 13 8 mil 80 3 15 40 1 57 120 4 72 40 1 57 120 4 72 80 3 15 0 Reading field height in mm inch 1 a b c Figure 57 Reading field diagram CLV632 short range oscillating mirror reading window on side 1 Reading field height in mm inch 2 Reading distan...

Page 84: ...standard resolution Reading distance in mm inch 1 Focus position in mm inch 2 380 14 96 320 12 6 260 10 24 200 7 87 140 5 51 80 3 15 600 23 62 400 15 75 200 7 87 0 Resolution 0 5 mm 19 7 mil 4 Max reading distance aperture angle 25 5 Max reading distance aperture angle 50 6 Min reading distance 7 A B C A B C DOF 25 DOF 50 For devices with plastic reading window the depth of field is reduced by app...

Page 85: ...ture angle 50 5 Min reading distance 6 380 14 96 320 12 6 260 10 24 200 7 87 140 5 51 80 3 15 600 23 62 400 15 75 200 7 87 0 A B C DOF 25 DOF 50 A B C Figure 60 Reading field diagram CLV640 standard density resolution 0 5 mm dynamic reading window on side 1 Reading distance in mm inch 2 Focus position in mm inch 3 Resolution 0 5 mm 19 7 mil 4 Max reading distance aperture angle 25 5 Max reading di...

Page 86: ...ngle 25 6 Max reading distance aperture angle 50 7 Min reading distance Reading distance in mm inch 1 Focus position in mm inch 2 380 14 96 320 12 6 260 10 24 200 7 87 140 5 51 80 3 15 600 23 62 400 15 75 200 7 87 0 Resolution 0 5 mm 19 7 mil 4 Max reading distance aperture angle 25 5 Max reading distance aperture angle 50 6 Min reading distance 7 A B C A B C DOF 25 DOF 50 For devices with plastic...

Page 87: ... of field is reduced by approx 10 3 Figure 63 Reading field diagram CLV640 standard density resolution 0 5 mm dynamic oscil lating mirror oval light spot 1 Reading distance in mm inch 2 Focus position in mm inch 3 The depth of field is reduced by approx 10 for devices with plastic lenses 4 Resolution 0 5 mm 19 7 mil 5 Max reading distance aperture angle 25 6 Max reading distance aperture angle 50 ...

Page 88: ... 100 3 94 300 11 81 100 3 94 300 11 81 200 7 87 100 3 94 200 7 87 Figure 64 Oscillating mirror deflection widths diagram CLV640 standard density focus position 140 mm oscillating mirror 1 Deflection width in mm inch 2 Reading distance in mm inch 3 Solution 12 TECHNICAL DATA 88 O P E R A T I N G I N S T R U C T I O N S CLV63x CLV64x CLV65x 8019588 129Z 2019 02 07 SICK Subject to change without noti...

Page 89: ... 100 3 94 300 11 81 100 3 94 300 11 81 200 7 87 100 3 94 200 7 87 Figure 65 Oscillating mirror deflection widths diagram CLV640 standard density focus position 215 mm oscillating mirror 1 Deflection width in mm inch 2 Reading distance in mm inch 3 Solution TECHNICAL DATA 12 8019588 129Z 2019 02 07 SICK O P E R A T I N G I N S T R U C T I O N S CLV63x CLV64x CLV65x 89 Subject to change without noti...

Page 90: ...15 75 500 19 69 100 3 94 300 11 81 100 3 94 300 11 81 200 7 87 100 3 94 200 7 87 Figure 66 Oscillating mirror deflection widths diagram CLV640 standard density focus position 280 mm oscillating mirror 1 Deflection width in mm inch 2 Reading distance in mm inch 3 Solution 12 TECHNICAL DATA 90 O P E R A T I N G I N S T R U C T I O N S CLV63x CLV64x CLV65x 8019588 129Z 2019 02 07 SICK Subject to chan...

Page 91: ...ading distance aperture angle 25 5 Min reading distance 12 6 4 Overview of CLV65x reading field diagrams 12 6 4 1 standard resolution 0 600 23 62 1 000 39 37 1 400 55 12 1 800 70 92 200 7 87 a b c d Reading field height in mm 1 Reading distance in mm 2 400 15 75 200 7 87 200 7 87 400 15 75 0 Resolution 3 a 0 25 mm 9 8 mil c 0 50 mm 19 7 mil d 1 00 mm 39 4 mil b 0 35 mm 13 8 mil Figure 68 Reading f...

Page 92: ...600 23 62 800 31 50 1 000 39 37 1 200 47 24 1 400 55 12 200 7 87 0 Reading distance in mm inch 2 For devices with plastic reading window the depth of field is reduced by approx 10 3 Resolution 4 a 0 25 mm 9 8 mil c 0 50 mm 19 7 mil d 1 00 mm 39 4 mil b 0 35 mm 13 8 mil Reading field height in mm inch 1 a b c d Figure 70 Reading field diagram CLV650 0120S01 reading window on front variants with pol...

Page 93: ...00 23 62 600 23 62 400 15 75 400 15 75 200 7 87 200 7 87 200 7 87 400 15 75 600 23 62 800 31 50 1000 39 37 1200 47 24 Figure 71 Oscillating mirror deflection widths diagram CLV650 standard density oscillating mirror 1 Deflection width in mm inch 2 Reading distance in mm inch 3 Solution TECHNICAL DATA 12 8019588 129Z 2019 02 07 SICK O P E R A T I N G I N S T R U C T I O N S CLV63x CLV64x CLV65x 93 ...

Page 94: ...distance in mm inch 3 Solution Reading field height in mm inch 1 500 19 69 400 15 75 300 11 81 200 7 87 100 3 94 100 3 94 200 7 87 300 11 81 400 15 75 500 19 69 0 0 1 000 39 37 200 7 87 400 15 75 600 23 62 800 31 5 Resolution 3 a 0 50 mm 19 7 mil Reading distance in mm inch 2 a Figure 73 Reading field diagram CLV651 oscillating mirror reading window on side 1 Reading field height in mm inch 2 Read...

Page 95: ...and tilt 3 a Resolution 0 50 mm 19 7 mil Tilt 45 b Resolution 0 50 mm 19 7 mil Tilt 0 b a Figure 74 Oscillating mirror deflection widths diagram CLV651 low density oscillating mirror 1 Deflection width in mm inch 2 Reading distance in mm inch 3 Resolution and angle TECHNICAL DATA 12 8019588 129Z 2019 02 07 SICK O P E R A T I N G I N S T R U C T I O N S CLV63x CLV64x CLV65x 95 Subject to change wit...

Page 96: ... found at www sick com CLV63x www sick com CLV64x www sick com CLV65x Accessories for devices with heating Brackets Part no 2050705 Part no 2058082 13 ACCESSORIES 96 O P E R A T I N G I N S T R U C T I O N S CLV63x CLV64x CLV65x 8019588 129Z 2019 02 07 SICK Subject to change without notice ...

Page 97: ...ROFINET Conformance Classes can be found in the docu ment of the PI user organization PROFIBUS and PROFINET International You can find the document in the Downloads area at www profibus com 14 1 4 General requirements on a switch suitable for PROFINET applications For PROFINET Conformance Class B and C CC B CC C a PROFINET certified switch which can be configured as a PROFINET device must be used ...

Page 98: ...re cancellation Switching on the PROFINET network Values are initialized to passive The reading cycle input can also be controlled by the fieldbus If the fieldbus is inter rupted the reading cycle input is no longer updated Reading results can get lost since the reading cycle input keeps the last value from before the interruption After switching on the fieldbus power up the reading cycle input is...

Page 99: ... ESD Electro Static Discharge Electrostatic discharge GSD General Station Description generic station description for PROFIBUS PROFINET HTML Hyper Text Markup Language page description language on the Internet I Input LED Light Emitting Diode Light emitting diode LPS Limited Power Supply MAC Medium Access Control MTTF Mean Time To Failure MTTR Mean Time To Repair O Output PCS Printed Contrast Sign...

Page 100: ...ble Logic Controller TCP IP Transmission Control Protocol Internet Protocol 14 ANNEX 100 O P E R A T I N G I N S T R U C T I O N S CLV63x CLV64x CLV65x 8019588 129Z 2019 02 07 SICK Subject to change without notice ...

Page 101: ...ANNEX 14 8019588 129Z 2019 02 07 SICK O P E R A T I N G I N S T R U C T I O N S CLV63x CLV64x CLV65x 101 Subject to change without notice ...

Page 102: ...xico Phone 52 472 748 9451 E Mail mario garcia sick com Netherlands Phone 31 0 30 229 25 44 E Mail info sick nl New Zealand Phone 64 9 415 0459 0800 222 278 tollfree E Mail sales sick co nz Norway Phone 47 67 81 50 00 E Mail sick sick no Poland Phone 48 22 539 41 00 E Mail info sick pl Romania Phone 40 356 17 11 20 E Mail office sick ro Russia Phone 7 495 283 09 90 E Mail info sick ru Singapore Ph...

Reviews: