background image

32

8026473/V1-0/2021-01| SICK

OP E R A T I N G   I N S T R U C T I O N S  | MCR

Subject to change without notice

6

OPERATION 

6.4

Switching to Aggregation mode

As soon as a valid aggregation code has been scanned, the user interface switches 

to Aggregation mode.

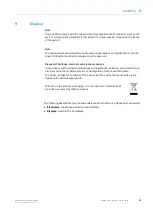
Fig. 20: Aggregation mode screen

6.5

Scanning individual packages to the aggregation

Once Aggregation mode has been opened, the current aggregation code is shown in the 

Current aggregation field

.

Position the container so that the entire contents are in the reading field of the camera.

Bar codes must not be obscured.

The scan can be started with the blue Scan button.

The number of codes read is shown in the reading field on the right and can increase 

over the duration of the image acquisitions. 

As soon as the illumination goes out, the scan is finished.

The inline image is displayed.

Note

Do not move the container during the reading process.

Ensure that no objects (e.g. hands) are in the reading field (area between the camera and 

container).
If the positioning of the container is not optimal, the scan can be repeated at any time.
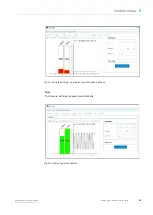
Identified valid bar codes are marked with a green rectangle.
Red squares indicate that the decoder has recognized a potential bar code but could not 

decode it. 
If the number of read codes matches the number of codes expected, then the red squares 

do not matter at all – they are then only relevant for manual reworking.

Summary of Contents for MCR

Page 1: ...MMMI MMMOPERATING INSTRUCTIONS OPE RATI NG INSTR UCTIO NS MCR Multi Code Reader ...

Page 2: ...erved by SICK AG Reproduction of this document or parts of this document is only permissible within the limits of the statutory provisions of copyright law Any modification abridgment or translation of this document is prohibited without the express written permission of SICK AG The trademarks mentioned in this document are the property of their respective owners SICK AG All rights reserved Origin...

Page 3: ...mbols 10 2 9 Safety notes 10 3 System Overview 11 4 Installation 13 4 1 System assembly 13 4 2 Provided by operating entity 13 5 Commissioning 15 5 1 System start 15 5 1 1 Arvato login process 16 5 1 2 medAspis and Metacarp login process 17 5 1 3 Login process for the 3rd party cloud application 17 5 2 System configuration 18 5 2 1 Application settings 19 5 2 2 Connector settings 20 5 2 3 Notifica...

Page 4: ...inating scan 33 6 5 2 Adding bar codes 33 6 5 3 Canceling scan 33 6 5 4 Completion of aggregation Complete 33 6 5 5 Pausing aggregation pause 33 6 5 6 Cancellation of aggregation Abort 33 6 6 Hand held scanners 34 7 Maintenance 35 7 1 Visual control 35 7 2 Hand held scanners 35 7 3 Cleaning 35 7 3 1 Camera lens 35 7 3 2 Touchscreen 35 8 Fault Diagnosis 37 9 Disposal 39 ...

Page 5: ...em Note Applicable standards and regulations the latest state of technological development and our many years of knowledge and experience have all been taken into account when assembling the data and information contained in this document The manufacturer accepts no liability for damage caused by Failure to observe this document Non compliance with notes and regulations Unauthorized mounting and i...

Page 6: ...s The local laws regulations technical rules and internal company operating instructions at the operation site must be observed Storage of documents This document and other relevant technical documentation information Must be kept available for reference Must be handed over to new system operators new specialist personnel 1 5 Document conventions Action to be taken ...

Page 7: ... of the system The system must be set up in an environment where reading cannot be disturbed by ambient light such as sunlight The 3rd party cloud application on which the aggregation or where the check against the EMVS takes place is not part of the system offered by SICK and must be provided by the operating entity Intended use also includes observance of these operating instructions in particul...

Page 8: ...skills experience and knowledge of the rele vant standards and provisions needed to work on electrical systems and to detect and avoid any potential dangers independently 2 4 Sources of danger Electrical voltage Touching live devices which may still be energized can lead to death burns or electrical shock LED illumination The LEDs may cause eye injuries Hot surfaces Risk of burns from hot surfaces...

Page 9: ...a situation presenting danger which will lead to death or serious injuries if not prevented WARNING Identifies a situation presenting danger which may lead to death or serious injuries if not prevented CAUTION Identifies a situation presenting danger which may lead to minor or moderate inju ries if not prevented WARNING Identifies a situation that may lead to property damage to the system or produ...

Page 10: ...on the system by qualified personnel Disconnect the voltage supply when working on the system Check residual voltage on the system components Use extra caution Always connect equipotential bonding earthing Do not disconnect or remove the protective conductor DANGER SUSPENDED LOADS Serious injury or death from falling suspended loads Never stand under suspended loads Pay close attention when liftin...

Page 11: ...on The system simultaneously reads containers holding up to 500 serialized packages and sends the codes to a cloud application provided by the operating entity for example for NMVS connection The system operator receives optical feedback on the display on the number of scanned codes and on the scanning field of the scanned container Fig 1 System components Legend 1 Camera system 2 3rd party cloud ...

Page 12: ...12 8026473 V1 0 2021 01 SICK OP ER A T ING INST R U CT IO NS MCR Subject to change without notice 3 SYSTEM OVERVIEW ...

Page 13: ...ystem must be firmly mounted on a table or similar work surface Mounting mate rial is not included in the SICK scope of delivery The operating entity of the system must ensure that the company specific ergonomic requirements are adhered to when setting the height of the work surface 4 2 Provided by operating entity 230 V AC voltage supply unit in close proximity to the system Network connection or...

Page 14: ...14 8026473 V1 0 2021 01 SICK OP ER A T ING INST R U CT IO NS MCR Subject to change without notice 4 INSTALLATION ...

Page 15: ...5 Commissioning 5 1 System start Connect the power supply unit 230 V and attach it to the MCR The system starts automatically The System startup screen appears Fig 2 System startup screen After the boot process the individual login screen appears depending on the cloud provider with which the system is to be connected ...

Page 16: ...MISSIONING 5 1 1 Arvato login process The login process at Arvato is two step and consists of Device initialization User login The information to be performed during the process is visible on the Arvato cloud Fig 3 Information screen Arvato device initialization Fig 4 Information screen Arvato user login ...

Page 17: ...tion screen device enrollment for medApsis and Metacarp 5 1 3 Login process for the 3rd party cloud application To use the MCR the system must be connected to a cloud application Generate enrollment code from 3rd party cloud Scan enrollment code with mobile hand held scanner The user and device data for the login process is displayed in the Device data area on the Settings page Fig 6 Enrollment co...

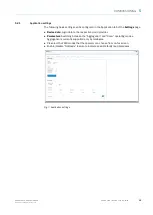
Page 18: ...ch is located in the local network of the MCR Connect network cable Connect PC laptop to free port on MCR Ethernet switch The IP address of the PC laptop must be 192 168 168 1 Web browser configuration address http 192 168 168 221 page settings page Note The Settings page of the MCR is divided into 8 sub pages Application Connector Notification history Camera Network Device language Logs Version i...

Page 19: ...n the Application tab of the Settings page Device data Login data to the respective cloud provider Parameters Switching between the Aggregation and Scan operating modes Aggregation is currently supported only by medAspis Pre select the FMD modes that the operator can choose from on his screen Enable disable NoReads feature to indicate possible faulty read processes Fig 7 Application settings ...

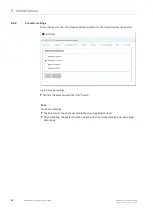
Page 20: ...tings In the Connector tab the relevant active connector to the cloud provider is selected Fig 8 Connector settings Confirm the selection with the OK button Note Connector settings The selected connector must match the cloud application used After rebooting the system must be paired with the corresponding cloud Have login data ready ...

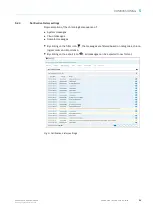
Page 21: ... history settings Representation of the chronological sequence of System messages Cloud messages Operator messages By clicking on the filter icon the messages are filtered based on categories chrono logical order and importance By clicking on the export icon all messages can be exported to csv format Fig 9 Notification history settings ...

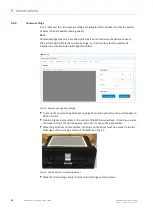
Page 22: ...hat the system be installed in a location with stable light conditions Fig 10 Camera and lighting settings To set up the camera the grid sheet on page 21 must be printed out on a white paper in DIN A4 format Create a higher level surface in the center of the MCR work surface It must have a size of at least 30 x 21 cm and be approx 14 to 20 cm above the work surface Place the grid sheet on this sur...

Page 23: ......

Page 24: ...just the focus lower lens ring so that the modulation Mod bar graph is as high as possible Required minimum value for good reading performance is 70 Check whether the avg value is still at least 95 correct by adjusting the gain value if necessary Close the locking screws on both lens rings Stop set up by pressing the Stop continuous gate function Control element Location Description Focus Lower le...

Page 25: ... AG O P ER A T ING INST R UC TI O NS MCR Subject to change without notice COMMISSIONING 5 Fig 13 Camera settings camera set up with closed aperture Fig 14 Final set up of the camera Note The camera settings are saved automatically ...

Page 26: ...t to change without notice 5 COMMISSIONING 5 2 5 Network settings The Network tab on the Settings page is used to set the system external network interface for communicating with the cloud provider Other optional entries are Time server Name server Fig 15 Network settings ...

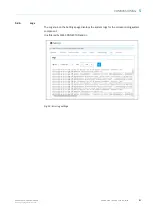
Page 27: ...G INST R UC TI O NS MCR Subject to change without notice COMMISSIONING 5 5 2 6 Logs The Logs tab on the Settings page displays the system logs for the corresponding system component It is filtered by SIM CONNECTOR and UI Fig 16 Error log settings ...

Page 28: ...A T ING INST R U CT IO NS MCR Subject to change without notice 5 COMMISSIONING 5 2 7 Version info settings The Version info tab on the Settings page clearly displays the version statuses of the indi vidual components Fig 17 Version info ...

Page 29: ... Scan button on the user interface The number of codes read is shown in the reading field on the right and can increase over the duration of the image acquisitions Note Do not move the container during the reading process Ensure that no objects e g hands are in the reading field area between the camera and container As soon as the illumination goes out the scan is finished The reading result is di...

Page 30: ...argeable battery of the hand held scanner from being completely dis charged it must be plugged into the base station after scanning The number of scanned codes can be reset at any time by pressing the red Reject button The green Confirm button transmits the scanned codes to the cloud provider 6 2 1 Notification bar The actions performed by the operator are displayed in the notification bar at the ...

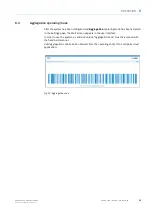
Page 31: ...as been configured and Aggregation operating mode has been selected in the Settings page the Start screen appears in the user interface In order to use the system a valid and unique AggregationCode must be scanned with the hand held scanner Valid aggregation codes can be obtained from the operating entity of the 3rd party cloud application Fig 19 Aggregation code ...

Page 32: ... blue Scan button The number of codes read is shown in the reading field on the right and can increase over the duration of the image acquisitions As soon as the illumination goes out the scan is finished The inline image is displayed Note Do not move the container during the reading process Ensure that no objects e g hands are in the reading field area between the camera and container If the posi...

Page 33: ... 5 3 Canceling scan The scan can be canceled at any time Press the red Reject button on the user interface 6 5 4 Completion of aggregation Complete Once all relevant codes for the opened aggregation have been scanned pressing the Complete button finalizes the opened aggregation on the cloud 6 5 5 Pausing aggregation pause Once all codes relevant to the open aggregation have been scanned the open a...

Page 34: ...nners After exchanging a component of the hand held scanner it may be necessary to re pair the scanner with the base station Observe the corresponding operating instructions for the hand held scanner An excerpt is printed below Source Extract from SICK Operating Instructions IDM Corded WPAN Hand held Scanner Document No 8017159 ...

Page 35: ...rol Check electrical installations regularly Make sure that all cable connections are secure Replace any damaged plug connectors and connecting cables immediately 7 2 Hand held scanners The hand held scanner communicates wirelessly with the charging station connected to the MCR The hand held scanner contains a rechargeable battery which must be charged for opera tion by precise placement in the ch...

Page 36: ...36 8026473 V1 0 2021 01 SICK OP ER A T ING INST R U CT IO NS MCR Subject to change without notice 7 MAINTENANCE ...

Page 37: ...ult Diagnosis Fault diagnosis is done via a PC laptop web browser which is located in the local network of the MCR Connect the PC laptop to a free port of the Ethernet switch on the MCR with a network cable The IP address of the PC laptop must be 192 168 168 1 The configuration address http 192 168 168 221 page settings page ...

Page 38: ...38 8026473 V1 0 2021 01 SICK OP ER A T ING INST R U CT IO NS MCR Subject to change without notice 8 FAULT DIAGNOSIS ...

Page 39: ...sion transport and dispose of the system Note The applicable local and statutory environmental regulations and guidelines for the dis posal of industrial and electrical waste must be observed Disposal of batteries electrical and electronic devices In accordance with international directives and regulations batteries accumulators and electrical or electronic devices must not be disposed of with hou...

Page 40: ...il support sick jp Malaysia Phone 603 8080 7425 E Mail enquiry my sick com Mexico Phone 52 472 748 9451 E Mail mario garcia sick com Netherlands Phone 31 0 30 229 25 44 E Mail info sick nl New Zealand Phone 64 9 415 0459 0800 222 278 tollfree E Mail sales sick co nz Norway Phone 47 67 81 50 00 E Mail sick sick no Poland Phone 48 22 539 41 00 E Mail info sick pl Romania Phone 40 356 17 11 20 E Mail...

Reviews: