background image


WLL190T-2 Photoelectric switches for fibre-optic cables

2007-08-24 

SENSICK  

3 1

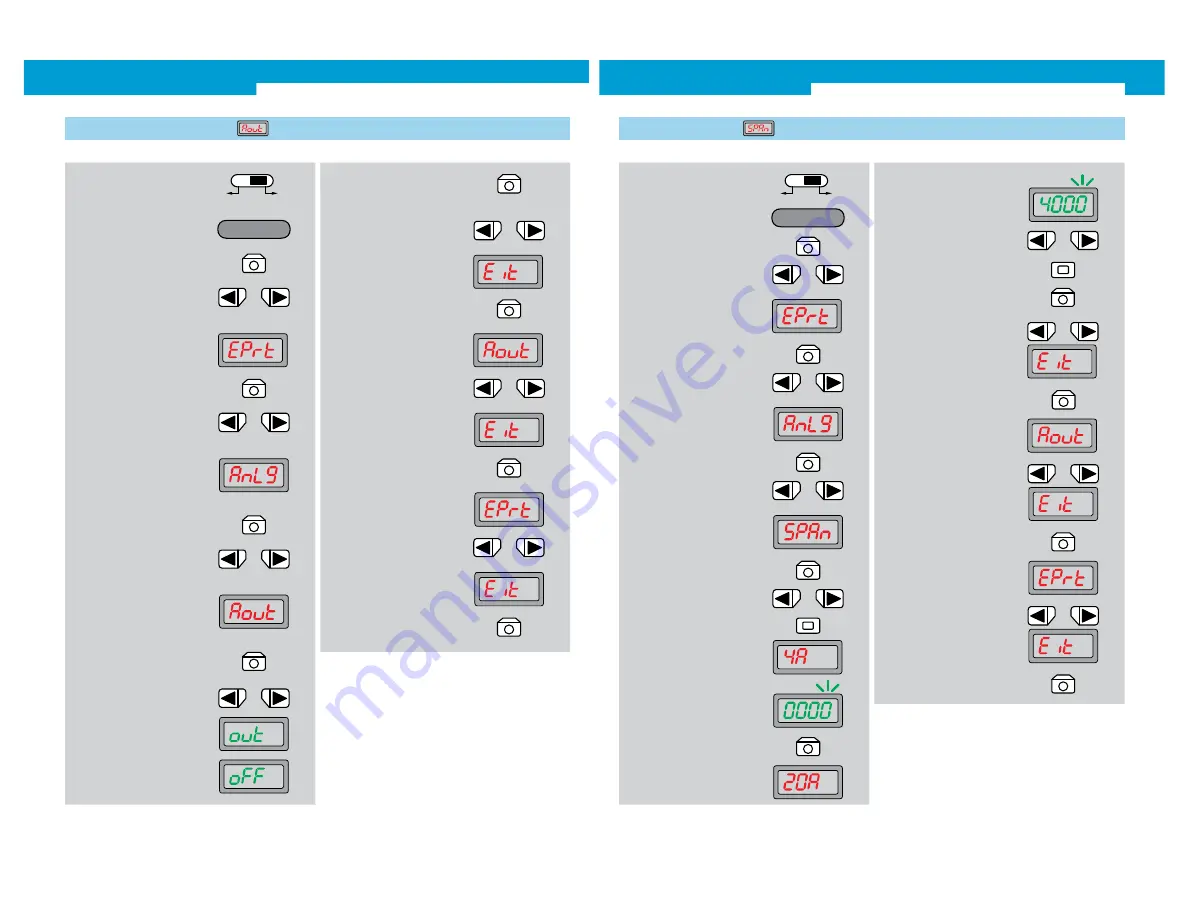
1.  Selector switch to RUN

2.   Operating mode Configuring 

active

4.   In the basic menu, select 

 Expert mode by pressing the 
arrow keys

5.   Expert mode is shown on the 

display

6.  Press Mode key

10.   In the Analogue menu, select 

activation of analogue output 
by pressing the arrow keys

11.   Activated Analogue output is 

shown on the display

14.   Finish selection with Mode key

���

���

�����������

13.   Select between “out” and 

“oFF” by pressing the arrow 
keys

4.1  Activation of analogue output 

This function is only available for the analogue devices.

oFF:  Analogue output deactivated,
out:  Analogue output activated (factory setting).

The analogue output has a resolution of 12 bits.

3.  Press Mode key

15.   Close Analogue menu with 

 arrow key

16.   Finish selection with Mode key

7.   In Expert mode, select 

 Analogue menu by pressing 
the arrow keys

8.   Analogue menu is shown on 

the display

9.   Press Mode key

12.   Press Mode key

20.   Expert mode is shown on the 

display

21.   Select ending the adjustment 

(Exit)

22.   Finish selection with Mode key

17.   Analogue menu is shown on 

the display

18.   Close Expert mode with arrow 

key

19.   Finish selection with Mode key

WLL190T-2 Photoelectric switches for fibre-optic cables


32


SENSICK 

2007-08-24 


1.  Selector switch to RUN

2.   Operating mode Configuring 

active

4.   In the basic menu, select 

 Expert mode by pressing the 
arrow keys

5.   Expert mode is shown on the 

display

6.  Press Mode key

10.   In the Analogue menu, select 

range adjustment by pressing 
the arrow keys

11.   Range adjustment is shown on 

the display

���

���

�����������

4.2  Range adjustment 

Allocation of display values to the respective current values of 
the analogue output (only available for analogue devices).

After setting the 4 mA value, the display automatically changes 
to the 20 mA setting.

The maximum values to be allocated for transmission or reflec-
tion type are between 0 and 4000.

3.  Press Mode key

18.   Close Analogue menu with 

 arrow key

19.   Finish selection with Mode key

7.   In Expert mode, select 

 Analogue menu by pressing 
the arrow keys

8.   Analogue menu is shown on 

the display

9.  Press Mode key

12.   Press Mode key

13.  Setting the 4-mA-Value using 

the arrow keys, changing deci-
mal place using the Teach key

14.  Press Mode key

16.  Setting the value using the 

 arrow keys, changing decimal 
place using the Teach key

17.   Press Mode key for 

 confirmation

15.  The setting of the 20-mA-Value 

is automatically switched to

23.   Expert mode is shown on the 

display

24.   Select ending the adjustment 

(Exit)

25.   Finish selection with Mode key

20.   Analogue menu is shown on 

the display

21.   Close Expert mode with arrow 

key

22.   Finish selection with Mode key

Summary of Contents for WLL190T-2

Page 1: ...threshold ad justment of moving objects Even falling or tiny objects are reliably detected Zone Teach in This so called window technology learns the object within a definable bandwidth of the switching threshold Ideal for the detection of marks or simultaneous fore ground and background suppression Teach in of transparent objects Teach in with minimum sensitivity reliably detecting glass films or ...

Page 2: ...e output 4 2 Range adjustment 4 3 Def of invalid measurement values 4 4 Average values 4 5 Setting of extreme value memory EXIT back to Expert menu P 6 P 7 P 8 P 9 P 10 P 11 P 12 P 13 P 14 P 15 P 16 P 17 P 18 P 19 P 20 P 21 P 22 P 23 P 24 P 25 P 26 P 27 P 28 P 29 P 30 P 31 P 32 P 33 P 34 P 35 2 SENSICK 2007 08 24 Photoelectric switch for fibre optic cables WLL190T 2 Easy handling structured functi...

Page 3: ... in for Teach in without stopping the production process 1 4 Page 9 Zone Teach in for learning an upper and lower switching threshold 1 5 Page 10 Transparent Teach in transparent objects such as bottles and films 1 6 Page 11 For standard applications Teach in and the commissioning is complete The automatic learning with Teach in is always the first step The six different Teach in versions can be q...

Page 4: ... Utilising the entire functionality If further adjustments need to be made beyond the normal Teach in the entire functionality can be selected via a comfortable menu WLL190T 2 Photoelectric switches for fibre optic cables 6 SENSICK 2007 08 24 1 1 Max Teach in 1 Selector switch to SET 2 Operating mode Teach in active 3 In the basic menu select required mode by pressing the arrow keys 4 1 point Teac...

Page 5: ...rror Indicates an interruption of the Teach in WLL190T 2 Photoelectric switches for fibre optic cables 8 SENSICK 2007 08 24 1 Selector switch to SET Exact adjustment of the switching threshold to object and ambient conditions in any order 1st step Teach in with object 2 Operating mode Teach in active 3 In the basic menu select required mode by pressing the arrow keys 4 2 point Teach in is shown on...

Page 6: ...th object 8 The switching threshold display flashes and the basic display is shown 1 Selector switch to SET 2 Operating mode Teach in active 4 Zone Teach in is shown on the display 7 Selector switch to RUN 5 Press Teach in key 6 Adjust diffuse type fibre to the background without and with object Adjusts the zone with 10 according to the light received 1 5 Zone Teach in Typical applications Ideal f...

Page 7: ...can be manually readjusted for each channel 1 6 Teach in of transparent objects Typical applications Detection of objects with low attenuation such as glass clear film or very small objects In case of faulty input during Teach in the following messages are shown Indicates that light intensity is too low Indicates a non detected moving object Indicates a calculation error Indicates an interruption ...

Page 8: ...de key WLL190T 2 Photoelectric switches for fibre optic cables 14 SENSICK 2007 08 24 1 Selector switch to RUN Option for various time delays and variable time range oFF no time delay activated factory setting oFdY OFF delay release delay ondY ON delay on delay SHot One Shot output active for set time window Time delay selectable from 1 9999 1 ms 9 s 2 Operating mode Configuring active 4 In the bas...

Page 9: ...display Typical applications The measuring range is adapted to the service signal to obtain an optimum resolution This is especially useful for long range ap plications or objects with low reflectance spreading the measur ing range or for the detection of very close objects or objects with very high reflectance preventing saturation WLL190T 2 Photoelectric switches for fibre optic cables 16 SENSIC...

Page 10: ... selection with Mode key 9 Select ending the adjustment Exit 10 Finish selection with Mode key 3 Press Mode key WLL190T 2 Photoelectric switches for fibre optic cables 18 SENSICK 2007 08 24 1 Selector switch to RUN The current reception value is set to zero Adjusted switching threshold values are adapted on Function active oFF Function deactivated factory setting 2 Operating mode Configuring activ...

Page 11: ...ectric switches for fibre optic cables 20 SENSICK 2007 08 24 1 Selector switch to RUN 2 Operating mode Configuring active 4 In the basic menu select Expert mode by pressing the arrow keys 5 Expert mode is shown on the display 6 Press Mode key 7 In Expert mode select detection mode by pressing the arrow keys 8 Detection mode is shown on the display 11 Finish selection with Mode key The switching ou...

Page 12: ...a the arrow keys 14 Press Mode key to finish the entry 17 Expert mode is shown on the display 18 Select ending the adjustment Exit 19 Finish selection with Mode key 20 The basic display shows the counting value and counting function up down WLL190T 2 Photoelectric switches for fibre optic cables 22 SENSICK 2007 08 24 1 Selector switch to RUN 2 Operating mode Configuring active 4 In the basic menu ...

Page 13: ...ection with Mode key 14 Expert mode is shown on the display 15 Select ending the adjustment Exit 16 Finish selection with Mode key WLL190T 2 Photoelectric switches for fibre optic cables 24 SENSICK 2007 08 24 1 Selector switch to RUN 2 Operating mode Configuring active 4 In the basic menu select Expert mode by pressing the arrow keys 5 Expert mode is shown on the display 6 Press Mode key 7 In Expe...

Page 14: ...16 Finish selection with Mode key WLL190T 2 Photoelectric switches for fibre optic cables 26 SENSICK 2007 08 24 1 Selector switch to RUN 2 Operating mode Configuring active 4 In the basic menu select Expert mode by pressing the arrow keys 5 Expert mode is shown on the display 6 Press Mode key 7 In Expert mode select strength setting by pressing the arrow keys 8 Illumination setting is shown on the...

Page 15: ...on the display 14 Select ending the adjustment Exit 15 Finish selection with Mode key WLL190T 2 Photoelectric switches for fibre optic cables 28 SENSICK 2007 08 24 1 Selector switch to RUN 2 Operating mode Configuring active 4 In the basic menu select Expert mode by pressing the arrow keys 5 Expert mode is shown on the display 6 Press Mode key 7 In Expert mode select setting the display value to z...

Page 16: ... connected extension units see page 7 Note Locked Loc extension units are not taught 3 Press Mode key 11 Close Expert mode with arrow key 12 Finish selection with Mode key 13 Expert mode is shown on the display 14 Select ending the adjustment Exit 15 Finish selection with Mode key WLL190T 2 Photoelectric switches for fibre optic cables 30 SENSICK 2007 08 24 1 Selector switch to RUN 2 Operating mod...

Page 17: ...re optic cables 32 SENSICK 2007 08 24 1 Selector switch to RUN 2 Operating mode Configuring active 4 In the basic menu select Expert mode by pressing the arrow keys 5 Expert mode is shown on the display 6 Press Mode key 10 In the Analogue menu select range adjustment by pressing the arrow keys 11 Range adjustment is shown on the display 4 2 Range adjustment Allocation of display values to the resp...

Page 18: ...19 Finish selection with Mode key WLL190T 2 Photoelectric switches for fibre optic cables 34 SENSICK 2007 08 24 1 Selector switch to RUN 2 Operating mode Configuring active 4 In the basic menu select Expert mode by pressing the arrow keys 5 Expert mode is shown on the display 6 Press Mode key 10 In the Analogue menu se lect average values setting by pressing the arrow keys 11 Average values settin...

Page 19: ...features and technical data do not represent any guarantee 01 A4 4c int29 Australia Phone 61 3 9497 4100 1800 33 48 02 tollfree E Mail sales sick com au Belgium Luxembourg Phone 32 0 2 466 55 66 E Mail info sick be Brasil Phone 55 11 3215 4900 E Mail sac sick com br Ceská Republika Phone 420 2 57 91 18 50 E Mail sick sick cz China Phone 852 2763 6966 E Mail ghk sick com hk Danmark Phone 45 45 82 6...

Reviews: