background image

Software Configuration

11

Software Configuration

In a first step, install the 

drivemaster2

 software as described in the corresponding soft-

ware documentation.
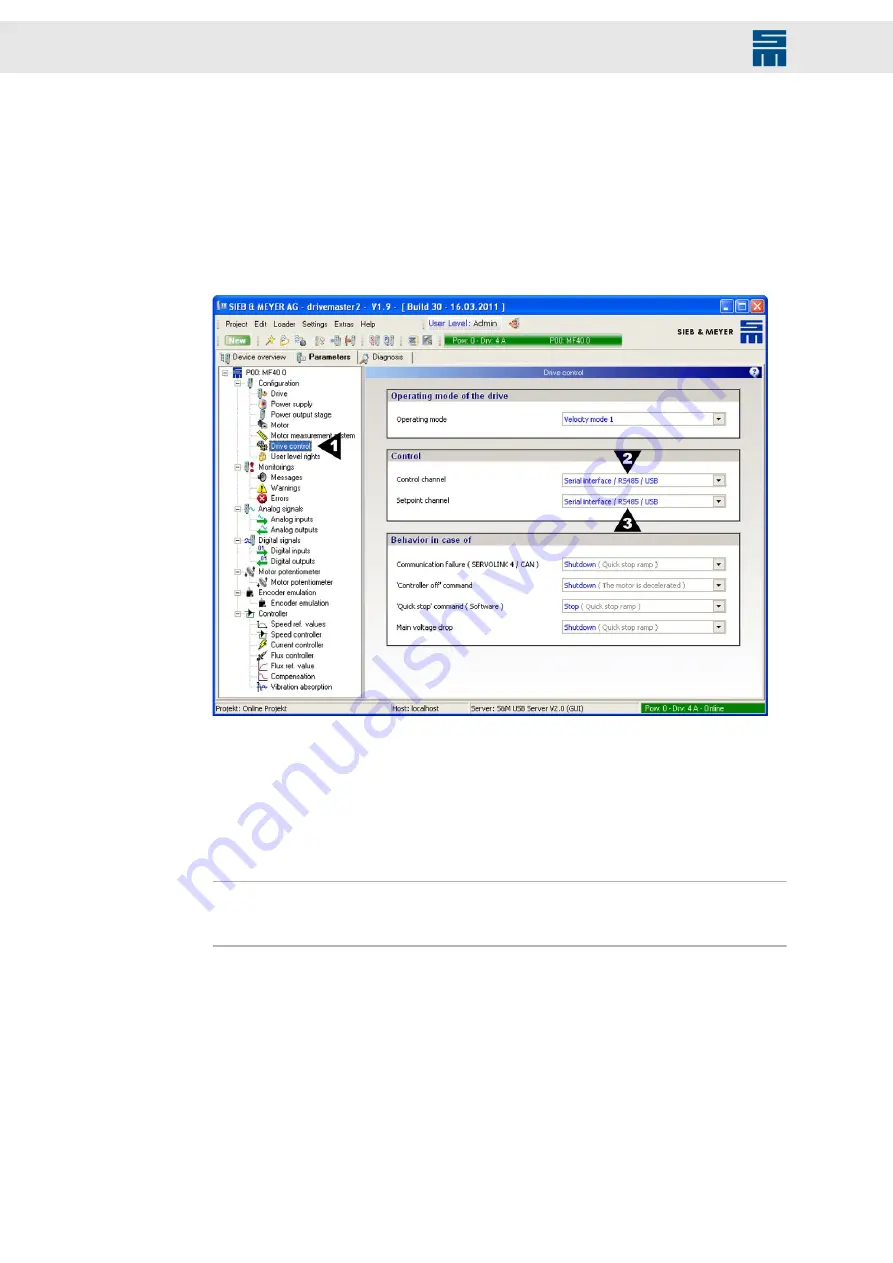
To be able to control the drives via the operating terminal, you must set the following pa-

rameters in accordance with the used drive via the 

drivemaster2

 software:

Control channel / Setpoint channel

[1]

On the “Parameter” tab, open the “Drive control” page.

[2]

Select the control channel “Serial Interface / RS485 / USB”.

[3]

Up to software version (operating terminal) 3.08: select the setpoint channel

“Serial interface / RS485 / USB”. 

Software version (operating terminal) 3.09 and higher: Select the setpoint

channel in accordance with the preset parameters.

Note

The operating terminal cannot control the drive if another control channel (and setpoint

channel up to version 3.08) have been selected or if the 

drive-setup-tool

 is active.

20

Drive System SD2x - Operating Terminal 0362150 and 0362153

Summary of Contents for 0362150

Page 1: ...Drive System SD2x D 00000021 3 2022 06 09 Drive System SD2x Operating Terminal 0362150 and 0362153 Operating terminal to control a drive of the series SD2S SD2M SD2B or SD2B plus SIEB MEYER...

Page 2: ...dem Schmaarkamp 21 21339 Lueneburg Germany Phone 49 4131 203 0 Fax 49 4131 203 2000 info sieb meyer de http www sieb meyer com SIEB MEYER Shenzhen Trading Co Ltd Room A208 2 F Internet Innovation and...

Page 3: ...S232 and CAN 14 7 6 X62 COM1 Interface 15 7 7 X63 JTAG Download Socket 15 8 Connection to the Drive 16 9 Switch Cabinet Installation 17 10 Hardware Configuration 19 11 Software Configuration 20 12 Swi...

Page 4: ...CHANGE PASSWORD 36 14 4 INFO MODE 36 14 5 AXIS RESET 37 14 6 TRANSPARENT MODE 37 14 6 1 TRANSPARENT MODE for USB 38 14 6 2 TRANSPARENT MODE for RS232 38 14 7 RESET 38 14 8 BRIGHTNESS 39 15 Status Mes...

Page 5: ...void danger WARNING Risk of injury Indicates an imminently hazardous situation which if not avoided will re sult in death or serious injury Follow the instructions in this manual to avoid danger CAUTI...

Page 6: ...et Note As an alternative the operating terminal 0362150 can also be connected via the switch cabinet kit 32299567 For the mounting instructions refer to the technical information TIE_MountingPlate_Op...

Page 7: ...number 1000286240 and higher 4 PCB version 036210043 3 new processor type STM32F105R8 connectors X60 download socket X61 bus RS232 via the pins 2 3 and 6 7 X62 COM1 X63 JTAG download socket and switc...

Page 8: ...on mounting to the drive Fig 1 Operating terminal 0362150 for plug on mounting to the drive 4 1 Dimensions 0362150 Fig 2 Dimensions of the operating terminal 0362150 in mm inch Fig 2 Dimensions of the...

Page 9: ...g 3 Operating terminal 0362153 for switch cabinet installation 5 1 Dimensions 0362153 Fig 4 Dimensions of the operating terminal 0362153 in mm inch Fig 4 Dimensions of the operating terminal 0362153 i...

Page 10: ...043 Fig 5 PCB 036210043 example illustration of operating terminal 0362150 Fig 5 PCB 036210043 example illustration of operating terminal 0362150 Connector Meaning Pin assignment X58 USB port to the P...

Page 11: ...interface COM1 RS232 to the drive page 15 6 3 Connectors on PCB 036210043 3 Fig 7 PCB version 036210043 3 example illustration of operating terminal 0362150 Fig 7 PCB version 036210043 3 example illus...

Page 12: ...tor Meaning Pin assignment X60 USB download socket to load new software into the operating terminal page 13 X60 1 USB download socket type b to load new software into the operating terminal X61 Serial...

Page 13: ...oader is used by the SIEB MEYER service staff for load ing new operating terminal software If you want to load a new software into the operat ing terminal please contact the SIEB MEYER service 9 pole...

Page 14: ...V voltage supply 2 O SD TX2 Transmit data internal bridge to pin 7 1 2 3 I SD RX2 Receive data internal bridge to pin 6 1 2 4 I O CAN_L CAN_L 5 I O GND Ground 6 I SD RX2 Receive data internal bridge t...

Page 15: ...ge supply 2 O SD TX1 Transmit data 3 I SD RX1 Receive data 4 I O CAN_L CAN_L 5 I O GND Ground 6 I SD RX2 Receive data 7 O SD TX2 Transmit data 8 I O CAN_H CAN_H 9 I O GND Ground Stud bolt flange max t...

Page 16: ...via this connection Note When using the operating terminal with a drive of the series SD2B SD2B plus or SD2M 0369x7xxF only the terminal cannot be direclty plugged on the drive for mechanical reasons...

Page 17: ...nnector Pin I O Name I O Pin 1 E VCC5 5 V voltage supply A 1 2 A SD TX1 transmit data to drive E 2 3 E SD RX1 receive date from drive A 3 4 I O CAN_L I O 4 5 I O GND ground I O 5 6 E SD RX2 receive da...

Page 18: ...ly unit Fig 9 Operating terminal supplied by a separate power supply unit NOTICE Property damage when using a separate voltage supply When using a separate voltage source the voltage supply from the d...

Page 19: ...ed This makes compatible internal forwarding of the data in the operating terminal necessary The internal forwarding must be set by means of the slide switch S1 on the PCB accord ing to the used cable...

Page 20: ...e Parameter tab open the Drive control page 2 Select the control channel Serial Interface RS485 USB 3 Up to software version operating terminal 3 08 select the setpoint channel Serial interface RS485...

Page 21: ...IN0 No function 1 On the Parameter tab open the Digital inputs page 2 For the D IN0 input select No function from the drop down list 21 Drive System SD2x Operating Terminal 0362150 and 0362153 Softwar...

Page 22: ...ress is kept and drive specific objects are read These are for example the conversion factors of the speed Operating terminals with USB RS232 support During initialization the terminal recognizes whet...

Page 23: ...tward selection of a display parameter in AUTOMATIC MODE Rightward selection of a display parameter in INFO MODE Rightward selection of a digit in the parameterization mode Cursor left Leftward select...

Page 24: ...ressing ENTER M0 M1 M0 M1 If an error is displayed both LEDs flashalternately 13 3 Display The display is made up of 3 16 characters It shows information actual values and menu items The language of t...

Page 25: ...een operating terminals with and without USB support 14 2 1 1 Actual Value Display of Devices with USB Support In automatic operation current drive values are displayed They include the actual pa rame...

Page 26: ...ject 398 with Odict version 8 and higher is displayed 2nd display line Output stage off The set reference speed object 168 up to Odict version 7 object 395 with Odict version 8 and higher is displayed...

Page 27: ...MS value Arms Software version operating terminal 3 19 and higher The displayed unit of the cur rent depends on the DeviceDriveFunctionMode In the mode HSBLOCK the cur rent is displayed as sine wave p...

Page 28: ...here is information on the cause of the quick stop object 71 available the quick stop code will be displayed Top priority is given to the error display 14 2 2 LED Display The LED displays have the fol...

Page 29: ...a the STOP key you can stop the spindle and the output stage will be switched off With software version operating terminal 3 17 and higher switch off is a multi stage process According to the terminal...

Page 30: ...switch back to the main menu Software version operating terminal 3 09 or higher The modified parameters will only become active in the drive if the selected setpoint channel supports these parameters...

Page 31: ...only negative values or positive and neg ative values 14 3 2 1 Change parameters While you are modifying a parameter its name and actual value are displayed You can change the values Use the arrow key...

Page 32: ...current object 400 Internal setpoints object 406 Motor potentiometer step size object 410 In a next step the drive is switched to the loader Then the initialization parameters are written to the Flas...

Page 33: ...3 5 READ PARAMETER Note You must enter the correct password to open this menu item When the parameters are read all parameter sets saved in the Flash EPROM of the dri ve are loaded into the Flash EPR...

Page 34: ...e In a next step there is a change over in the drive which can take some seconds When the parameters are written all parameter sets saved in the Flash EPROM of the operating terminal are loaded into t...

Page 35: ...e hardware does not support all features of the parameter sets The logic software does not support all features of the parameter sets The firmware does not support all features of the parameter sets N...

Page 36: ...display will then switch back to the PROGRAM MENU If the two new passwords are not identical the error message wrong password will be displayed for one second and you must enter the new passwords agai...

Page 37: ...AXIS RESET menu item the axis is restarted It switches to the loader and then back to the firmware The following note is displayed Finally the display switches to the AUTOMATIC MODE 14 6 TRANSPARENT M...

Page 38: ...more You can select the RS232 TRANSPARENT MODE via the menu item RS232 Trns Mode The related note appears on the display In this mode the operating terminal reads the data and commands of the PC user...

Page 39: ...en you select the menu item TERMINAL RESET the operating terminal application is restarted 14 8 BRIGHTNESS Software version operating terminal 4 00 and higher Via this menu item you can change the bri...

Page 40: ...the drive Ctrl channel fail Spt channel fail The displays Ctrl channel fail and Spt channel fail indicate that the operating termi nal cannot access the control channel and or the setpoint channel of...

Page 41: ...ors 40 K Keys 23 L LEDs 23 M Main menu 25 P Parameter set selection 32 Parameters change 30 Parameters read 33 Parameters save 32 Parameters write 34 Password 36 R Reset axis 37 Reset terminal 38 S S1...

Reviews: