background image

3 YEARS

LIMITED WARRANTY

4

4) USE AND CARE OF THE ELECTRIC TOOL

a) Do not force the power tool. Use the correct power tool for your application. Using the 
correct power tool will do the job better and safer at the speed for which it was designed.

b) Do not use the power tool if the switch does not turn on or off. Any power tool that is not 
controlled by the switch is dangerous and must be repaired.

c) Disconnect the plug from the power source before making any adjustments, changing 
accessories, or storing power tools. Such preventive safety measures reduce the risk that the 
power tool will operate accidentally.

d) Store the power tool out of the reach of children and do not allow persons unfamiliar with 
the power tool or these instructions to operate the power tool. Power tools are dangerous in 
the hands of those inexperienced.

e) Maintenance of power tools. Check or verify alignment of moving parts, breakage of parts, 
and any other conditions that may affect the operation of the power tool. If the power tool is 
damaged then you must repair it before using it. Many accidents are caused by improper main-
tenance of power tools.

f) Keep cutting tools sharp and clean. Proper maintenance of cutting tools with sharp cutting 
edges are less prone to stagnation and easy to control.

g) Use the power tool, accessories and bits according to these instructions and in the manner 
established for each type of power tool, taking into account the working conditions and the 
work or task to be performed. The use of the power tool for operations other than those men-
tioned, could generate or give rise to dangerous situations.

5) SERVICE

a) Have your power tool serviced by an experienced person and use only identical replacement 
parts. This could ensure the maintenance of the power tool.

Special requirements for the demolition hammer

1. Wear hearing protection. Exposure to noise can cause hearing loss.

Summary of Contents for SD4814

Page 1: ...a cuidadosamente las INSTRUCCIONES DE USO Aseg rese de saber c mo funciona la m quina y c mo debe ser operada Mantenga la herramienta de acuerdo a estas instrucciones y aseg rese de que la maquina fun...

Page 2: ...de seguridad para herramientas el ctricas Requerimientos especiales del martillo demoledor Instrucciones de seguridad Especificaciones Accesorios Aplicaciones Antes de la operaci n o funcionamiento Fu...

Page 3: ...3 Cubierta de mandril retr ctil 4 Fuelle 5 Indicador de potencia y control de desgaste de las escobillas de carb n 6 Perilla de ajuste de velocidad 7 Selector de funci n 8 Cubierta izquierda 9 Barra d...

Page 4: ...entras est operando la herramienta el ctri ca Las distracciones pueden causarle la p rdida de control del equipo 2 SEGURIDAD EL CTRICA a El enchufe de la herramienta el ctrica debe coincidir con la to...

Page 5: ...otecci n auditiva usados en las condiciones adecuadas reducir las lesiones personales c Evitar el arranque imprevisto Asegurarse de que el interruptor este en la posici n apagado antes de conectarlo a...

Page 6: ...icas Revise o compruebe la alineaci n de las partes m viles la rotura de las partes y cualquier otra condici n que pueda afectar la opera ci n de la herramienta el ctrica S la herramienta el ctrica es...

Page 7: ...mpreciso e incluso peligroso 6 Antes de iniciar su trabajo revise el rea de trabajo Ej Con un detector de metales para ase gurarse de que no hay cables el ctricos ocultos o tuber as de agua y de gas p...

Page 8: ...na descarga el ctrica Desconectar inmediatamente el enchufe de la electricidad en caso de que el cable se da e y durante el mantenimiento Utilice protecci n auditiva y visual Lea todas las advertencia...

Page 9: ...n 7 11 17 mm 2 Grasa para martillo 3 Manija auxiliar 4 Barra de profundidad Los accesorios est ndar est n sujetos a cambios sin previo aviso 1 Perforaci n de agujero pasante Rotaci n Percutor 1 Broca...

Page 10: ...35mm 40mm 45mm 50m 55mm 60mm 70mm 75mm 80mm 85mm 90mm 95mm 100mm 105mm 110mm 115mm 120mm 3 V stago de la sierra copa met lica Aplicado a V stago de la sierra copa met lica Core bit shank por encima de...

Page 11: ...rea de trabajo este alejada de la fuente de alimentaci n utilice un cable de exten si n de suficiente grosor y capacidad nominal El cable de extensi n debe ser lo m s corto posible 4 Como instalar la...

Page 12: ...ci n etc La escala 1 del ajustador de velocidad de la perilla est dise ada para una velocidad m nima con el n mero de 250 rotaciones por minuto y 1 900 veces de percutor por minuto La escala 6 est dis...

Page 13: ...tapa izquierda como se ilustra en la Fig 3 2 Monte la broca del martillo 3 Pulse el gatillo del interruptor despu s de poner la punta de la broca del martillo a la posi ci n de perforaci n 4 No es ne...

Page 14: ...c a Ubique de la funci n de la perilla y de la cubierta izquierda como se ilustra en la Fig 6 b Gire el fuelle como se muestra en la Fig 7 y fije el cincel plano a la direcci n de trabajo deseada c Ub...

Page 15: ...litar el desmontaje 2 Monte la sierra copa met lica en el cuerpo principal de la misma manera como se monto la broca de perforaci n Fig 11 3 Ajuste la broca mediante la alineaci n del tornillo con la...

Page 16: ...rtillo demoledor queda listo para el desmontaje Fig 15 CAMBIO DE GRASA La grasa de baja viscosidad se aplica en el martillo demoledor de modo que este pueda ser utilizado durante un largo periodo sin...

Page 17: ...est suelto apretelo inmediatamente El no hacerlo puede generar un peligro serio 3 Mantenimiento del motor La unidad de bobinado del motor es el coraz n de la herramienta el ctrica Prestar el mayor cu...

Page 18: ...rnillos 8 Medio ambiente Aparatos el ctricos defectuosos y o da ados deben ser desechados en el lugar de reciclaje apropiado PRECAUCI N La reparaci n modificaci n e inspecci n de las herramientas el c...

Page 19: ...tico se evidencia que no llevaron a cabo estos cuidados la garant a puede ser negada 3 A OS DE GARANT A Cada herramienta SIEFKEN Industriell tiene garant a al comprador original de estar libre de defe...

Page 20: ...sing this tool please read the INSTRUCTIONS FOR USE carefully Make sure you know how the machine works and how it should be operated Keep the tool according to these instructions and make sure the mac...

Page 21: ...6 17 General safety warnings for electric tools Demolition hammer special requirements Safety instructions Specifications Accessories Applications Before operation or function Functioning Lubrication...

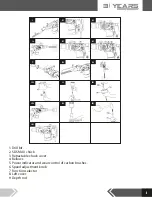
Page 22: ...1 Drill bit 2 SDS MAX chuck 3 Retractable chuck cover 4 Bellows 5 Power indicator and wear control of carbon brushes 6 Speed adjustment knob 7 Function selector 8 Left cover 9 Depth rod 1 2 3 4 5 6 7...

Page 23: ...t or fumes c Keep children and bystanders away while operating the power tool Distractions can cause you to lose control of your equipment 2 ELECTRICAL SAFETY to The power tool s plug must match the o...

Page 24: ...hearing protection equipment worn in the right conditions will reduce personal injury c Avoid unexpected starting Make sure the switch is in the off position before connecting it to the power source C...

Page 25: ...of power tools Check or verify alignment of moving parts breakage of parts and any other conditions that may affect the operation of the power tool If the power tool is damaged then you must repair i...

Page 26: ...us operation 6 Before starting your work check the work area eg with a metal detector to make sure that there are no hidden electrical cables or water and gas pipes present Contact with electrical cab...

Page 27: ...icates the danger of electric shock Immediately disconnect the power plug in case the cable becomes damaged and during maintenance Wear hearing and vision protection Read all warnings and safety instr...

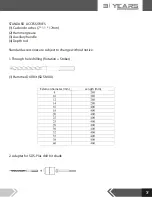
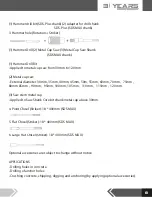
Page 28: ...ushes 7 11 17mm 2 Hammer grease 3 Auxiliary handle 4 Depth rod Standard accessories are subject to change without notice 1 Through hole drilling Rotation Striker 1 Hammer Drill Bit SDS MAX 2 Adapter f...

Page 29: ...r 30mm 35mm 40mm 45mm 50m 55mm 60mm 70mm 75mm 80mm 85mm 90mm 95mm 100mm 105mm 110mm 115mm 120mm 3 Saw stem metal cup Applied to Saw Shank Core bit shank metal cup above 30mm 4 Point Chisel Striker 18...

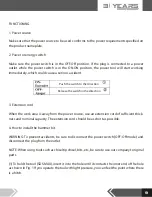
Page 30: ...rom the power source use an extension cord of sufficient thick ness and nominal capacity The extension sord should be as short as possible 4 How to install the hammer bit WARNING To prevent accidents...

Page 31: ...ons such as drilling holes in fragile materials demolition etc The knob speed adjuster scale 1 is designed for minimum speed numbered 250 rotations per minute and 1 900 striker times per minute The 6...

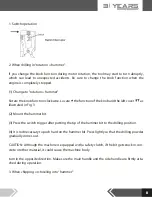
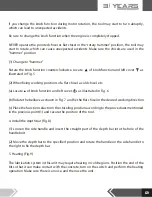
Page 32: ...b and the left cover as illustrated in Fig 3 2 Mount the hammer bit 3 Press the switch trigger after putting the tip of the hammer bit to the drilling position 4 It is not necessary to push hard on th...

Page 33: ...e of knob function and left cover as illustrated in Fig 6 b Rotate the bellows as shown in Fig 7 and fix the flat chisel in the desired working direction c Place the function selector in the chiseling...

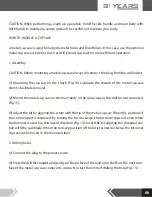
Page 34: ...m to facilitate removal 2 Mount the metal cup saw on the main body in the same way as the drill bit was mounted Fig 11 3 Adjust the bit by aligning the screw with the tip of the metal cup saw When the...

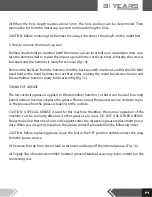
Page 35: ...isassembly Fig 15 CHANGE OF GREASE The low viscosity grease is applied to the demolition hammer so that it can be used for a long period without having to replace the grease Please contact the nearest...

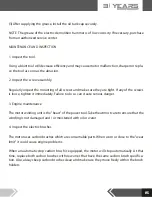
Page 36: ...ny of the screws is loose tighten it immediately Failure to do so can create serious danger 3 Engine maintenance The motor winding unit is the heart of the power tool Take the utmost care to ensure th...

Page 37: ...Environment Defective and or damaged electrical appliances should be disposed of in the proper recycling location CAUTION Repair modification and inspection of power tools must be performed at an aut...

Page 38: ...d If at the moment of carry the tool to the service center the tool shows evidence that was not correctly maintained the guarantee may be denied 3 YEARs WARRANTY Each SIEFKEN Industriell tool is guara...

Page 39: ...3 YEARS LIMITED WARRANTY...

Page 40: ......

Reviews: