background image

18

Last update: 03.2014

KFVkeyless

Operating instructions

5.4.3  Deleting the keyboard code

A keyboard code can be deleted via app as described below:

1.  Follow the instructions in the previous chapter 5.4.2. "Assigning keypad code to a mobile phone user".

2.  Instead of entering an individual keyboard code, delete the keyboard code. 

3.  Confirm the procedure by clicking "Save". 

See chapter 3.1.2. to delete the keyboard code via the keyboard code.

5.4.4  Adjusting the user specific range

The user-specific setting of the range can only be carried out via app.

1.   Follow the instructions in chapter 5.3 "Door management".

2.  Select the desired user. 

(If this has not yet been taught in, see chapter 3.2.1.)

3.  Select the desired detection range on the "User range" bar. 


The standard setting of the range is "medium".

4.  Confirm the procedure by clicking "Save settings".

5.4.5  Adjusting user-specific touch function for door opening

The user-specific setting of the touch function can only be carried out via app.

1.   Follow the instructions in chapter 5.3 "Door management".

2.  Select the desired user. 

(If this has not yet been taught in, see chapter 3.2.1.)

3.  Select the desired setting of the touch function: 


- "Yes" to have to press the "OK" button to open the door. 

- "No", so that the door opens automatically on proximity with the mobile phone. 


4.  Confirm the procedure by clicking "Save settings".

Note:

  If the touch function is deactivated and and you are within the range following the automatic unlock-

ing of the door, you will automatically change over to the activated touch mode, meaning that it is 

unnecessary to leave the range to achieve renewed door opening. Opening the door by touching 

the "OK" button of the keyboard code is possible from this moment. As soon as you exit the range, 

the touch function is deactivated again.

Summary of Contents for KFVkeyless

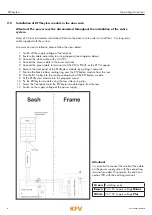
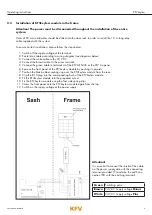
Page 1: ...NDOW HARDWARE DOOR HARDWARE SLIDING DOOR HARDWARE VENTIL ATION TECHNOLOGY BUILDING TECHNOLOGY DOOR HARDWARE KFVkeyless Bluetooth access control system with keypad O P E R A T I N G I N S T R U C T I O N S ...

Page 2: ......

Page 3: ... deleting 11 4 Settings 11 4 1 Duration of re activation 11 4 2 Adjusting user specific range touch function 11 4 3 Setting lighting 11 4 4 Setting beeper 11 5 App 12 Page 5 1 Setting up App 1 Introduction 12 5 2 Setting up a door in app 12 5 3 Managing Door 14 5 3 1 Displaying log 14 5 3 2 Opening door 15 5 3 3 Adjusting lighting 15 5 3 4 Adjusting beeper 15 5 4 Managing users via app 17 5 4 1 Ch...

Page 4: ...er following a successful function test on the programming of the module 1 1 Door PIN Delete PIN and serial number of the KFVkeyless module Attention Please keep the two labels contained in the envelope together with the secu rity related PIN code in a safe location and do not make the code available to unauthorised persons under any circumstances You will require the listed PIN codes for all prog...

Page 5: ...s 2 Installation The KFVkeyless module can with be adhered directly to the door sash or to the wall beside the door 2 1 Cut out template The following cut out must be prepared for the installation of the KFVkeyless module Dimension of hole for relay cable ...

Page 6: ... the green cable to terminal 4 of the KFV GENIUS or the KFV A opener 6 Remove the front panel of the KFVkeyless module by pushing it upwards 7 Position the black rubber sealing ring over the KFVkeyless module from the rear 8 Clip the RJ10 plug into the corresponding bush of the KFVkeyless module 9 Fit the KFVkeyless module into the prepared cut out 10 Fix the KFVkeyless module using the four side ...

Page 7: ...he green cable to terminal 4 of the KFV GENIUS or the KFV A opener 6 Remove the front panel of the KFVkeyless module by pushing it upwards 7 Position the black rubber sealing ring over the KFVkeyless module from the rear 8 Clip the RJ10 plug into the corresponding bush of the KFVkeyless module 9 Fit the KFVkeyless module into the prepared cut out 10 Fix the KFVkeyless module using the four side sp...

Page 8: ...t following successful installation of the device After switching on the power supply enter the Default PIN and confirm the entry by pressing the OK button The correct installation and correct entry of the Default PIN triggers an opening pulse and the door is opened The Default PIN is deleted after the Door PIN has been entered once The end customer can now begin programming the KFVkeyless module ...

Page 9: ... taught in The door PIN cannot be saved as a keyboard code The programming mode is exited automatically after 3 min without any input After teaching in the maximum number of 24 keyboard codes the teaching of Bluetooth devices and or access via app is no longer possible 1 Teaching in a CODE Beeper Lighting Enter 6 digit Door PIN on the keyboard Confirm procedure with OK Depending on the mode select...

Page 10: ...til a tone sequence of 2 ascending tones has been emitted and the blue LEDs stop flashing before you enter the desired keyboard code 2 Enter the keyboard code to be deleted Beep when key is pressed 3 Confirm procedure with OK The keyboard code has been successfully saved 3 ascending tones The programming mode has been exited automati cally Note If a keyboard code is deleted that has been assigned ...

Page 11: ...tings on your mobile phone and select it Note It is possible that the device is displayed as Headset or with its MAC address 4 Connecting your mobile phone to KFVkeyless To do this type in your 6 digit door PIN and confirm with OK The mobile phone has been successfully taught in Note The error message Connection failed must be acknowledged with OK in Apple devices 2 x 2 ascending tones The door un...

Page 12: ...e with OK Depending on the mode selected The programming mode initialises itself Single prolonged high pitched beep The programming mode is active 2 ascending tones 3 Search for the delete KFVkeyless device in the Bluetooth settings on your mobile phone and select it 4 Connect your mobile phone to delete KFVkeyless To do this type in the Delete PIN and confirm with OK The Delete PIN is specified o...

Page 13: ...airing request on the mobile phone 1 Type the 6 digit door PIN of the relevant module into the input field of the pairing request on the Smartphone Confirm procedure with OK The mobile phone has been successfully taught in 2 x 2 ascending tones The programming mode has been exited automatically The door unlocks 3 2 5 Blocking mobile phone user not deleting The blocking of a code or a user can only...

Page 14: ...everal devices simultaneously 5 1 Setting up App 1 Introduction To use the app for KFVkeyless you must first set it up as described below 1 Load the purchased app into your Smartphone The app is available under the name KFVkeyless for iPhones and Android Smartphones in the relevant Appstore 2 Switch on Bluetooth on your mobile phone 3 Start the app a license check is carried out with Android an In...

Page 15: ...ding tones The door unlocks 2 ascending tones Depending on the mode selected The programming mode has been exited You will now be asked to enter the 6 digit door PIN of the selected device again Confirm procedure with OK The door is now set up in the app or iPhone iPhone mobile phone user already created The door is now set up in the app You will now be asked to enter the 6 digit door PIN of the s...

Page 16: ...on your Smartphone and register yourself 3 Enter 6 digit Door PIN on the keyboard Confirm procedure with OK Depending on the mode selected when key is pressed The programming mode initialises itself Single prolonged high pitched beep The programming mode is activated 2 ascending tones 4 Select the desired door in the app If this has not yet been added see chapter 5 2 5 You are now in the Door mana...

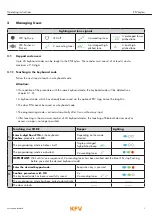
Page 17: ...e selected The table on the next page shows the differences in the individual lighting modes 1 Follow the instructions in chapter 5 3 Door management 2 Click on the menu item Advanced settings 3 You can now adjust the lighting mode as required 4 Confirm the procedure by clicking Save settings The standard lighting mode is effective when touched 5 3 4 Adjusting beeper The beeper behaves differently...

Page 18: ...of a keystroke The blue LEDS light up in the event of a keystroke and when the door opens Normal operation when key is pressed Taught in mobile phone in opening range Flashes green Flashes green Flashes green Flashes green Opening the door Flickers green Flickers green Flickers green Flickers green Beeper modes Note The beeper modes do not apply to actions carried out in the program ming mode ON O...

Page 19: ... Confirm the procedure by clicking Save settings Note The name of a newly taught in mobile phone is equivalent to the MAC address of the mobile phone 5 4 2 Assigning keyboard code to a mobile phone user keyboard codes can only be assigned to existing mobile phone users 1 Follow the instructions in chapter 5 3 Door management 2 Select the desired user If this has not yet been taught in see chapter ...

Page 20: ...4 Confirm the procedure by clicking Save settings 5 4 5 Adjusting user specific touch function for door opening The user specific setting of the touch function can only be carried out via app 1 Follow the instructions in chapter 5 3 Door management 2 Select the desired user If this has not yet been taught in see chapter 3 2 1 3 Select the desired setting of the touch function Yes to have to press ...

Page 21: ...Door management 2 Select the desired user If this has not yet been taught in see chapter 3 2 1 3 Click on Delete user 4 You will now be asked whether you really want to delete the user Delete the user by clicking Yes 5 5 Ending management procedure When you have carried out all the desired actions via the app you must exit the programming mode by clicking the X button or OK button on the KFVkeyles...

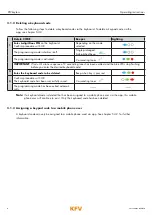
Page 22: ...f a single prolonged low pitched beep is emitted and the red LED lights up a blocked or invalid keypad has been entered 7 Reset Carry out the following steps to reset the KFVkeyless to factory default settings 1 Activating Factory Default Beeper Lighting Enter 6 digit Door PIN on the keyboard Confirm procedure with OK Depending on the mode selected The programming mode starts Single prolonged high...

Page 23: ...ss the X button on the keypad before you enter the code The keyboard code no longer reacts after the input of several wrong coded If 30 digits that do not represent a known code are typed in the keypad will freeze for 5 seconds If 30 unknown digits are typed in again after this it will be blocked for a further 10 seconds then for 30 seconds and finally for 60 seconds As soon as a digit sequence wh...

Page 24: ...duct and or individual components or if the product and or individual components is are dismantled or partly dismantled and the defect is due to the changes made Exclusion of liability The product and its components are subject to stringent quality controls As a result they function reliably and safely when used correctly Our liability for consequential losses and or claims for damages is ex clude...

Page 25: ...23 Last update 03 2014 Operating instructions KFVkeyless Test report in accordance with EN 61000 ...

Page 26: ......

Page 27: ......

Page 28: ...Phone 32 9 2811312 China Phone 86 316 5998198 France Phone 33 3 89618131 Germany Phone 49 271 39310 Great Britain Phone 44 2476 622000 Hungary Phone 36 76 500810 Italy Phone 39 02 9353601 Poland Phone 48 77 4477700 Russia Phone 7 495 7211762 South Korea Phone 82 31 7985590 Switzerland Phone 41 33 3461010 Turkey Phone 90 216 5934151 Ukraine Phone 380 44 4637979 You can find address details for our ...

Reviews: