background image

09.2019

16/28

H47.SENS002EN-00

SIEGENIA senso secure

Installation and operating instructions

4

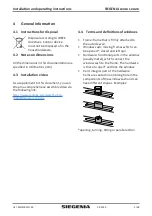
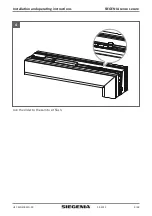
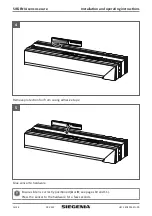
Remove.protection.foil.from.casing.adhesive.tape

5

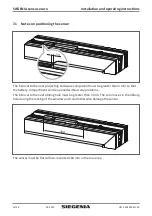
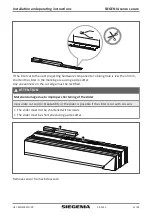
Glue.sensor.to.hardware

Ensure.slider.is.correctly.positioned.(or B;.see.pages.10 and 11).
Press.the.sensor.to.the.hardware.for.a.few.seconds.

Summary of Contents for Senso Secure

Page 1: ...INSTALLATION AND OPERATING INSTRUCTIONS DRIVE Radio sensor for status and locking monitoring system of windows SIEGENIA senso secure Window systems Door systems Comfort systems...

Page 2: ......

Page 3: ...INSTALLATION 14 8 1 Installation of window sensor 14 8 2 Installation of frame magnet 17 9 OPERATION 19 9 1 Device functions in the SIEGENIA Comfort app 19 9 1 1 Status indicator 19 9 1 2 Signal tone...

Page 4: ...ly via EnOcean radio to the SIEGENIA Connect Box or to other remote stations which support the EnOcean Equipment Profile EEP of the SIEGENIA senso secure e g mediola EnOcean PlugIn Use the sensor only...

Page 5: ...am a comprehensive assembly video via the following link https www youtube com watch v qHL rTip8jE feature youtu be 4 4 Terms and definitions of windows Frame frame that is firmly attached to the outs...

Page 6: ...net marking 3 Slider 3a Sash magnet 3b Cropping area 4 Bag with accessories 4a Cam catcher self adhesive 4b Batteries AAAA 2x 4c Frame magnet self adhesive 6 Function SIEGENIA senso secure is a concea...

Page 7: ...radio channels External magnetic and or electromagnetic sources e g power lines neodymium magnets etc can impair the functioning of the sensor and and cause incorrect notifications Youwill find notes...

Page 8: ...and operating instructions 2 Position the slider in the casing Do not remove the protection foil from the adhesive tapes 3 Position senor on the hardware of the window sash Suitable installation locat...

Page 9: ...09 2019 9 28 H47 SENS002EN 00 Installation and operating instructions SIEGENIA senso secure 4 Join the slider to the cam to sit flush...

Page 10: ...or B If the cam is seated on the right of the sensor the slider must be in position A for the installation The oblong hole of the cam is not covered in the installation of the slider If the cam is se...

Page 11: ...osition A or B If the cam is seated below the sensor the slider must be in position A for the installation The oblong hole of the cam is not covered in the installation of the slider If the cam is sea...

Page 12: ...rojecting hardware component must be greater than 3 mm so that the battery compartment can be opened without any problems The interval to the next oblong hole must be greater than 3 mm The cam moves i...

Page 13: ...the slider in the marking area using a side cutter Any unevenness on the cut edge must be rectified ATTENTION Material damage due to improper shortening of the slider Inaccurate cut and or breakabili...

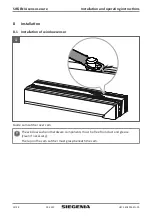
Page 14: ...lation and operating instructions 8 Installation 8 1 Installation of window sensor 1 Guide cam catcher over cam The window sash and hardware components must be free from dust and grease clean if neces...

Page 15: ...ions SIEGENIA senso secure 2 Remove protection foil from cam catcher adhesive tape 3 Glue the slider onto the cam catcher The slider must be seated closely on the cam 1 mm clearance Press the slider o...

Page 16: ...so secure Installation and operating instructions 4 Remove protection foil from casing adhesive tape 5 Glue sensor to hardware Ensure slider is correctly positioned A or B see pages 10 and 11 Press th...

Page 17: ...H47 SENS002EN 00 Installation and operating instructions SIEGENIA senso secure 8 2 Installation of frame magnet 1 Transfer the frame magnet marking to the window sash 2 Transfer the window sash markin...

Page 18: ...g instructions 3 Remove protection foil from frame magnet 4 Glue frame magnet to the frame from the inside The frame and hardware components must be free from dust and grease clean if necessary Press...

Page 19: ...ifies the status of the connected window Window locked Window not locked tilted Window not locked turn opened 9 1 2 Signal tone In case of vibration of the connected window the signal tone will be emi...

Page 20: ...rt app The following figures demonstrate this sequence of steps 7 Add window sensor Cancel Finished If you want to add a new sensor 1 insert batteries 2 clip on battery compartment 3 confirm with Fini...

Page 21: ...of the casing Never clean the unit with a high pressure cleaner or steam jet cleaner 10 2 Replacing the batteries 1 Remove battery compartment and batteries 2 Insert new batteries into the battery co...

Page 22: ...nsert battery compartment with batteries into the sensor 3 Tap 4x on the sensor with your finger Sensor briefly beeps 2x 12 Spare parts and accessories Name Content Material number SIEGENIA senso secu...

Page 23: ...ion performance 0 4 mW Radio range in open space 300 m Protection type IP64 electronics IP40 battery compartment Permissible room temperature 20 C to 60 C Batteries 2x AAAA Service life of batteries a...

Page 24: ...ng instructions SIEGENIA Connect Box H47 MOTS013EN Interference of the wireless signal Observe notes on wireless range planning and potential sources of interference see page 7 SIEGENIA senso secure n...

Page 25: ...settings Via Further settings it is possible to regulate the alarm sensitivity from level 0 to level 6 Please proceed as shown below 1 Open SIEGENIA Comfort app 2 Select SIEGENIA Connect Box 3 SIEGENI...

Page 26: ...30 4 2011 A1 2014 Emission EN 50130 4 2011 A1 2014 EN 61000 6 2 2005 b 2014 53 EU RED Directive b1 Electromagnetic compatibility EN 301 489 1 V 1 9 2 EN 301 489 3 V 1 6 1 b3 Safety of persons in elect...

Page 27: ......

Page 28: ...www siegenia com H47 SENS002EN 00...

Reviews: