background image

en

5

Children in the household

Do not let infants play or operate the
dishwasher.
Keep cleaning and rinsing agents out of
the reach of infants. These may cause
chemical burns in the mouth, throat and
eyes or asphyxiation.
Keep infants away from the open
dishwasher. It could contain residue of
the cleaning agent.
If the appliance is installed at eye-level,
ensure when opening and closing the
door that children are not caught or
crushed between the appliance door
and the cupboard door situated below.
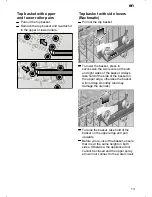
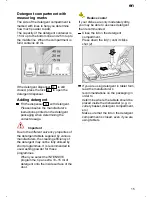
Child-proof lock*

* some models
Comply with the drawings in the back
of the envelope.

40

Switch on the child-proof lock 

41

Open the door with child-proof lock
switched on

42

Switch off the child-proof lock

When the door is open, the child-proof
lock offers no protection.

If a fault occurs

Repairs or other work on the
dishwasher should only be carried out
by a qualified specialist.
The dishwasher must be disconnected
from the electricity supply before any
repairs or other work are started. Pull
the mains plug out of the wall socket or
switch off at the fuse box. Grasp the
plug to remove it from the socket; do
not tug on the cable. Turn the water off
at the tap.

When disposing of old
appliances

Appliances that have reached the end
of their service life should be rendered
inoperable in order to exclude the
possibility of subsequent accidents. Pull
the mains plug out of the wall socket,
cut through the connecting cable and
disable the door lock.
Take the appliance to a designated
waste disposal centre.

Warning

Children could get locked in the appliance
(risk of suffocation) or get stuck in other
positions.
Therefore: Remove the mains plug, cut the
mains wire and set aside. Damage the
door lock so that the door can no longer
be closed.

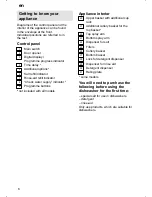
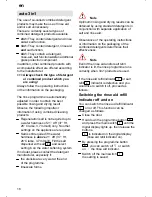
Childproof lock (button lock)

*

Select the required programme.
Hold down the button   for
approx. 4 sec. until this 

 is indicated

on the digital display.

If any button is pressed while the
programme is running, this 

 is indicated

on the digital display. It is not possible to
end (reset) the programme.
Deactivating the button lock:

Hold down the button   for
approx. 4 sec. until the display 

 goes

out.

At the end of the programme (

 on the

digital display) the button lock is cancelled.
If there is a power failure, the button lock
is retained. Whenever a programme
is restarted, the button lock must
be reactivated.

You can secure your appliance from being
unintentionally switched over (e.g.
improper operation by children).
Activating the button lock:

* some models

Summary of Contents for 1G03QB 630G

Page 1: ...9000 249 195 8704 ...

Page 2: ......

Page 3: ...ing rinse aid 9 Not suitable for the dishwasher 10 Arranging crockery glasses etc in the dishwasher 11 Detergents 14 auto 3in1 16 Overview of programmes 18 Washing dishes 19 Additional functions 21 Maintenance and care 21 Fault finding 24 Customer Service 26 Information 27 Installation 27 Waste disposal 29 ...

Page 4: ...on the water input contains an electrically operated valve The connecting wires are inside the inlet hose Do not cut through this hose and do not immerse the plastic housing in water Warning For safety reasons if the appliance is not fitted in a recess thereby making a side wall accessible the door hinge area should be covered at the side Risk of injury Covers are available as optional accessories...

Page 5: ...the water off at the tap When disposing of old appliances Appliances that have reached the end of their service life should be rendered inoperable in order to exclude the possibility of subsequent accidents Pull the mains plug out of the wall socket cut through the connecting cable and disable the door lock Take the appliance to a designated waste disposal centre Warning Children could get locked ...

Page 6: ...upply indicator 9 Programme buttons not included with all models Appliance interior 20 Upper basket with additional cup rack 21 Additional cutlery basket for the top basket 22 Top spray arm 23 Bottom spray arm 24 Dispenser for salt 25 Filters 26 Cutlery basket 27 Bottom basket 28 Lock for detergent dispenser 29 Dispenser for rinse aid 30 Detergent dispenser 31 Rating plate some models You will nee...

Page 7: ...rvice agent can help you with this Identify setting from the following water hardness table Water hardness table Press and hold the B programme button and set the main switch 1 to ON before releasing the programme button again The indicator lamp for the B button flashes as does the figure in the numerical display The latter represents the value that was pre set in the factory To change the setting...

Page 8: ...tilting the lid The LOW SALT indicator 6 on the front panel will light up initially but will extinguish again after a short period when the salt solution has become sufficiently concentrated When the control is set to it is not necessary to fill up with salt as none will be consumed while the dishwasher is operating The LOW SALT indicator is switched off If the control is set between and then salt...

Page 9: ...aid which has run over with a cloth Adjusting the amount of rinse aid The amount of rinse aid added to the water can be varied by adjusting the stepless control The rinse aid control has been set to 4 in the factory Do not alter the setting of the rinse aid control unless streaks turn knob towards or water marks turn knob towards are left on the dishes 29 Rinse aid controller Rinse aid refill indi...

Page 10: ...nd fade during the wash cycle Even some types of glass e g crystal glass objects may turn cloudy after many wash cycles Recommendation In future buy utensils which are identified as dishwasher proof Damage to glassware and other dishes Possible causes type of glass or manufacturing process chemical composition of detergent water temperature and duration of dishwasher programme Suggested remedy Use...

Page 11: ...should be at a slant so that water can run off D they are stacked securely and cannot tip over D they do not prevent the spray arms from rotating while washing takes place Very small items should not be washed in the dishwasher as they could easily fall out of the baskets Removing the dishes To prevent water dripping from the top basket onto the dishes in the lower basket we recommend that you emp...

Page 12: ...ther items to be washed Long items serving cutlery salad servers or knives should be placed on the shelf so that they do not obstruct the rotation of the spray arms The shelf can be folded back when not required for use Small accessories holder some models Light weight plastic accessories e g cups lids etc can be held securely in the small accessories holder Adjusting position of basket not on all...

Page 13: ...o levers on the left and right sides of the basket Always take hold of the side of the basket on the upper edge otherwise the basket will not drop smoothly and may damage the utensils To raise the basket take hold of the basket on the upper edge and pull upwards Before you re insert the basket ensure that it is at the same height on both sides Otherwise the appliance door cannot be closed and the ...

Page 14: ...ates and chlorine 2 those containing phosphates but no chlorine 3 those containing neither phosphates nor chlorine When a phosphate free detergent is used in conjunction with hard water there is a greater possibility that white marks will be left behind on crockery and glasses etc These can be avoided by pouring an increased amount of detergent into the dispenser Chlorine free detergents have a re...

Page 15: ...he detergent tablets supplied by various manufacturers the cleaning efficiency of the detergent may not be fully utilised by short programmes It is recommended to use washing powder for these programmes When you select the INTENSIVE programme tip an extra 10 15 ml of detergent onto the inside surface of the door Reduce costs If your dishes are only moderately dirty you may be able to use less dete...

Page 16: ...larke 3 7 mmol l Fill the salt dispenser with salt 24 and select setting 6 on the water softening system If in doubt please contact the detergent manufacturer especially if the utensils are very wet at the end of the programme limescale forms Note Optimum rinsing and drying results can be obtained by using standard detergents in conjunction with separate application of salt and rinse aid Observanc...

Page 17: ...umps back to the salt refill indicator water softening system has been switched off Switch off the main switch 1 The set value is stored within the device Approx 4 litres of water are required to regenerate the water softening system As a result the water consumption per rinse cycle increases by 0 to maximum 4 litres depending on the water hardness setting Note If you use the detergent and rinse a...

Page 18: ...ive 70_ Eco 50_ Gentle 40_ Quick 45_ Prerinse Mixed Mixed Non sensitive Medium Lightly Adhesive Very adhesive Dry Clean 65_ Clean 50_ Prerinse Dry Clean 70_ Dry Clean 70_ Prerinse 40_ The programme sequence is optimised and adjusted according to the degree of soiling on the utensils Auto 55_ 65_ Prerinse Rinse off if the dishes have been stacked for several days in the dishwash er prior to washing...

Page 19: ...th fresh water In this way the water consumption is reduced by approx 4 litres for utensils which are less dirty Switching the dishwasher ON Turn on the tap Set main switch 1 to ON Indicators light up according to the last programme that was selected This same programme will run again if no other programme button 9 is pressed The numerical display 3 shows the expected duration of the programme The...

Page 20: ... When it has ended set the main switch 1 to OFF To restart the dishwasher set main switch 1 to ON again and select desired programme Changing the programme It is possible to change the programme within 2 minutes after you have switched the dishwasher on Should it be necessary to change the programme after this period the programme cycle that has already been begun e g washing will be completed fir...

Page 21: ... cleaners which are particularly suitable for use with dishwashers Regularly wipe the door seal with a damp cloth to remove deposits Never use a steam cleaner to clean your dishwasher The manufacturer is not liable for any consequential damage Regularly wipe the front of the appliance and panel with a damp cloth water and a little washing up liquid will suffice Do not use sponges with a rough surf...

Page 22: ...consists of a filter cylinder a flat fine filter and depending on the model a microfilter Inspect the filters for obstructions every time the dishwasher has been used By unscrewing the filter cylinder you can remove the filter system Remove any food remnants and clean the filters under running water Reassembly Insert the filter system and screw down with the filter cylinder ...

Page 23: ... and the upper one is screwed tight Pump on applicable models Larger remnants of food that have not been trapped by the filters and have been left in the water can cause a blockage in the pump The water is no longer pumped out of the dishwasher and it can be seen covering the filter Proceed as follows First always disconnect the appliance from the power supply Ladle out as much water as possible R...

Page 24: ... The appliance door has not been shut properly The tap has not been turned on The filter on the water supply hose is blocked Switch off the appliance and pull out the mains plug Turn off the tap Then clean the filter which is situated at the connection of the supply hose Finally restore the power turn on the tap and switch on the appliance with the appliance itself Lower spray arm rotates with dif...

Page 25: ...ay the water pipes have been laid and it has no effect upon the way the appliance functions There is no remedy for this with the dishes cutlery etc Remnants of food are stuck to the dishes cutlery etc Dishwasher was not loaded properly Jets of water could not reach all parts of the dishes etc Too many items in the rack Items in the rack were touching each other Not enough detergent was added to di...

Page 26: ...etergent was used Glasses are not dishwasher proof Smears left behind on glasses and cutlery glasses have acquired a metallic appearance Amount of rinse aid set too high Customer Service Please call your local service agent if you are not able to resolve any problem yourself The name of your nearest service agent is shown in the Customer Service address list When you call please provide details of...

Page 27: ...ion The specifications for supply drainage and connected load must fulfil the required criteria as stated in the following paragraphs or in the installation instructions Install the appliance in the following sequence Check the delivery Install the appliance Connect the waste water Connect the fresh water Connect the power supply Delivery Your dishwasher was checked at the factory to ensure that i...

Page 28: ...ing the appliance to observe the following sequence First disconnect the appliance from the power supply Pull out the mains plug Turn off the water supply Disconnect the waste water and fresh water connections Loosen the fastening screws under the worktop If fitted remove the base panel Pull out the appliance carefully pulling the hose behind Transporting the dishwasher Drain water from the dishwa...

Page 29: ...al in an environmentally friendly manner Keep children away from shipping carton and packaging components Danger of suffocation from folding cartons and plastic film D Corrugated cardboard consists mainly of wastepaper D The moulded polystyrene parts do not contain any chlorofluorohydrocarbons D The polyethylene film PE consists partly of secondary raw materials D The wooden frames if fitted are m...

Page 30: ...en 30 en Subjekt to modification ...

Page 31: ...pt 29 ...

Page 32: ...1 2 1 0 7 0 0 2 0 1 01 1 1 2 8 1 51 0 00 6 2 4 16 0 1 3 1 3 02 6 0 11 0 2 1 1 2 8 1 1 1 1 1 0 1 00 6 1 1 11 4 1 2 8 1 2 1 1 0 2 1 1 4 0 6 12 1 1 2 0 2 6 12 1 1 6 2 0 1 6 0 3 4 0 9000 249195 en 8704 1G03QB 630G 5 3 5 551 888 4 4 64 3 5 Siemens Electrogeräte GmbH Carl Wery Straße 34 81739 München To contact us directly use the tel no or fax no in the enclosed customer service list ...

Reviews: