UMSITRPDS3-1
Installation
November 2010
4-21
4.3.10 Shielding and Grounding
GROUNDING
Ground the transmitter’s enclosure through a 16 AWG (1.3 mm
2
) or larger copper wire to a low resistance
ground, such as a nearby metal cold water pipe. A grounding screw for this purpose is provided on the
outside of the enclosure beneath the field terminals cap (Figure 1-6B). The ground wire should be
installed even though the enclosure is often grounded through the electrical conduit or, in some
transmitter models, through the process connections and piping.
SHIELDING
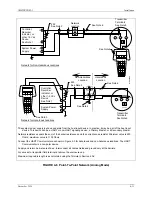
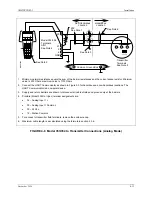
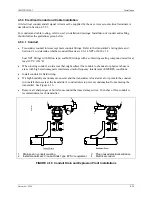
Shielded loop cable is recommended. The preferred method of grounding that shield is shown in Figures
4-6 through 4-9.
Ground the cable shield at one point. Multiple grounds can cause signal error and poor HART
performance. The location of the ground connection is often determined by the installation environment
(hazardous or non-hazardous) or by the requirements of a regulating agency.
The following grounding practices are field proven and will reduce magnetically coupled interference.
Select the appropriate option from the three bulleted items below for the installation at hand.
•
Hazardous location - ground the shield(s) only at the barrier(s) or as recommended on the appropriate
control (installation) drawing and by the certifying agency.
•
Non-hazardous location - ground the shield at the network power supply.
•
Ground the cable shield to the power supply ground terminal. Do not connect the cable shield at
the transmitter.
•
If a network junction box is used, splice the input and output cable shields and isolate them from
ground.
•
Non-hazardous location - ground the shield at the Transmitter
•
Ground the cable shield at the ground screw inside the transmitter’s signal terminal compartment.
•
Power supply (+) and (-) connections must be floated.
•
If a network junction box is used, splice input and output shields and isolate them from ground.
Summary of Contents for 7MF4033 series
Page 48: ...Model 275 Universal Hart Communicator UMSITRPDS3 1 November 2010 2 26 ...
Page 86: ...Installation UMSITRPDS3 1 November 2010 4 34 ...
Page 152: ...Calibration and Maintenance UMSITRPSD3 1 November 2010 7 20 ...
Page 158: ...Circuit Description UMSITRPDS3 1 November 2010 8 6 ...
Page 197: ......
Page 198: ......
Page 200: ...Model Designations and Specifications UMSITRPDS3 1 November 2010 9 42 ...
Page 204: ...Glossary UMSITRPDS3 1 November 2010 10 4 ...
Page 208: ...Appendix A Online Configuration Map UMSITRPDS3 1 11 4 November 2010 ...
Page 216: ...Appendix C Elevation and Suppression Correction UMSITRPDS3 1 13 4 November 2010 ...


