background image

 Installation

98/214

Revision 11 • INSTALLATION AND OPERATING INSTRUCTIONS • 8DA10 • 861-9601.9 


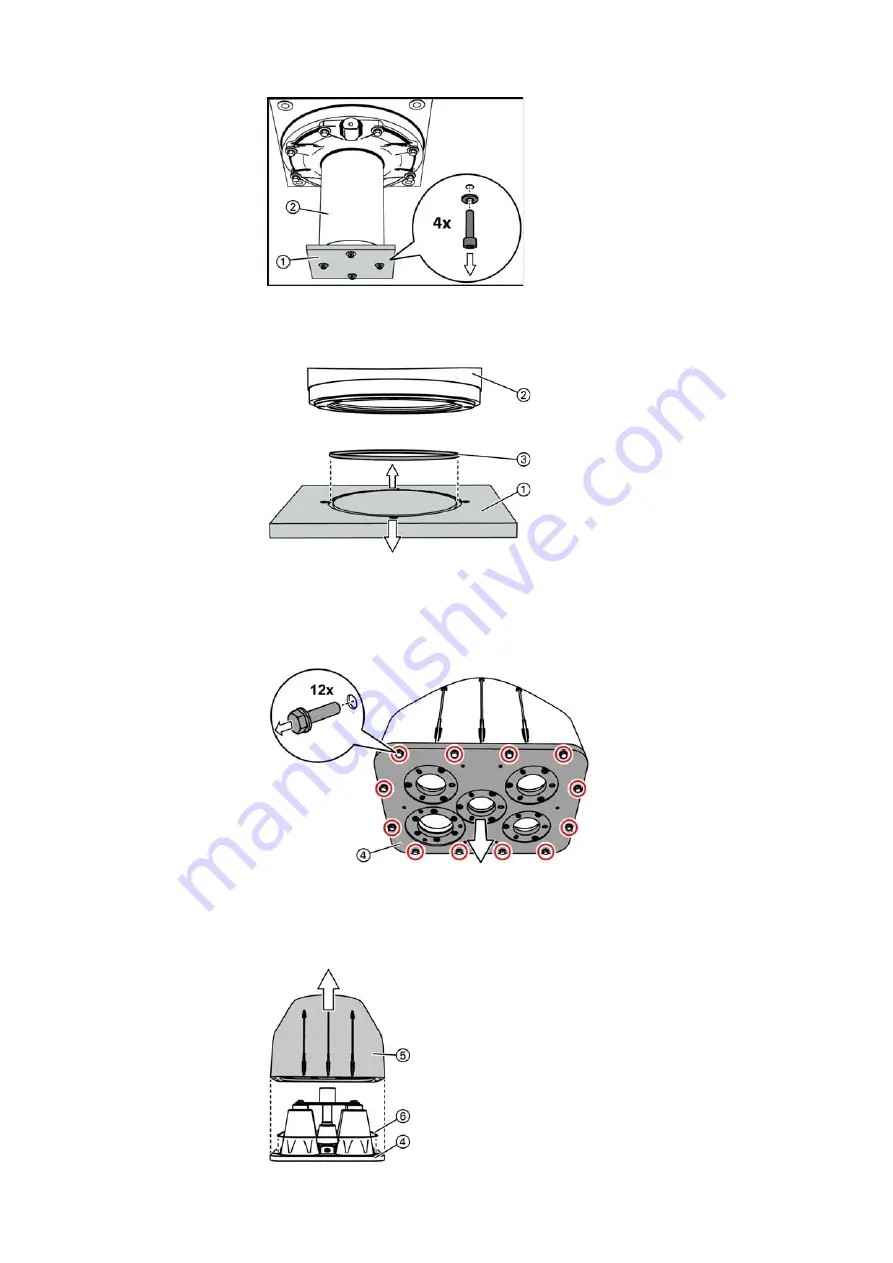
➭ Remove the cover of the transformer housing ① and the sealing ring ③ .

➭ Undo 12 bolt-and-washer assemblies M8x40 at the cover of the panel connection 

housing ④ .

➭ Remove the panel connection housing ⑤ .
➭ Take the sealing ring ⑥ out of the groove in the cover of the panel connection housing.

Fig. 110: Removing the cover of the transformer housing

Transformer housing

Cover of transformer housing

Fig. 111: Removing the cover of the transformer housing and 

the sealing ring

Cover of transformer housing

Transformer housing

Sealing ring (O-ring)

Fig. 112: Removing the cover with the plug sockets

Cover of panel connection housing

Fig. 113: Removing the panel connection housing

Cover of panel connection housing

Panel connection housing

Sealing ring

Summary of Contents for 8DA10

Page 1: ...0 Extendable Fixed Mounted Circuit Breaker Switchgear up to 40 5 kV Single Busbar Single Pole Metal Enclosed Gas Insulated Medium Voltage Switchgear INSTALLATION AND OPERATING INSTRUCTIONS Order No 861 9601 9 Revision 11 Issue 07 11 2017 ...

Page 2: ... modify the specified values and drawings All dimensions are given in mm The contents of this instruction manual shall not become part of or modify any prior or existing agreement commitment or relationship The Sales Contract contains the entire obligations of Siemens The warranty contained in the contract between the parties is the sole warranty of Siemens Any statements contained in this instruc...

Page 3: ...tional stipulations 40 18 1 Switchgear room 40 18 2 Constructional data of the foundation 43 18 3 Transport units 45 19 Before installation 46 19 1 Preliminary clarifications 46 19 2 Installation and fixing material 46 19 3 Working materials 46 19 4 Overview of busbar housing covers with desiccant bags 47 19 5 Tightening torques 48 19 6 Comments on electromagnetic compatibility 49 20 Transport and...

Page 4: ...ng circuit diagrams 149 33 6 Instructing the operating personnel 149 Operation 150 34 Control elements and indicators 151 34 1 Control elements and indicators of the circuit breaker 152 34 2 Control elements and indicators of the three position disconnector 152 34 3 Operating tools 153 35 Interlocks 154 36 Operating the circuit breaker 155 36 1 Closing the circuit breaker manually 155 36 2 Opening...

Page 5: ...ce of the vacuum circuit breaker operating mechanism 204 41 2 Procedure for bolted joints and seals 207 41 3 Cleaning agents and cleaning aids 207 41 4 Lubricants 207 41 5 Switchgear extension and replacement of panels and components 208 41 6 Spare parts 208 42 End of service life 209 Siemens Service Hotline 210 Index 211 ...

Page 6: ...voided death or serious injury will be the consequence Observe the safety instructions WARNING Warning Indicates a potentially hazardous situation If this hazardous situation is not avoided death or serious injury can be the consequence Observe the safety instructions CAUTION Caution Indicates a potentially hazardous situation If this hazardous situation is not avoided minor or moderate injury can...

Page 7: ... determine if it has an internal arc classification If the switchgear has internal arc classification IAC A FL the area behind the switchgear is not tested to evaluate the effects of internal arcs Personnel must be prevented from entering the area behind the switchgear when the switchgear is energized If the switchgear is classified as arc resistant note that it is not arc resistant unless all of ...

Page 8: ...ust be worn for operating the switchgear For switchgear without proof of internal arc classification according to IEC 62271 Part 200 personal protective equipment must be worn for operating the switchgear If covers have to be removed to work on switchgear personal protective equipment must be worn for protection against hot gases exhausting in case of internal arc In case of internal arc full pers...

Page 9: ...ed type tested single pole metal enclosed switchgear for indoor installation used in transformer and switching substations The switchgear is designed for application under normal ambient conditions according to IEC 62271 1 The switchgear can also be used under special ambient conditions as defined individually between the operator and the manufacturer of the switchgear Sulfur hexafluoride SF6 is u...

Page 10: ...certificate and after proof in form of an installation record for the Siemens Switchgear Factory Frankfurt am Main After having been issued by the Siemens Switchgear Factory Frankfurt am Main the certificate is valid for three years The owner of the certificate commits himself to prove his received qualification by means of installation records and to extend the certificate in due time In case of ...

Page 11: ...e consists of a vertically arranged housing e g with integrated vacuum interrupter The busbar housing with integrated three position disconnector is mounted horizontally over the switchpanel pole Fig 3 8DA10 circuit breaker panel Low voltage compartment standard heights 850 1200 mm SIPROTEC bay controller option Indication and control board for three position disconnector with circuit breaker posi...

Page 12: ...ns Circuit breaker panel Disconnector panel Bus sectionalizer Cable connection panel Metering panel Dummy panel Vacuum circuit breaker Plug in voltage transformer Three position disconnector Capacitive voltage detecting system Plug in cable not included in the scope of supply These components are optionally selectable ...

Page 13: ...mechanism for three position disconnector Gas pressure manometer for switchpanel pole housing Gas filling valve Circuit breaker operating mechanism Capacitive voltage detecting system Busbar housing Busbars Gas pipe Switchpanel pole housing with vacuum interrupter Current transformer 4MC4 Panel connection housing with inside cone bushings for cable plugs voltage transformers and surge arresters or...

Page 14: ...ing mechanism of three position disconnector Gas pressure manometer for switchpanel pole housing Gas filling valve Capacitive voltage detecting system Busbar housing Busbars Gas pipe Switchpanel pole housing with vacuum interrupter 4MC4 current transformer Panel connection housing with inside cone bushings for cable plugs voltage transformers and surge arresters or for connection of bar systems ...

Page 15: ...N rail for incoming and outgoing cables e g bus wires Devices can be optionally mounted in the door or on DIN rail inside the low voltage compartment Height of low voltage compartment optionally 850 mm standard or 1200 mm option Low voltage compartment SIPROTEC bay controller option Operating mechanism for three position disconnector Gas pressure manometer Gas filling valve Circuit breaker operati...

Page 16: ...over The front cover contains openings for control elements and indicators All components required for operating the circuit breaker are accommodated in the operating mechanism housing Fig 4 Sectional view of a vacuum interrupter Moving contact Metal bellows Fixed contact Fig 5 Circuit breaker operating mechanism without front cover Auxiliary switch S1 ON pushbutton Closing solenoid Y9 1st shunt r...

Page 17: ...spring can be read on the spring charged indicator see page 155 Closing the circuit breaker manually 7 3 Equipment Basic equipment Basic equipment of the circuit breaker Electrical operating mechanism charging motor with mechanical and electrical anti pumping device M1 Closing solenoid Y9 1st shunt release Y1 Low voltage plug connector with 2 4 and 10 pole wiring Q0 Auxiliary switch max 12 NO 12 N...

Page 18: ...sbar and bushing Fixed contact busbar Busbar housing Busbar Busbar support Fixed contact earth Bushing Moving contact in READY TO EARTH EARTHED position Moving contact in CLOSED position Moving contact in OPEN position Switch positions Position indicator Basic scheme OPEN Three position disconnector OPEN Circuit breaker OPEN CLOSED Three position disconnector CLOSED Circuit breaker CLOSED READY TO...

Page 19: ...OSED position no operations are possible with the three position disconnector Inserted operating lever If the operating lever is inserted the circuit breaker cannot be closed or opened Operation of the control gate The control gate can only be operated if the interrogation lever is pushed downwards The corresponding operating shafts are only released at the control board after having operated the ...

Page 20: ...ONS 8DA10 861 9601 9 9 Make proof busbar earthing switch The busbar earthing switch is an earthing switch with short circuit making capacity for make proof earthing of the busbar Operating mechanism housing of busbar earthing switch Position indicator Actuating opening ...

Page 21: ...ansformer 4MU3 not in the panel connection via flexible cable with plug size S2 at the panel connection housing and metal enclosed voltage transformer Mounting locations Type Remark Busbar 4MT3 optionally with three position disconnector 4MU4 Panel connection housing 4MU3 external 4MT7 directly plugged in Designation 4MT3 4MU4 4MT7 4MU3 Operating voltage kV 3 3 to 23 0 24 0 to 38 0 3 3 to 38 0 3 3...

Page 22: ...NSTRUCTIONS 8DA10 861 9601 9 Damping resistor for voltage transformers Damping resistor for voltage transformers at the panel connection housing Damping resistor for voltage transformers on the busbar Fig 8 Position of damping resistors in the switchgear frame ...

Page 23: ...former type 4MC4_40 Feeder current transformer type 4MC4_10 Feeder current transformer type 4MC4_90 Current transformer on bus sectionalizer type 4MC4_40 Designation Type 4MC4 Operating voltage max 800 V Rated short duration power frequency withstand voltage winding test 3 kV Rated frequency 50 60 Hz Rated continuous thermal current max 1 2 x rated current primary Rated thermal short time current ...

Page 24: ...please contact the Siemens Service Hotline Bushings Gas quantity The gas quantity of 8DA10 varies depending on the pressure panel connection version and busbar component The gas quantities are determined specifically for the project and are indicated on the rating plates of the panels Fig 10 Gas compartment distribution of a single busbar panel Busbar in phase L1 manometer B11 Busbar in phase L2 m...

Page 25: ...ug size 2 at the panel connection housing For rated normal currents up to 2500 A 12 2 Cable plugs for panel connection versions Selection table Examples for panel connection versions Plug size S2 S3 S4 Rated normal current A 800 1250 2500 Rated lightning impulse withstand voltage kV 200 200 200 Rated short duration power frequency withstand voltage kV 95 95 95 Min cross section mm2 25 50 95 Min co...

Page 26: ...8DA10 861 9601 9 Version 3 S2 S3 4MT7 Solid insulated bar connection 1 1 2 3 2 3 1 2 1 1 2 1 1 1 2 1 1 1 1 1 1 1 1 2 1 Version 4 S2 S3 Solid insulated bar connection 4 5 6 4 1 3 1 4 2 2 2 3 3 1 3 2 4 1 2 1 1 1 2 1 1 1 1 1 1 1 Version 5 S2 S3 S4 1 1 1 2 1 1 1 1 1 3 1 2 2 1 ...

Page 27: ...5 with the following voltage detecting systems LRM plug in sockets VOIS VOIS R option CAPDIS S1 S2 option WEGA 1 2 2 2 option C1 Capacitance integrated into bushing C2 Capacitance of the connection leads and the voltage indicator to earth ULE UN 3 during rated operation in the three phase system U2 UA Voltage at the interface plug in sockets of the plug in voltage indicator or the test socket of t...

Page 28: ...rom earthquakes see the relevant order and delivery documents The additional components for earthquake resistant design are pre assembled at the factory The earthquake resistant design is bolted to the foundation rails at all 4 points on site using a floor fixing profile Fig 14 Floor fixing profile Fig 13 Earthquake resistant panel design Reinforced side plate Additional fixing elements between th...

Page 29: ...nstructions Operating lever for three position disconnector DISCONNECTING function Operating lever for three position disconnector EARTHING and READY TO EARTH function Hand crank for charging the circuit breaker closing spring Double bit key with a diameter of 3 mm for door of low voltage compartment Operating lever for the make proof busbar earthing switch ...

Page 30: ...ators for LRM systems Unit to test the function of the plug in voltage indicators Units to test the capacitive interface and the voltage indicators Phase comparison test units Adapter for emergency operation of the operating mechanism of the three position switch to be used only with motor operating mechanism Service flap in the switchgear end wall to store the standard accessories Fig 15 Open ser...

Page 31: ... 1250 1250 1250 1250 A 2000 2000 2000 2000 A 2500 2500 2500 2500 A 3150 3150 3150 3150 A 4000 4000 4000 4000 A 5000 5000 5000 5000 Filling pressure pressure values at 20 C Rated filling level pre absolute for busbar kPa 70 120 Minimum functional level pme absolute kPa 50 100 Ambient air temperature T Operation without secondary equipment C 25 to 55 Operation with secondary equipment2 C 5 25 to 55 ...

Page 32: ...Ik tk 3 s up to kA 40 50 Hz Rated peak withstand current Ip up to kA 100 Rated short circuit making current Ima up to kA 100 60 Hz Rated peak withstand current Ip up to kA 104 Rated short circuit making current Ima up to kA 104 Rated short circuit breaking current Isc up to kA 40 Electrical endurance of vacuum circuit breakers at rated normal current Standard 10 000 operating cycles Option 30 000 ...

Page 33: ... on two different principles are used The shunt release Y1 3AY15 10 is used as standard in the basic circuit breaker version With this design the circuit breaker is opened electrically Power consumption 140 W or 140 VA The shunt release Y2 3AY11 01 with energy store is fitted if more than one shunt release is required With this design the electrical opening command is transferred magnetically and ...

Page 34: ...it breaker Disconnector Earthing switch Circuit breaker panel M2 M1 E21 1 By closing the circuit breaker E2 C2 Bus sectionalizer panel M2 M1 E21 E2 C2 Disconnector panel M1 E0 Function Class Standard Property BREAKING M2 IEC 62271 100 10000 times mechanically M2 extended version 30000 times mechanically with maintenance E2 IEC 62271 100 10000 times rated normal current 50 times short circuit break...

Page 35: ...mblies comprising up to 4 panels the switchgear is delivered ex works completely with SF6 filling ready for service The SF6 filling is provided to last the total service life of the switchgear Filling quantity as per rating plate Features Non toxic Odorless Colorless Non inflammable Chemically neutral Electronegative Heavier than air Filling degree of compressed gas cylinders 1 04 kg SF6 liter cyl...

Page 36: ...requency withstand voltage kV 70 70 all Rated functional level kPa 70 120 Min functional level 1 1 Min functional level at which the rated insulation levels are accomplished kPa 50 100 Signal pressure low kPa 50 100 Signal pressure very low kPa 40 90 Max functional level kPa 120 180 Signal pressure rising kPa 120 180 Circuit breaker housing Rated busbar current A 1250 1250 Rated lightning impulse ...

Page 37: ...category LSC 2 Accessibility to compartments Busbar compartment Tool based Switching device compartment Tool based Low voltage compartment Tool based Cable compartment Tool based Designation of the internal arc classification IAC IAC class for Wall standing arrangement IAC A FL 40 kA 1 s Free standing arrangement IAC A FLR 40 kA 1 s Type of accessibility A Switchgear in closed electrical service l...

Page 38: ...structions For operation the legal stipulations applicable at the place of installation have to be observed additionally In this way the switchgear assemblies of this type series fulfill the basic protection requirements of the EMC Directive Protection against solid foreign objects electric shock and water The fixed mounted circuit breaker switchgear of the 8DA10 series fulfills the following degr...

Page 39: ...tes for panel optionally for voltage transformers and current transformers If the circuit breaker class is specified as M2 a maximum of 10000 optionally 30000 mechanical operating cycles are possible with the circuit breaker Fig 18 Rating plate of switchgear example Switchgear type Serial number Panel number Internal arc classification Technical data Year of manufacture Cable test voltages Panel t...

Page 40: ...itchgear can only be removed with tools Preparing the switchgear room Observe the following points when preparing the switchgear room Base frame and switchgear dimensions Transport ways to the switchgear room Distribution and intermediate storage spaces Size of the room and the doors Construction and load bearing capacity of the floor Illumination heating power and water supply Dimensions of insta...

Page 41: ...ing arrangement Depending on national requirements Lateral wall distance 500 mm optionally required on the left or on the right Lateral minimum wall distance 100 mm optionally possible on the left or on the right Load data Constant loads Vertical single load1 1 Without busbar components height of low voltage compartment 850 mm 12 kN m2 2 Depending on national requirements Not constant loads Live l...

Page 42: ...ates mounted on a supporting structure The supporting floor is about 100 cm to 60 cm lower depending on the cable routing bending radius Earthing system Provide suitable earthing system for the substation building e g foundation earth electrode ring earth electrode earth rod and prepare the associated connection points inside the substation building Connect components brought into the substation b...

Page 43: ...or fixing profile The floor fixing profile is included in the scope of supply The fixing material is not included in the scope of supply Part number 865 2944 0 without fixing material NOTICE Damage to the welded seams Welded seams are susceptible to corrosion After welding protect the welded seams professionally against corrosion Fig 24 Overview of floor openings and fixing points Base frame Fixin...

Page 44: ...the foundation Observe the following items when preparing the foundation Dimensions of the floor opening and fixing points of the switchgear frame see page 43 Constructional data of the foundation Align the base frame of the switchgear starting from a fixed point Determine level differences between the installation surfaces of the panels using a measuring sheet and compensate with shims 0 5 1 0 mm...

Page 45: ...ns Transport weight with packing 1 1 Average values based on standard base frame with 850 mm low voltage compartment depending on the degree to which panels are equipped Transport weight without packing1 mm Width x Height x Depth mm x mm x mm approx kg approx kg Means of transport Truck 1 x 600 1370 x 2550 x 1888 850 750 2 x 600 1764 x 2550 x 1870 1700 1500 3 x 600 2400 x 2550 x 1870 2550 2250 4 x...

Page 46: ... truck lifting truck hydraulic jack roller pads If no lifting equipment is available please notify this explicitly 19 2 Installation and fixing material Before starting to install the individual switchgear components provide for the required installation and fixing material 19 3 Working materials Materials Emery paper K 360 Shims 0 5 1 mm Guide string Use only the supplied or released mounting pas...

Page 47: ...ube and plastic tip 19 4 Overview of busbar housing covers with desiccant bags NOTICE Property damage If busbar housing covers are removed from the switchgear ensure that the correct cover type is refitted on the busbar housing Mark the cover type before removal Verify that the correct cover type is refitted on the correct busbar housing NOTICE Property damage The busbar housing post insulator cov...

Page 48: ...nt holder Adhesive label Busbar direction Busbar housing post insulator cover with desiccant holder for 1x 450 g desiccant bag Adhesive label Filter Adhesive label Busbar direction Type of housing cover Front view Rear view Joint Material material Thread Tightening torque Metal joints Sheet steel sheet steel e g front plates top plates etc M6 self tapping 12 Nm M8 30 Nm Earthing busbar Sheet steel...

Page 49: ...ronment where the switchgear is installed Such measures must be implemented by the installation company in charge In an environment with heavy electromagnetic interference it may be necessary to use shielded cables and wires for the external connections This makes it possible to avoid interferences in the low voltage compartment and thus undesired influences on the electronic protection and contro...

Page 50: ...ng in a weatherproof place to detect hidden damages Stick the PE film together again and do not remove it totally until reaching the final mounting position in order to keep the switchgear as clean as possible Check the gas pressure Inform the forwarding agent immediately about any defects or transport damages if required refuse to accept the delivery As far as possible document larger defects and...

Page 51: ...aken out later in the correct order for installation WARNING Fire risk The transport unit is packed in flammable materials No smoking Keep fire extinguishers in a weatherproof place Mark the location of the fire extinguisher NOTICE Damaged packings of desiccant bags Can cause corrosion of switchgear parts and formation of creepage distances by high air humidity In the ambient air the desiccant bag...

Page 52: ...stics Protected against rain water Protected against flooding as well as melting water from snow and ice Protected against pollution and vermin e g insects mice rats Even floor to enable stable storage Floor with adequate load bearing capacity Sufficient size to enable clearly arranged storage Place transport units on planks or square timber for protection against floor humidity Store transport un...

Page 53: ...e the transport blocks until right before assembling the busbars Do not move the panels over a longer distance without transport blocks at the busbars WARNING Risk of injury due to transport unit falling down The transport unit can slip off the transport tackle due to the high position of the center of gravity Make sure that nobody is standing in the swinging area of lifted switchgear Observe even...

Page 54: ... points for transport are located behind the front metal cover in the frame at the rear cross member and at the lateral parts of the frame Remove front cover sheets from the subframe of the panel Remove all fixing bolts that connect the transport unit with the transport pallet Lifting unpacked transport unit with transport pallet To lift the switchgear use two lifting rods with a diameter of 30 mm...

Page 55: ...e front and at the rear Attach ropes or chains at the ends of the lifting rods Stretch the ropes or chains by lifting the hoisting tackle carefully If the ropes or chains are touching the transport unit use transport tackle expander Lift the transport unit carefully Lif the transport unit by means of a crane Fig 33 Position of transport holes Fig 34 Marking of transport holes Fig 35 Example for cr...

Page 56: ...wly and evenly INFORMATION A transport unit standing on roller pads can only be moved straight ahead To change the direction the position of the roller pads must be changed DANGER Transport units falling down The transport units can slip off due to mistakes during transport or while unloading from the roller pads rollers or tubes Can cause death serious injury or damage the transport units Observe...

Page 57: ... final position Lift the transport unit Remove the roller pads tubes from underneath the transport unit Set down the transport unit carefully Shift the transport unit with hydraulic jacks lifting equipment or lifting jacks until it is exactly aligned on its mounting position Prop the hydraulic equipment or jacks up at surrounding walls Roll the next transport unit along the floor opening place it ...

Page 58: ...with hydraulic jacks lifting equipment or lifting jacks until it is exactly aligned on its place of installation Prop the hydraulic equipment or jacks up at the surrounding walls If the transport unit is partly or totally standing on the sliding aids lift the transport unit remove the sliding aids and carefully set down the transport unit again Roll the next transport unit in front of the floor op...

Page 59: ...nce of at least 500 mmbetween the transport units for the subsequent installation work If not all parts of the switchgear can be brought into the switchgear room before installation due to the little space available proceed as follows Place as many transport units as possible side by side Mount these transport units Put other transport units on the free space left etc Fig 36 Position of the transp...

Page 60: ...factory on the associated gas pressure indicators The values must not drop below the temperature dependent limit values Do not install commission or operate a switchgear with incorrect or too low SF6 gas pressures If required isolate the switchgear and put it out of service Inform the competent regional Siemens representative Fig 37 Gas pressure manometers at the panel Gas pressure manometers for ...

Page 61: ... the switchgear room and are aligned for assembly see page 59 Aligning the switchgear Principle Repeat the following operations for all panels until final assembly WARNING Risk of injury due to inappropriate installation The activities described below must be performed professionally in order to minimize the risk of injury The switchgear must be assembled by certified personnel only see page 10 Qu...

Page 62: ...ar assembly Dispose of the fixing brackets properly CAUTION Risk of property damage If the panels are transported without transport blocks fixing brackets at the busbars parts of the switchgear may be damaged Do not remove the transport blocks until right before assembling the busbars Do not move the panels over a longer distance without transport blocks at the busbars Fig 40 Mounting direction of...

Page 63: ...d switchgear assembly Short busbar housing Flange cover 4 bolts with protective caps at the joint of the busbar ends NOTICE This operation is only performed if one of the following components is mounted on the busbar housings of the panel to be lined up In these cases the busbar joints are not accessible anymore after the panels have been interconnected Disconnectable busbar connection Disconnecta...

Page 64: ...n all vertical flanges of the busbar housings at the panel joint and the grooves for the toroidal sealing rings O rings carefully with lint free paper Carefully check the sealing surfaces of the flanges for scratches other damages or pollution Damages and pollution will cause leaks If the sealing surfaces are damaged Inform the regional Siemens representative and coordinate the elimination of dama...

Page 65: ... busbar sections Undo the bolted joints and Remove the bolted joint Fig 47 Bolted joints at the busbar section Clean the links at the busbar sections using an emery sponge and a lint free cloth Then apply a very thin film of the supplied mounting paste Link at the busbar Link at the joint of the busbars ...

Page 66: ...ine INFORMATION Execute this installation section only if one of the following devices is mounted on the busbar housing of the panel to be lined up for a 4000 A busbar Disconnectable busbar connection Disconnectable busbar voltage transformer NOTICE Damage to the busbar support The busbar support keeps the busbar with a weight of approx 26 kg in the correct position for the busbar connection After...

Page 67: ... During assembly of the 4000 A busbar there is risk of property damage in case of re assembling the busbar into the panel to be lined up Do not re assemble the busbar from the fixed mounted panel to the panel to be lined up Fig 50 Preparing busbar assembly on the panel to be lined up example 4000 A Busbar housing of the fixed mounted panel Busbar housing of the panel to be lined up Assembly openin...

Page 68: ...ermediate ring with supporting plate and disconnector The disconnector kinematics of the disconnectable voltage transformer with the short disconnector shaft remain mounted Pull the rotary post insulator off the disconnector shaft Loosen the fixing bolts at the busbar ends Fig 53 Coding at the rotary post insulator Rotary post insulator Coding slot The coding at the rotary post insulator helps to ...

Page 69: ...ghtening torque 40 Nm Fig 55 Inserting the busbar Busbar in the fixed mounted panel Upper connecting bar Upper disconnector contact Cup head bolt with hexagon nut and conical spring washer 5x Busbar in the panel to be lined up Lower disconnector contact Lower connecting bar Fig 56 Bolting the busbar and the connecting bars together Upper connecting bar Cup head bolt with hexagon nut and conical sp...

Page 70: ... Mount the transformer connection housing of the disconnectable busbar voltage transformer with supporting plate and disconnector at the busbar housing To do this compress the potential spring of the disconnector The disconnector with the potential spring must be fully positioned in the driver of the rotary post insulator Verify contact overlapping with suitable means Fig 58 Example for correct an...

Page 71: ...ne using the lifting gear The observer checks and corrects the approach of the busbar sections Continue approaching the panels until the flanges touch evenly In case of deviations correct the position of the panel compensating any floor unevenness with shims under the corners same points as for roller pads tubes NOTICE Risk of property damages to the panel When the panels are joined the busbar hou...

Page 72: ...y be damaged during installation work at the busbar and the busbar housings While working at the busbars or the busbar housings prop up only on the base frame of the transport unit Do not prop up on sensitive parts of the switchgear like gas pipes bursting discs shafts etc Fig 59 Flange to flange connection Busbar housing Toroidal sealing ring Fig 60 Short busbar housing with compensator Busbar ho...

Page 73: ...sbar has been pre assembled with a post insulator After having joined all panels align the busbar and the post insulator horizontally with each other To do this use the clearance of the busbar hole Align the busbars and the links so that the busbar sections are in line and the fixing bolts will fit through the holes Tighten the fixing bolts just a little The busbar sections must still be able to m...

Page 74: ...apping with suitable means For open housing covers a welding mirror and a pocket lamp are suitable For badly visible points a stick mounted camera with a flex handle is suitable Fig 64 Example for correct and incorrect position of the contact fingers on the fixed contact Fitting protective caps Fit the protective caps on the bolted busbar joints Correcting contact overlapping of disconnector conta...

Page 75: ...2 Preparing busbar assembly Clean the sealing surfaces of the busbar housing covers with a lint free paper and apply a thin film of grease see page 62 Preparing busbar assembly Insert the sealing rings in the busbar housing covers Put the busbar housing covers on the prepared flanges Fasten the busbar housing covers crosswise Tightening torque 20 Nm WARNING In the ambient air the desiccant bags lo...

Page 76: ...ecting plates at the frames The holes must be in line Fig 67 Panel links for panel groups assembled at the factory Large panel link front Large panel link rear Fig 68 Panel links for panel groups to be assembled on site Small panel links front Large panel link rear Fig 69 Bolted joint at the frame executed on site front view Small panel link top Rear part of the frame at the panel to be lined up F...

Page 77: ...be lined up Use 2 cup head bolts M10x20 plain washers and hexagon nuts for the large panel link tightening torque 40 Nm Fastening the panels to the foundation Fasten the panels to the foundation see page 43 Constructional data of the foundation The fixing material is not included in the scope of supply 21 5 Mounting the cable bracket If the circuit breaker switchgear has been delivered with cable ...

Page 78: ...e cable plugs Fasten the cables at the cable bracket using cable clamps Earth the C rail at the nearest earthing point using the supplied PE conductor Fig 72 Mounting the cable bracket at the cross members Cage nut Contact washer Cable bracket Hexagon head bolt M10x40 Hexagon nut M12 used as spacer ...

Page 79: ...panel At the joint bolt the earthing busbars of the adjacent panels together using 2x bolts M12 including contact washers conical spring washers and nuts To do this reuse the disassembled bolted joint Tightening torque 70 Nm Repeat the assembly operations for all panels until all earthing busbars have been interconnected Fig 73 As delivered condition of panel to be lined up Upright earthing busbar...

Page 80: ...l connection housings together with the earthing busbar of the switchgear frame To do this use a cup head bolt M12 with contact washer conical spring washer and nut Tightening torque 70 Nm Fig 75 Earthing busbars at the end panel Short circuit bridge at the circuit breaker housing 2x M12 with contact washers conical spring washers and nuts at the joint Earthing busbar connection to the next panel ...

Page 81: ...materials of the earthing conductors are specified in the DIN VDE 0101 or IEC 61936 1 standard and in the relevant country specific standards Connect the earthing busbar to the substation earth Recommendation In case of panel groups earth the end panels and every fifth panel at least Mount an earthing cable or an earthing bar to the earthing bolt of the earthing busbar Fig 78 Earthing bolt of eart...

Page 82: ...l spring washer and one hexagon nut to bolt the horizontal earthing bar together with the two vertical earthing bars Fig 79 Adjusting the height of the optional earthing bar The optional earthing bar is bolted onto the short circuit bridge of the panel connection housings which was pre assembled at the factory using 2 hexagon head bolts M12x40 Fig 80 Optional earthing bar at the panel connection O...

Page 83: ...sing 3 hexagon head bolts M12 At the joint bolt the short circuit bridge of the bus sectionalizer housings together with the earthing busbar of the switchgear frame To do this use a cup head bolt M12 with contact washer conical spring washer and nut Tightening torque 70 Nm Repeat the assembly operations for the short circuit bridges at the bus sectionalizer housings until all bar ends of the switc...

Page 84: ...usbar Fig 84 Busbar version 5000 A twin busbar Preparations Removing upper row of busbar housings The upper row of busbar housings has been pre assembled at the factory To interconnect the panels this row must first be dismantled Fig 85 Overview Twin busbar Busbars upper row Busbar housing upper row Busbars lower row Busbar housing lower row ...

Page 85: ...llation Remove the earthing bar To do this loosen the three hexagon head bolts M12x30 Fig 86 Removing the earthing bar Detach the coupling rod option from all upper busbar housings Fig 87 Detaching the coupling rod option Detach the 3 pole disconnector shaft from the busbar housings ...

Page 86: ... washers Secure the two links against falling down and take the three busbars out carefully To remove the earthing lug unscrew the two hexagon head bolts M12x30 with plain washers Fig 88 Removing the busbar Hexagon nut M10 with plain washer Link Twin busbar link called supporting angle hereafter Busbars Fig 89 Removing the earthing lug Busbar housing upper row Earthing lug Busbar housing lower row...

Page 87: ...housings To do this undo the eight bolt and washer assemblies M8 Remove the supporting angle To do this remove the two hexagon head bolts with plain washers Fig 91 Removing the supporting angle Upper busbar housing system removed Fig 90 Removing the upper busbar housing Busbar housing upper row Supporting angle Guide line for bolt and washer assembly M8 8x Busbar housing lower row ...

Page 88: ...plank Fig 92 Panel after removal of upper busbar housing system WARNING Risk of falling due to uncovered openings and cutouts A cover prevents the person from falling into or through an opening or a cutout Provide for sufficient load bearing capacity of the cover Provide for sufficient width of the cover Secure the cover against shifting ...

Page 89: ... rings carefully with lint free paper Carefully check the external contact surfaces of the flanges and the grooves for scratches and other damages or pollution Damages and pollution will cause leaks If any external contact surfaces or grooves are damaged Inform the regional Siemens representative and coordinate the elimination of damages Apply a uniform film of the supplied mounting paste to the f...

Page 90: ...RUCTIONS 8DA10 861 9601 9 Setting down and mounting the busbar housing Set down the busbar housing Fig 97 Setting down the busbar housing Align the housings to be interconnected using a suitable auxiliary means and bolt together Fig 98 Aligning the busbar housings ...

Page 91: ...20 Nm Use 8 bolt and washer assemblies M8 in order to bolt busbar housings located side by side together tightening torque 20 Nm Fasten earthing lugs to the busbar housings To do this use two hexagon head bolts M12x30 with plain washers tightening torque 20 Nm Fig 99 Bolting busbar housings together Fig 100 Setup Completely assembled busbar Hexagon nut M10 with plain washer Busbar Busbar lug Twin ...

Page 92: ...nnect the busbars and bolt them together at the twin busbar connection Fig 102 Bolting busbars together Tighten the bolts lightly The busbar sections must still be able to move Repeat the operations until all busbar housings are mounted Tighten the fixing bolts of all busbars and fixed contacts at all panel joints of the switchgear Tightening torque 40 Nm Finally fit the protective caps on the bol...

Page 93: ... have been pre assembled at the factory Interconnect the upper operating shaft and the lower operating shaft by means of a double coupling rod Fig 103 Operating shafts at the busbar housings Operating shaft with coupling rod for upper row of busbar housings Operating shaft for lower row of busbar housings Fig 104 Fixing of operating shafts at the busbar housing Bearing plate for fixing the operati...

Page 94: ... of the operating shaft with spring type straight pins to prevent displacement of the operating shaft Fig 106 Securing the operating shaft Hook the coupling rod in at the lever of the disconnector shaft upper busbar housing Fig 107 Fixing the coupling rod at the upper busbar housing Checking contact overlapping of disconnector contacts and adjust see page 74 Completing switchgear installation ...

Page 95: ... housings that are dirty inside with a hand vacuum cleaner The hand vacuum cleaner must feature a plastic tip Clean the bushing plates with a cloth WARNING Danger of suffocation Inhaling high concentrations of SF6 can cause death or serious injury SF6 gas is heavier than air SF6 gas concentrates first near to the floor and in floor openings Observe the safety data sheet for SF6 gas Do not enter co...

Page 96: ...s evacuation One of the covers next to the right and left end panel of the switchgear contains the manometers and gas filling valves for one busbar run Evacuating a five panel busbar run takes about 30 to 40 minutes Undo the locking cap of the gas filling valve from the closed busbar run Connect the vacuum pump to the valve of the busbar run Use short tubes with the largest inside diameter possibl...

Page 97: ...ections that are supplied separately the circuit breaker housing is not filled with SF6 gas at the factory To expose the desiccant bags as briefly as possible to the ambient air the following assembly operations are performed completely for one circuit breaker housing on one panel each Assembling panel connections supplied separately Remove 4 cheese head bolts M6 and 4 conical spring washers from ...

Page 98: ...f the groove in the cover of the panel connection housing Fig 110 Removing the cover of the transformer housing Transformer housing Cover of transformer housing Fig 111 Removing the cover of the transformer housing and the sealing ring Cover of transformer housing Transformer housing Sealing ring O ring Fig 112 Removing the cover with the plug sockets Cover of panel connection housing Fig 113 Remo...

Page 99: ...nge and the groove for scratches and other damages or pollution Damages and pollution will cause leaks If the external contact surface or the groove are damaged Inform the regional Siemens representative and coordinate the elimination of damages INFORMATION The length of the panel connection stud depends on the version of the panel connection the feeder current and on whether there are voltage tra...

Page 100: ...Carefully check the external contact surface of the flange and the groove for scratches and other damages or pollution Damages and pollution will cause leaks If the external contact surface or the groove are damaged Inform the regional Siemens representative and coordinate the elimination of damages Clean the sealing ring taken out of the groove in the cover of the panel connection housing Grease ...

Page 101: ...el connection housing Fasten the cover of the panel connection housing with 12 bolt and washer assemblies M8x40 Tightening torque 20 Nm Fig 121 Fastening the cover with the plug sockets Repeat the above work operations for all other panel connections in the same panel The panel connections are assembled INFORMATION In other panel connection versions the plug sockets may be arranged asymmetrically ...

Page 102: ...t of desiccant agent in the panel evacuate the circuit breaker housings and fill them with SF6 gas Evacuating the circuit breaker housings with the vacuum pump The circuit breaker housings of one panel form a common gas compartment Before filling SF6 gas in the air must be removed from the circuit breaker housings evacuation The manometer and the gas filling valve for the circuit breaker housings ...

Page 103: ...sings with the maintenance unit The procedure to be followed corresponds to the work operations described above for evacuating and filling without maintenance unit As against working with vacuum pump and gas cylinder the maintenance unit offers better environmental protection due to reduced SF6 losses The same gas pressure data apply as for filling with gas cylinder Observe the operating instructi...

Page 104: ...f the spacing nuts required for transport in an environmentally compatible way Write down the beginning of the ventilation time of the circuit breaker housing Prepare the flange of the solid insulated bar and the connection flange at the panel connection for assembly Mount the solid insulated bar using the previously removed bolts and contact washers Tightening torque 20 Nm Replace the desiccant b...

Page 105: ...cable connection bushing via test adapters The rated short duration power frequency withstand voltage test can now be performed Performing the power frequency voltage test Apply 80 of the rated short duration power frequency withstand voltage consecutively to phases L1 L2 and L3 for 60 seconds each WARNING Hazardous electrical voltage An incorrectly performed high voltage test can cause death seri...

Page 106: ...s damaged the voltage transformer is not safe to touch anymore Do not damage the metal coating of voltage transformers WARNING Internal arcing and explosion hazard If a voltage transformer is short circuited there will be a considerable current flow This considerable current flow implies the risk of internal arcing and the voltage transformer can explode and produce a fire Death serious injury and...

Page 107: ... the outside cone bushing carefully Use a cleaning agent without solvents and a lint free cloth Grease the silicone adapter of the voltage transformer and the outside cone bushing of the voltage transformer mounting plate uniformly with mounting paste for cable sets If not yet pre assembled mount the adapter plate on the voltage transformer Fig 123 4MT3 busbar voltage transformer shown without cov...

Page 108: ...ter plate can be displaced due to vibrations during transport To position the adapter plate correctly Loosen the M8 bolts of the adapter plate a little bit Bolt the adapter plate uniformly together with the voltage transformer mounting plate Tightening torque 30 Nm M8 bolts for fixing the adapter plate on the voltage transformer mounting plate Bushing for low voltage plug connector ...

Page 109: ...utside cone bushing WARNING Risk of injury while transporting the voltage transformer The voltage transformer may fall down during transport Serious injury and property damage can be the consequence Secure the voltage transformer against falling down If required use a support If necessary transport the voltage transformer with several persons or with suitable aids CAUTION Disruptive discharges due...

Page 110: ...voltage plug connectors in at the voltage transformers Fasten the voltage transformer at the panel To do this bolt the voltage transformer uniformly together with the voltage transformer mounting plate using four M8 bolts Tightening torque 30 Nm Mount the cover of the voltage transformer using four bolts M6x12 and contact washers Tightening torque 8 Nm Fixing bolts for connecting the voltage trans...

Page 111: ...tallation Remove protective cap Remove the surge proof dummy plug from the inside cone bushing To do this undo the three M8 hexagon socket head bolts and remove the dummy plug Fig 124 Busbar voltage transformer Low voltage plug connector Crane eye Voltage transformer Inside cone bushing Busbar housing Voltage transformer mounting plate Primary terminal at the voltage transformer Silicone adapter F...

Page 112: ... with mounting paste for cables sets Lower the voltage transformer slowly onto the busbar housing Fig 127 Greasing and cleaning the silicone adapter Fig 128 Greasing and cleaning the inside cone cast resin bush WARNING Risk of injury while transporting the voltage transformer The voltage transformer may fall down during transport Serious injury and property damage can be the consequence Secure the...

Page 113: ... 130 Fastening the voltage transformer 24 3 Installation of voltage transformers type 4MT7 at the cable feeder Isolate and earth the cable feeder Verify safe isolation from supply CAUTION Disruptive discharges due to air inclusions Will damage the cast resin bushing While installing the voltage transformer let excess air out of the plug in connection with a cable strap Verify intact condition of t...

Page 114: ...ig 133 Removing surge proof dummy plugs Clean the silicone adapter and the inside cone cast resin bush carefully Use a cleaning agent without solvents and a lint free cloth Grease the silicone adapter and the inside cone cast resin bush uniformly with mounting paste for cables sets Fig 132 Mounting the threaded rods Panel connection housing Panel connection cover M10 nuts acc to DIN 4035 Threaded ...

Page 115: ...orque 30 Nm Fig 137 Bolting the voltage transformer together Connect the low voltage plug connector to the voltage transformer WARNING Risk of injury while transporting the voltage transformer The voltage transformer may fall down during transport Serious injury and property damage can be the consequence Secure the voltage transformer against falling down If required use a support If necessary tra...

Page 116: ...ondary side Check the voltage transformer circuits from the voltage transformer to the secondary fuse or short circuit protective device for short circuits Check correct operation of the existing protective devices in the voltage transformer secondary circuit NOTICE Damage to parts of the switchgear Non observance of the following instructions can damage sensitive parts of the switchgear while wor...

Page 117: ...s into the holes provided for this purpose in the adapter plate Press the voltage transformer out of the bushing together with the adapter plate with the help of the press out bolts While doing so screw the press out bolts in uniformly so that the transformer is not canted Fig 138 4MT3 busbar voltage transformer shown without cover 4MT3 voltage transformer Low voltage plug connector Adapter plate ...

Page 118: ...emoved from the bushing the voltage transformer can detach suddenly Remove the voltage transformer upwards as uniformly as possible Adequately support the voltage transformer so that it cannot fall as it is being withdrawn Do not use excessive force WARNING Risk of injury while transporting the voltage transformer The voltage transformer may fall down during transport Serious injury and property d...

Page 119: ...ormer mounting plate Fig 139 Removing the fixing bolts at the voltage transformer mounting plate Lift the voltage transformer at the upper crane eyes using a suitable rod e g steel rod WARNING Risk of injury while transporting the voltage transformer The voltage transformer may fall down during transport Serious injury and property damage can be the consequence Secure the voltage transformer again...

Page 120: ...these bolts carefully Insert the dummy plug and bolt together with 3 bolts M8 Fig 140 Closing the inside cone bushing in a surge proof way CAUTION Voltage transformer falling down Can cause injury and property damage While being removed from the bushing the voltage transformer can detach suddenly Remove the voltage transformer upwards as uniformly as possible Adequately support the voltage transfo...

Page 121: ...his remove the 4 bolts of the fixing brackets at the panel connection cover Bolt size M10 Fig 142 Removing the voltage transformer Fig 141 4MT7 voltage transformer Panel connection housing Inside cone bushing for primary terminal of transformer Primary terminal at the voltage transformer Silicone adapter Fixing bracket fixed at the voltage transformer housing 4MT7 voltage transformer Low voltage p...

Page 122: ...G Risk of injury while transporting the voltage transformer The voltage transformer may fall down during transport Serious injury and property damage can be the consequence Secure the voltage transformer against falling down If required use a support If necessary transport the voltage transformer with several persons or with suitable aids CAUTION Voltage transformer falling down Can cause injury a...

Page 123: ... busbar earthing switch Capacitive voltage detecting system according to IEC 61243 5 or IEC 61958 Top mounted bus sectionalizer This chapter describes the basic assembly operations for busbar components by means of several examples Example Busbar voltage transformer Depending on the design option of the switchgear the voltage transformer is available with or without three position disconnector For...

Page 124: ... and the solid insulated bar connection Mount the solid insulated bar using the previously removed bolts and contact washers Tightening torque 20 Nm Evacuate the busbar housings and fill with SF6 gas The solid insulated bar connection is disassembled in reverse order Remove the bolts from the pressure ring of the solid insulated bar connection Remove the solid insulated bar connection and the seal...

Page 125: ...bar housings must be free from gas Remove the covers To do this remove the 8 bolts M8x20 and the nuts Reuse the bolts for fixing the gas insulated bar Fig 149 Removing the covers Fig 148 Overview of busbar component Gas insulated bar with three position disconnector Control and indication board of the three position disconnector for the busbar component Gas insulated bar with integrated pressure r...

Page 126: ...ng torque 20 Nm The gas insulated bar is disassembled in reverse order Remove the bolts at the pressure ring of the gas insulated bar Remove the gas insulated bar and bolt the cover onto the connection housing Gas insulated bar with integrated pressure ring Pressure ring Connection housing Fig 150 Fixing points for the pressure ring of the gas insulated bar Gas insulated bar Pressure ring Connecti...

Page 127: ...on 2x bus sectionalizer busbars for 1600 A version 3x bus sectionalizer busbars as from 2000 A version Bolted joint per bus sectionalizer busbar The bolt length of the 2 hexagon head bolts increases with the number of bus sectionalizer busbars and the normal current For the example of the 1250 A version use 2 hexagon head bolts M16x40 with plain washers 6x connection flange including contact stud ...

Page 128: ...t the bus sectionalizer housing together with the pole supporting plate Observe that a sealing ring is inserted between the bus sectionalizer housing and the pole supporting plate Fig 151 Connection flange for 1250 A version Terminal Pole supporting plate Connection flange Cheese head bolt with hexagon socket M8x50 and conical spring washer Contact stud of the terminal Fig 152 Connection flange fo...

Page 129: ...xagon head bolts and conical spring washers from the bus sectionalizer busbar Keep the bolting material for later reuse Push the bus sectionalizer busbar into the bus sectionalizer housing and fasten it to the contact studs on both sides using one hexagon head bolt M16x40 and conical spring washer each Tightening torque 130 Nm Pole supporting plate Sealing ring O ring Bolt and washer assembly M8 w...

Page 130: ...lub GLY 801 mounting paste Lay the sealing ring O ring into the groove of the housing cover Fasten the housing cover to the bus sectionalizer using 8 bolt and washer assemblies M8 and nut and washer assemblies each Tightening torque 20 Nm Fig 154 Bus sectionalizer busbars for 3150 A version Contact stud Bus sectionalizer housing Bus sectionalizer busbar Cup head square neck bolt conical spring was...

Page 131: ...e Siemens representative After this period of time check the gas pressures according to the maintenance instructions 28 2 Monitoring the gas pressure The perfect functioning of the switchgear is only guaranteed if the gas pressure indication of the manometer is between the minimum and the maximum functional level see page 35 Insulating gas CAUTION Insufficient gas filling can cause injury or prope...

Page 132: ...zer right Bus sectionalizer panel with busbar connection Circuit breaker panel Bus sectionalizer panel bus riser Switchgear termination right Circuit breaker panel with disconnectable voltage transformer on the busbar Intermediate busbar section Manometer designation Function B0 Circuit breaker phase L1 L2 L3 B11 Busbar phase L1 B12 Busbar phase L2 B13 Busbar phase L3 B15 Busbar connection disconn...

Page 133: ...jumpers in the low voltage compartment Check the designation labels on the terminal blocks Replace missing labels using the information given in the circuit diagrams 28 6 Checking protection against environmental influences For touch up work on doors and front parts a paint pen is available on request Touch up surface damages Fig 156 Indication at the gas pressure manometer minimum functional leve...

Page 134: ...The use of dust proof caps on live switchgear can cause death serious injury or property damage The dust proof caps mounted on the plug sockets of the panel connection housings protect the plug sockets against pollution The dust proof caps do not provide sufficient shock protection If the operator s cables are not connected before the switchgear is energized remove the dust proof caps Close unused...

Page 135: ...latched into the modular terminal and mounted Removing the STG plug Push the STG plug slightly to the screwing side until the latching noses come out of the latching slots of the modular terminal Pull the STG plug horizontally out of the VBSTB4 modular terminal The STG plug is removed 29 3 Mounting the metal covers Screw all metal covers to the frames again INFORMATION The information stated herei...

Page 136: ... for panels with and without busbar earthing switch Fig 158 Basic scheme with 850 mm low voltage compartment Protection plate for left end panel Protection plate for busbar earthing switch Sealing ledge for intermediate panels Right hand angle Protection plate for intermediate panels Protection plate for right end panels located beside busbar earthing switches Left hand angle Felt strips between t...

Page 137: ...aling ledge Attach sealing straps and fasten an angle between an intermediate panel and a panel with make proof busbar earthing switch Tightening torque 12 Nm Fig 160 Example Fastening the sealing ledge on the junction edge between two panels Sealing ledge 4 bolts M6x25 Sealing strap Fig 161 Example Fastening an angle between intermediate panels and panels with make proof earthing switches basic s...

Page 138: ... busbar earthing switch Tightening torque 12 Nm Fig 162 Example Fastening a protection plate for end panels with make proof earthing switch basic scheme Busbar earthing switch Protection plate for right end panels with make proof earthing switch 3x bolts M6x25 Sealing strap Switchgear termination only partly shown here Fig 163 Example Mounting the protection plate on the roof plate of the busbar e...

Page 139: ...e bolt at the busbar housing cover at a time Mounting position for intermediate panels or end panels Mounting position turned by 180 for intermediate panels or end panels with disconnectable busbar voltage transformer disconnectable busbar connection make proof earthing switch at the busbar top mounted busbar sectionalizer Fig 164 Mounting fixing cross members on busbar housings Fixing cross membe...

Page 140: ...ts M6x16 Tightening torque 12 Nm Fasten the retainers on end panels using 5 bolts Fasten the retainers on intermediate panels using 10 bolts Fig 165 Number of bolts for retainers Fixing cross member Cross member rear top Support vertical Fig 166 Retainers for the rear walls Retainer for right end panel Retainer for intermediate panel Retainer for intermediate panel Retainer for left end panel ...

Page 141: ...t the lower rear walls together with the retainers Use 8 bolts M6x12 for each rear wall Tightening torque 12 Nm Fig 167 Mounting lower rear walls Bolt the upper rear walls together with the retainers Use 10 bolts M6x12 for each rear wall Tightening torque 12 Nm Fig 168 Mounting upper rear walls ...

Page 142: ...lls As delivered condition of panel Fig 169 As delivered condition Screw termination plate on loosely using bolts and contact washers do not tighten yet Fig 170 Fixing points for the termination plate Hexagon head bolt M8x25 with cage nut 4x Bolt M6x20 2x Bolt M8x25 2x Use bolt M8x25 only for a frame height 1020 mm ...

Page 143: ...ttach one sealing strap each at the front rear and top of the termination plate Slide front end cover under the loosely fixed termination plate and bolt tight Fig 171 Sealing straps on the termination plate Fig 172 Inserting front end cover Hexagon head bolt M8x25 with cage nut 2x M6x20 M8x25 ...

Page 144: ...ion walls and fix loosely using bolts Hook in the upper arc protection walls and fix loosely using bolts Fig 173 Fixing points for rear end cover Fig 174 Fixing points for upper arc protection walls Front end cover Middle left arc protection wall Middle right arc protection wall Rear end cover Fig 175 Fixing points for central arc protection walls Front end cover Middle left arc protection wall Mi...

Page 145: ...protection walls Mount short air guide from inside and long air guide from outside Fig 176 Fixing points for central arc protection walls Front end cover Middle left arc protection wall Middle right arc protection wall Rear end cover Fig 177 Fixing points for lower arc protection walls Front end cover Upper left arc protection wall Right hand arc protection wall Rear end cover Front end cover Cros...

Page 146: ...r end wall Fasten the upper end wall with 22 self tapping bolts Fig 179 Fixing points for long air guide Front end cover Long air guide Rear end cover Fig 180 Fixing points for lower end wall Self tapping bolts M6x16 16x Close the holes with sealing stoppers 6x Fig 181 Fixing points for upper end wall ...

Page 147: ...as been successfully completed WARNING High speed moving parts Can cause serious injury Do not remove the front cover of the operating mechanism until the following actions have been performed To avoid impermissible switching operations switch off auxiliary voltage e g Switch the auxiliary voltage supply of the motor Trip the MCB Disconnect the control cables from the low voltage compartment To di...

Page 148: ...force Check correct indication on position indicators at the front of the panels and in the control room Completing test operation Switch the circuit breakers disconnectors and earthing switches to OPEN position Activating the undervoltage release The undervoltage releases mounted in the circuit breaker must be activated for operation The circuit breaker operating mechanism is located in the centr...

Page 149: ...4 Checking protection devices Check the version of the firmware installed on the protection devices and update if required see page 9 IT security 33 5 Correcting circuit diagrams Note any modifications which may have been made during installation or commissioning in the supplied circuit diagrams After completion of the installation work ask the regional Siemens representative for correction of the...

Page 150: ...cts of internal arcs Personnel must be prevented from entering the area behind the switchgear when the switchgear is energized If the switchgear is classified as arc resistant note that it is not arc resistant unless all of the following conditions are met All pressure relief devices are free to operate as designed The fault energy available to the switchgear does not exceed the internal arcing sh...

Page 151: ...2 L3 Control and indication board for three position disconnector with position indicator for circuit breaker Manometer for gas compartment monitoring of feeder gas compartments Gas filling valve for feeder gas compartments Control and indication board for circuit breaker Sockets for LRM voltage detecting system Switching device Indication of switch positions Disconnector CLOSED OPEN Earthing swit...

Page 152: ... on the side of the outermost busbar housing over the circuit breaker housing Fig 184 Position indicator at the rear Opening for charging the closing spring manually ON pushbutton OFF pushbutton Feeder earthed locking device Operations counter Position indicator for circuit breaker Closing spring charged not charged indicator Fig 183 Control board on the switchgear front Interrogation lever Positi...

Page 153: ...their respective function The emergency operating lever only has a slot and may exclusively be used as described see page 187 Emergency operation of the three position disconnector Fig 185 Operating lever for DISCONNECTING function Fig 186 Operating lever for READY TO EARTH function cross bar marked red Fig 187 Adapter for emergency operation to be used only with motor operating mechanism Fig 188 ...

Page 154: ...ircuit breaker OPEN mechanical disconnector OPEN mechanical Circuit breaker CLOSED disconnector or earthing switch not in intermediate position shutter open mechanical Circuit breaker OPEN not locked by a locking device mechanical Additionally electromechanical interlocks may be fitted for disconnectors and earthing switches or for earthing switches Bus riser of bus sectionalizer unit Disconnectab...

Page 155: ...ree position disconnector In EARTHED position of the three position disconnector with locking solenoid Y16 In all switch positions of the three position disconnector If the auxiliary voltage fails the feeder earthed locking device is blocked Operate emergency release Insert a suitable auxiliary means e g a very small screwdriver in the release opening as far as it will go and push softly to the le...

Page 156: ... B to activate the undervoltage release With auxiliary voltage motor operating mechanism Switch on the supply voltage The motor operating mechanism starts up and charges the closing spring Check whether the spring charged indication appears Close the circuit breaker The closing spring is recharged automatically Check whether the position indication circuit breaker CLOSED appears Open the circuit b...

Page 157: ...ly if the control voltage fails Remove cover from cutout Insert hand crank Turn hand crank clockwise approx 48 turns until the indication closing spring charged appears Remove hand crank Close cutout with cover Fig 192 Closing spring charged indication Fig 193 Closing spring not charged indication CAUTION High speed moving parts Using an incorrect hand crank can cause injury Use exclusively the ha...

Page 158: ...sition disconnector under load can cause injury or property damage A mechanical interlock prevents as standard the three position disconnector from being operated under load The switchgear can optionally be equipped in accordance with a customer specific interlocking and control scheme If the customer specific interlocking and control scheme requires that the panel be provided without electromecha...

Page 159: ...ation lever downwards 3 Push the control gate to the left 4 Switch the three position disconnector to CLOSED position insert the operating lever for the DISCONNECTING function and turn 180 clockwise 5 Remove the operating lever for the DISCONNECTING function The interrogation lever and the control gate return to their initial position 6 Close the circuit breaker ...

Page 160: ...breaker 3 Push the interrogation lever downwards 4 Push the control gate to the left 5 Switch the three position disconnector to OPEN position insert the operating lever for the DISCONNECTING function and turn 180 counter clockwise 6 Remove the operating lever for the DISCONNECTING function The interrogation lever and the control gate return to their initial position ...

Page 161: ...ing and explosion hazard Operating the three position disconnector under load can cause injury or property damage A mechanical interlock prevents as standard the three position disconnector from being operated under load The switchgear can optionally be equipped in accordance with a customer specific interlocking and control scheme If the customer specific interlocking and control scheme requires ...

Page 162: ...ght 4 Switch the three position disconnector to READY TO EARTH position insert the operating lever for the READY TO EARTH function and turn 180 clockwise 5 Remove the operating lever for the READY TO EARTH function The interrogation lever and the control gate return to their initial position 6 Close the circuit breaker to earth the feeder Padlock the feeder earthed locking device ...

Page 163: ...ker to de earth the feeder 3 Push the interrogation lever downwards 4 Push the control gate to the right 5 Switch the three position disconnector from READY TO EARTH to OPEN position insert the operating lever for the READY TO EARTH function and turn 180 counter clockwise 6 Remove the operating lever for the READY TO EARTH function The interrogation lever and the control gate return to their initi...

Page 164: ...ion lever downwards 3 Push the left hand control gate to the left 4 Switch the left hand three position disconnector to CLOSED position insert the operating lever for the DISCONNECTING function and turn 180 clockwise 5 Remove the operating lever for the DISCONNECTING function The interrogation lever and the left hand control gate return to their initial position 6 Push the right hand control gate ...

Page 165: ...tch the right hand three position disconnector to CLOSED position insert the operating lever for the DISCONNECTING function and turn 180 clockwise 8 Remove the operating lever for the DISCONNECTING function The right hand control gate returns to its initial position 9 Close the circuit breaker ...

Page 166: ...errogation lever downwards 4 Push the left hand control gate to the left 5 Switch the left hand three position disconnector to OPEN position insert the operating lever for the DISCONNECTING function and turn 180 counter clockwise 6 Remove the operating lever for the DISCONNECTING function The interrogation lever and the left hand control gate return to their initial position ...

Page 167: ...and control gate to the left 8 Switch the right hand three position disconnector to OPEN position insert the operating lever for the DISCONNECTING function and turn 180 counter clockwise 9 Remove the operating lever for the DISCONNECTING function The right hand control gate returns to its initial position ...

Page 168: ...rds 3 Push the left hand control gate to the left 4 Switch the left hand three position disconnector to CLOSED position insert the operating lever for the DISCONNECTING function and turn 180 clockwise 5 Remove the operating lever for the DISCONNECTING function The interrogation lever and the left hand control gate return to their initial position 6 Push the right hand control gate to the right ...

Page 169: ...tor to READY TO EARTH position insert the operating lever for the READY TO EARTH function and turn 180 clockwise 8 Remove the operating lever for the READY TO EARTH function The right hand control gate returns to its initial position 9 Close the circuit breaker to earth the busbar section in the left hand panel Lock the circuit breaker ...

Page 170: ...in the left hand panel 3 Push the right hand control gate to the right 4 Switch the right hand three position disconnector to OPEN position insert the operating lever for the READY TO EARTH function and turn 180 counter clockwise 5 Remove the operating lever for the READY TO EARTH function The interrogation lever and the right hand control gate return to their initial position 6 Push the interroga...

Page 171: ...te to the left 8 Switch the left hand three position disconnector to OPEN position insert the operating lever for the DISCONNECTING function and turn 180 counter clockwise 9 Remove the operating lever for the DISCONNECTING function The interrogation lever and the left hand control gate return to their initial position ...

Page 172: ...e left 3 Switch the right hand three position disconnector to CLOSED position insert the operating lever for the DISCONNECTING function and turn 180 clockwise 4 Remove the operating lever for the DISCONNECTING function The interrogation lever and the right hand control gate return to their initial position 5 Push the interrogation lever downwards again 6 Push the left hand control gate to the righ...

Page 173: ...r to READY TO EARTH position insert the operating lever for the READY TO EARTH function and turn 180 clockwise 8 Remove the operating lever for the READY TO EARTH function The interrogation lever and the left hand control gate return to their initial position 9 Close the circuit breaker to earth busbar section 2 Lock the circuit breaker ...

Page 174: ...anel 3 Push the interrogation lever downwards 4 Push the left hand control gate to the right 5 Switch the left hand three position disconnector from READY TO EARTH to OPEN position insert the operating lever for the READY TO EARTH function and turn 180 counter clockwise 6 Remove the operating lever for the READY TO EARTH function The interrogation lever and the left hand control gate return to the...

Page 175: ...te to the left 8 Switch the right hand three position disconnector to OPEN position insert the operating lever for the DISCONNECTING function and turn 180 counter clockwise 9 Remove the operating lever for the DISCONNECTING function The interrogation lever and the right hand control gate return to their initial position ...

Page 176: ...osition insert the operating lever for the DISCONNECTING function and turn 180 clockwise 4 Remove the operating lever for the DISCONNECTING function The left hand control gate returns to its initial position 5 Push the right hand control gate to the left 6 Switch the right hand three position disconnector to CLOSED position insert the operating lever for the DISCONNECTING function and turn 180 clo...

Page 177: ...NECTING function and turn 180 counter clockwise 4 Remove the operating lever for the DISCONNECTING function The left hand control gate returns to its initial position 5 Push the right hand control gate to the left 6 Switch the right hand three position disconnector to OPEN position insert the operating lever for the DISCONNECTING function and turn 180 counter clockwise 7 Remove the operating lever...

Page 178: ...he READY TO EARTH function and turn 180 clockwise 4 Remove the operating lever for the READY TO EARTH function The right hand control gate returns to its initial position 5 Push the left hand control gate to the left 6 Switch the left hand three position disconnector to CLOSED position insert the operating lever for the DISCONNECTING function and turn 180 clockwise 7 Remove the operating lever for...

Page 179: ... function and turn 180 counter clockwise 4 Remove the operating lever for the DISCONNECTING function The left hand control gate returns to its initial position 5 Push the right hand control gate to the right 6 Switch the right hand three position disconnector from EARTHED to OPEN position insert the operating lever for the READY TO EARTH function and turn 180 counter clockwise 7 Remove the operati...

Page 180: ... READY TO EARTH function and turn 180 clockwise 4 Remove the operating lever for the READY TO EARTH function The left hand control gate returns to its initial position 5 Push the right hand control gate to the left 6 Switch the right hand three position disconnector to CLOSED position insert the operating lever for the DISCONNECTING function and turn 180 clockwise 7 Remove the operating lever for ...

Page 181: ...NG function and turn 180 counter clockwise 4 Remove the operating lever for the DISCONNECTING function The right hand control gate returns to its initial position 5 Push the left hand control gate to the right 6 Switch the left hand three position disconnector from EARTHED to OPEN position insert the operating lever for the READY TO EARTH function and turn 180 counter clockwise 7 Remove the operat...

Page 182: ...sconnector The marking in the illustration represents possible busbar components Fig 194 Basic scheme for switching operations of busbar components Connecting the voltage transformers or the busbar connection to the busbar 1 Initial situation 2 Push the control gate to the left 3 Switch the three position disconnector to CLOSED position insert the operating lever for the DISCONNECTING function and...

Page 183: ...he operating lever for the DISCONNECTING function and turn 180 counter clockwise 4 Remove the operating lever for the DISCONNECTING function The control gate returns to its initial position 1 Initial situation 2 Push the control gate to the right 3 Switch the three position disconnector to EARTHED position insert the operating lever for the READY TO EARTH function and turn 180 clockwise 4 Remove t...

Page 184: ... Initial situation 2 Push the control gate to the right 3 Switch the three position disconnector from EARTHED to OPEN position insert the operating lever for the READY TO EARTH function and turn 180 counter clockwise 4 Remove the operating lever for the READY TO EARTH function The control gate returns to its initial position ...

Page 185: ...isconnector to CLOSED position insert the operating lever for the DISCONNECTING function and turn 180 clockwise 4 Remove the operating lever for the DISCONNECTING function The control gate returns to its initial position 1 Initial situation 2 Push the control gate to the left 3 Switch the three position disconnector to OPEN position insert the operating lever for the DISCONNECTING function and tur...

Page 186: ...READY TO EARTH function and turn 180 clockwise 4 Remove the operating lever for the READY TO EARTH function The control gate returns to its initial position 1 Initial situation 2 Push the control gate to the right 3 Switch the three position disconnector from EARTHED to OPEN position insert the operating lever for the READY TO EARTH function and turn 180 counter clockwise 4 Remove the operating le...

Page 187: ...m fails and the three position disconnector is in no defined end position the three position disconnector must be operated manually Fig 195 Example Position indicator for DISCONNECTING in faulty position Fig 196 Example Position indicator for EARTHING in faulty position Adapter for emergency operation Push emergency operation adapter on operating lever for three position disconnector NOTICE Incorr...

Page 188: ...positions of the three position switch while switching with the operating lever with pushed on adapter Insert the operating lever with pushed on adapter in such a way that the inner slot of the adapter fits on the pin of the operating shaft Fig 199 Inserting the operating lever with pushed on adapter NOTICE The operating lever does not have a stop Switching beyond the end position of the three pos...

Page 189: ...ion of short slot right Adapter position Position of long slot right Position of short slot left The disconnector is in CLOSED position The disconnector is in OPEN position Adapter position Position of long slot bottom Position of short slot top Adapter position Position of long slot top Position of short slot bottom The earthing switch is in CLOSED position The earthing switch is in OPEN position...

Page 190: ...DISCONNECTING function of the three position disconnector Push the interrogation lever downwards Push the control gate to the left The opening for the DISCONNECTING function is free To switch the DISCONNECTING function of three position disconnector to the desired end position CLOSED or OPEN perform the following actions Turn the emergency operating lever until the position indicator changes to CL...

Page 191: ... a way that the pin of the hexagonal shaft fits in the inner slot of the operating adapter Fig 202 Inserting the operating lever with pushed on adapter READY TO EARTH function Fig 203 Emergency operation of the READY TO EARTH function of the three position disconnector Push the interrogation lever downwards Push the control gate to the right The opening for the READY TO EARTH function is free Push...

Page 192: ... changes to READY TO EARTH or OPEN position Remove the emergency operating lever again The control gate returns to its initial position The opening for the READY TO EARTH function is closed Switching operations after emergency operation Perform further manual switching operations only with the associated operating levers for the DISCONNECTING or READY TO EARTH functions Position of emergency opera...

Page 193: ...ION Hazardous voltages and high currents Can cause injury or property damage Repeated switching under load impairs the function of the busbar earthing switch Observe the Five Safety Rules see page 7 General instructions Disconnect the incoming and outgoing feeders in all panels NOTICE Damage to the busbar earthing switch The control gate can only be moved for a switching operation that is permissi...

Page 194: ...zontal position Insert the operating lever in the actuating opening as far as it will go Observe the position of the operating spindle Turn the operating lever 180 clockwise Remove the operating lever The position indicator changes from faulty position to CLOSED position The control gate returns to its initial position The busbar earthing switch is closed Optionally Padlock the control gate Fig 20...

Page 195: ...gency release of the interlock with solenoids at the busbar earthing switch To push the control gate from center position to right position Remove the left hand plastic split rivet Insert the screwdriver into the left hand opening and push the solenoid back Push the control gate to the right Pull out the screwdriver Push the control gate to the right as far as it will go Reinstall the left hand pl...

Page 196: ...ft as far as it will go Reinstall the right hand plastic split rivet The right hand solenoid is released again blocking further movements Fig 210 Pushing the control gate to the left position To push the control gate from the right or left position to the center position again Remove the plastic split rivet according to the position of the control gate Push the solenoid back using the screwdriver ...

Page 197: ...siderable property damage Verify safe isolation from supply Possible sources of failure Defective voltage indicator or device for function testing of the coupling section Maloperation of the voltage indicator or device for function testing of the coupling section Test the function of the voltage indicator and the coupling section in accordance with national standards On a live panel With a test un...

Page 198: ...ver for test sockets Indication of LRM voltage indicator Description of the indication Indication flashes Phase not isolated from supply Indication lights up Phase not isolated from supply No lighting up or flashing of the indication Phase isolated from supply DANGER High voltage Danger Do only modify the factory setting of the C2 module in the voltage detecting system CAPDIS S1 S2 after consultat...

Page 199: ... L2 L3 State of the relay contacts1 Red Green A0 U 0 U 0 Operating voltage not present A1 U 0 U 0 Operating voltage present A2 U 0 U 0 Operating voltage not present Auxiliary voltage not available only CAPDIS S2 A3 U 0 U 0 Failure in phase L1 operating voltage at L2 and L3 for CAPDIS Sx also earth fault indication A4 U 0 U 0 Voltage not operating voltage present A5 U 0 U 0 Indication Test passed l...

Page 200: ...ig 216 Operating elements WEGA Display illuminated for WEGA 2 2C LEDs green and red state of the relay contacts Test socket L1 Test socket L2 Test socket L3 Earth socket Display Test button Indication WEGA 1 2C WEGA 2 2C Description of the indication L1 L2 L3 L1 L2 L3 State of the relay contacts1 Red Green A0 U 0 U 0 Operating voltage not present A1 U 0 U 0 Operating voltage present Integrated rep...

Page 201: ...ARTHED position before testing the cables and secure them Remove non disconnectable voltage transformers NOTICE Voltage indicators may be damaged by test voltage during cable tests May cause property damage Short circuit the voltage indicators with short circuit plugs at the earthing points of the test sockets Rated voltage of the switchgear kV DC test voltage AC test voltage VLF1 0 1 Hz 1 Very lo...

Page 202: ...onnected cable Fig 218 Test arrangement with connected cable Earth the feeder see page 161 Earthing the feeder Remove non disconnectable voltage transformers Short circuit capacitive test sockets and test sockets on integrated voltage detecting systems e g CAPDIS Open the circuit breaker see page 155 Opening the circuit breaker manually Switch three position disconnector to OPEN position see page ...

Page 203: ...uum circuit breaker operating mechanism These intervals are guidelines which have to be adjusted to the different operating conditions e g dusty environment frequent condensation etc The maintenance actions with the associated test and maintenance operations are shown in the following table Visual inspection Status inspection Maintenance X X X Check and document SF6 gas pressure see page 35 Insula...

Page 204: ... serious injury and property damage Always observe the Five Safety Rules Isolate Secure against reclosing Verify safe isolation from supply Earth and short circuit Cover or barrier adjacent live parts DANGER Life endangering voltage Can cause death injury or property damage If the operating mechanism cover is removed do not touch any live parts Switch off auxiliary voltage WARNING High speed movin...

Page 205: ...pin for pushbutton operation Bearing of operating shaft NOTICE Contact by cleaning agents Can cause property damage Joints and bearings which cannot be dismantled may be damaged by cleaning agents Do not use cleaning agents to clean joints and bearings which cannot be dismantled For bearings sliding surfaces Isoflex Topas L 32 Klüber Lubrication KG Geisenhauer Str 7 Postfach 70 10 47 D 81310 Munic...

Page 206: ... 32 Deflection of auxiliary switch Isoflex Topas L 32 Curve contour Isoflex Topas L 32 Auxiliary switch Shell Tellus Oil 32 Closing latch Isoflex Topas L 32 Deflection of auxiliary switch Isoflex Topas L 32 Opening latch Isoflex Topas L 32 Bearing of operating shaft Shell Tellus Oil 32 Curve for opening latch Isoflex Topas L 32 Stop Isoflex Topas L 32 Guide of opening spring Isoflex Topas L 32 Cra...

Page 207: ...sehold cleaner for general degreasing work and cleaning work solvent free Cleaning electrostatically stressed insulation e g epoxy resin Dry wiping cloths plastic cleaner containing alcohol if there is a lot of dirt Applying and wiping off liquid cleaning agent single use Lint free cleaning paper Removing dust Brush Damp cleaning drying Lint free wiping cloths Suction of drilling chips constructio...

Page 208: ...are part orders of single components and devices Type and serial number of the switchgear and the circuit breaker see rating plates Precise designation of the device or component if applicable on the basis of the information and illustrations in the associated instructions a drawing sketch or circuit diagram 41 6 Spare parts Due to the fact that all parts of this switchgear type have been optimize...

Page 209: ...residual mixed scrap After evacuating the SF6 gas the switchgear mainly consists of the following materials Steel Copper Aluminum Cast resin Fiber reinforced plastics Rubber materials Ceramic materials Lubricants The switchgear can be recycled in ecological manner in compliance with existing legislation Auxiliary devices such as short circuit indicators have to be recycled as electronic scrap Any ...

Page 210: ...ice Hotline Customer Support Global 49 180 524 7000 support energy siemens com 24 hours Customer Support Brazil for the Brazilian market only 55 11 4585 8040 suporte br siemens com Local working hours Customer Support India for Indian market only 91 1 800 419 7477 service energy in siemens com Local working hours ...

Page 211: ...anually 157 Circuit breaker control elements 152 Circuit breaker design 16 Circuit breaker emergency release 155 Circuit breaker manual closing 155 Circuit breaker manual opening 155 Circuit breaker operation 155 Circuit breaker test operation 156 Circuit breaker test operation with auxiliary voltage 156 Circuit breaker test operation without auxiliary voltage 156 Cleaning agents and cleaning aids...

Page 212: ...formers 106 Insulating gas 35 Integrated varistor 34 Interlocks 154 Intermediate storage 50 IP31D 136 IPX1 136 L Leakage test 131 Lubricants 207 M Maintenance unit 103 Maintenance bolted joints and seals 207 Maintenance vacuum circuit breaker operating mechanism 204 Make proof busbar earthing switch description 20 Make proof earthing switch closing 194 Make proof earthing switch control elements a...

Page 213: ...rques 48 Top mounted bus sectionalizer switching operations 176 Top mounted bus sectionalizer panel switching operations 164 Torques 48 Transport regulations 38 Transport unit 50 Transport unit setting down from the long side of the floor opening 56 Transport unit setting down from the narrow side of the floor opening 56 Transport storage 50 Twin busbar panel interconnection 84 U Undervoltage rele...

Page 214: ... Revision 11 INSTALLATION AND OPERATING INSTRUCTIONS 8DA10 861 9601 9 Imprint Siemens AG Energy Management Medium Voltage Systems Switchgear Factory Frankfurt Carl Benz Str 22 D 60386 Frankfurt Siemens AG 2017 ...

Reviews: