7SR11 & 7SR12 Settings & Instruments Guide
©2017 Siemens Protection Devices Limited Chapter 2 Page 19 of 20
2.1.5
Connecting to the Relay for setting via Reydisp
When Reydisp software is running all available communication ports will automatically be detected.
On the start page tool bar open up the sub-menu ‘File’ and select ‘Connect’.
The ‘Connection Manager’ window will display all available communication ports. With the preferred port
highlighted select the ‘Properties’ option and ensure the baud rate and parity match that selected in the relay
settings. Select ‘Connect’ to initiate the relay-PC connection.
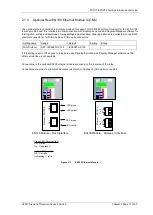
Figure 2.1-4 PC Comm Port Selection
The relay settings can now be configured using the Reydisp software. Please refer to the Reydisp Evolution
Manual for further guidance.
Summary of Contents for Argus 7SR11
Page 1: ...Energy Management 7SR11 7SR12 Argus Overcurrent Relay Reyrolle Protection Devices ...
Page 2: ......
Page 4: ...7SR11 7SR12 Argus Contents 2015 Siemens Protection Devices Limited Page 2 of 2 ...
Page 170: ...7SR120 Technical Manual Chapter 4 Page 2 of 84 2017 Siemens Protection Devices Limited ...
Page 174: ...7SR120 Technical Manual Chapter 4 Page 6 of 84 2017 Siemens Protection Devices Limited ...
Page 196: ...7SR120 Technical Manual Chapter 4 Page 28 of 84 2017 Siemens Protection Devices Limited ...
Page 242: ...7SR120 Technical Manual Chapter 4 Page 74 of 84 2017 Siemens Protection Devices Limited ...
Page 244: ...7SR120 Technical Manual Chapter 4 Page 76 of 84 2017 Siemens Protection Devices Limited ...
Page 246: ...7SR120 Technical Manual Chapter 4 Page 78 of 84 2017 Siemens Protection Devices Limited ...
Page 254: ...7SR11 7SR12 Installation Guide Chapter 5 Page 2 of 32 2017 Siemens Protection Devices Limited ...
Page 358: ...7SR11 7SR12 Applications Guide Page 2 of 48 2017 Siemens Protection Devices Limited ...
Page 405: ......

