background image

en

        Before using for the first time

8

Operating modes menu

The menu is divided into different operation modes. In 

this way, you can quickly access the required function.
Depending on the appliance type, there are a various 

number of operating modes.

--------

Further information

In most cases, the appliance provides you with notes 

and further information on the action that is being 

carried out. To view these, press the 

l

 button. The note 

is displayed for a few seconds. Use the rotary selector 

to scroll to the end of longer notes.
Some notes are displayed automatically, for example as 

confirmation, or to provide an instruction or warning.
The note can be cleared by pressing the 

l

 button 

again.

Cooking compartment functions

The functions in the cooking compartment make your 

appliance easier to use. This, for example, enables the 

cooking compartment to be well lit and a cooling fan to 

prevent the appliance from overheating.

Automatic door opening

The appliance door springs open if you activate the 

automatic door opening. You can fully open the 

appliance door manually.
The automatic door opening does not work in the event 

of a power cut. You can open the door manually.

Notes

If you open the appliance door during operation, the 

operation is paused.

When you close the appliance door, the operation 

does not continue automatically. You must restart 

the operation manually.

If the appliance has been switched off for a long 

time, the appliance door will open after a time delay.

Interior lighting

When you open the appliance door, the interior lighting 

switches on. If the door remains open for longer than 

around five minutes, the cooking compartment lighting 

switches off again. When the automatic door opening is 

activated, the cooking compartment lighting switches 

on again.
For all operating modes, the cooking compartment 

lighting switches on as soon as the operation is started. 

When the operation has finished, the lighting switches 

off.

Cooling fan

The cooling fan switches on as required. The hot air 

escapes above the door.
The cooling fan may continue to run for a certain time 

after the operation.

Caution!

Do not cover the ventilation slots. Otherwise, the 

appliance may overheat.

Notes

The appliance remains cool during microwave 

operation. Despite this, the cooling fan will still 

switch on. The fan may run on even when the 

microwave operation has ended.

Condensation may form on the door window, interior 

walls and floor. This is normal and does not 

adversely affect microwave operation. Wipe away the 

condensation after cooking.

K

Before using for the first 

time

Before us

ing for t

he first

 time

Before you can use your new appliance, you must 

make some settings.

Initial use

After connecting the appliance to the power or following 

a power cut, the settings for initial use are shown in the 

display. It may take a few seconds for the instruction to 

appear.

Note: 

You can change these settings again at any time 

in the basic settings. 

Setting the language

1.

Use the rotary selector to select the required 

language.

2.

Touch the 

¿

 arrow.

The next setting appears.

Setting the time

1.

Turn the rotary selector to set the current time.

2.

Touch the 

¿

 arrow.

Setting the date

1.

Use the rotary selector to set the current day.

2.

Touch the arrow 

¿

to confirm.

3.

Use the rotary selector to set the current month.

4.

Touch the arrow 

¿

to confirm.

5.

Use the rotary selector to set the current year.

6.

Touch the arrow 

¿

to confirm.

A note appears in the display confirming that the 

initial use has been completed.

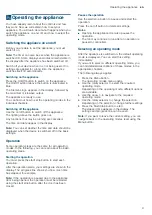
Operating mode

Use

Microwave

Selects the microwave output

Programmes

Automatic programmes 

Prepares selected meals very eas-

ily

Settings 

~

 "Basic settings" 

on page 14

You can adapt your appliance's 

basic settings to suit your needs.

Summary of Contents for BF634LGS1

Page 1: ...Register your product online siemens home com welcome en QVWUXFWLRQ PDQXDO Microwave BF634LGS1I BF634RGS1I ...

Page 2: ......

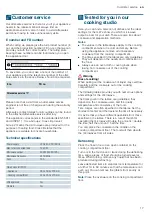
Page 3: ...icrowave 10 O Timer 11 Setting the timer 11 P Programmes 12 Setting a programme 12 Information on the programmes 12 Resting time 13 Programme table 13 Q Basic settings 14 Changing settings 14 List of settings 14 Power cut 14 Changing the time 14 D Cleaning 15 Cleaning agent 15 3 Trouble shooting 16 4 Customer service 17 E number and FD number 17 Technical specifications 17 J Tested for you in our ...

Page 4: ...low the age of 8 years old at a safe distance from the appliance and power cable Always slide accessories into the cooking compartment the right way round Important safety information Importantsafetyinformation General information Warning Risk of fire Combustible items stored in the cooking compartment may catch fire Never store combustible items in the cooking compartment Never open the appliance...

Page 5: ... retaining packages Do not leave food heating unattended in containers made of plastic paper or other combustible materials Do not select a microwave power or time setting that is higher than necessary Follow the information provided in this instruction manual Never use the microwave to dry food Never defrost or heat food with a low water content e g bread at too high a microwave power or for too ...

Page 6: ...ng compartment walls and the inside of the door Sparks can irreparably damage the glass on the inside of the door Foil containers Do not use foil containers in the appliance They damage the appliance by producing sparks Operating the microwave without food Operating the appliance without food in the cooking compartment may lead to overloading Never switch on the microwave unless there is food insi...

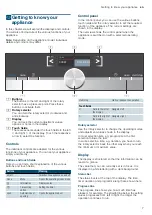
Page 7: ... maximum value Display The display is structured so that the information can be read at a glance The value that you can currently set is in focus It is displayed in white lettering with a dark background Status bar The status bar is at the top of the display The time timer duration and programme length are shown here Progress line The progress line shows you how much time has elapsed for example T...

Page 8: ...switches on again For all operating modes the cooking compartment lighting switches on as soon as the operation is started When the operation has finished the lighting switches off Cooling fan The cooling fan switches on as required The hot air escapes above the door The cooling fan may continue to run for a certain time after the operation Caution Do not cover the ventilation slots Otherwise the ...

Page 9: ...erating modes In the following you can learn about the basic operating steps Starting the operation You must press the start stop button to start each operation After the operation starts your settings are shown in the display The progress line shows you how much time has elapsed for example Note If the operation is paused due to the appliance door being opened the operation must be restarted usin...

Page 10: ...rform the following test if you are unsure whether your cookware is suitable for use in the microwave 1 Heat the empty cookware at maximum power for to 1 minute 2 Check the temperature of the cookware during this time The cookware should remain cold or warm to the touch The cookware is unsuitable if it becomes hot or sparks are generated In this case stop the test Warning Risk of burns The accessi...

Page 11: ...n to start the operation OTimer Timer You can use the timer as a kitchen timer The timer runs alongside other settings You can set it at any time even if the device is switched off It has its own audible signal so that you can tell whether it is the timer or a cooking time which has elapsed Setting the timer The maximum setting is 24 hours The higher the value the longer the time intervals 1 Press...

Page 12: ...ble of suitable types of food with appropriate weight ranges and the cookware required can be found in the section after the notes It is not possible to set a weight outside the weight range With many dishes a signal sounds after a certain time Turn or stir the food Defrosting As far as possible freeze and store food flat and in portion sized quantities at 18 C Place the frozen food in flat cookwa...

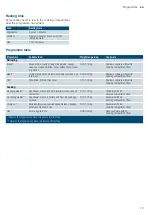
Page 13: ...hallow cookware without lid Cooking compartment floor Fish Whole fish fish fillet fish cutlet 0 10 1 00 kg Shallow cookware without lid Cooking compartment floor Cooking Fresh vegetables Cauliflower broccoli carrots kohlrabi leeks peppers courgettes 0 15 1 00 kg Cookware with lid Cooking compartment floor Frozen vegetables Cauliflower broccoli carrots kohlrabi red cabbage spinach 0 15 1 00 kg Cook...

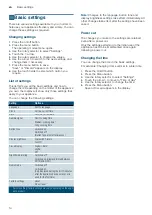
Page 14: ...er cut The changes you make to the settings are retained even after a power cut Only the settings pertaining to the initial use of the appliance need to be implemented once again following a power cut Changing the time You can change the time in the basic settings For example Changing from summer to winter time 1 Press the On Off button 2 Press the Menu button 3 Use the rotary selector to select S...

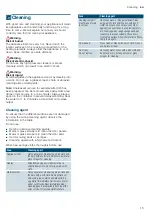
Page 15: ...ents Metal or glass scrapers to clean the door panels Metal or glass scrapers to clean the door seal Hard scouring pads or sponges Cleaning agents with a high alcohol content Wash new sponge cloths thoroughly before use Area Cleaning agent Appliance front Hot soapy water Clean using a dish cloth and then dry with a soft cloth Do not use a metal or glass scraper for cleaning Display Wipe down using...

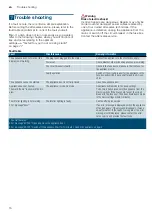
Page 16: ...e working The circuit breaker is faulty Check in the fuse box to make sure that the fuse for the appliance is OK Faulty operation Switch off the circuit breaker for the appliance in the fuse box and switch it back on after approx 60 sec onds The appliance cannot be started The appliance door is not fully closed Close the appliance door Appliance does not heat up The word demo is shown in the dis p...

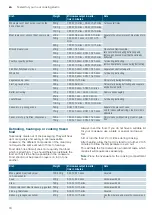
Page 17: ...times specified in the tables are only guidelines They will depend on the quality and composition of the food Always use an oven cloth or oven gloves when taking hot cookware out of the cooking compartment Warning Risk of scalding When pulling out the cookware hot liquid may overflow Carefully pull the cookware out of the cooking compartment The following tables provide you with numerous options a...

Page 18: ...inced meat that has already defrosted 500 g 180 W 5 mins 90 W 10 15 mins 1000 g 180 W 15 mins 90 W 20 25 mins Poultry or poultry portions 600 g 180 W 8 mins 90 W 10 15 mins Turn during defrosting remove liquid that escapes during defrosting 1200 g 180 W 15 mins 90 W 20 25 mins Fish fillet fish steak or slices 400 g 180 W 5 mins 90 W 10 15 mins Separate any defrosted parts Whole fish 300 g 180 W 3 ...

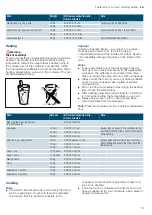
Page 19: ...g compartment floor Cooking Notes Food which lies flat will cook more quickly than food which is piled high You should therefore distribute the food so that it is as flat as possible in the cookware Food should not be placed in layers on top of one another Cook the food in cookware with a lid If you do not have a suitable lid for your cookware use a plate or special microwave foil Side dishes e g ...

Page 20: ...18 mins Sweet foods e g blancmange instant 500 ml 600 W 6 8 mins Stir the blancmange thoroughly 2 to 3 times using an egg whisk while heating Fruit compote 500 g 600 W 9 12 mins Stir while heating Microwave popcorn 100 g 600 W 3 4 mins Always place the popcorn bag on the glass tray observe the manufacturer s instructions You cannot find any information about the settings for the quantity of food y...

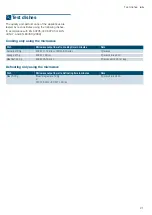
Page 21: ...sing the microwave Defrosting only using the microwave Dish Microwave output in watts cooking time in minutes Note Custard 1000 g 600 W 11 12 mins 180 W 8 10 mins Pyrex dish Sponge 475 g 600 W 7 9 mins Pyrex dish dia 22 cm Meat loaf 900 g 600 W 25 30 mins Pyrex cake dish 28 cm long Dish Microwave output in watts defrosting time in minutes Note Meat 500 g Meat programme 500 g or 180 W 8 mins 90 W 7...

Page 22: ...6 ...

Page 23: ...6 ...

Page 24: ...BSH Hausgeräte GmbH Carl Wery Straße 34 81739 München GERMANY 9001026352 9001026352 951106 www siemens home com 0DQXIDFWXUHG E 6 DXVJHUlWH PE XQGHU 7UDGHPDUN LFHQVH RI 6LHPHQV ...

Reviews: