background image

Childproof lock

 en

21

To rename a favourite, you must use the Home Con-

nect app. If your appliance is connected, follow the

instructions in the app.

13.2 Selecting favourites

If you have saved favourites, you can use these to set

the operation.

1.

Press "Favourites".

2.

Press the required favourites.

3.

If required, you can change the settings.

4.

Use 

​⁠ to start the operation.

a

The adjustment values are shown on the display.

Note:

Pay attention to the specifications for the various

operating modes:

¡

→ 

"Steaming", Page 16

13.3 Changing favourites

You can change, sort or delete your saved favourites at

any time.

To change the favourites, you must use the

Home Connect app. If your appliance is connected,

follow the instructions in the app.

14  Childproof lock

You can secure your appliance to prevent children

from accidentally switching it on or changing the set-

tings.

14.1 Activate the childproof lock

The childproof lock can be activated regardless of

whether the appliance is on or off.

Press and hold  ​⁠ for approx. 4 seconds to activate

the childproof lock.

a

A confirmation message appears on the display.

a

The control panel is locked. The appliance can only

be switched off using  ​⁠.

a

When the appliance is switched on,  ​⁠ lights up.

When the appliance is switched off,  ​⁠ does not

light up.

14.2 Deactivating the childproof lock

You can deactivate the childproof lock at any time.

Press and hold  ​⁠ for approx. 4 seconds to deactiv-

ate the childproof lock.

a

A confirmation message appears on the display.

15  Basic settings

You can configure the basic settings for your appliance

to meet your needs.

15.1 Overview of the basic settings

Here you can find an overview of the basic settings

and factory settings. The basic settings depend on the

features of your appliance.

You can find more information about the individual ba-

sic settings on the display using  ​⁠.

Basic settings Selection

Language

See selection on the appliance

Home Connect Connect the oven to a mobile end

device and remotely control it. Home

Connect → 

Page 22

Time

Time in 24-hour format

Date

Date in the format DD.MM.YYYY

Display

Selection

Brightness

¡

Levels 1, 2, 3, 4 and 5

1

Standby

screen

¡

On for a limited time

1

¡

Off

Clock

¡

D date

1

¡

Digital

¡

Analogue

Adjustment

¡

Align the display horizontally and

vertically

1

Factory setting (may vary according to model)

Tone

Selection

Button tone

¡

On

1

¡

off

Signal tone

¡

Very short duration

¡

Short duration

¡

Medium duration

1

¡

Long duration

1

Factory setting (may vary according to model)

Appliance set-

tings

Selection

Fan run-on

time

¡

Minimum

¡

Recommended

1

¡

Long

¡

Very long

Pull-out system

¡

Retrofitted (if 2 or 3 sets of pull-

out rails are fitted)

¡

Not retrofitted (if shelf supports

and a single set of pull-out rails

are fitted)

1

1

Factory setting (may vary according to model)

Summary of Contents for CS736G1 1 Series

Page 1: ...n CS736G1 1 en User manual and installation instructions Register your product on My Siemens and discover exclusive ser vices and offers siemens home bsh group com welcome The future moving in Siemens Home Appliances ...

Page 2: ... Read this instruction manual carefully Keep the instruction manual and the product information safe for future refer ence or for the next owner Do not connect the appliance if it has been damaged in transit 1 2 Intended use This appliance is designed only to be built into kitchen units Read the special installation instructions Only a licensed professional may connect ap pliances without plugs Da...

Page 3: ... Hot steam and jets of flame may escape Only use small quantities of drinks with a high alcohol content in food Do not heat spirits 15 vol when undi luted e g for marinating or pouring over food Open the appliance door carefully WARNING Risk of scalding The accessible parts of the appliance become hot during operation Never touch these hot parts Keep children at a safe distance Hot steam may escap...

Page 4: ...NG Risk of suffocation Children may put packaging material over their heads or wrap themselves up in it and suffocate Keep packaging material away from chil dren Do not let children play with packaging ma terial Children may breathe in or swallow small parts causing them to suffocate Keep small parts away from children Do not let children play with small parts 1 5 Steam Follow these instructions w...

Page 5: ...sing oven cleaner in a hot cooking compartment damages the enamel Never use oven cleaner in the cooking compartment when it is still warm Remove all food remnants from the cooking com partment and the appliance door before you next heat up the appliance If the seal is very dirty the appliance door will no longer close properly during operation This may dam age the front of adjacent kitchen units K...

Page 6: ...ot being used do not need to be heated Allow frozen food to defrost before cooking This saves the energy that would otherwise be re quired to defrost it Switch off the display in the basic setting Page 21 Energy is saved when the display is switched off Note The appliance requires a maximum of 2 W in networked standby mode a maximum of 1 W when the appliance is not con nected to the network with t...

Page 7: ... 3 Buttons You can use the buttons to directly select various func tions Button Function Switch the appliance on or off Basic operation Page 13 Button Function Display additional information about a function or setting Displaying information Page 13 Start or pause the operation Basic operation Page 13 Select the timer Setting the timer Page 15 Press and hold for approx 4 seconds Activate or deacti...

Page 8: ...ypes of heating for the optimal preparation of your food Basic operation Page 13 Dishes Use programmed recommended set tings for various types of food Dishes Page 19 Operating mode Use Steam Gently prepare food with types of steam heating Steaming Page 16 Cleaning Select the cleaning function for the cooking compartment Cleaning aid humidClean Page 26 Descaling Page 27 Drying Page 28 Favourites Us...

Page 9: ...dual heat This type of heating is most effective between 125 and 250 C Always keep the appliance door closed when cooking This type of heating is used to determine the energy consump tion in air recirculation mode and the energy efficiency class Circulated air grilling 30 250 C Roast poultry whole fish or larger pieces of meat The grill element and the fan switch on and off alternately The fan cir...

Page 10: ...g on the appliance model Accessories Use Wire rack Cake tins Ovenproof dishes Cookware Meat e g roasting joints or steak Frozen meals Universal pan Moist cakes Baked items Bread Large roasts Frozen meals Catch dripping liquids e g fat when grilling food on the wire rack or water when cooking with steam Steam container solid size M Cooking Rice Pulses Cereals Do not place the steam container on the...

Page 11: ...alist retailers or online You will find a comprehensive range of products for your appliance in our brochures and online siemens home bsh group com Accessories vary from one appliance to another When purchasing accessories always quote the exact product number E no of your appliance You can find out which accessories are available for your appliance in our online shop or from our after sales servi...

Page 12: ...ds on the air pressure During the calibration process the appliance makes adjustments to adapt to the pressure conditions in the location where it is installed Do not open the appliance door while calibration is in progress as this will cancel the calibration process Requirement The cooking compartment is cold or at room temperature 1 Remove the product information and the accessor ies from the co...

Page 13: ... values Swipe over the blue adjustment line or push the adjustment line to the appropriate point Or press and enter the value directly via the number field that appears 5 Use to start the operation 6 If the operation is ended If required you can select other settings and re start the operation When the food is ready use to switch the ap pliance off Tip You can save your settings as Favourites and ...

Page 14: ...operation has ended remove the food from the cooking compartment The appliance auto matically switches off completely after approximately 15 to 20 minutes Note If necessary change the basic setting for the lighting and the standby screen again 9 Rapid heating To save time rapid heating can shorten the preheat ing time for set temperatures over 100 C Rapid heating is possible for the following type...

Page 15: ...en reached the appli ance starts heating and the cooking time starts counting down a When the time has elapsed a signal sounds A message appears on the display confirming that the operation has finished 5 Once the cooking time has elapsed If required you can select other settings and re start the operation When the food is ready use to switch the ap pliance off Setting the end time To achieve good...

Page 16: ...t automatically 2 Pull the control panel towards you with both hands and then push it upwards until it clicks into place 3 Lift the water tank and remove it from the water tank recess 4 Press down on the water tank lid along the seal to prevent water from leaking out of the water tank 5 Remove the cover on the water tank 6 Fill the water tank with water up to the max mark 7 Put the cover back into...

Page 17: ...ield 4 Press Cooking time A cooking time must always be set for types of steam heating 5 To change the preset cooking time press the relev ant time value e g minute display min or second display s a The selected value is marked in blue 6 Set the cooking time using or or via the adjust ment bar Or enter the cooking time directly via the number field If required use to reset the adjustment value 7 P...

Page 18: ...m jet You can cancel the steam jet at any time Press Steam jet a Steam jet Off appears in the display a The operation continues without the steam jet 11 6 After using steam operation Dry the appliance after each steam operation Note Traces of limescale may remain in the cooking compartment after operation with steam The functional ity of the appliance is not affected by this You can re move traces...

Page 19: ...ccessory or cookware Added liquid Time for turning or stirring When this time is reached a signal sounds To call up the information press Some notes are displayed automatically Programmes The ideal type of heating temperature and cooking time are preset for programmes To achieve an optimal cooking result you must also set the weight thickness or the cooking level You can set the weight only in the...

Page 20: ... the required food 4 Press the required dish Tip For some dishes you can select a preferred cooking method Setting options for the dishes Page 19 a The settings for the dish appear on the display 5 Adjust the settings if required You can adjust only certain settings depending on the dish Setting options for the dishes Page 19 6 For information about the accessory and shelf posi tion for example pr...

Page 21: ...4 2 Deactivating the childproof lock You can deactivate the childproof lock at any time Press and hold for approx 4 seconds to deactiv ate the childproof lock a A confirmation message appears on the display 15 Basic settings You can configure the basic settings for your appliance to meet your needs 15 1 Overview of the basic settings Here you can find an overview of the basic settings and factory ...

Page 22: ...ter a power failure 16 Home Connect This appliance is network capable Connecting your ap pliance to a mobile device lets you control its functions via the Home Connect app adjust its basic settings and monitor its operating status The Home Connect services are not available in every country The availability of the Home Connect function depends on the availability of Home Connect services in your c...

Page 23: ...liance remotely it is helpful to set the remote start to Permanent 16 3 Operating the appliance with the Home Connect app You can use the Home Connect app to set and start the appliance remotely WARNING Risk of fire Combustible objects that are left in the cooking com partment may catch fire Never store combustible objects in the cooking compartment If smoke is emitted the appliance must be switch...

Page 24: ... In formation on data protection can be retrieved in the Home Connect app 17 Cleaning and servicing To keep your appliance working efficiently for a long time it is important to clean and maintain it carefully 17 1 Cleaning products In order to avoid damaging the various oven surfaces on the appliance do not use unsuitable cleaning products WARNING Risk of electric shock An ingress of moisture can...

Page 25: ...burns at very high temperatures causing minor discol ouration The functionality of your appliance is not affected by this The edges of thin trays cannot be completely enamelled and may be rough This does not impair the corrosion protection Food residues leave a white coating on the enamel surfaces The coating does not pose a health risk The functionality of your ap pliance is not affected by this ...

Page 26: ...rt using soapy water and a soft cloth From the smooth enamel surfaces From the inside of the appliance door From the glass cover on the oven lamp This prevents stains that cannot be removed 4 Remove any objects from the cooking compartment The cooking compartment must be empty 5 Set the 4D hot air type of heating 6 Set the maximum temperature 7 Start the operation 8 Switch off the appliance after ...

Page 27: ...g in full If descaling is interrupted you can no longer set any operation To ensure that the appliance is ready for op eration again carry out 2 rinse cycles 19 1 Preparing descaling ATTENTION The length of time for which the descaler is left to work is based on the recommended liquid descaler Other descalers may damage the appliance Only use the liquid descaler recommended by us for the descaling...

Page 28: ...y 4 Confirm the notification a The drying process starts and the duration counts down a Once the drying has ended a signal tone sounds A notification appears on the display confirming that the operation has finished 5 Press to switch the appliance off 6 To dry the cooking compartment completely leave the appliance door open for 1 to 2 minutes 21 Appliance door To clean the appliance door thoroughl...

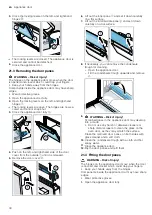
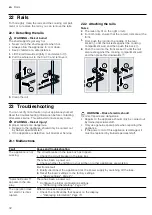
Page 29: ...to pull the condensate tray up wards and out at an angle Installing the condensate tray 1 Use both hands to insert the condensate tray at an angle 2 Snap the hooks on the left and right of the con densate tray into the gap 3 Push the condensate tray until the hooks on the right left and bottom click into place a The condensate tray is installed horizontally 21 2 Attaching the appliance door WARNIN...

Page 30: ...e inner pane and set it down carefully on a flat surface 7 Lift out the intermediate pane and set it down carefully on a flat surface 8 If necessary you can remove the condensate trough for cleaning Open the appliance door Tilt the condensate trough upwards and remove it 9 WARNING Risk of injury Scratched glass in the appliance door may develop into a crack Do not use any harsh or abrasive cleaner...

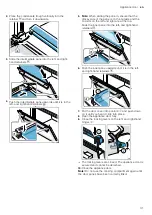
Page 31: ...on the left and right are at the top Slide the inner pane into the left and right hand retainers 6 Push the inner pane upwards until it is in the left and right hand retainers 7 Put the door cover into position and push down on it until you hear it click into place 8 Open the appliance door fully 9 Close the locking levers on the left and right hand hinges a The locking levers are closed The appli...

Page 32: ... Risk of injury Improper repairs are dangerous Repairs to the appliance should only be carried out by trained specialist staff If the appliance is defective call Customer Service WARNING Risk of electric shock Incorrect repairs are dangerous Repairs to the appliance should only be carried out by trained specialist staff Only use genuine spare parts when repairing the appliance If the power cord of...

Page 33: ... Grip on the right and left below the control panel Slowly pull out the control panel and push it upwards Intense steam gener ation when steaming The appliance is automatically calibrated No action required If the cooking times are too short the appliance is not automatically calibrated If a lot of steam is generated repeatedly the appliance is recalibrated 1 Reset the appliance to the factory set...

Page 34: ... the appliance press to switch it off Tip To prevent the appliance from switching off when you do not want it to set a cooking time Time setting options Page 14 Error code made up of letters and num bers appears on the display e g E0111 The electronics have detected a fault 1 Switch the appliance off and on again a If the fault was a one off the message disappears 2 If the message appears again ca...

Page 35: ... li cence information via your Home Connect app Profile Legal information Licence Information 1 You can download the licence information on the brand product website Please search on the product website for your appliance model and additional documents Al ternatively you can request the relevant information from ossrequest bshg com or BSH Hausgeräte GmbH Carl Wery Str 34 81739 Munich Germany The s...

Page 36: ...t Never place cookware containing water on the cooking compartment floor Shelf positions You will obtain the best results if you use the following shelf positions If you are baking on one level use shelf position 1 Baking on 2 levels Height Universal pan Baking tray 3 1 Baking tins dishes on two wire racks 3 1 Use the 4D hot air heating function Note Items that are placed in the appliance on bakin...

Page 37: ... option here To catch any liquid that drips down slide the universal pan into the cooking compart ment one level below Alternatively you can place a glass dish onto the wire rack Cover food that you would normally cook in a bain marie with film e g cling film You do not need to turn the food To obtain a slightly different flavour you can sear the meat poultry or fish before steaming Reduce the coo...

Page 38: ...ng tray 2 140 160 15 30 Biscuits 2 levels Universal pan Baking tray 3 1 130 150 20 35 Bread 750 g Universal pan or Loaf tin 1 1 210 220 2 180 190 3 Off 1 10 15 2 25 35 Bread 1500 g Universal pan or Loaf tin 1 1 210 220 2 180 190 3 Off 1 10 15 2 45 55 Bread 1500 g Universal pan or Loaf tin 1 200 210 35 45 Flatbread Universal pan 2 220 230 3 20 30 Bread rolls fresh Baking tray 1 200 220 2 20 30 Pizz...

Page 39: ...kg Covered cookware 1 200 220 130 140 Pot roasted beef 1 5 kg Covered cookware 1 200 220 140 160 Sirloin medium 1 5 kg Wire rack 1 220 230 60 70 Sirloin medium 1 5 kg Uncovered cook ware 1 190 200 1 65 80 Burger 3 4 cm thick Wire rack 2 3 20 30 2 Leg of lamb boned me dium 1 5 kg Wire rack 1 170 190 50 70 Leg of lamb boned me dium 1 5 kg Uncovered cook ware 1 170 180 1 80 90 Fish grilled whole 300 ...

Page 40: ...ating Page 8 Temperature in C Steam in tensity Cooking time in mins Crème brûlée Individual moulds 1 85 20 30 Crème caramel Individual moulds 1 85 25 35 Yoghurt Individual moulds Cooking compart ment floor 35 40 300 360 Cooking whole menus with steam Recommended settings and further information for cooking a whole menu at once Tips for cooking whole menus Use suitable accessories and ensure that y...

Page 41: ...e cooking com partment door closed during slow cooking Tips for slow cooking Here you will find tips for achieving good results when slow cooking food Issue Tip You want to slow cook a duck breast Place the cold duck breast into a pan Sear the skin side first Slow cook the duck breast After slow cooking grill the duck breast for 3 to 5 minutes until crispy You want to serve your slow cooked meat a...

Page 42: ...d quantity of the ingredients 4 Do not open the appliance door while the dough is proving otherwise moisture will escape 5 Wipe the cooking compartment dry before baking in it Recommended settings for proving dough Food Accessory cook ware Height Type of heating Page 8 Temperature in C Steam in tensity Cooking time in mins Rich dough e g pan ettone Bowl on wire rack 1 40 45 40 90 White bread Bowl ...

Page 43: ...d heat up For baking use the lower of the temperatures indic ated first Items that are placed in the appliance on baking trays or in baking tins dishes at the same time will not necessarily be ready at the same time Shelf positions when baking on 2 levels Universal pan Shelf position 3 Baking tray Shelf position 1 Hot water sponge cake When baking on 2 levels place the springform tins at diagonall...

Page 44: ...e sample is cooked for 5 minutes produced as described in IEC 60350 1 Grilling Recommended settings for grilling Food Accessory cook ware Height Type of heating Page 8 Temperature in C grill setting Steam in tensity Cooking time in mins Toasting bread Wire rack 3 3 1 3 6 1 Do not preheat the appliance 29 Installation instructions Observe this information when installing the appliance 29 1 General ...

Page 45: ... power cord and non approved adapters Do not use multiple socket strips Only use extension cables that are certified have a minimum cross section of 1 5 mm and comply with the applicable national safety requirements If the power cord is too short contact cus tomer service Only use adapters approved by the manu facturer ATTENTION Carrying the appliance by the door handle could break it The door han...

Page 46: ...ling in a tall unit To ventilate the appliance the intermediate floors must have a ventilation cut out If the tall unit has another back panel in addition to the element back panels this must be removed Only fit the appliance up to a height which allows accessories to be easily removed 29 6 Installing two appliances on top of each other Your appliance can also be installed above or below another a...

Page 47: ...vailable from after sales service Contact protection must be guaranteed by the in stallation If the display on the appliance remains dark it has not been connected correctly Disconnect the appli ance from the mains and check the connection Electrically connect the appliance with the protective contact plug Note The appliance must only be connected to a pro tective contact socket that has been corr...

Page 48: ...l aluminium profiles to establish a screw connection Secure the appliance using a suitable screw Note The gap between the worktop and the appliance must not be closed by additional battens Thermal insulation strips must not be fitted to the side panels of the surround unit 29 10 Removing the appliance 1 Disconnect the appliance from the power supply 2 Undo the fastening screws 3 Lift the appliance...

Page 49: ......

Page 50: ......

Page 51: ......

Page 52: ...nchen GERMANY siemens home bsh group com Valid within Great Britain Imported to Great Britain by BSH Home Appliances Ltd Grand Union House Old Wolverton Road Wolverton Milton Keynes MK12 5PT United Kingdom Manufactured by BSH Hausgeräte GmbH under the trademark licence of Siemens AG ...

Reviews: