Childproof lock
en
21
To rename a favourite, you must use the Home Con-
nect app. If your appliance is connected, follow the
instructions in the app.
13.2 Selecting favourites
If you have saved favourites, you can use these to set
the operation.
1.
Press "Favourites".
2.
Press the required favourites.
3.
If required, you can change the settings.
4.
Use
to start the operation.
a
The adjustment values are shown on the display.
Note:
Pay attention to the specifications for the various
operating modes:
¡
13.3 Changing favourites
You can change, sort or delete your saved favourites at
any time.
▶
To change the favourites, you must use the
Home Connect app. If your appliance is connected,
follow the instructions in the app.
14 Childproof lock
You can secure your appliance to prevent children
from accidentally switching it on or changing the set-
tings.
14.1 Activate the childproof lock
The childproof lock can be activated regardless of
whether the appliance is on or off.
▶
Press and hold for approx. 4 seconds to activate
the childproof lock.
a
A confirmation message appears on the display.
a
The control panel is locked. The appliance can only
be switched off using .
a
When the appliance is switched on, lights up.
When the appliance is switched off, does not
light up.
14.2 Deactivating the childproof lock
You can deactivate the childproof lock at any time.
▶
Press and hold for approx. 4 seconds to deactiv-
ate the childproof lock.
a
A confirmation message appears on the display.
15 Basic settings
You can configure the basic settings for your appliance
to meet your needs.
15.1 Overview of the basic settings
Here you can find an overview of the basic settings
and factory settings. The basic settings depend on the
features of your appliance.
You can find more information about the individual ba-
sic settings on the display using .
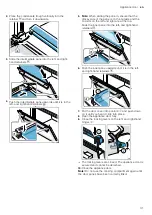
Basic settings Selection
Language
See selection on the appliance
Home Connect Connect the oven to a mobile end
device and remotely control it. Home
Time
Time in 24-hour format
Date
Date in the format DD.MM.YYYY
Display
Selection
Brightness
¡
Levels 1, 2, 3, 4 and 5
1
Standby
screen
¡
On for a limited time
1
¡
Off
Clock
¡
D date
1
¡
Digital
¡
Analogue
Adjustment
¡
Align the display horizontally and
vertically
1
Factory setting (may vary according to model)
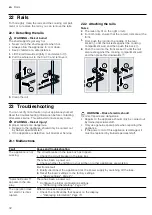
Tone
Selection
Button tone
¡
On
1
¡
off
Signal tone
¡
Very short duration
¡
Short duration
¡
Medium duration
1
¡
Long duration
1
Factory setting (may vary according to model)
Appliance set-
tings
Selection
Fan run-on
time
¡
Minimum
¡
Recommended
1
¡
Long
¡
Very long
Pull-out system
¡
Retrofitted (if 2 or 3 sets of pull-
out rails are fitted)
¡
Not retrofitted (if shelf supports
and a single set of pull-out rails
are fitted)
1
1
Factory setting (may vary according to model)


