


Basic settings
en
23
¡
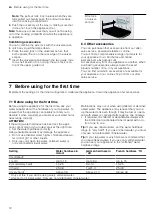
Installation takes a few minutes. You cannot use
your appliance during installation.
15.5 Remote diagnostics
Customer Service can use Remote Diagnostics to ac-
cess your appliance if you contact them, have your ap-
pliance connected to the Home Connect server and if
Remote Diagnostics is available in the country in which
you are using the appliance.
Tip:
For further information and details about the avail-
ability of Remote Diagnostics in your country, please
visit the service/support section of your local website:
www.home-connect.com
15.6 Data protection
Please see the information on data protection.
The first time your appliance is registered on a home
network connected to the Internet, your appliance will
transmit the following types of data to the
Home Connect server (initial registration):
¡
Unique appliance identification (consisting of appli-
ance codes as well as the MAC address of the Wi-Fi
communication module installed).
¡
Security certificate of the Wi-Fi communication mod-
ule (to ensure a secure data connection).
¡
The current software and hardware version of your
appliance.
¡
Status of any previous reset to factory settings.
This initial registration prepares the Home Connect
functions for use and is only required when you want to
use the Home Connect functions for the first time.
Note:
Please note that the Home Connect functions
can only be utilised with the Home Connect app. In-
formation on data protection can be retrieved in the
Home Connect app.
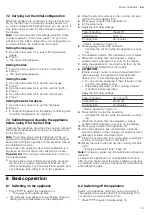
16 Basic settings
You can configure the appliance to meet your needs.
16.1 Overview of the basic settings
Here you can find an overview of the basic settings
and factory settings. The basic settings depend on the
features of your appliance.
Basic setting
Selection
Language
See selection on the appli-
ance.
Clock
Clock in 24-hour format.
Date – day
Sets the current day
Date – month
Sets the current month
Date – year
Sets the current year
Water hardness
0 (softened)
1 (soft)
2 (medium)
3 (hard)
4 (very hard)
1
Signal tone
Short cooking time
Medium cooking time
1
Long cooking time
Button tone
Switched on
Switched off
1
Display brightness
5 settings
Clock display
off
D date
1
Analogue
Lighting
Off during operation
On during operation
1
Childproof lock
Keylock only
1
1
Factory setting (may vary according to model)
Basic setting
Selection
After switch-on
Main menu
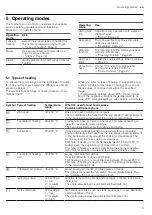
Types of heating
1
Steam
Dishes
Night-time dimming
Switched off
1
Switched on
Brand logo
Display
1
Do not display
Fan run-on
Recommended
1
Minimum
Telescopic rails
Retrofitted
1
Not retrofitted
Sabbath mode
Switched on
Switched off
1
Home Connect
Home Connect Settings
Factory setting
Reset
1
Factory setting (may vary according to model)
16.2 Changing the basic settings
1.
Press
.
2.
Press
.
a
The operating modes menu opens.
3.
Select the "Settings" operating mode.
a
The first basic setting appears.
4.
Press to switch between the different settings.
5.
Use the rotary selector to change the basic setting.
6.
Press
.
a
The display shows the changes "Save" or "Discard".
7.
Press the required change.
Note:
Your changes to the basic settings will be re-
tained even after a power failure.
Summary of Contents for CS856GN.7
Page 51: ......


