background image

Contents

ECOFAST  Motor Starters

GWA 4NEB 950 5221-12 DS 01

i

Deutsc

h

En

glish

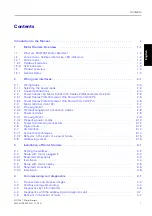
Contents

Introduction to the Manual . .  . .  . .  . .  . .  . .  . .  . .  . .  . .  . .  . .  . .  . .  . .  . .  . .  . .  . .  . .  . . 

v

1

Motor Starters: Overview  . .  . .  . .  . .  . .  . .  . .  . .  . .  . .  . .  . .  . .  . .  . .  . .  . .  . .  . . 

1-1

1.1

What are ECOFAST Motor Starters?   . .  . .  . .  . .  . .  . .  . .  . .  . .  . .  . .  . .  . .  . .  . .  . . 

1-2

1.2

Connections, fieldbus interfaces, LED indicators .  . .  . .  . .  . .  . .  . .  . .  . .  . .  . .  . .  . . 

1-2

1.2.1

Connections .  . .  . .  . .  . .  . .  . .  . .  . .  . .  . .  . .  . .  . .  . .  . .  . .  . .  . .  . .  . .  . .  . .  . . 

1-2

1.2.2

Fieldbus interfaces .  .  .  .  .  .  .  .  .  .  .  .  .  .  .  .  .  .  .  .  .  .  .  .  .  .  .  .  .  .  .  .  .  .  .  . 

1-3

1.2.3

LED indicators . .  . .  . .  . .  . .  . .  . .  . .  . .  . .  . .  . .  . .  . .  . .  . .  . .  . .  . .  . .  . .  . .  . . 

1-3

1.3

Product overview  . .  . .  . .  . .  . .  . .  . .  . .  . .  . .  . .  . .  . .  . .  . .  . .  . .  . .  . .  . .  . .  . . 1-4

1.3.1

General Notes . .  . .  . .  . .  . .  . .  . .  . .  . .  . .  . .  . .  . .  . .  . .  . .  . .  . .  . .  . .  . .  . .  . . 

1-4

2

Wiring and interfaces.  . .  . .  . .  . .  . .  . .  . .  . .  . .  . .  . .  . .  . .  . .  . .  . .  . .  . .  . .  . . 

2-1

2.1

Wiring Rules .  . .  . .  . .  . .  . .  . .  . .  . .  . .  . .  . .  . .  . .  . .  . .  . .  . .  . .  . .  . .  . .  . .  . . 

2-3

2.1.1

Selecting the power leads.  . .  . .  . .  . .  . .  . .  . .  . .  . .  . .  . .  . .  . .  . .  . .  . .  . .  . .  . . 

2-3

2.1.2

Unused Connections .  .  .  .  .  .  .  .  .  .  .  .  .  .  .  .  .  .  .  .  .  .  .  .  .  .  .  .  .  .  .  .  .  .  . 2-4

2.2

Power Cables and Motor Connection Cables Prefabricated at One End. .  . .  . .  . .  . .  . . 

2-5

2.2.1

Power Cables Prefabricated at One End with Han Q4/2 Pin   . .  . .  . .  . .  . .  . .  . .  . .  . . 

2-5

2.2.2

Power Cables Prefabricated at One End with Han 10E Pin  .  .  .  .  .  .  .  .  .  .  .  .  .  .  .  . 

2-6

2.3

Motor terminal (Han 10E)  .  . .  . .  . .  . .  . .  . .  . .  . .  . .  . .  . .  . .  . .  . .  . .  . .  . .  . .  . . 

2-7

2.3.1

Pin assignment  .  . .  . .  . .  . .  . .  . .  . .  . .  . .  . .  . .  . .  . .  . .  . .  . .  . .  . .  . .  . .  . .  . . 

2-7

2.3.2

Prefabricating Motor Connection Cables  .  .  .  .  .  .  .  .  .  .  .  .  .  .  .  .  .  .  .  .  .  .  .  .  . 

2-8

2.4

Power terminal. .  . .  . .  . .  . .  . .  . .  . .  . .  . .  . .  . .  . .  . .  . .  . .  . .  . .  . .  . .  . .  . .  . . 

2-9

2.4.1

Pin assignment  .  . .  . .  . .  . .  . .  . .  . .  . .  . .  . .  . .  . .  . .  . .  . .  . .  . .  . .  . .  . .  . .  . . 

2-9

2.4.2

Preparing power cables   .  .  .  .  .  .  .  .  .  .  .  .  .  .  .  .  .  .  .  .  .  .  .  .  .  .  .  .  .  .  .  .  .  2-10

2.5

Power tee clamping connectors  .  . .  . .  . .  . .  . .  . .  . .  . .  . .  . .  . .  . .  . .  . .  . .  . .  . . 

2-12

2.6

Digital inputs.  . .  . .  . .  . .  . .  . .  . .  . .  . .  . .  . .  . .  . .  . .  . .  . .  . .  . .  . .  . .  . .  . .  . . 

2-13

2.7

AS-Interface  .  . .  . .  . .  . .  . .  . .  . .  . .  . .  . .  . .  . .  . .  . .  . .  . .  . .  . .  . .  . .  . .  . .  . . 

2-14

2.7.1

Connection techniques   . .  . .  . .  . .  . .  . .  . .  . .  . .  . .  . .  . .  . .  . .  . .  . .  . .  . .  . .  . . 

2-14

2.7.2

Behavior in the event of a power failure  .  .  .  .  .  .  .  .  .  .  .  .  .  .  .  .  .  .  .  .  .  .  .  .  .  2-15

2.8

Addressing socket. .  . .  . .  . .  . .  . .  . .  . .  . .  . .  . .  . .  . .  . .  . .  . .  . .  . .  . .  . .  . .  . . 2-16

3

Installation of Motor Starters . .  . .  . .  . .  . .  . .  . .  . .  . .  . .  . .  . .  . .  . .  . .  . .  . .  . . 

3-1

3.1

Setting the address .  . .  . .  . .  . .  . .  . .  . .  . .  . .  . .  . .  . .  . .  . .  . .  . .  . .  . .  . .  . .  . . 3-2

3.2

Setup with motor plugged in  .  . .  . .  . .  . .  . .  . .  . .  . .  . .  . .  . .  . .  . .  . .  . .  . .  . .  . . 

3-3

3.2.1

Required components  .  . .  . .  . .  . .  . .  . .  . .  . .  . .  . .  . .  . .  . .  . .  . .  . .  . .  . .  . .  . . 

3-3

3.2.2

Installation  .  .  .  .  .  .  .  .  .  .  .  .  .  .  .  .  .  .  .  .  .  .  .  .  .  .  .  .  .  .  .  .  .  .  .  .  .  .  .  . 

3-4

3.3

Setup with motor nearby  .  . .  . .  . .  . .  . .  . .  . .  . .  . .  . .  . .  . .  . .  . .  . .  . .  . .  . .  . . 

3-5

3.3.1

Required components  .  . .  . .  . .  . .  . .  . .  . .  . .  . .  . .  . .  . .  . .  . .  . .  . .  . .  . .  . .  . . 

3-5

3.3.2

Installation  .  .  .  .  .  .  .  .  .  .  .  .  .  .  .  .  .  .  .  .  .  .  .  .  .  .  .  .  .  .  .  .  .  .  .  .  .  .  .  . 

3-6

4

Commissioning and diagnostics . .  . .  . .  . .  . .  . .  . .  . .  . .  . .  . .  . .  . .  . .  . .  . .  . . 

4-1

4.1

Process data and process images  . .  . .  . .  . .  . .  . .  . .  . .  . .  . .  . .  . .  . .  . .  . .  . .  . . 

4-2

4.2

Commissioning and starting. .  . .  . .  . .  . .  . .  . .  . .  . .  . .  . .  . .  . .  . .  . .  . .  . .  . .  . . 

4-4

4.3

Diagnostics by LED indicators   . .  . .  . .  . .  . .  . .  . .  . .  . .  . .  . .  . .  . .  . .  . .  . .  . .  . . 

4-6

4.4

Diagnostics with the addressing and diagnostic unit .  . .  . .  . .  . .  . .  . .  . .  . .  . .  . .  . . 

4-7

4.5

Behavior in the event of faults  . .  . .  . .  . .  . .  . .  . .  . .  . .  . .  . .  . .  . .  . .  . .  . .  . .  . . 

4-7

Summary of Contents for Ecofast 3RK1 323-2AS54-1AA0

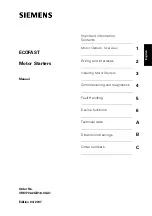
Page 1: ...Motor Starter Manual 03 2007 ecofast Totally Integrated Automation ...

Page 2: ......

Page 3: ...rs Overview 1 Wiring and interfaces 2 Installing Motor Starters 3 Commissioning and diagnostics 4 Fault Handling 5 Device functions 6 Technical data A Dimension drawings B Order numbers C Edition 03 2007 ECOFAST Motor Starters Manual Order No 3RK1702 2GB18 0AA1 ...

Page 4: ...other manufacturers which have been approved or recommended by Siemens This product can only function correctly and safely if it is transported stored set up and installed correctly and operated and maintained as recommended Brands SIMATIC SIMATIC HMI ECOFAST and SIMATIC NET are brands of SIEMENS AG Han Brid Han Q4 2 Han 10E are brands of Harting company Some other designations used in these docum...

Page 5: ...Pin 2 6 2 3 Motor terminal Han 10E 2 7 2 3 1 Pin assignment 2 7 2 3 2 Prefabricating Motor Connection Cables 2 8 2 4 Power terminal 2 9 2 4 1 Pin assignment 2 9 2 4 2 Preparing power cables 2 10 2 5 Power tee clamping connectors 2 12 2 6 Digital inputs 2 13 2 7 AS Interface 2 14 2 7 1 Connection techniques 2 14 2 7 2 Behavior in the event of a power failure 2 15 2 8 Addressing socket 2 16 3 Instal...

Page 6: ... braking 6 4 6 4 Electronic mechanical switching technology 6 5 A Technical data A 1 A 1 Motor Starters A 2 A 1 1 General technical data A 2 A 1 2 Auxiliary power A 5 A 1 3 Digital inputs A 5 A 1 4 Brake output 400 V AC A 5 A 1 5 Main power A 6 A 1 6 Mechanical switching A 6 B Dimension drawings B 1 B 1 Motor Starter B 2 C Order numbers C 1 C 1 Motor Starters Reversing starters C 2 C 2 Data Tee Co...

Page 7: ...r motor terminal 2 7 Fig 2 5 Pin assignment for power terminal 2 9 Fig 2 6 Han Q4 2 power connector 2 11 Fig 2 7 Pin assignment for power tee clamping connector 2 12 Fig 2 8 Pin assignment with circuit examples 2 13 Fig 2 9 AS i interface 2 14 Fig 2 10 Contacting the AS i cables 2 14 Fig 2 11 Addressing socket 2 16 Fig 4 1 Starting the motor starter 4 5 Fig 5 1 Responding to faults 5 2 Fig 6 1 Typ...

Page 8: ...motor plugged in 3 4 Table 3 5 Components required for setting up with the motor nearby 3 5 Table 3 6 Installation motor nearby 3 6 Table 4 1 Process data and process image AS Interface 4 2 Table 4 2 Software requirements for commissioning 4 4 Table 4 3 Requirements for commissioning 4 4 Table 4 4 Testing the wiring from the motor starter to the motor 4 4 Table 4 5 Diagnostics through LED indicato...

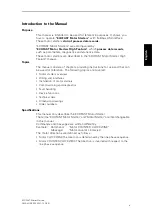
Page 9: ...ers providing instructions for use and that can be used for reference The following topics are covered Motor starters overview Wiring and interfaces Installation of motor starters Commissioning and diagnostics Fault handling Device functions Technical data Dimension drawings Order numbers Specifications This manual only describes the ECOFAST Motor Starter The terms ECOFAST Motor Starter and Motor ...

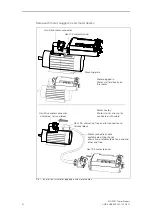
Page 10: ...ve motor connector Han 10E motor terminal Mounting plate Han 10E motor terminal Han Drive motor connector alternative terminal block Han 10E alternative free end for connection to prefabricated at both ends alternative prefabricated at one end and other end free terminal block Motor plugged in Motor starter directly on the motor Motor nearby Motor starter and motor connected with cable ...

Page 11: ...otor starter please observe the installation guidelines in the ECOFAST system manual Other system manuals For more information on ECOFAST see the following system manual System ECOFAST Correction page At the end of this manual is a correction page Please use this page to note your suggestions for improvements additional information or corrections and send the page back to us In this way you will h...

Page 12: ...ECOFAST Motor Starters viii GWA 4NEB 950 5221 12 DS 01 ...

Page 13: ...ect Page 1 1 What are ECOFAST Motor Starters 1 2 1 2 Connections fieldbus interfaces LED indicators 1 2 1 2 1 Connections 1 2 1 2 2 Fieldbus interfaces 1 3 1 2 3 LED indicators 1 3 1 3 Product overview 1 4 1 3 1 General Notes 1 4 1 3 2 Product Overview Individual Motor Starters and Their Device Functions 1 5 ...

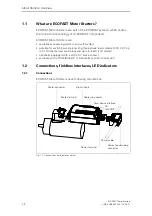
Page 14: ...d protecting three phase loads rated at 400 V AC up to 4 kW mechanical switching and up to 5 5 kW soft starter optionally equipped with a 400 V AC brake contact available with a PROFIBUS DP or AS Interface AS i connection 1 2 Connections fieldbus interfaces LED indicators 1 2 1 Connections ECOFAST Motor Starters have following connections Fig 1 1 Connections on the motor starter AUX PWR AS i Motor...

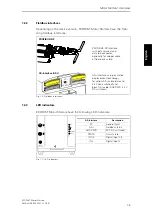
Page 15: ...3 LED indicators PROFIBUS DP PROFIBUS DP interface with data terminal and data tee connector optionally for copper cable or fiber optic cable AS i interface using insulation displacement technology for yellow AS i cable data and 24 V non switched and black AS i cable AUX PWR 24 V DC switched AS Interface AS i AS i AUX PWR AS Interface Description SF General fault AS i Fieldbus status AUX PWR 24 V ...

Page 16: ...starters 3RK1 323 2AS54 1AA0 3RK1 323 2AS54 1AA3 Grey fields Description in this manual ECOFAST Motor Starters Order no 3RK1702 2GB18 0AA1 German English White fields Description in manual ECOFAST Motor Starters High Feature Order no 3RK1702 3AB18 1AA1 German Order no 3RK1702 3BB18 1AA1 English Order number Device function Local device interface Response to bus failure Self test Emergency start In...

Page 17: ...refabricated at One End with Han Q4 2 Pin 2 5 2 2 2 Power Cables Prefabricated at One End with Han 10E Pin 2 6 2 3 Motor Terminal 2 7 2 3 1 Pin Assignment 2 7 2 3 2 Prefabricating Power Cables 2 8 2 4 Power Terminal 2 9 2 4 1 Pin Assignment 2 9 2 4 2 Prefabricating Power Cables 2 10 2 5 Power Tee Connectors 2 12 2 6 Digital Inputs 2 13 2 7 AS Interface 2 14 2 7 1 Connection Techniques 2 14 2 7 2 R...

Page 18: ...Danger Ensure that the wiring is carried out carefully and correctly Otherwise motor starters may be destroyed There is potentially lethal danger Caution Note that star jumpers are already wired in the motor starter Caution ECOFAST motor starters have an integrated EMC protective circuitry To avoid malfunctioning only motors without EMC protective circuitry are to be operated together with ECOFAST...

Page 19: ...ble duct for example the maximum current carrying capacity as a function of ambient temperature is as follows Observe the following rules when carrying out wiring Table 2 1 Rules for wiring 30 C 40 C 45 C 50 C 55 C 1 5 mm2 14 A 12 2 A 11 1 A 9 9 A 8 5 A 2 5 mm2 19 A 16 5 A 15 0 A 13 5 A 11 6 A 4 0 mm2 26 A 22 6 A 20 5 A 18 5 A 15 9 A Rules for flexible cables Data Current carrying capacity of the ...

Page 20: ...Starters 2 4 GWA 4NEB 950 5221 12 DS 01 2 1 2 Unused Connections Close off unused connections with screw caps this is the only way of ensuring degree of protection IP65 Order number 3RK1902 0CJ00 10 screw caps or 3RK1902 0CK00 1 screw cap ...

Page 21: ...n strip the cores and for example attach a plug connector or terminal block Fig 2 1 Numbers printed on the power cable cores 2 2 1 Power Cables Prefabricated at One End with Han Q4 2 Pin Fig 2 2 Power cables prefabricated at one end with Han Q4 2 pin 1 2 4 5 1 1 2 2 4 4 3 3 3 5 5 Numbers are printed on the cores for identification purposes The core number pin assignments are specified in the follo...

Page 22: ...ower cables prefabricated at one end with Han 10E pin Pin Core no 7 core Core no 11 core Assignment 1 1 1 Phase L1 2 2 2 Phase L2 3 3 3 Phase L3 4 4 Brake reference potential 5 5 Brake 6 4 6 Winding terminal W2 7 5 7 Winding terminal U2 8 6 8 Winding terminal V2 9 9 Temperature sensor terminal a 10 10 Temperature sensor terminal b PE yellow green ...

Page 23: ...able cannot get jammed or squashed Caution Safe separation between 400 V AC and 24 V DC is only guaranteed on a motor with safe separation of the temperature sensor circuit with respect to the stator winding 2 3 1 Pin assignment Fig 2 4 Pin assignment for motor terminal 10 9 8 7 6 5 4 3 2 1 Pin Assignment 1 Winding terminal U1 2 Winding terminal V1 3 Winding terminal W1 4 Brake reference potential...

Page 24: ...or in the motor must satisfy the requirements for safe separation The 400 V power supply for the motor and the 24 V DC power supply for the brake are taken over common cables and plug connectors to the loads If the cables are pinched there is a risk of voltage transfer That is why loads with degree of protection Extra low voltage must not be connected to the brake circuit As safeguard against acci...

Page 25: ...against accidental voltage transfer in the event of a fault It is therefore not permissible to connect any loads with the extra low voltage degree of protection to the braking circuit Caution The brake must not be fed from the power supply unit of the 24 V DC swit ched supply AUX PWR black AS i cable 2 4 1 Pin assignment Fig 2 5 Pin assignment for power terminal Pin Assignment 1 Phase L1 2 Phase L...

Page 26: ...eads with Han Q4 2 You need for connecting the main power on the motor starter power tee connector for looping through the main power from the power tee connector A flexible Cu cable 5 x 4 mm2 3 conductors N PE 5 x 6 mm2 3 conductors N PE Power connector Han Q4 2 socket 4 mm2 3RK1911 2BE10 6 mm2 3RK1911 2BE30 Power connector Han Q4 2 pin 4 mm2 3RK1911 2BF20 6 mm2 3RK1902 2BF40 Power connector Han ...

Page 27: ... connectors Step Procedure 1 Guide the cable through the heavy gauge threaded joint the matching enclosed sealing ring in each case and the connector housing 2 Attach the jacks contact pins to the strands 3 Push the jacks contact pins into the socket insert pin insert until they snap into place 4 Pull the cable back and screw the insert in place in the connector housing with the enclosed screws 5 ...

Page 28: ...tor starter is unplugged Pin assignment Fig 2 7 Pin assignment for power tee clamping connector Pin Assignment Wire No 1 Phase L1 2 Phase L2 3 Phase L3 PE 4 Neutral N 5 reserved 6 reserved 2 2 2 3 3 3 4 4 4 1 1 1 1 2 3 4 5 6 1 2 4 5 1 1 2 2 4 4 3 3 3 5 5 Caution Note that core numbers and terminal numbers are not identical for prefabricated power cables Wire No Terminal numbers and Han Q4 2 pin nu...

Page 29: ...r 2 and 3 wire circuits Fig 2 8 Pin assignment with circuit examples Attention The digital inputs are short circuit proof The current is limited to a maximum of 200 mA In the event of a short circuit or overloading of the sensor supply the switching element motor and brake output are deactiva ted and a general fault is issued You must acknowledge this fault with trip reset Attention Do not use an ...

Page 30: ...uxiliary power for supplying actuators PELV must be grounded Schematic arrangement The diagram below shows the position and coding of the AS i cables on the motor starter Fig 2 9 AS i interface Contacting The AS i cables are contacted automatically using the insulation piercing method when the AS i cover is screwed on Fig 2 10 Contacting the AS i cables AS i AUX PWR AS i cable Communication and no...

Page 31: ...en the supply is restored the disconnection command and the associated signal bits and error bits are acknowledged automatically 24 V DC voltage supply AUX PWR switched black AS i cable This voltage is not constantly available It is only required for driving the switching elements e g a contactor The voltage can be disconnected in the event of an emergency stop or safety shutdown category 1 accord...

Page 32: ... The addressing socket is used for addressing with a device such as the addressing and diagnostic unit This is connected to the addressing socket with the connecting lead Fig 2 11 Addressing socket Addressing socket Connecting lead Screw cap SF AS i AUX PWR STATE IN 1 2 IN 2 ADDR DEVICE X1 X3 Addressing socket ...

Page 33: ...in the vicinity of the motor motor nearby with connecting cable or plug it into the motor directly motor plugged in with mounting plate Section Subject Page 3 1 Setting the address 3 2 3 2 Setup with motor plugged in 3 3 3 2 1 Required components 3 3 3 2 2 Installation 3 4 3 3 Setup with motor nearby 3 5 3 3 1 Required components 3 5 3 3 2 Installation 3 6 ...

Page 34: ...o I O configu ration hex ID Code hex ID1 Code hex ID2 Code hex of product status1 smaller 10 from 10 3RK1323 2AS54 1AA0 7 D F F 0 3RK1323 2AS54 1AA3 7 D F F 0 1 The product status is printed below the addressing socket Step Procedure 1 If you intend to address the motor starter via the addressing socket switch off the AS i supply voltage This is necessary for reasons of system safety 2 Unscrew the...

Page 35: ...ing on version 2 Mounting plate with screws for motor starter 3RK1911 3AA00 3 Power T clamping connector optional 5 x 4 mm2 5 x 6 mm2 3RK1911 2BF01 3RK1911 2BF02 4 Power cable 3RK1911 0A depending on the length and cross section 5 AS i cable trapezoidal section yellow rubber 2 x 1 5 mm2 for fieldbus 3RX901 0AA00 depending on length 6 AS i cable trapezoidal section black rubber 2 x 1 5 mm2 for ext ...

Page 36: ...nting plate Push the motor starter onto the motor connector Secure the connection with the locking device 3 Connect the AS i cables in accordance with the diagram below Attention If the motor starter is the last station on the AS Interface line you must terminate the ends of the AS i cables with cable end covers Order No 3RK1901 1MN00 in order to obtain degree of protection IP65 To allow this leav...

Page 37: ...r connection cable for motor starter motor connection Han 10E prefabricated or prepared by customer 3RK1911 0 depending on length cross section Han 10E one end both ends 4 Power T clamping connector optional 5 x 4 mm2 5 x 6 mm2 3RK1911 2BF01 3RK1911 2BF02 Power cable 3RK1911 0A depending on the length and cross section 5 AS i cable trapezoidal section yellow rubber 2 x 1 5 mm2 for fieldbus 3RX901 ...

Page 38: ... work Take note of the information in the operating instructions Work through the following steps to install the motor starter Step Description 1 Choose a flat surface for installation The distance from the motor depends on the length of the power cable Any required mounting position can be chosen 2 3 Screw the motor starter down onto the flat surface Table 3 6 Installation motor nearby 90 210 Dri...

Page 39: ...5 To allow this leave the cable ends projecting by about 10 cm beyond the AS inter face 5 Connect the motor starter and motor with the motor connecting cable Secure the connections with the locking devices 6 Connect the data lines to the data tee connector Secure the connection with the locking device 7 Connect the terminating connector to the last load feeder non assigned con nection on the last ...

Page 40: ...Installation of Motor Starters ECOFAST Motor Starters 3 8 GWA 4NEB 950 5221 12 DS 01 ...

Page 41: ... Commissioning and diagnostics 4 Section Subject Page 4 1 Process data and process images 4 2 4 2 Commissioning and starting 4 4 4 3 Diagnostics through LED indicators 4 6 4 4 Diagnostics with the addressing and diagnostic unit 4 7 4 5 Behavior in the event of faults 4 7 ...

Page 42: ...ges Table 4 1 Process data and process image AS Interface Process data Process image 4 outputs DO 0 0 to DO 0 3 4 inputs DI 0 0 to DI 0 3 4 parameters PO 0 0 to PO 0 3 Signal 1 HIGH 0 LOW Outputs Control commands PLC to motor starter DO 0 0 Motor CW 1 ON 0 OFF 1 Motor CCW 1 ON 0 OFF 2 Brake 1 ON 0 OFF 3 Trip Reset 0 1 ACTIVE 0 1 NOT ACTIVE Inputs Signals motor starter to PLC DI 0 0 Ready automatic...

Page 43: ...ior in the event of overload temperature sensor para meter to Warn the motor starter automatically sets the Auto reset para meter to YES As a result the General warning signal is automatically cleared after the cause of the fault is eliminated Self test function with trip reset Attention If trip reset output DO 0 3 is applied for longer than 2 seconds and there is no general fault general warning ...

Page 44: ...urther information is provided in the operating instructions for the addressing and diagnostic unit Configuration software used Explanations Configuration software for the AS i master used See AS i master manual Action assumed to have been taken Further information see 1 Motor starter installed Installation chapter 2 Address set on the motor starter Installation chapter 3 Supply voltage for the mo...

Page 45: ...n supply voltage for motor starter Motor starter sets outputs to 0 and accepts the set address Motor starter receives configurati on data from AS i master Does the configuration data match the actual setup Inputs and outputs enabled data exchange is possible Remedy match configuration data to setup or vice versa AS i and AUX PWR LEDs light up No Yes Ready for operation ...

Page 46: ... flashing Zero address green Communication and unswitched supply ok off No unswitched supply voltage green Unswitched supply voltage ok off Unswitched supply voltage not ok AUX PWR green Switched supply voltage ok off Switched supply voltage not ok STATE green Circuit state switching element ON by control HMI off Switching element OFF red Circuit state switching command IN 1 green Digital input 1 ...

Page 47: ...t with as follows Table 4 6 Possible faults and fault handling Possible fault Action Indication LEDs Comment Reset Bus fault Tripping AS i Auto Process image fault Tripping SF OFF Undervoltage AS i Tripping SF U 18 V Auto Undervoltage AUX PWR Tripping SF U 18 V Auto Sensor supply overload Tripping SF I 200 mA Trip reset Temperature sensor overload Warning tripping SF Auto Auto reset Trip reset Tem...

Page 48: ...ys With Trip reset output DO 0 3 Trip reset via fieldbus With a counter command e g Motor off only in the case of a process image fault Automatic acknowledgement depending on parameter PO 0 3 Auto reset only in the case of temperature sensor faults Attention If trip reset is applied constantly the acknowledgement is triggered once by edge triggering If trip reset output DO 0 3 is applied for longe...

Page 49: ...ECOFAST Motor Starters GWA 4NEB 950 5221 12 DS 01 5 1 Deutsch English Fault Handling 5 Section Topic Page 5 1 Responding to Faults 5 2 5 1 1 Acknowledging Faults 5 3 5 2 Potential Faults 5 4 ...

Page 50: ...motor starter responds depen ding on how it has been parameterized Fig 5 1 Responding to faults Attention In the event of a fault Process image error or device fault Switching ele ment defective the response is always trip Responses to faults cannot be parameterized Fault Reaction 1 Reaction 2 Response Warning Trip Signaling bit General warning set General fault set LED indicator DEVICE flashes ye...

Page 51: ...nd e g Motor off process image errors only Automatic acknowledgement depending on the PO 0 3 Autoreset parameter only valid for temperature sensor errors Attention If trip reset is applied constantly the acknowledgement is triggered once by edge triggering If trip reset output DO 0 3 is applied for longer than 2 seconds and there is no general fault general warning present the self test function i...

Page 52: ...k the sensor supply I Sensor 200 mA Temperature sensor overload Warning SF red Auto Wait until the motor has cooled down Trip SF red Autoreset trip reset Wait until the motor has cooled down Acknowledge after motor has cooled down If acknowledgement is not possi ble the motor is still too hot Temperature sensor short circuit Warning SF red Auto Remove the short circuit on the temperature sensor le...

Page 53: ...NEB 950 5221 12 DS 01 6 1 Deutsch English Device functions 6 Section Subject Page 6 1 Temperature sensor 6 2 6 2 Reversing starter control function 6 3 6 3 Mechanical braking 6 4 6 4 Electronic mechanical switching technology 6 5 ...

Page 54: ...302 and 303 Temperature sensor parameter This parameter enables you to determine which temperature sensor is to be used Setting range with parameter PO 0 1 Thermoclick 1 PTC type A 0 Behavior in the event of overload temperature sensor parameter This parameter enables you to determine how you want the motor starter to respond in the event of overloading of the temperature sensor Setting range with...

Page 55: ...ly permissible to switch from one direction of rota tion to the other after a certain delay During this delay the flywheel of the drive is supposed to come to a standstill The length of the delay depends on which drive is being used and must be taken into account accordingly in the application program Control outputs The direction of rotation is controlled with two outputs DO 0 0 and DO 0 1 Motor ...

Page 56: ...ical circuit for mechanical braking Fig 6 1 Typical circuit for mechanical braking Control output The brake is controlled with output DO 0 2 Brake DO 0 2 1 ON 0 OFF M 3 L1 L2 L3 AC Brake output 10 9 8 7 6 5 4 3 2 1 Pin Assignment 1 Winding terminal U1 2 Winding terminal V1 3 Winding terminal W1 4 Brake reference potential 5 Brake 6 Winding terminal W2 7 Winding terminal U2 8 Winding terminal V2 9 ...

Page 57: ...ors Only applicable to soft starters Mechanical switching technology The motor starter controls the motor in a 3 phase system with contactors Possible causes of faults The Switching technology device function returns the General fault signal in response to the following causes Switching element defective e g contactor contact welded power semicon ductor failed Switching element overload e g semico...

Page 58: ...Device functions ECOFAST Motor Starters 6 6 GWA 4NEB 950 5221 12 DS 01 ...

Page 59: ...1 A 1 Deutsch English Technical data A Section Subject Page A 1 Motor Starters A 2 A 1 1 General Technical Data A 2 A 1 2 Auxiliary Power A 5 A 1 3 Digital Inputs A 5 A 1 4 Brake Output 400 V AC A 5 A 1 5 Main Power A 6 A 1 6 Mechanical switching A 6 ...

Page 60: ...n to form Site altitude 2000 m 4000 m Without restrictions With restrictions Reduction of Ie by 1 per 100 m to 2 000 m Vibration strain f 5 to 26 Hz d 0 75 mm f 26 to 150 Hz a 2 g 10 cycles Shock a 120 m s2 12 g 11 ms duration 3 shocks per direction in all of the three perpendicular axes 18 ESD 8 kV air discharge 6 kV contact discharge IEC 1000 4 2 severity 3 Electromagnetic fields 10 V m IEC 1000...

Page 61: ...th example Ia Ie ta tb tED tp ts Load diagram Ia Direct motor starting current Ie Rated motor operational current ta Motor starting time tb Operating time tp Idle time tED Cyclic duration factor ts Operating cycle ED tED ts x 100 Thermal motor model Class Example Cyclic duration factor 1 s starting time ta 0 1 s Ie 6 A mechanical switching Determined switching frequency approx 1300 switching cycle...

Page 62: ... Ia 6 x Ie and Ia 7 19 x Ie Maximum switching frequency when Ia 6 x Ie Limitation for devices with mech switching elements 0 1 1 10 100 1000 10000 Cyclic duration factor tED in s Switching cycles h Switching cycles h Cyclic duration factor tED in s 0 1 1 10 100 1000 10000 Limitation for devices with mech switching elements Maximum switching frequency when Ia 7 19 x Ie ...

Page 63: ...y 15 mA switching element contactor off Polarity reversal protection Yes device will not function however Short circuit protection overload protection Yes 0 5 A multifuse self healing fuse Reset by power OFF No Undervoltage detection USP 17 V DC 17 V DC Bridging of power failure 20 ms device is not affected Insulation voltage 500 V DC between the auxiliary voltages and PE Input voltage 20 4 V DC t...

Page 64: ...am 16 A 500VAC Ik 120kA Utilization category 1 Device destroyed after short circuit Operating voltage 3 AC 200 V 10 to 460 V 10 Operating current 0 3 A to 9 A 0 3 A to 7 3 A 0 3 A to 6 7 A Class 10 Class 20 Class 30 Switching capacity AC 3 9 0 A AC 4 6 5 A Switching load 3 phase with SIMICONT contactor Short circuit protection Fusible link am 16 A 500 VAC ICu 120 kA Lifetime of switching element 0...

Page 65: ...ECOFAST Motor Starters GWA 4NEB 950 5221 12 DS 01 B 1 Deutsch English Dimension drawings B Section Subject Page B 1 Motor Sarter B 2 ...

Page 66: ...ECOFAST Motor Starters B 2 GWA 4NEB 950 5221 12 DS 01 B 1 Motor Starter Fig B 1 Motor starter dimension drawing ...

Page 67: ... 4NEB 950 5221 12 DS 01 C 1 Deutsch English Order numbers C Section Topic Page C 1 Motor Starters Reversing starters C 2 C 2 Data Tee Connectors C 3 C 3 Accessories for Motor Starters C 3 C 4 Project engineering software and Documentation C 4 ...

Page 68: ... A 1 1 kW Thermal Motor Model Mechanical AS Interface 3RK1323 5BS44 3AA0 2 4 A 9 A 4 kW AS Interface 3RK1323 5CS44 3AA0 0 3 A 3 A 1 1 kW 400 V AC AS Interface 3RK1323 5BS44 3AA3 2 4 A 9 A 4 kW 400 V AC AS Interface 3RK1323 5CS44 3AA3 0 3 A 3 A 1 1 kW Full Motor Protection Electronic Soft PROFIBUS DP 3RK1303 6BS74 3AA0 2 4 A 12 A 5 5 kW PROFIBUS DP 3RK1303 6DS74 3AA0 0 3 A 3 A 1 1 kW 400 V AC PROFI...

Page 69: ...Order No Data 24 V Data Tee Connector Cu 3RK1911 2AG00 Data Tee Connector FO 3RK1911 2AH00 Table C 2 Order numbers for Connectors Description Order No Mounting plate for motor plugged in 3RK1911 3AA00 Identification Plug 6ES7194 1KB00 0XA0 PC cable with memory submodule 3RK1911 0BN20 Test connector set 3RK1911 2AM00 Table C 3 Order numbers for accessories ...

Page 70: ...14 new CP card and MPI interface on PG7xx and its driver software view interactive catalog CA01 CD ROM drive STEP7 object manager for integrating the ECOFAST starter as an S7 slave in SIMATIC S7 for calling Switch ES from STEP7 System requirements SIMATIC S7 M7 C7 PCS7 STEP7 Version 5 0 or higher CD ROM drive 3ZS1310 0CC20 0YA0 Upgrade Switch ES Motor Starter from Version 1 0 to 2 0 3ZS1310 0CC20 ...

Page 71: ... 7 E Electronic switching technology 6 5 F Faults 4 7 Fieldbus interfaces 1 3 G General technical data A 2 H Han Q4 2 power connectors 2 11 L LED indicators 1 3 M Main power A 6 Mechanical braking 6 4 Mechanical switching A 6 Mechanical switching technology 6 5 Motor connection cables with Han 10E 2 8 Motor starter dimension drawing B 2 Motor terminal 2 7 P Potential Faults in Motor Starters with ...

Page 72: ...the power leads 2 3 Self test function with trip reset 4 3 Set the address 3 2 Setup with motor nearby 3 5 Setup with motor plugged in 3 3 Starting the motor starter 4 5 T Temperature sensor 6 2 Temperature sensor leads 2 8 Testing the wiring 4 4 Thermoclick 6 2 Trip reset 4 3 4 8 5 3 ...

Page 73: ...0 Amberg Fax 09621 80 3337 ECOFAST Motor Starters system manual Have you found any typographical errors while reading this manual Please use this form to tell us about them We would also welcome any ideas and suggestions you may have Sender please fill out Name Company Department Address Telephone ...

Page 74: ...ECOFAST Motor Starters GWA 4NEB 950 5221 12 DS 01 ...

Page 75: ......

Page 76: ...Siemens Aktiengesellschaft Automation and Drives Low Voltage Controls and Distribution Postfach 4848 D 90327 Nürnberg w w w s i e m e n s c o m e c o f a s t Order No 3RK1702 2GB18 0AA1 ...

Reviews: