Installation Instructions
Peligro
Tensión peligrosa que puede
causar daños serio o la
muerte, desenergice
totalmente antes de instalar
o darle servicio. Reemplace
todas las barreras y
cubiertas antes de energizar
el interruptor.
Instructivo de Instalación y Operación
Page
3 of 4
Pc. No.
75822A04
NOTE: When aluminum conductors are used, the
application of a suitable joint compound is recommended
to reduce the possibility of terminal overheating.
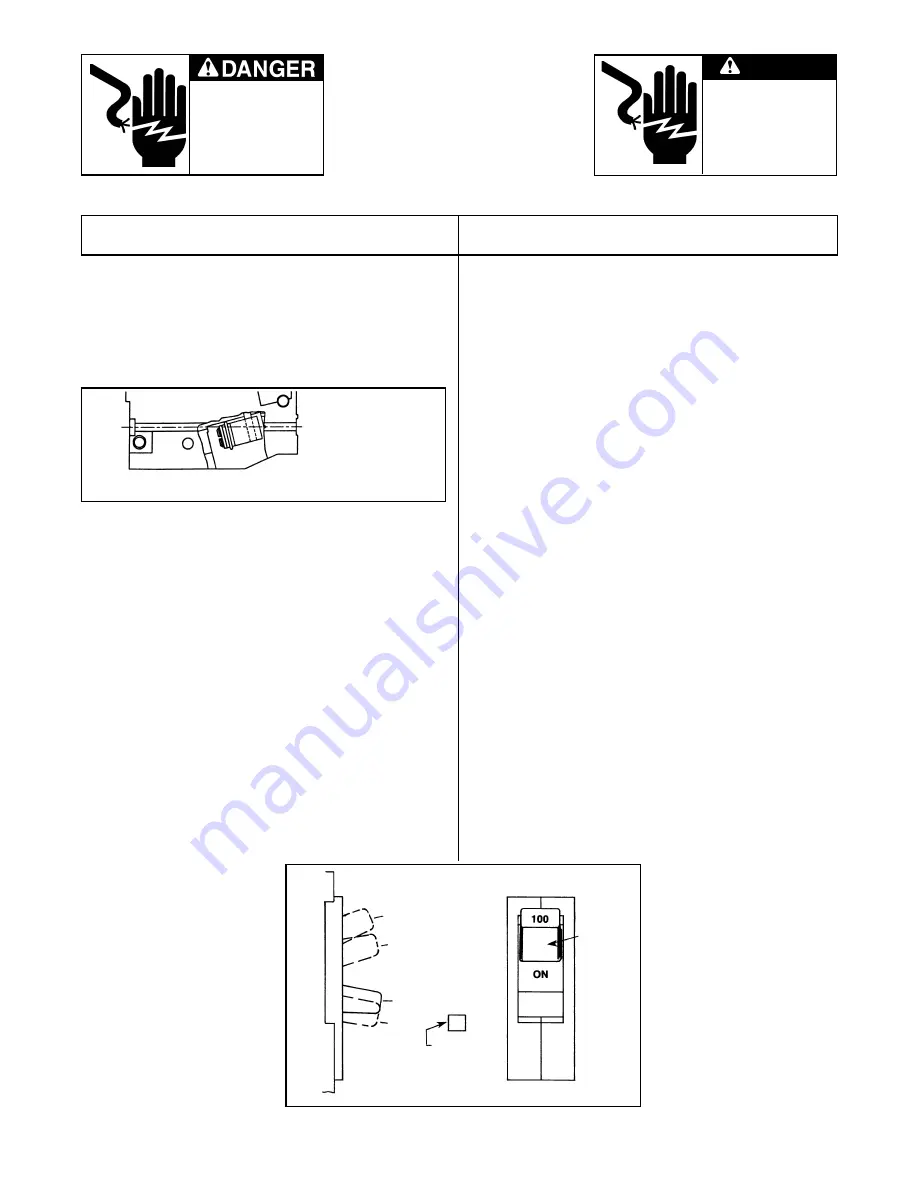
NOTE: Circuit Breakers Type HHED6, HHED6-A and
XED6 have load terminals that can rotate between two
positions. When installing wire connectors, the load terminal
must be positioned at an angle as shown in Fig. 2.
7. After the circuit breaker is installed, check all
mounting hardware for secureness.
3. Manual Operation
Manual operation of the circuit breaker is controlled by the
circuit breaker handle and the PUSH-TO-TRIP button. The
circuit breaker handle has three indicating positions, two of
which are molded into the handle to indicate ON and OFF.
The third position indicates a TRIP position and is between
the ON and OFF position. (See Fig. 3)
A. Circuit Breaker Reset
After tripping, the circuit breaker is reset by moving the
circuit breaker handle to the reset position and then
moving the handle to the ON position.
NOTE: In the event of a thermal trip, the circuit breaker
cannot be reset until the thermal element cools.
B. PUSH-TO-TRIP Button
The PUSH-TO-TRIP button checks the tripping function
and is used to manually exercise the operating mecha-
nism. (PUSH-TO-TRIP button not provided on switch)
NOTA:
Cuando se usen conductores de aluminio, se
recomienda efectuar la junta adecuada para evitar la
posibilidad de sobrecalentamiento de la terminal.
7.
Después de que el interruptor esté instalado, revise todos
los elementos de conexión. Revise los conectores de cables
y observe el adecuado par de apriete, los de la línea y de la
carga, indicado en la placa de características del interruptor.
3.
Operación manual.
La operación de cierre y apertura del interruptor se efectúa por
medio de la manija y con el botón pulsador se logra un disparo de
prueba. La manija del interruptor tiene 3 posiciones, 2 de las
cuales están moldeadas dentro de la manija del interruptor e
indican “ON” conectado y “OFF” desconectado, la posición
“trip” disparo se encuentra entre la posición “ON” y “OFF” ver
Fig. 3.
A.
Restablecer. Después de un disparo “tripping” el interruptor
debe ser restablecido, accionando la manija totalmente hacia abajo,
llevando después la manija hacia la posición de conectado “ON”.
Nota:
En el caso de un disparo por sobrecarga (térmico) no podrá
serrestablecido, sino hasta que se enfríen los elementos térmicos.
B.
Botón pulsador, para disparar
púlsese el botón de disparo
“trip” para verificar la función de disparo y del mecanismo de
operación.
4. Revisión y prueba de campo.
Los interruptores ED, están previstos desde su diseño, para
varios años sin sevicio de mantenimiento. A continuación se
describe el precedimiento para revisarlo y probarlo cuando se
encuentren montados.
Fig. 2
Fig. 3
Wiring Lug Installation for
Circuit Breakers Type
HHED6 , HHED6-A and
XED6 Load terminal and
wiring lug are positioned
at an angle
On
[dentro]
Trip
[disparo]
Off
[fuera]
Reset
[restablecer]
Push-To-Trip
[botón pulsador
de disparo]
(FOR BREAKER ONLY)
Handle
[manija]
Hazardous voltage.
Will cause death or serious
injury.
Turn off and lock out all power
supplying this device before
removing cover or device and
while cover is removed.
Replace the cover before power
supplying this device is turned on.


