© Siemens AG 2015. All rights reserved
A5E34716119A/002, 10/2015
3
SIPLUS HCS4300
EM4315 expansion module
Compact Operating Instructions
Application
In the basic configuration, a maximum of 8 POMs can be
operated with a CIM. The operation of up to 8 additional
POMs is possible with an EM4315 expansion module.In the
maximum configuration twoexpansion modules can be
used, making it possible to operate 24 POMs with a single
CIM.
Applicability of the documentation
HCS EM4315
expansion module
6BK1943-1AA50-0AA0
Safety guidelines
This device corresponds to the approvals printed on the
type plate. If you have questions about whether it is
permissible to install the device in the planned environment,
please contact your service representative.
WARNING
•
The product/system described in this documentation
may only be operated by personnel qualified for the
specific task in hand. Qualified personnel are those
who, based on their training and experience, are
capable of identifying risks and avoiding potential
hazards when working with these products/systems.
•
Alterations to the devices are not permitted. Failure to
observe these guidelines shall constitute a revocation
of the approvals and manufacturer's warranty.
•
Incorrectly performed repairs may result in substantial
damage to equipment or endanger the user. Return the
device to Siemens for repair.
•
The device may only be used in the control cabinet.
WARNING
Hazardous voltages from the mains power input or heat
emitter lines
May cause death, serious injury or damage to property
Before starting installation or connection work on the
heating control system, you must switch off the line voltage
and secure it from being switched on again.
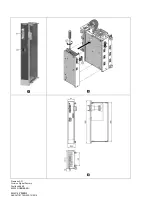
Installing the EM4315 expansion module (see Fig. 2)
Tool: You will need a Torx T10 screwdriver
1.
Connect the expansion module to the Power Output
Module (POM)
①
using the four connection tabs.
2.
Tighten the four screws
②
.
Minimum clearances
Natural convection must be possible above and below the
device. A clearance of 100 mm must be observed in each
case.
X1: Input system interface
X3: 24 V DC supply voltage (see Fig. 1)
+ +24 V DC The plug connector for the 24 V DC
connection is included in the scope of
delivery. Features: PUSH IN spring-loaded
terminal with release catch, daisy chain
cabling is possible.
- GND
Connecting system interfaces at the front (see Fig. 2)
Connect the connection cable
③
of the expansion module
to the system interface (X7)
④
of the POM.


