background image

Fusesaver


| Installation and operation manual

19

6 Maintenance

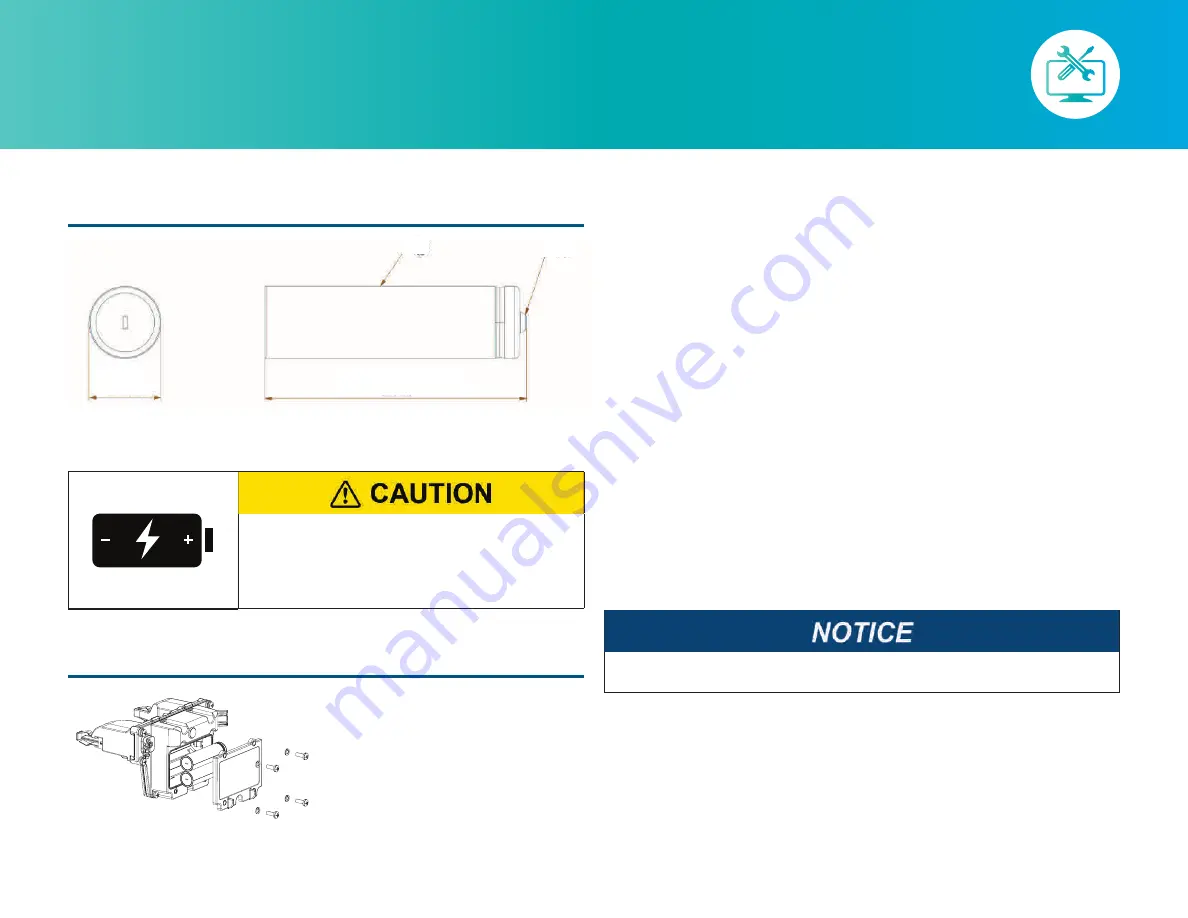
Battery specification 

1)   Molicel lithium-ion battery  

(18650, 3.6 V, 2000 mAh).

2)   Contact nipple to be welded to 

positive terminal by specialist 

battery manufacturer.

Replace the battery cells according to the following procedure:

Battery replacement

A.  Remove the battery compartment 

cover by undoing the four screws.

B.  Remove the battery cells from  

their holder.

C.  Fit new cells while ensuring  

correct polarity.

D.  Press both actuators and conduct  

a battery test according to section 

3.3 and confirm batteries are 

adequately charged.

E.  Check and clean battery cover 

compartment seal.

F.  Fit battery compartment cover  

by tightening screws.

G.  Reset the battery life by holding 

down the GREEN lever for 10 

seconds. LED blinks 3 times quickly 

to confirm battery life is reset.

H.  If required, connect a charger  

to recharge batteries.

I.  Communications module is ready  

for return to service.

6.3  Battery charging

The battery cells in the rechargeable 

communications module can be 

recharged using a standard off-the 

-shelf battery charger suitable for  

18650 lithium-ion cells.
A.  Remove the battery cells from  

the rechargeable communications 

module.

B.  Charge the battery cells using the 

bench charger and according to the 

instructions of the charger unit.

C.  Fit the battery cells back into the 

communications module taking  

care to get the polarity correct.

D.  Fit the cover and tighten the screws 

ensuring the seal is correctly 

seated.

Recharging of the batteries in the primary cell communications module  

is not possible.

• 

Siemens does not approve the use of 

alternative battery types.

• 

This battery MUST NOT be used without the 

nipple fitted.

2

1

Ø 0.71”  

(18 mm)

2.64” (67 mm)

Summary of Contents for Fusesaver

Page 1: ...usa siemens com fusesaver Fusesaver Medium voltage circuit breaker installation and operation manual ...

Page 2: ...4 1 Connecting cables 9 4 2 Fusesaver mounting 9 4 3 Communications module 13 attachment fitting 4 4 Fusesaver configuration 14 4 5 Fusesaver status check 14 5 Operation 5 1 Automatic operation 15 5 2 Manual operation 15 5 3 Electrical isolation 16 5 4 External lever 16 5 5 Fault passage indication 17 5 6 Fusesaver event data 17 6 Maintenance 6 1 Firmware updating 18 6 2 Battery replacement 18 6 3...

Page 3: ...ed In addition this person has the following qualifications Is thoroughly familiar with this manual Is trained and authorized to switch de energize clear ground and tag circuits and equipment in accordance with established safety procedures Is trained in techniques to distinguish exposed energized parts from other parts of electric equipment and to determine the nominal voltage of exposed live par...

Page 4: ... Siemens Service Center for further advice Hazardous voltage danger to life Do not work on energized equipment Always de energize and ground the lines before working on the equipment If live line work must be performed follow the requirements of local occupational health and safety regulations and employ personal protective equipment PPE suitable for the voltages involved It is the user s responsi...

Page 5: ...en the box use a box cutter to cut through the sealing tape and then fold open the top flap to access the contents All items in the box can then be easily removed Other miscellaneous items such as mounting hardware are packed separately Typical Weights and Dimensions Package of line mounted Fusesaver Package of cross arm pole mounted Fusesaver 21 85 555 mm L x 14 37 365 mm W x 9 84 250 mm H 21 85 ...

Page 6: ...cardboard box for shipping damage Major damage must be documented photographically Ensure that the transport company confirms any damage to the cardboard box The Fusesaver box should be handled with care and protected from water exposure Store in a clean and dry location Do not drop the Fusesaver or any of its parts or accessories Do not store the Fusesaver with the communications module connected...

Page 7: ... vacuum interrupter the user can apply a 48 kV ac 50 60 Hz voltage across the open contacts of the Fusesaver for 60 seconds Note that vacuum interrupters can experience self extinguishing momentary breakdowns under high voltages These momentary breakdowns do not indicate a loss of vacuum or failure of the test Every Fusesaver is inspected and tested at the factory before dispatch No further testin...

Page 8: ...er of times to indicate the battery charge level This blink pattern repeats three times For example the blink pattern for a battery with a low charge is xx 1s xx 1s xx where x is a blink Refer to section 6 2 for how to recharge batteries 3 3 Communications module battery test The communications module is available in two versions Primary cell non rechargeable Rechargeable Do not electrically probe...

Page 9: ...esaver To open the Fusesaver press the GREEN actuating button To close the Fusesaver press the RED actuating button After pressing the applicable actuating button the LED starts flashing After the configured delay of up to 60 seconds the Fusesaver operates The indicator changes color to confirm the operation Conducting excessive operations or leaving the communications module connected to the Fuse...

Page 10: ...nd can be installed using three different approaches In all cases the Fusesaver should be mounted horizontally For mounting options not covered here contact a Siemens Service Center The Siemens Service Center has available general arrangement drawings and solid models of various configurations of the following installation options that the end user can utilize to create their customized pole top c...

Page 11: ...nnection cables The Fusesaver assembly can now be installed to the line according to the following steps Clamping to dead end A Loosen the M10 bolts in the line clamp assembly The plastic insulating sleeve is held in the line clamp assembly during fitment B Secure the Fusesaver with the line clamp assembly ensuring the plastic sleeve is seated on the conductor dead end and tighten the M10 bolts to...

Page 12: ...94 125 x 100 mm or 4 92 x 4 92 125 x 125 mm Line mounted Fusesaver Prepare the Fusesaver on the ground prior to installation by fitting the line clamp connecting cables and birdguard as follows Fusesaver ready for installation A Prepare the connection cable by cutting to length stripping insulation as required and fitting a 2 hole NEMA palm to one end B Slide the birdguard over the connecting cabl...

Page 13: ... Nm Bolted connection Fishplate connection C Secure the connection cable on the conductor above the crossarm with a parallel groove clamp torque is marked on the parallel groove clamp or other approved line connection device D Uncoil and then secure the connection cable to the rating plate end of the Fusesaver E Uncoil and then secure the other connection cable at the crossarm side of the Fusesave...

Page 14: ...he Fusesaver in the correct orientation and once in place holds itself with self engaging locking tabs The communications module can be installed onto the Fusesaver before the Fusesaver is installed on the line or it can be installed and removed at any time later from ground level Ground level attachment and removal is achieved with the use of the communications module attachment tool and a live l...

Page 15: ...roup flash their LEDs with four bursts of three flashes Therefore when installing communications modules to operate in ganged mode wait for at least one minute or until you see this LED pattern on the members of the group before pushing a trip or close actuator To remove a communications module from a Fusesaver in service follow these steps Removing communications module A Rotate live line tool ho...

Page 16: ... LED on the communications module flashes for several seconds at a fast rate to let the user know that the operation has been requested Once the operation is scheduled the LED keeps blinking confirming the trip or close instruction is pending If the action is rejected then the LED stops blinking Reasons for rejection might include that the Fusesaver is already in the requested state or because the...

Page 17: ...g nearby air break switches Electrical isolation 5 4 External lever The external lever is used by an operator to change the way a Fusesaver works for operational reasons such as live line working The effect of pulling the lever down is determined by configuration refer KFS 2034 manual for options The effect is in three areas Protection mode Manual operation SCADA control When the lever has changed...

Page 18: ...pattern until either the configured time out occurs or the local operator closes the Fusesaver If the Fusesaver has tripped to lockout then the LED is powered by the communications module battery 5 6 Fusesaver event data While in service a local user can connect to the Fusesaver wirelessly using the PC application Siemens Connect Refer to KFS 2035 manual for how to do this With this PC application...

Page 19: ...ng wirelessly to the Fusesaver using the Siemens Connect PC application Remove and replace the communications module from the Fusesaver in service according to section 4 3 6 2 1 Primary cell communications module The Primary cell communications module has built in sealed for life non rechargeable batteries that provide an estimated 10 year life subject to appropriate site selection Sites with inad...

Page 20: ...10 seconds LED blinks 3 times quickly to confirm battery life is reset H If required connect a charger to recharge batteries I Communications module is ready for return to service 6 3 Battery charging The battery cells in the rechargeable communications module can be recharged using a standard off the shelf battery charger suitable for 18650 lithium ion cells A Remove the battery cells from the re...

Page 21: ...multi phase installation is required the user should follow these steps A Wirelessly connect to the Fusesaver s in the line using the Operate an Existing Installation tab of the Siemens Connect PC application and download the event log if possible B Dismount the Fusesaver to be replaced using the reverse process to installation as described in section 4 2 Remove the communications module from the ...

Page 22: ...ugh wide ranging dismantling into sorted scrap and mixed scrap residues is more environmentally sustainable Electronic scrap must be disposed of in accordance with applicable regulations All electronic modules in Fusesaver are ROHS compliant 6 9 Battery disposal Material safety data sheets and regulatory guides for the batteries are available for download in the Siemens Outdoor Systems Data Manage...

Page 23: ...and operation manual 22 7 Troubleshooting Refer to the FAQ page on the Siemens Outdoor Systems Data Management Cloud site at https sosdmc siemens cloud for the latest troubleshooting guide User access authentication required ...

Page 24: ... required Materials to be handled include but are not limited to Metals Should be transferred and recycled as mixed scrap metals Plastics Plastic containing a recycle symbol should be recycled Plastic lacking the recycle symbol should be discarded as industrial waste Small electronics insulated cables and motors Should be recycled via electronics scrap disposal companies specialized in separating ...

Page 25: ...ument contains a general description of available technical options only and its effectiveness will be subject to specific variables including field conditions and project parameters Siemens does not make representations warranties or assurances as to the accuracy or completeness of the content contained herein Siemens reserves the right to modify the technology and product specifications in its s...

Reviews: