background image

A580 IP KBA / USA EN / A31008-M2013-R301-1-6043 / Pack_Content_1pg.fm / 12.2.09

Ve

rs

ion 4,

 16

.09.

2005

4

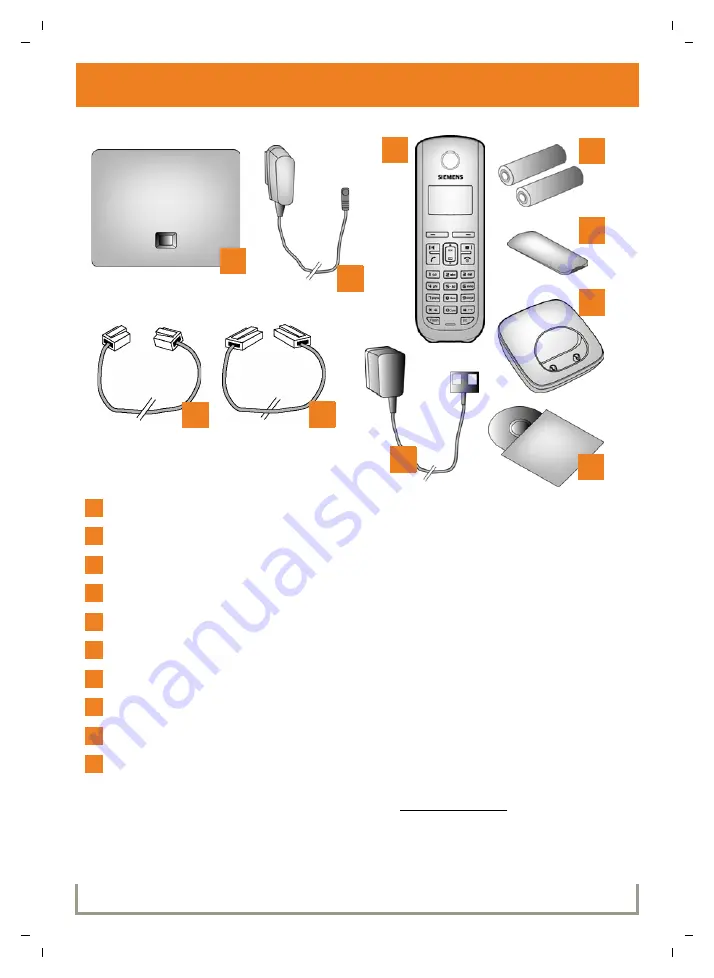
Package contents

Gigaset A580 IP 

base station


Power adapter for connecting the base station to a power outlet

Phone cord for connecting the base station to the fixed-line telephone network

Ethernet (LAN) cable for connecting the base station to a router (LAN/Internet)

Gigaset A58H 

handset

Two batteries for the handset (uncharged)

Battery compartment cover for the handset

Handset 

charging cradle

Power adapter for connecting the charging cradle to a power outlet

CD with the user guide for your Gigaset.
If the firmware for your base station is updated, the user guide will also be updated and 
made available for download on the Internet at www.gigaset.com. 

1

2

3

4

5

7

8

9

10

6

1

2

3

4

5

6

7

8

9

10

Summary of Contents for Gigaset A580

Page 1: ...A580 IP Black Cyan Magenta Yellow Simple step by step installation ...

Page 2: ...t sources direct sunlight or other electrical appliances Protect your Gigaset from moisture dust corrosive liquids and vapors If you give your Gigaset to someone else make sure you also give them the user guide Please remove faulty base stations from use or have them repaired by our Service Center as they could interfere with other wireless services All electrical and electronic equipment should b...

Page 3: ...for operation You should have a telephone that does not require electricity available for use during power outages VoIP service may not work during a power outage or when the Internet connection fails or becomes overloaded If your power is out or your Internet connection is down be aware that your VoIP service may not work Consider installing a backup power supply maintaining a traditional phone l...

Page 4: ...LAN cable for connecting the base station to a router LAN Internet Gigaset A58H handset Two batteries for the handset uncharged Battery compartment cover for the handset Handset charging cradle Power adapter for connecting the charging cradle to a power outlet CD with the user guide for your Gigaset If the firmware for your base station is updated the user guide will also be updated and made avail...

Page 5: ... call Control key Press up Set call volume ringer and advisory tones Press down Open directory Press up down Navigate menus and text Press up Message key f Open call lists and message lists Flashes New message or new call or New base station firmware new provider profile available Press down end call On Off key a End call cancel function press briefly Return to idle status press and hold Switch ha...

Page 6: ...he batteries Connecting the phone cord and power cable to the base station Connecting the base station to the fixed line telephone network PSTN and the power supply To connect the base station to the Internet first connect the base station to the router connection via router and modem or via router with integrated modem PC in LAN optional for advanced configuration of the Gigaset A580 IP base stat...

Page 7: ...battery compartment cover into the notches at the top of the battery compartment Then press the battery compart ment cover until it clicks into place The display is protected by a plastic film Please remove this protective film Place the handset in the charging cradle and wait until the batteries are fully charged Do not put the handset back in the charging cradle until the batteries are fully dis...

Page 8: ...ess the Talk key c Insert the phone cord connector into the phone jack connection at the rear of the base station Insert the power cable of the power adapter into the power connector at the rear of the base station Insert both cables into their respective cable recesses Only use the supplied phone cord and the supplied power adapter Insert the phone cord connector into the telephone jack in the wa...

Page 9: ...le supplied As soon as the cable connecting the phone and router is plugged in and the router is switched on the button lights up on the front of the base station Paging button The procedures in steps to require that your phone is automatically assigned an IP address by the router i e DHCP is enabled on router and phone Exception e g if DHCP is not enabled on the router you will have to assign a s...

Page 10: ...tion to the Gigaset net online directory is established You will see the following display If an entry already exists with this name the message Please choose another name will appear You will be prompted to enter a name again If an entry in the Gigaset net directory is successful the message Name added to Gigaset net will be shown Exclusion of liability Gigaset net is a voluntary service provided...

Page 11: ...o the Internet by calling the Gigaset net echo serv ice Enter one of the following phone numbers Press the Talk key c When prompted speak into the microphone on the handset If you hear your own voice your base is connected to the Internet If you do not hear your voice check your phone and router settings 12341 9 English 12344 9 French 12342 9 Dutch 12345 9 German 12343 9 Italian 12346 9 Spanish ...

Page 12: ...access data using your PC steps to Launch the Web browser on your PC Enter the URL http www Gigaset config com in the address field of the Web browser and press the Return key You are connected to your base station s Web configurator You can find a description of the Web configurator in the user guide on the enclosed CD Automatic configuration If your provider supports automatic configuration you ...

Page 13: ...es The new firmware will be loaded The process takes approx 3 minutes The Message key f will now flash again Press the Message key f to start configuration Press the key below Yes on the display right Display key Using the Number keys enter the base station s system PIN The default PIN is 0000 Press the right hand Display key OK If the connection wizard does not start properly you can start it via...

Page 14: ...e first provider is shown in the display Press the bottom of the Control key repeatedly until your provider is displayed Press the Display key OK If your provider does not appear in the list you have the following options Press the left Display key twice and continue as described in However you can only make a call via VoIP once you have completed the provider details using the Web configurator Yo...

Page 15: ...l times if necessary Characters entered incorrectly can be deleted using the left Display key X The charac ter to the left of the cursor will be deleted You can navigate within the input field using the Control key p press up down Using the Number keys enter your authentication name user ID This entry is case sensitive Press the right hand Display key OK Using the Number keys enter your authentica...

Page 16: ...king a VoIP call Enter a number using the handset keypad and press and hold the Talk key c If a VoIP connection cannot be established a corre sponding message will be shown in the display To ensure that you can always be reached via the Internet the router must be permanently connected to the Internet In the user guide on the enclosed CD you will find detailed information about setting up and oper...

Page 17: ...o dial the area code for calls via VoIP provider dependent Briefly press the Talk key c if you want to make a call via the fixed line network Or Press and hold the Talk key c if you want to make a call via VoIP An icon in the top right of the display tells you what line you are using for the call ç is displayed if you are making a call via VoIP æ is displayed if you are making a call via the fixed...

Page 18: ... or eliminate the interfer ence However there is no guarantee that interference will not occur in a particular installation If this telephone system does cause harmful interference to radio or television reception which can be determined by turning the system off and on the user is encouraged to try to correct the interference by one or more of the following measures 1 Reorient or relocate the rec...

Reviews: