background image

28

First steps

DL500A/DX600A-ISDN/DX800A / GRC EN / A31008-N3101-T101-1-8U43 / starting.fm / 27.10.10

V

e

rsion 4, 16.0

9

.2005

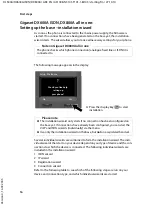
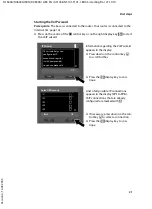
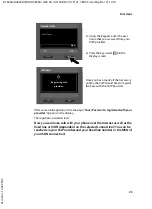
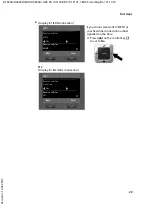
Starting the connection wizard 

a.

¤

Press the display key 

§Yes§

, if you 

wish to change the setting for the 
send and receive connection of the 

base

 (internal name 

INT 1

). 

¤

Press the display key 

§No§

, if you do 

not wish to change the setting for 
the base. 

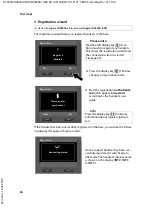
b.

(Display for ISDN connection)

Or:

(Display for fixed line connection)

The list of receive connections cur-
rently assigned is displayed. 

Press down on the control key 

s

 to 

scroll through the list if necessary. 

¤

Press the display key 

§Change§

, if 

you wish to change the receive 
connection setting for the base. 

¤

Press the display key 

§OK§

, if you do 

not wish to change the setting. 

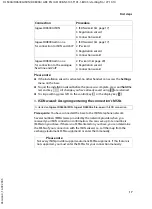
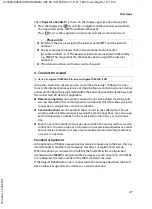
Note on DX800A all in one: 

A Gigaset.net phone number is 
already assigned to the base on 
delivery. You can also assign the 
Gigaset.net number to all connected 
devices as a receive connection. 

Press 

§OK§

 to skip the following steps. Continue from  

£

e.

Press 

§Change§

 to display the following:

Connection Wizard


?

Assign connections 

to desk phone 

INT 1?

No

Yes

Receive Connections

Ð

INT 1

receives calls for

MSN1: 12345601

MSN2: 12345602

MSN3: 12345603

V

Change

OK

Receive Connections

Ð

INT 1

receives calls for

Fixed Line: 4560123

IP1: 12345602

Gigaset.net: 12345#9

V

Change

OK

Summary of Contents for Gigaset DX600A ISDN

Page 1: ...y Gigaset Communications GmbH under trademark license of Siemens AG As of 1 Oct 2011 Gigaset products bearing the trademark Siemens will exclusively use the trademark Gigaset All rights reserved Subject to availability www gigaset com Gigaset Communications GmbH 2010 DL500A DX600A ISDN DX800A all in one ...

Page 2: ...erface you can register up to five GSM mobile phones You can con nect one of the mobile phones with the base and make calls using this GSM connection Link2mobile Go online with your Gigaset Use your phone s Info Centre and have information specifically provided for the phone from the Internet shown on the display Do not disturb Switch off the display backlight at night page 48 use time control for...

Page 3: ...fun using your new phone User guide This document only describes how to get started with your Gigaset phone and its key func tions in condensed form There is a detailed description of the phone and its functions and a description of its Web configurator on the enclosed CD You can make phone settings from the PC via the Web configurator the phone s Web interface These instructions are in PDF format...

Page 4: ...d key End call cancel function go back one menu level press briefly back to idle status press and hold 6 Function keys programmable page 47 7 Redial Open redial list page 37 8 Handsfree key 9 Mute key During a call Activate deactivate microphone 10 key Activate deactivate ringer press and hold Text input Special characters table 11 Back key for answering machine During playback Back to the start o...

Page 5: ...larm clock Display in idle status example Status display in the headers The following icons are displayed dependent on the settings and the operating status of your base Answering machine icon DX600A DX800A 1 2 3 numbers of the activated answering machines orange on DL500A 1 orange answering machine activated Eco Mode activated white Eco Mode and Eco Mode activated green ò Bluetooth activated ô Bl...

Page 6: ...ng an internal call 35 Ending a call 35 Accepting a call 35 Activating deactivating handsfree open listening mode 36 Muting the base 36 Making calls using network services 36 Using lists 37 Redial list 37 Call lists 37 Opening lists with the message key 37 Using directories 38 Using the local base directory 38 Using online telephone directories 39 Using the private net directory 39 Using the Gigas...

Page 7: ...unctions and numbers quickly 47 Setting the display 48 Changing the handsfree receiver volume 48 Setting ringers 49 Activating deactivating advisory tones 50 Changing the system PIN 50 Setting your own area code 50 Customer Service Assistance 51 Questions and answers 52 Authorisation 52 Menu overview Gigaset DX800A all in one 53 Menu overview Gigaset DX600A ISDN 58 Menu overview Gigaset DL500A 62 ...

Page 8: ...may affect nearby medical equipment Be aware of the tech nical conditions in your particular environment e g doctor s surgery Do not install the phone in a bathroom or shower room The phone is not splash proof Do not use your phone in environments with a potential explosion hazard e g paint shops If you give your phone to a third party make sure you also give them the user guide Remove faulty tele...

Page 9: ... 6 One CD 7 Various connection cables device specific Gigaset DX800A all in one One Ethernet LAN cable Cat 5 with 2 RJ45 modular jacks for connecting to a router LAN Internet or PC One phone cable for connecting to the analogue fixed line TAE RJ45 8 pin the outer 2 pins are in use cable slightly flattened One phone cable for connecting to the ISDN 8 pin with 2 mini western jacks 8 8 the inner 4 pi...

Page 10: ...itude of different varnishes and polishes used on today s furnishings the occurrence of marks on the surfaces cannot be completely ruled out Firmware updates This user guide describes the functions of your base from firmware version 56 00 Whenever there are new or improved functions for your Gigaset firmware updates are made available for you to download to your base If this results in operational...

Page 11: ...work 3 Connect the base to the mains power supply 4 Connect the base to the router for accessing the Internet connection via router and modem or via router with integrated modem and for configuring the base via the Web configurator 5 Connect a wire bound headset to the base Additional device specific connections 6 Gigaset DX600A ISDN DX800A all in one Connect the base to a fax device 7 Gigaset DX8...

Page 12: ... can be found on the longer straight end of the connection cable into the connection port marked with the symbol on the underside of the base 2 Place the straight part of the cable in the cable recess provided 3 Insert the other jack on the connection cable into the port on the receiver 3 1 2 Underside of the base The LAN2 and FAX connections are not available for all devices ...

Page 13: ...page 8 cable 7c Use the TAE connection cable with RJ11 jack to connect to the analogue fixed line page 8 cable 7b 2 Plug the telephone cable into the port marked with the symbol on the un derside of the base 3 Then connect the phone cable to your phone connection 3a ISDN or 3b ana logue fixed line 3b 2 1 Underside of the base 3a The LAN2 and FAX connections are not available for all devices page 1...

Page 14: ...le mode Now you can make calls with your base via the fixed line or ISDN and can be reachedviayourfixedlinenumberorthemainnumberofyourISDNconnection The answering machine on the base is set with a pre recorded announcement in answer and record mode page 42 1 3 2 The LAN2 and FAX connections are not available for all devices page 10 Warning u Keep the power cable plugged in at all times for operati...

Page 15: ...or phone numbers in an online directory The base will have to be connected to a PC via a router or directly if you wish to use the following features of your base u You wish to set up the base using its Web configurator u You wish to use the additional PC software Gigaset QuickSync over Ethernet to dial numbers via the PC e g numbers from a PC directory or to load images or melodies from the PC to...

Page 16: ...ng 2 Plug the jack on the Ethernet cable into the LAN port on the underside of the base 3 Then insert the second Ethernet cable plug into a LAN socket on the router Gigaset DX800A all in one You are now able to establish VoIP connections within Gigaset net page 40 Gigaset DL500A You have completed the setup for the base For more information see page 33 Date time 1 2 3 The LAN2 and FAX connections ...

Page 17: ...s to which the device is connected The following individual wizards are included in the installation wizard 1 ISDN wizard 2 IP wizard 3 Registration wizard 4 Connection wizard Refer to the following table to see which of the following steps are run on your device and connection type and which individual wizards are started Note on Gigaset DX800A all in one The phone checks which phone connection a...

Page 18: ...nnection confirmation You can save up to ten numbers MSNs on your base If there is no MSN entered on your base you can determine the MSNs of your connection with the ISDN wizard i e call them up from the exchange automatic MSN assignment or enter them manually Connection Procedure GigasetDX600A ISDN 1 ISDN wizard page 17 3 Registration wizard 4 Connection wizard GigasetDX800A all in one for connec...

Page 19: ...reen After the MSNs have been successfully assigned a list containing the MSNs is displayed Pressthe displaykey OK toclose the ISDN wizard The display showsISDNinstallation complete ISDN Wizard Start ISDN installation wizard No Yes ISDN Wizard Ð This wizard helps you detect and configure your ISDN phone numbers MSNs OK ISDN Wizard Ð MSN Assignment MSN1 12345601 MSN2 12345602 MSN3 12345603 MSN4 123...

Page 20: ...istration wizard Pressthedisplaykey OK toenterthe MSNs manually Enter a name for MSN 1 via the number keys max 16 characters If you enter nothing MSN1 is set Press down on the control key s to switch to entering the MSN Enter your first MSN without area code max 20 digits Press down on the control key again to switch to the next field Repeat the above procedure to enter the remaining MSNs After en...

Page 21: ... data from your VoIP provider This will include Either u Your user name if required by VoIP provider The user name of your IP account caller ID frequently identical to your phone number u Your authentication name or login ID u The login password registered with the VoIP provider u General settings for your VoIP provider server addresses etc Or u An auto configuration code activation code Your Giga...

Page 22: ...egarding the VoIP wizard appears in the display Press down on the control key s to scroll further Press the OK display key to con tinue A list of all possible IP connections appears in the display IP 1 to IP 6 VoIP connections that are already configured are marked with If necessary press down on the con trol key s to select a connection Press the OK display key to con tinue IP Wizard Ð This wizar...

Page 23: ...ider has supplied you with an authentication name pass word and where applicable a user name Press the key below No on the display screen For further information please see Downloading VoIP provider data on page 23 You have received an auto configura tion code Activation Code from your VoIP provider Press the key below Yes on the display screen For further information please see Entering the auto ...

Page 24: ...d Press up or down on the control key q repeatedly until your VoIP pro vider is selected in the display Press the key below OK on the display screen to confirm your selection Select your country Country 1 Country 2 Country 3 Country 4 Country 5 V Back OK Select Provider Provider 1 Provider 2 Provider 3 Provider 4 Provider 5 V Back OK You have not been able to download your provider s data If your ...

Page 25: ...ss the key several times if necessary You can see briefly in the display whether upper case lower case or digit input is selected Characters entered incorrectly can be deleted using the left display key below Ñ The character to the left of the cursor is deleted You can navigate within the input field using the control key r left right Using the keypad enter the authen tication name that you receiv...

Page 26: ...e over the Internet as well as the fixed line or ISDN dependent on the selected connection You can be reached via your VoIP number and your fixed line number or the MSN of your ISDN connection Using the keypad enter the user name that you received from your VoIP provider Press the key under OK on the display screen Once you have made all the necessary entries the VoIP wizard tries to register the ...

Page 27: ...wish to register any handsets This closes the registration wizard and the connection wizard is started page 27 Press the display key Yes The base changes to registration mode Registration Register a handset No Yes Start the registration on the hand set within approx 60 seconds according to the handset s user guide Info Press the display key Info to display information about registering hand sets R...

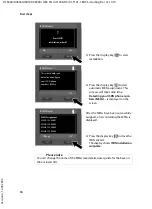
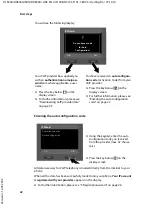
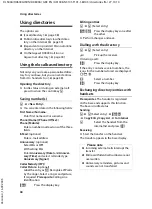
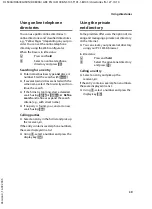
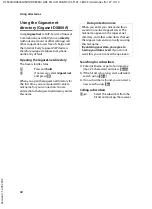
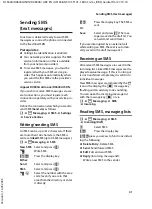
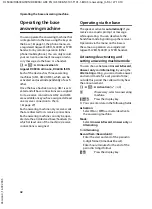
Page 28: ...er or the associated connection as a send connec tion u Each connection number of your phone can be both a send as well as a receive connection You can assign each connection to several internal parties as a send and or receive connection It may only be assigned to an answering machine as a receive connection Standard assignment All connections of the base are assigned as receive connections to th...

Page 29: ...he list if necessary Press the display key Change if you wish to change the receive connection setting for the base Press the display key OK if you do not wish to change the setting Note on DX800A all in one A Gigaset net phone number is already assigned to the base on delivery You can also assign the Gigaset net number to all connected devices as a receive connection Press OK to skip the followin...

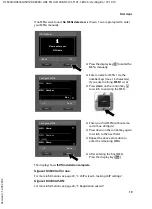
Page 30: ... connection Or Display for fixed line connection If you do not want calls to MSN1 or your fixed line connection number signalled on the base Press right on the control key v to set to No INT 1 Receive calls for MSN1 f Yes g Receive calls for MSN2 V Back Save INT 1 Receive calls for Fixed Line f Yes g Receive calls for IP1 V Back Save ...

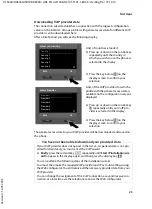
Page 31: ...of receive connections is displayed one more time for you to check Press the display key OK to confirm the assignment e The send connection currently set for the base is displayed MSN1 for con nection to the ISDN and Fixed Line for connection of the Gigaset DX800A all in one to the analogue fixed line Press the display key OK if you do not wish to change the setting The following step is skipped T...

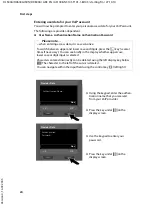
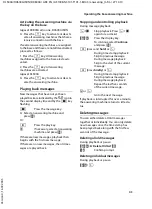
Page 32: ...splay Perform steps a to d for each answering machine Please note Each connection may only be assigned to one of the three local answering machines as a receive connection If you assign a receive connection to an answering machine and this connection is already assigned to another answer ing machine the old assignment is deleted After successfullyconfiguring the settings you will briefly see thefo...

Page 33: ...ompletes the installation The following is shown in the display Afterwards the base changes to idle status for an example of the display in idle sta tus page 4 The answering machines of the base to which you assigned a receive connection are activated and switched on in answer and record mode with a standard announcement page 42 Setup Setup complete ...

Page 34: ...m a time server on the Internet at regular intervals Or you set the date and time manually on the base see below u Gigaset DL500A By default your base is configured so that the date and time are transferred from a time server on the Internet provided it is connected to the Internet You can also set the date and time manually via the base menu or one of the registered handsets see below You can act...

Page 35: ...ones can read the detailed user guide to find out how to operate the base You will also find a user guide for the Web configurator of your telephone on the enclosed CD You can use it to make settings for your phone on the PC If you have any questions about using your phone please read the tips on troubleshooting in the phone s long user guide or contact our Customer Care team Information on is loc...

Page 36: ...nal party c Lift the receiver If the internal party cannot be reached e g outside of range does not answer or if there are already three internal connections the busy tone sounds Calling all internal parties group call u Press and hold left on the control key All handsets are called Ending a call Replacethereceiverorpressthe red end key T If you make a call with a headset Press the Headset functio...

Page 37: ...e to receiver mode c Pick up receiver The speaker on the base is deactivated Muting the base Using the mute key P you can switch the microphone of the receiver the base hands free mode and a connected headset off or on again during an external call also during a conference call or call swapping If the microphone is deactivated Microphone is off is displayed Making calls using network services Netw...

Page 38: ...ling Line Identification Presentation CLIP The options are u Accepted calls list u Outgoing calls list u Missed calls list u List of all calls Opening call lists In idle status Press t or v Ê Select list using s and press OK To call a number from the list Select an entry Lift receiver c To copy the number to the directory Select an entry Options Copy to Directory OK Opening lists with the message ...

Page 39: ...niver sary Time and select reminder type Anniversary Signal Caller Melody VIP Caller Picture optional Label the entry as Æ Recognize VIP calls by the ringer Select a ringer and picture if required Prerequisite Calling Line Identification Save Press the display key Editing entries s s Select entry View Edit Press the display keys one after the other Perform changes and save Dialling with the direct...

Page 40: ...ist is too long start a detailed search using Refine or Options Refine search and refine or expand the search criteria e g with street name If no party is found you can start a new search using New Calling parties Select an entry in the hit list and pick up the receiver c If the entry contains severalphonenumbers these are displayed in a list Using q select a number and press the display key Dial ...

Page 41: ...ry for the first time you are requested to enter a nickname for your connection You are entered into the Gigaset net directory under this name Searching for subscribers Enter nickname or part of a nickname max 25 characters and press Search If the hit list is too long start a detailed search using Refine If no subscriber is found you can start a new search using New Calling subscribers q c Select ...

Page 42: ... ËMessaging SMS New SMS Select and press OK Write SMS Options Press the display key Either Send Select and press OK SMS Select and press OK s Select the number with the area code even if you are in that area from the directory or enter it directly Send Press the display key The SMS is sent Or Save Select and press OK The mes sageissavedinthedraftlist You can edit and send it later If you are inter...

Page 43: ...ng machine can only be oper ated via the end devices base handsets to which at least one of the machine s receive connections is assigned Operating via the base The speaker activates automatically if you receive an acoustic prompt or message while operating You can deactivate the handsfree mode by picking up the receiver Operation via the menu on the base is the same as operation via a registered ...

Page 44: ...y selectananswering machine and press OK If there are new messages playback then begins with the first new message If there are no new messages the old mes sages are played back Stopping and controlling playback During message playback 2 w Stop playback Press 2 w again to resume or Options Press the display key To continue select Continue and press OK h press and hold or During time stamp playback...

Page 45: ...wering machine Prerequisite You are conducting an external call Inform the caller that the call is being recorded Options Two Way Record Select and press OK End End two way record Activating deactivating call screening While recording a message you can screen a call via the speaker on the base or on the registered handsets Permanently activating deactivating call screening v Ì Call Screening Deskt...

Page 46: ...e the following keys A During time stamp playback Skip to previous message During message playback Skip to the start of the current mes sage B Stop playback Press again to resume 3 Go to the next message D Repeat the last five seconds of the message 0 During message playback Delete current message Change the status of a previ ously played back message to new Cancelling remote operation Press the e...

Page 47: ... replaced and trust again is dis played Yes Confirm q Select the registered device to be overwritten and press OK If necessary enter a PIN of your choice or the PIN of the Blue tooth device to be registered and press OK Generally you can enter a PIN of your choice for a data device GSM mobile telephone You must also enter this PIN in the data device mobile phone handshake For a headset you only ne...

Page 48: ...the base and an activated mobile phone in range u If a call comes in on the GSM connection of the mobile phone u If you try to make a call on the base via the GSM connection select GSM connec tion as send connection Making calls via the GSM connection If the prerequisites are fulfilled you can make calls on your base via the GSM connec tion as described in the Making calls chap ter on page 35 Sett...

Page 49: ...se and specify a timeframe during which the display on the base is completely deactivatede g atnight reactivatesassoon as a key is pressed v Ï Settings Display Backlight The current setting is displayed You can enter data in the following fields Time Control Prerequisite The date and time have already been set Select On or Off For Time Control On Display off from Enter time in 4 digit format Displ...

Page 50: ...s the display key Yes To confirm the settings The setting for all calls will not work as soon as you change the setting for an individual connection Setting time control for external calls You can specify a time period when you do not want the base to signal external calls e g during the night Prerequisite The date and time have already been set v Ï Audio Settings Ringer Settings Time Control You ...

Page 51: ...g the system PIN v Ï Settings System System PIN If necessary enter the current system PIN of the base and press OK Enter your new system PIN and press OK Setting your own area code You should save your own country and area code in the base particularly if you want to make calls with the base via the GSM con nection of your Bluetooth mobile phone Link2mobile Some of these numbers are already precon...

Page 52: ...he features of several products with each other u Downloads for user manuals and current software updates u E mail contact form to our customer service Our service representatives are available on the telephone for more advanced questions or in person consultation Service Greece 801 1000 500 0 026 per minute from the Greek phone network For calls from mobile phone networks other prices may apply P...

Page 53: ...e Greek telephone net DX600A This device is intended for ISDN telephone connection in the Greek tele phone net DX800A This device is intended for ana logue phone lines or ISDN telephone con nection in the Greek telephone net Voice over IP telephony is possible with an addi tional modem via the LAN interface Country specific requirements have been taken into consideration Gigaset Communications Gmb...

Page 54: ... connection Correspondingly the ISDN specific func tions say only for ISDN connection To open the main menu press v when the base is in idle mode Ç Select Services Next Call Withhold Number Only for ISDN connection Keypad Control Only for ISDN connection Withhold No Next Call Only for fixed line connection Call Divert Internal Only for ISDN connection Fixed Line Only for fixed line connection MSN1...

Page 55: ...ge 46 Activation Search for Headset Search for Mobile Search for Data Device Known Devices Own Device É Additional Features Info Centre Resource Directory Screensavers Caller Pictures Sounds Capacity Ê Call Lists page 37 All Calls Outgoing Calls Accepted Calls Missed Calls Ë Messaging SMS New SMS page 41 Incoming Draft Settings Service Centres Notification E mail ...

Page 56: ... Machine 3 Activation Answer Machine 1 page 42 Answer Machine 2 Answer Machine 3 Announcements Record Announcemnt Answer Machine 1 to 3 page 42 Play Announcement Answer Machine 1 to 3 Delete Announcemnt Answer Machine 1 to 3 Record Advisory Msg Answer Machine 1 to 3 Play Advisory Message Answer Machine 1 to 3 Delete Advisory Msg Answer Machine 1 to 3 Recordings page 44 Call Screening Desktop Phone...

Page 57: ...Missed Alarms Î Contacts Directory page 38 Network Directory Gigaset net Online Directory The accessible online directo ries are displayed with pro vider specific names page 39 Yellow Pages Prv NetDir Ï Settings Connection Wizard ISDN Only for ISDN connection VoIP VoIP Wizard Only for fixed line connection Date Time Audio Settings Call Volume page 48 Ringer Settings Volume page 49 Melodies Time Co...

Page 58: ...swer Machine 3 Dialling Mode Auto Tone Dial only for ISDN connec tion Auto Keypad Dial of and Recall Only for fixed line connection Access Code System Reset DECT Interface FAX Port Repeater Mode Local Network Update Firmware System PIN page 50 Eco Mode Eco Mode Eco Mode Please note This quick user guide only describes a small proportion of your base s functions A detailed description of all functi...

Page 59: ...when the base is in idle mode Ç Select Services Next Call Withhold Number Keypad Control Call Divert Internal MSN1 MSN2 MSN10 Call Waiting Withhold All Calls Busy on Busy Transfer ECT Ringback Off ò Bluetooth page 46 Activation Search for Headset Search for Mobile Search for Data Device Known Devices Own Device É Additional Features Info Centre Resource Directory Screensavers Caller Pictures Sound...

Page 60: ...y Messages Network Mailbox Answer Machine 1 Answer Machine 2 Answer Machine 3 Activation Answer Machine 1 page 42 Answer Machine 2 Answer Machine 3 Announcements Record Announcemnt Answer Machine 1 to 3 page 42 Play Announcement Answer Machine 1 to 3 Delete Announcemnt Answer Machine 1 to 3 Record Advisory Msg Answer Machine 1 to 3 Play Advisory Message Answer Machine 1 to 3 Delete Advisory Msg An...

Page 61: ...irectory Online Directory The accessible online directo ries are displayed with pro vider specific names page 39 Yellow Pages Prv NetDir Ï Settings ISDN Wizard Date Time Audio Settings Call Volume page 48 Ringer Settings Volume page 49 Melodies Time Control Anon Call Silencing Advisory Tones page 50 Music on hold Display Screensaver page 48 Info Ticker Backlight Language page 2 Registration Regist...

Page 62: ...achine 1 Answer Machine 3 Dialling Mode Auto Tone Dial Auto Keypad Dial of and Access Code System Reset DECT Interface FAX Port Repeater Mode Local Network Update Firmware System PIN Eco Mode Eco Mode Eco Mode Please note This quick user guide only describes a small proportion of your base s functions A detailed description of all functions in the menu tree can be found in the long user guide for ...

Page 63: ...ixed Line Call Waiting Withhold All Calls Network Mailbox Fixed Destination Call ò Bluetooth page 46 Activation Search for Headset Search for Mobile Search for Data Device Known Devices Own Device É Additional Features Info Centre Resource Directory Screensavers Caller Pictures Sounds Capacity Ê Call Lists page 37 All Calls Outgoing Calls Accepted Calls Missed Calls Ë Messaging SMS New SMS page 41...

Page 64: ...page 42 Play Announcement Delete Announcemnt Record Advisory Msg Play Advisory Message Delete Advisory Msg Recordings page 44 Call Screening Desktop Phone page 44 Handset Network Mailbox Set Key 1 Network Mailbox Answering Machine Í Organizer Calendar Alarm Clock Missed Alarms Î Contacts Directory page 38 Network Directory Online Directory The accessible online directo ries are displayed with pro ...

Page 65: ... Ticker Backlight Language page 4 Registration Register Handset De register Handset Telephony Area Codes page 50 Send Connections INT 1 INT 7 Receive Connections INT 1 INT 7 Access Code Recall System Reset DECT Interface Repeater Mode Local Network Update Firmware System PIN page 50 Eco Mode Eco Mode Eco Mode Please note This quick user guide only describes a small proportion of your base s functi...

Page 66: ...ht 48 C Call accepting 35 ending 35 ending on headset 35 internal 35 picking up from answering machine 44 two way recording 44 Call lists 37 Call screening during recording 44 Calling from classified directory 39 from online directory 39 Gigaset net 40 internal 35 Changing handsfree volume 48 receiver volume 48 ringer 49 system PIN 50 CLIP picture 38 Connection wizard starting getting started 21 C...

Page 67: ... answering machine 37 call lists 37 missed calls 37 network mailbox 37 SMS list 37 M Making calls accepting a call 35 external 35 internal 35 Manual redial 37 Medical equipment 7 Message key opening list 41 opening lists 37 Messages deleting 43 new message icon 43 playing back 43 Microphone muting 36 Missed call 37 Mobile phone connecting Bluetooth 47 Muting the phone 36 N Number saving in the dir...

Page 68: ...es SMS 41 deleting 41 linked 41 reading 41 receiving 41 SMS list 37 Sound see Ringer T Text message see SMS Time control 48 display backlight 48 ringer 49 U User guide 2 Using handsfree mode 36 V VIP directory entry 38 VoIP configuring account first 24 loading provider data 23 starting connection wizard 20 VoIP provider downloading data 23 selecting 23 VoIP user data entering connection wizard 24 ...

Page 69: ...ys 1 Place the insert strip into the indented area 2 nextto the function keys Slide it under the plastic tabs at the edge of the indented area Place the protective film back into the indented area so that the function keys fit into the recesses of the protective film Then slide the protective film under the plastic tabs 1 2 On the telephone Tabs Tabs See the back of the user guide for the insert s...

Reviews: