10
Preparing to use your phone
Gigaset SL 100 / SL 150 / IM_engl / A31008-L150-J102-1-7619 / starting.fm / 26.08.2003
Placing the handset into the charging unit and charging the battery
1. Plug the charger unit mains adapter into a mains socket.
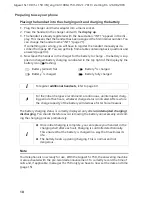
2. Place the handset in the charger unit with the
display up
.
3. The handset is already registered with the base station. "INT 1" appears in the dis-
play. This means that the handset has been assigned the first internal number. You
can change the handset name "INT 1" (page 71).
If something goes wrong, you will have to register the handset manually as de-
scribed from page 69. You can get help from a table containing basic questions and
answers (page 93).
4. Now leave the handset in the charger for the battery to charge – the battery is sup-
plied uncharged. Battery charging is indicated in the top right of the display by the
battery icon
V
flashing:
The battery charging status is correctly displayed only after
uninterrupted charging/
discharging
. You should therefore avoid removing the battery unnecessarily and end-
ing the charging process prematurely.
Note
Your telephone is now ready for use. With the Gigaset SL 150, the answering machine
is also activated with the pre-recorded announcement. To correctly record the time of
calls and, if applicable, messages (SL 150 only) you have to now set the date and time
=
Battery
(almost)
flat
V
Battery
2
/
3
charged
e
Battery
1
/
3
charged
U
Battery fully charged
i
To register
additional handsets
, refer to page 69.
W
For the initial charge we recommend a continuous, uninterrupted charg-
ing period of five hours, whatever charge status is indicated. After a while
the charge capacity of the battery will decrease for technical reasons.
i
◆
Once initial charging is complete, you can replace your handset in the
charging shell after each call. Charging is controlled electronically.
This ensures that the battery is charged in a way that maximises its
life.
◆
The battery heats up during charging. This is normal and not
dangerous.


