Cleaning assistance
en
21
18 Cleaning assistance
The cleaning assistance is a quick alternative for occa-
sionally cleaning the cooking compartment. The clean-
ing assistance softens dirt by vaporising the soapy wa-
ter. It is then easier to remove dirt.
18.1 Setting the cleaning aid
WARNING ‒ Risk of scalding!
If there is water in the cooking compartment when it is
hot, this may create hot steam.
▶
Never pour water into the cooking compartment
when the cooking compartment is hot.
Requirement:
The cooking compartment has cooled
down completely.
1.
Remove the accessories from the cooking compart-
ment.
2.
Mix 0.4 litres water with a drop of washing-up liquid
and pour into the centre of the cooking compart-
ment floor.
Do not use distilled water.
3.
Press
.
a
A type of heating and a temperature appears.
4.
Use the rotary selector to set the bottom heat
type of heating.
5.
Press the temperature.
6.
Use the rotary selector to set the temperature to
80 °C.
7.
Press .
8.
Use the rotary selector to set the time to
four minutes.
9.
Press
to start.
a
The appliance starts to heat and the time starts to
count down.
a
Once the time has elapsed, an audible signal
sounds. A message appears in the status bar.
10.
Use
to switch the appliance off and leave the
cooking compartment to cool for approx.
20 minutes.
18.2 Wiping down the cooking compartment
ATTENTION!
The prolonged presence of moisture in the cooking
compartment leads to corrosion.
▶
After using the cleaning assistance, wipe the cook-
ing compartment and allow it to dry completely.
Requirement:
The cooking compartment must have
cooled down.
1.
Open the appliance door and remove the remaining
water with an absorbent sponge cloth.
2.
Clean the smooth surfaces in the cooking compart-
ment with a dish cloth or a soft brush. Remove stub-
born food remnants using a stainless steel scouring
pad.
3.
Remove limescale with a cloth soaked in vinegar.
Then wipe with clean water and rub dry with a soft
cloth (including under the door seal).
4.
In order to dry the cooking compartment, leave the
appliance door open in the detent position (approx.
30°) for approx. one hour.
19 Appliance door
To clean the appliance door thoroughly, you can disas-
semble the appliance door.
19.1 Detaching the appliance door
WARNING ‒ Risk of injury!
Components inside the appliance door may have sharp
edges.
▶
Wear protective gloves.
The hinges on the appliance door move when the door
is opened and closed, which could trap your fingers.
▶
Keep your hands away from the hinges.
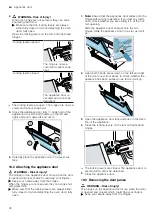
1.
Open the appliance door fully and push in the direc-
tion of the appliance.

