Cleaning and Maintenance
English 39
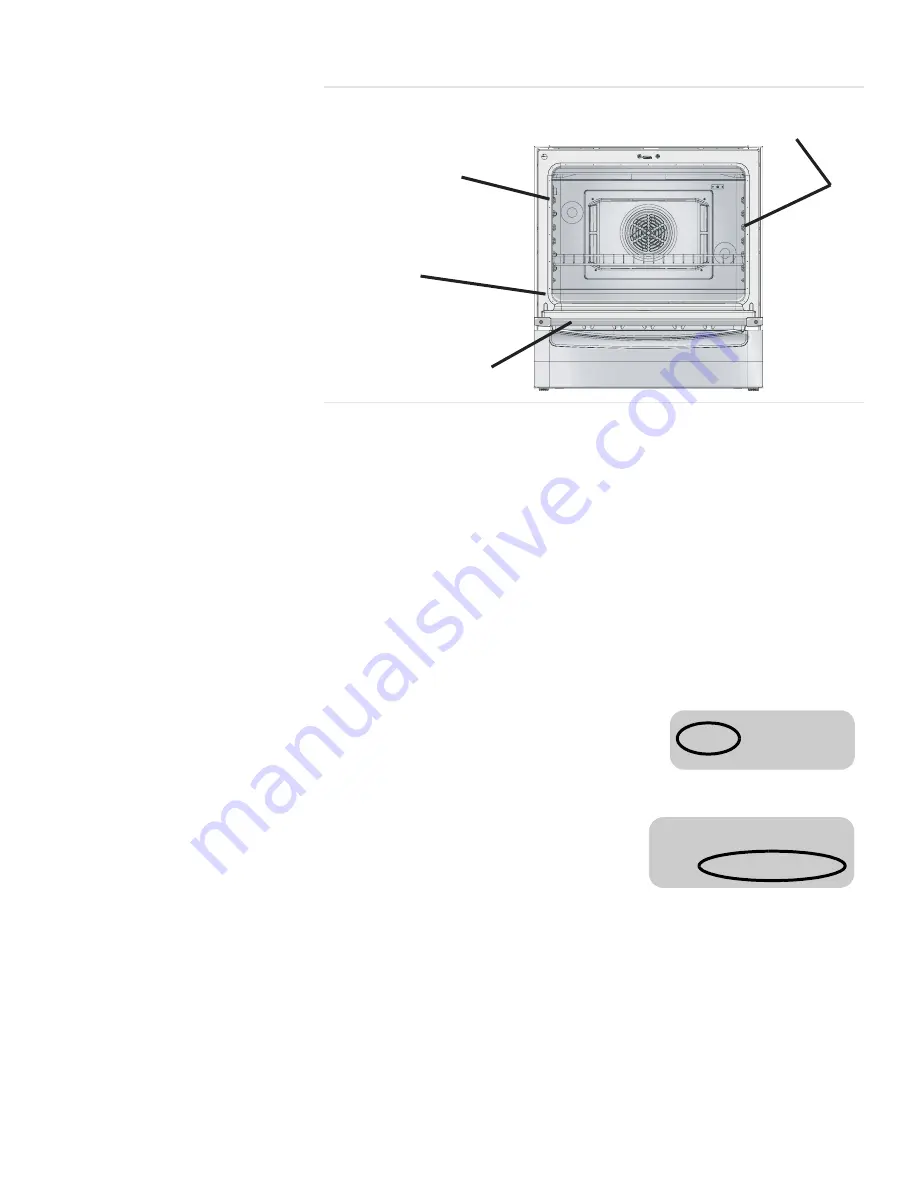
5. Review illustration above. Some areas of the oven must be cleaned by hand
before the cycle begins. Use a soapy sponge or plastic scrubber or a deter-
gent-filled S.O.S.
®
pad. Hand-clean the oven door edge, oven front frame and
up to 1-1/2 inches inside the frame with detergent and hot water. Do not clean
or rub the gasket on the oven. The gasket is designed to hold in heat during
the self-clean cycle. Rinse all areas thoroughly then dry.
6. Be sure oven light is turned off and the light bulbs and lens covers are in
place. Do not operate oven without light bulb and cover in place.
Important:
Do not use Commercial Oven Cleaners on the self-clean oven or any
part because they will damage the finish or part.
Setting the Self-Clean Mode
1. Press COOKING MODE.
2. Turn knob until SELF CLEAN mode appears. Press START.
3. The default cleaning time is 4 hours. To
change cleaning time, turn knob to change
number of hours. Otherwise, continue to
step 4.
4. Press START. SELF CLEAN flashes. Press
START.
5. REMOVE RACKS appears in the display
as a reminder to remove oven racks.
6. Press START again to begin the self-
clean.
Note:
The door locks at the beginning of the
cycle; The door lock symbol will appear in the display at this point. If door does not
lock, press OFF and do not self-clean; phone service.
Delaying the Start of
the Self-Clean
Note:
The time of day must be correctly set for this option to work properly. See
section “Setting the Clock” in “Setting Up Your Range”.
1. Press COOKING MODE.
2. Turn knob until SELF CLEAN mode appears. Press START.
3. The default cleaning time is 4 hours. To change cleaning time, turn knob to
change number of hours. Otherwise, continue to step 4.
4. Press START.
Figure 4: Cleaning Guidelines
Do not hand-clean
the gasket.
Do hand-clean door
area outside the gasket.
Do hand-clean frame
area outside the gasket.
Do hand-clean 1 1/2 inches from
rack guides to front of oven cavity.
3
SELF CLEAN
3: 00
REMOVE RACKS
4: 00
SELF CLEAN


