background image

I.L. No. 508533A00

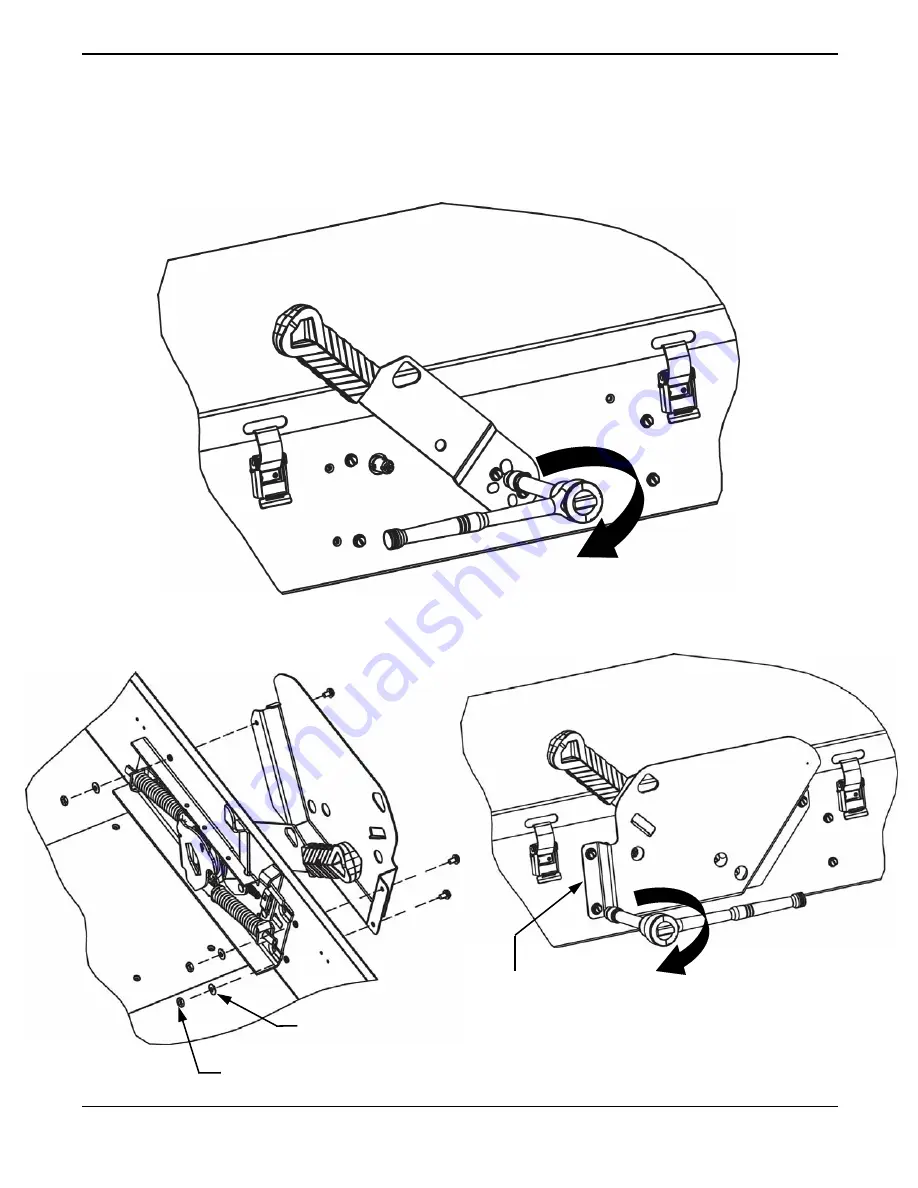
11. Place the handle onto the Mechanism as shown in Fig. 13.  Secure with (2) #10-32 x 0.5” screws (saved 

from Step 6 above).

12. Place the handle guard onto the enclosure as shown in Fig. 14.  Secure with (3) #10-32 x 0.312” screws 

(saved from Step 5 above).  Include sealing washers and #10-32 nuts for type 4X enclosures only.

Fig. 13

7 / 10 (English)

Torque to 30 lb-ins.

(3.39 Nm)

Torque to 30 lb-ins.

(3.39 Nm)

Fig. 14

Handle Guard

10-32 Nut
(Type 4X Only)

Sealing Washer 
(Type 4X Only)

Summary of Contents for HM656A

Page 1: ...icio Reemplace todas las barreras y cubiertas antes de energizar el interruptor I L No 508533A00 Use only with Siemens certified components NOTE These instructions do not purport to cover all details or variations in equipment or to provide for every possible contingency to be met in connection with installation operation or maintenance Should further information be desired or should particular pr...

Page 2: ...t barrer avant de travailler Remplacez touts les couverts avant que l approvisionnement de pouvoir soit alimenté Tensión peligrosa Puede causar la muerte o lesiones graves Tension dangereuse Danger de mort ou risque de blessures graves Hazardous Voltage Will cause death or serious injury Desenergice totalmente antes de instalar o darle servicio Reemplace todas las barreras y cubiertas antes de ene...

Page 3: ...4 Lift the line base assembly and enclosure barrier out of enclosure as shown Fig 5 3 10 English I L No 508533A00 Enclosure Barrier keep for re installation Line Base Assembly Fig 5 Fig 4 View shown for clarification Rotor Assembly Rotor Assembly Mechanism Assembly Fig 3 Enclosure Barrier Line Base Assembly Mechanism assembly ...

Page 4: ...ng screws sealing washers type 4X 10 32 nuts type 4X and handle guard as shown in Fig 6 Do not throw components away 6 Remove the two existing handle mounting screws and handle as shown in Fig 7 Do not throw away components Fig 7 Fig 6 Handle Guard 4 10 English ...

Page 5: ...terruptor Turn off and lock out all power supplying this device before working on this device Replace all covers before power supplying this device is turned on Couper l alimentation de l appareil et barrer avant de travailler Remplacez touts les couverts avant que l approvisionnement de pouvoir soit alimenté Tensión peligrosa Puede causar la muerte o lesiones graves Tension dangereuse Danger de m...

Page 6: ...roperly seated the enclosure sidewall will be captivated within the groove in the grommet 10 Align the new mechanism through the grommets openings Mount the Mechanism with the Mechanism Mounting Screws and sealing washers for type 4X as shown in Fig s 11 12 6 10 English Fig 10 Enclosure Inside Surface Fig 11 Fig 12 Torque to 30 lb ins 3 39 Nm ...

Page 7: ...2 Place the handle guard onto the enclosure as shown in Fig 14 Secure with 3 10 32 x 0 312 screws saved from Step 5 above Include sealing washers and 10 32 nuts for type 4X enclosures only Fig 13 7 10 English Torque to 30 lb ins 3 39 Nm Torque to 30 lb ins 3 39 Nm Fig 14 Handle Guard 10 32 Nut Type 4X Only Sealing Washer Type 4X Only ...

Page 8: ...he line base mounting holes are aligned as shown in Fig s 16 17 8 10 English I L No 508533A00 Fig 16 Enclosure Barrier Line Base Assembly Enclosure Barrier Line Base Assembly Fig 15 Fig 17 View shown for clarification Rotor Assembly Rotor Assembly Mechanism Assembly WARNING Electrical Shock Hazard Could cause death or serious injury Ensure the Enclosure Barrier is properly installed before restori...

Page 9: ...g this device before working on this device Replace all covers before power supplying this device is turned on Couper l alimentation de l appareil et barrer avant de travailler Remplacez touts les couverts avant que l approvisionnement de pouvoir soit alimenté Tensión peligrosa Puede causar la muerte o lesiones graves Tension dangereuse Danger de mort ou risque de blessures graves Hazardous Voltag...

Page 10: ...ardous Voltage Will cause death or serious injury Desenergice totalmente antes de instalar o darle servicio Reemplace todas las barreras y cubiertas antes de energizar el interruptor 16 While all power supplying the Safety Switch is still OFF and locked out a Hold Interlock Lever below the front of the enclosure to operate switch with the door open See Fig 14 Move the safety Switch handle to the O...

Reviews: