7
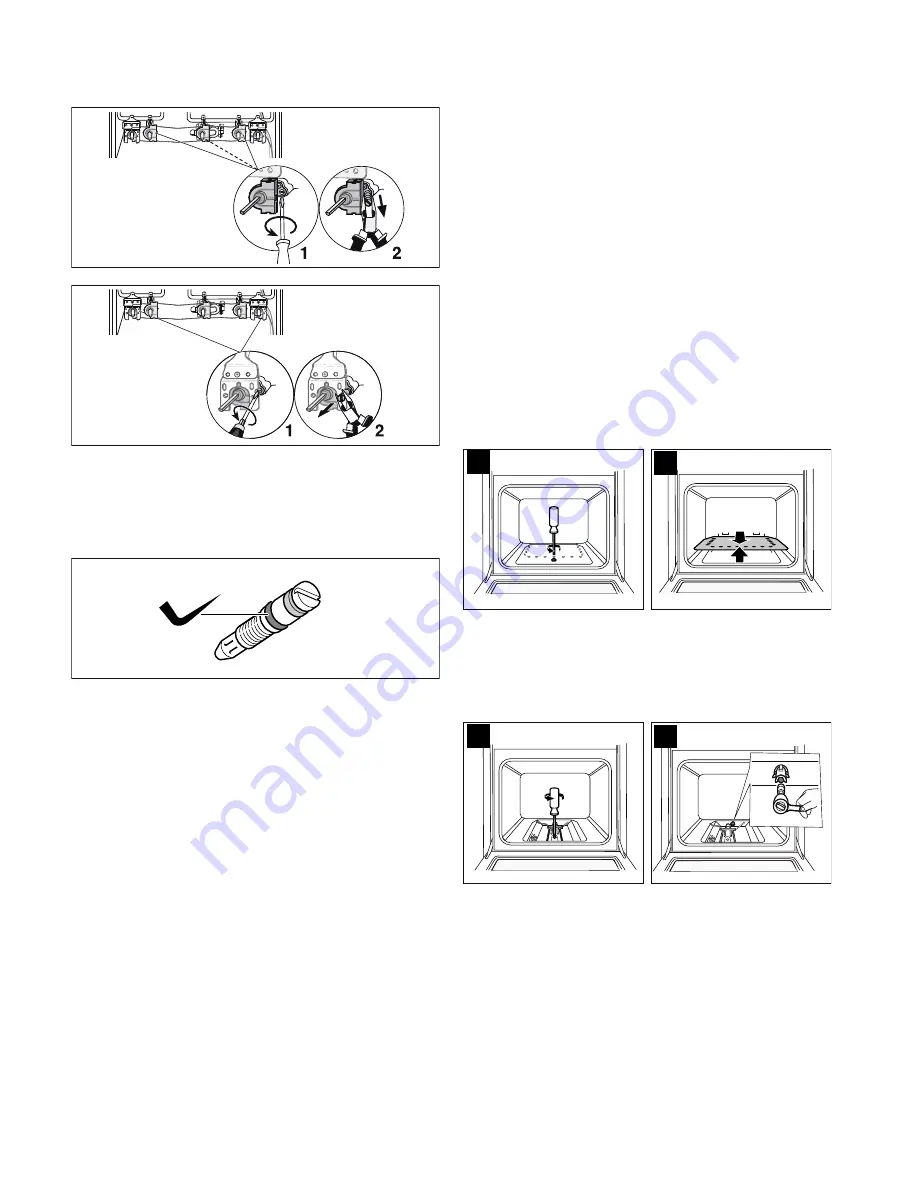
Replacing bypass screws
1.
Loosen the bypass screws with a flat screwdriver (no. 2).
Remove the bypass screws.
2.
You can use the table to determine the new bypass screws
that you will need after the gas conversion. See the section
entitled
"Technical properties - gas"
.
3.
Check whether the seals on the bypass screw are correctly
seated and work precisely. Only use bypass screws with
intact seals.
4.
Insert the new bypass screws and tighten them. Make sure
that all bypass screws are connected to the correct shut-off
valves.
5.
At this point, it is essential to carry out a leak test. See the
section entitled
"Leak test"
.
Fitting the control panel
To fit the control panel, follow the instructions for removing it in
the reverse order.
1.
Take hold of the front panel with both hands and carefully fit
it into place. Ensure that the cables are not damaged and the
connections do not come loose.Lower the front panel slightly
and place it in the fastening brackets.
2.
Screw the two screws (T15 and M4) that you removed from
the control panel back in.
3.
Screw the screws (T20) that you removed from the front
profiles back in on the right and left.Refit the plastic covers.
4.
Fit the hob panel carefully. Make sure that the plastic parts
underneath the screws do not fall out. Screw the two screws
(T20) back in at the front right and left of the hob panel. If
there are any burner connection screws, screw them all into
the hob panel.
5.
For models with a wok burner (optional): Screw the four Torx
screws (M4) that you removed from the wok burner back in.
6.
If your cooker has an upper cover, take hold of it on both
sides, hold it upright and push it straight down into the
holder.
7.
Fit burner housings of the correct size onto each burner, and
ensure that the spark plug is inserted into the opening on the
edge of the burner housing. Place the enamelled burner caps
in the centre of the matching burner bases.
8.
Refit the pan supports. Make sure that the 80 mm-wide pan
support is fitted on the auxiliary burner.
9.
Fit the control knobs carefully.
10.
At this stage, it is important to check that the burners are
burning correctly; see section entitled "
Correct burner
behaviour
".
11.
Check whether the appliance is functioning correctly.
Replacing the oven burners (optional)
Preparation
Turn off all switches on the control panel.
Shut off the gas supply.
:
Risk of electric shock!
Interrupt the power supply to the appliance.
Replacing the nozzle for the oven burner
1.
Open the oven door.
2.
Loosen the front securing screw in the bottom plate.
3.
Hold the bottom plate firmly at the front, lift and remove it.
4.
Loosen the burner securing screw and carefully remove the
oven burner. The burner nozzles are now freely accessible.
Make sure that the thermocouple and ignition plug
connections are not damaged.
5.
Release the nozzle at the burner access on the rear side of
the oven (using a 7 mm socket wrench).
6.
You can use the table to determine the new nozzle that you
will need after the gas conversion. See the section entitled
"Technical properties - gas"
.
7.
Insert and tighten the new nozzle.
8.
At this point, it is essential to carry out a leak test. To perform
a leak test, see the section entitled
"Leak test"
.
9.
Replace the oven burner, making sure that the thermocouple
and ignition plug connections are not damaged. Retighten
the securing screw.
10.
At this point, it is important to check the burner flame
formation. See the section entitled
"Correct flame formation"
.
11.
Replace the bottom plate.


