background image

Installation    

en

17

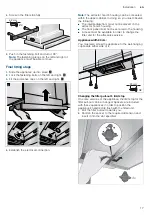
4.

Screw in the filler strip fully.

5.

Push in the fastening bolt and turn it 90°.

Note: 

The fastening pieces on the left and right of 

the appliance must be able to move.

Final fitting stage

1.

Slide the appliance up into place. 

¨

2.

Lock the fastening bolts on the left and right. 

©

3.

Fit the protective caps on the left and right. 

ª

4.

Establish the electrical connection.

Note: 

The extractor hood's housing can be concealed 

within the upper cabinet. In doing so, you must observe 

the following:

The intermediate floor must not be placed on the 

extractor hood's housing.

The front panel must not be secured to the housing.

Access must be available in order to change the 

filter and for the after-sales service.

Appliance width 90 cm:

You must also screw the appliance to the wall-hanging 

cupboards either side of it.

Changing the filter pull-out's limit stop

On some versions of the appliance, the limit stop for the 

filter pull-out can be changed. Spacers are included 

with these appliances in order to position the 

appliance's handle strip flush with the fitted unit.

1.

Pull the filter pull-out towards you.

2.

Shorten the spacer to the required dimension and 

insert it into the slot specified.

PP

[

%

$

&

[

PP

Summary of Contents for iQ500 LI67SA560S

Page 1: ...5HJLVWHU RXU SURGXFW RQOLQH VLHPHQV KRPH EVK JURXS FRP ZHOFRPH en Instructions for installation and use Extractor hood ...

Page 2: ...tallation location This appliance is intended for domestic use and the household environment only The appliance is not intended for use outside Do not leave the appliance unattended during operation The manufacturer is not liable for damage which is caused by improper use or incorrect operation This appliance is intended for use up to a maximum height of 2000 metres above sea level This appliance ...

Page 3: ...coming exhaust air wall boxes or by other technical means In any case consult your responsible Master Chimney Sweep He is able to assess the house s entire ventilation setup and will suggest the suitable ventilation measures to you Unrestricted operation is possible if the vapour extractor hood is operated exclusively in the circulating air mode Warning Risk of fire Grease deposits in the grease f...

Page 4: ...bles replaced by one of our trained after sales technicians If the appliance is defective unplug the appliance from the mains or switch off the circuit breaker in the fuse box Contact the after sales service Risk of electric shock Do not use any high pressure cleaners or steam cleaners which can result in an electric shock Causes of damage Caution Risk of damage due to corrosion Always switch on t...

Page 5: ...mentally friendly manner ÇOperating modes OperatingmodesExhaust air mode Note The exhaust air must not be conveyed into a functioning smoke or exhaust gas flue or into a shaft which is used to ventilate installation rooms which contain heat producing appliances Before conveying the exhaust air into a non functioning smoke or exhaust gas flue obtain the consent of the heating engineer responsible I...

Page 6: ... fan Press the A button Setting the brightness Press and hold the A button until the desired brightness is reached Saturation display When the metal grease filters or the activated charcoal filter are is saturated an audible signal will sound for approximately 4 seconds after the fan is switched off In addition the corresponding symbol will appear on the display Metal grease filter Activated charc...

Page 7: ...ion display When the metal grease filters or the activated charcoal filter are is saturated an audible signal will sound for approximately 4 seconds after the fan is switched off In addition the corresponding symbol will appear on the display Metal grease filter Activated charcoal filter If you have not yet done so the metal grease filters should now be cleaned or the activated charcoal filter rep...

Page 8: ...tch fire Clean the grease filter at least every 2 months Never operate the appliance without the grease filter Notes Do not use any aggressive acidic or alkaline cleaning agents When cleaning the metal mesh grease filters also clean the holder for the metal mesh grease filters in the appliance using a damp cloth The metal mesh grease filters can be cleaned in the dishwasher or by hand By hand Note...

Page 9: ... mesh grease filter upwards locking it in place 3Trouble shooting TroubleshootingMalfunctions often have simple explanations Please read the following notes before calling the after sales service Warning Risk of electric shock Incorrect repairs are dangerous Repairs may only be carried out and damaged power cables replaced by one of our trained after sales technicians If the appliance is defective...

Page 10: ...several appliance models It may be the case that an optional accessory that is listed does not apply for your appliance Note Observe the installation instructions in the accessory E no FD no After sales serviceO GB 0344 892 8999 Calls charged at local or mobile rate IE 01450 2655 0 03 per minute at peak Off peak 0 0088 per minute Accessory Order number Basic equipment Starter set for circulating a...

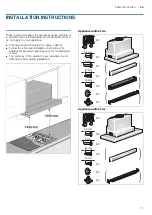
Page 11: ...tures are described which do not apply to your appliance This appliance is installed in a upper cabinet Follow the enclosed installation instructions for additional special accessories e g for circulating air mode The surfaces of the appliance are sensitive Avoid damaging them during installation Appliance width 60 cm Appliance width 90 cm PP PP PP PP PP PP PP PP ...

Page 12: ...pendent heat producing appliance is being operated Room air dependent heat producing appliances e g gas oil wood or coal operated heaters continuous flow heaters or water heaters obtain combustion air from the room in which they are installed and discharge the exhaust gases into the open air through an exhaust gas system e g a chimney In combination with an activated vapour extractor hood room air...

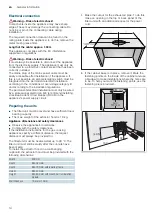
Page 13: ...ording to the installation regulations The permanent electrical installation must only be wired by a professional electrician We recommend installing a residual current circuit breaker RCCB in the appliance s power supply circuit Warning Danger of suffocation Packaging material is dangerous to children Never allow children to play with packaging material KGeneral information GeneralinformationExha...

Page 14: ...installing a residual current circuit breaker RCCB in the appliance s power supply circuit Preparing the units The fitted unit must be level and have sufficient load bearing capacity The max weight of the extractor hood is 18 kg Appliance dimensions and safety clearances Observe the appliance s dimensions Comply with the safety clearances If the installation instructions for the gas cooking applia...

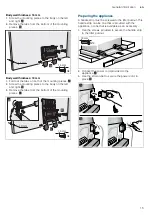
Page 15: ... to the body on the left and right 3 Remove the tabs from the bottom of the mounting pieces ª Preparing the appliance A handle strip must be screwed to the filter pull out This handle strip can be one that is provided with the appliance or one that is available as an accessory 1 Use the screws provided to secure the handle strip to the filter pull out 2 Connect the power cord provided to the appli...

Page 16: ...dimension Sliding out the appliance Note Before you remove the appliance protect the hob with a piece of polystyrene from the packaging 1 Use a flat blade screwdriver to push in the fastening bolt and turn it 90 until it locks into place 2 Push in the fastening bolt gently with your fingers and turn it until it comes out of the housing along with the spring Pull gently on the fastening bolt before...

Page 17: ... The intermediate floor must not be placed on the extractor hood s housing The front panel must not be secured to the housing Access must be available in order to change the filter and for the after sales service Appliance width 90 cm You must also screw the appliance to the wall hanging cupboards either side of it Changing the filter pull out s limit stop On some versions of the appliance the lim...

Page 18: ...or and seal the joint Exhaust air pipe dia 120 mm 1 Fit the reducing connector directly to the air pipe connector 2 Attach the exhaust air pipe to the reducing connector 3 Seal both joints appropriately Removing the appliance 1 Disconnect the electrical connection 2 Disconnect the pipes 3 Remove the metal grease filter 4 Remove the protective caps from the fastening elements 5 Remove the appliance...

Page 19: ...6 ...

Page 20: ...0DQXIDFWXUHG E 6 DXVJHUlWH PE XQGHU 7UDGHPDUN LFHQVH RI 6LHPHQV 6 DXVJHUlWH PE DUO HU 6WU 0 QFKHQ VLHPHQV KRPH EVK JURXS FRP 50 1 9001057558 9001057558 980402 ...

Reviews: