background image

10

Connecting the pipes

Note: 

If using an aluminium pipe, smooth the connection area 

beforehand.

Exhaust-air pipe Ø 150 mm (recommended size)

Attach the exhaust-air pipe directly to the air-pipe connector 

and seal.

Exhaust-air pipe Ø 120 mm

1.

Attach the reducing connector directly to the air-pipe 

connector.

2.

Attach the exhaust air pipe to the reducing connector. 

3.

Seal both joints appropriately.

Electrical connection

Risk of electric shock!

from damaged connection cable. Do not kink or pinch 
connection cable during installation.
The required connection data can be found on the rating plate 

inside the appliance; to do this, remove the metal mesh grease 

filter.

Length of the cable: approx. 1.30 m

This appliance complies with the EC interference suppression 

regulations.
This appliance may be connected to a correctly installed 

earthed socket only.
Attach the earthed socket preferably inside the flue duct.

The earthed socket should be connected via its own circuit.

If the earthed socket is no longer accessible following 

installation of the appliance, a disconnecter must be fitted as 

for a permanent connection. 

If a permanent connection is required, the installation must 

feature an all-pole disconnecter (circuit breakers, fuses and 

contactors) with a min. 3 mm contact opening. The permanent 

connection may be installed by an electrician only.

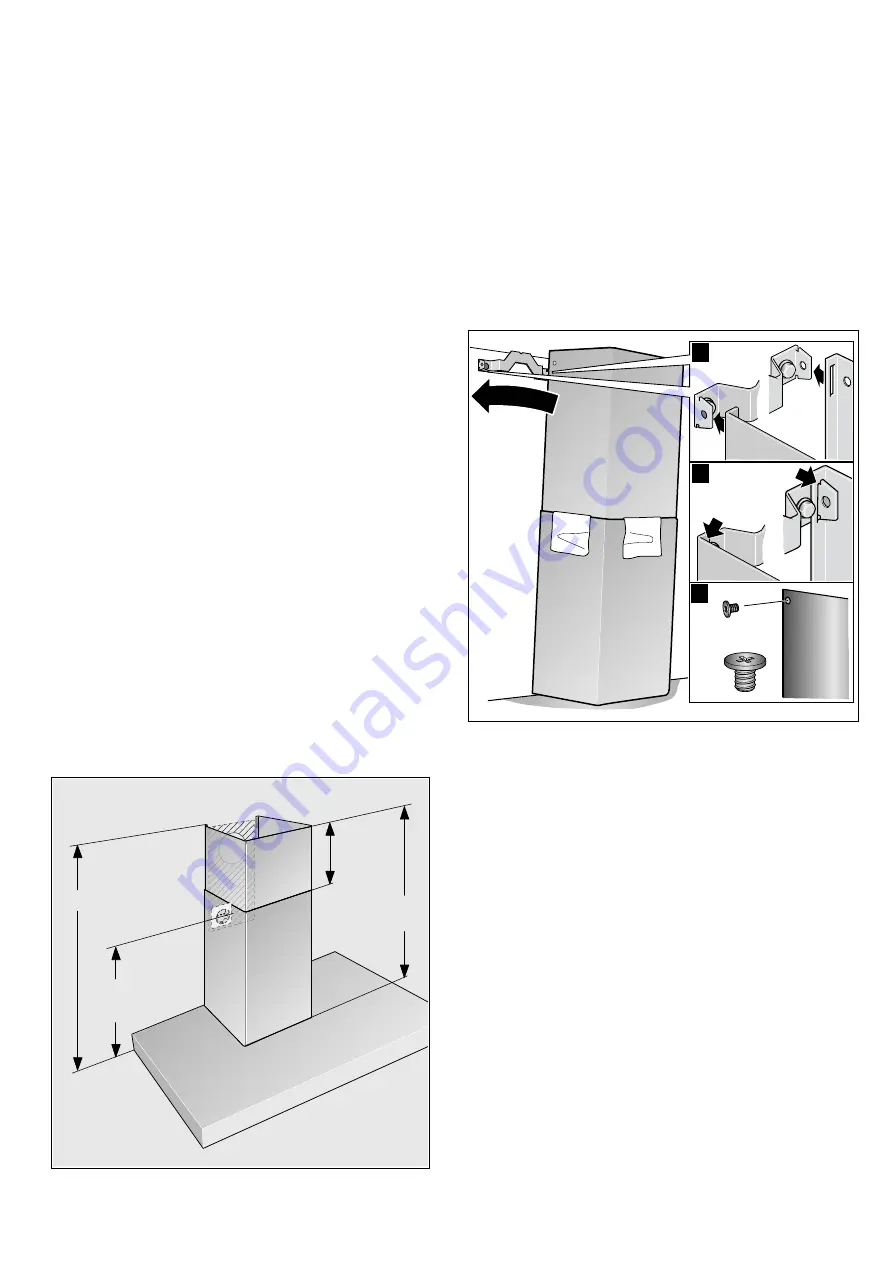
Attaching the flue duct

Risk of injury!

From sharp edges during installation. Always wear protective 
gloves while installing the appliance.

1.

Separate the flue ducts. 
To do this, remove the adhesive tape.

2.

Remove the protective foil from both flue ducts.

3.

Push one flue duct into the other.

Notes

To prevent scratches, use paper to protect the edges of the 

outer flue duct.

Slots of the inner flue duct downwards.

4.

Place the flue ducts on the appliance.

5.

Push the inner flue duct upwards and attach it to the fixing 

brackets on the left and right. 

¨

6.

Press the flue duct downwards until it engages. 

©

7.

Screw the flue duct to the sides of the fixing bracket using 

two screws. 

ª

PLQ
PP

PLQ
PP

PLQ
PP

PD[PP

[

$

%

&

Summary of Contents for LC98BC540

Page 1: ... HQ QVWUXFWLRQV IRU LQVWDOODWLRQ DQG XVH WUDFWRU KRRG ...

Page 2: ...r is not liable for damage which is caused by improper use or incorrect operation Danger of suffocation from packaging material Never allow children to play with packaging material After unpacking the appliance check it for visible damage Do not connect the appliance if it has been damaged in transit These instructions apply to several appliance variants It is possible that individual features are...

Page 3: ...rve the specifications for your cooking appliance If gas and electric hobs are operated together the largest specified distance applies The width of the extractor hood must correspond at least with the width of the hob For the installation observe the currently valid building regulations and the regulations of the local electricity and gas suppliers Risk of electric shock from damaged connection c...

Page 4: ... air mode Note The exhaust air must not be conveyed into a functioning smoke or exhaust gas flue or into a shaft which is used to ventilate installation rooms which contain heating appliances Before conveying the exhaust air into a non functioning smoke or exhaust gas flue obtain the consent of the heating engineer responsible If the exhaust air is conveyed through the outer wall a telescopic wall...

Page 5: ...hock from appliance Always leave appliance to cool down before cleaning or servicing Switch off fuse or pull out mains plug Removing metal mesh grease filter 1 Open the lock and fold down the metal mesh grease filter While doing this place the other hand under the metal mesh grease filter 2 Take the metal mesh grease filter out of the holder With edge extraction 1 Pull metal mesh grease filter dow...

Page 6: ...e metal mesh grease filters can be cleaned in the dishwasher or by hand In the dishwasher Note If the metal mesh grease filters are cleaned in the dishwasher slight discolouration may occur This has no effect on the function of the metal mesh grease filters Do not clean heavily soiled metal mesh grease filters together with utensils Place the metal mesh grease filters loosely in the dishwasher The...

Page 7: ...lways be ensured An incoming exhaust air wall box alone will not ensure compliance with the limit Safe operation is possible only whenever the partial vacuum in the place where the firing equipment is installed does not exceed 4 Pa 0 04 mbar This can be achieved whenever the air needed for combustion is able to enter through openings that cannot be sealed for example in doors windows incoming exha...

Page 8: ...13 cm2 Flat ducts should have no sharp deflections Use sealing strip for deviating pipe diameters Checking the wall The wall must be level vertical and adequately load bearing The depth of the bore holes must be the same length as the screws The wall plugs must have a secure grip The enclosed screws and wall plugs are suitable for solid brickwork Suitable fasteners must be used for other structure...

Page 9: ...hen attaching the appliance ensure that it engages firmly with the brackets 3 Align the appliance horizontally by turning the brackets If required the appliance can be moved to the right or left Securing the appliance 1 Press the safety caps with the arrow upwards onto the brackets until they engage 2 Screw on the knurled nut and washer firmly Removing the safety caps If the safety caps must be re...

Page 10: ...ocket should be connected via its own circuit If the earthed socket is no longer accessible following installation of the appliance a disconnecter must be fitted as for a permanent connection If a permanent connection is required the installation must feature an all pole disconnecter circuit breakers fuses and contactors with a min 3 mm contact opening The permanent connection may be installed by ...

Page 11: ...11 ...

Page 12: ...Siemens Electrogeräte GmbH Carl Wery Straße 34 81739 München Germany 9000548221 9000548221 930903 ...

Reviews: