background image

MCM 1902

Bildschirm / Moniteur / Monitor / Skärm / Beeldscherm

Betriebsanleitung
Operating Manual

Manuel d'utilisation

Manual de manejo

Istruzioni per l'uso

Användarmanual

Gebruikshandleiding

Summary of Contents for MCM 1902

Page 1: ...MCM 1902 Bildschirm Moniteur Monitor Skärm Beeldscherm Betriebsanleitung Operating Manual Manuel d utilisation Manual de manejo Istruzioni per l uso Användarmanual Gebruikshandleiding ...

Page 2: ...ieses Handbuches Siemens AG Redaktion OEC BS2 OS ID4 Otto Hahn Ring 6 D 81730 München Is there any technical problem or other question you need clarified Please contact one of our IT Service Shops your sales partner your sales office The addresses of your service partners are contained in the guarantee booklet or in the service address booklet The latest information on our products tips updates et...

Page 3: ...per Fax 089 636 42945 Oder schreiben Sie an Siemens AG Training Center Beratungsservice D 81730 München Your training needs The Siemens Training Centers offer you a wide range of training courses in information technology and on IT products and other subjects onsite near to your workplace or offsite at one of our training centers Contact us for information on consulting course schedules and selfst...

Page 4: ...o Questo manuale è stato stampato su carta da riciclaggio Denna handbok är tryckt på recyclingpapper Dit handboek werd op recycling papier gedrukt Herausgegeben von Published by Siemens AG D 33094 Paderborn D 81730 München Bestell Nr Order No A26361 K527 Z100 1 5E19 A26361 K527 Z100 1 5E19 A26361 K527 Z100 1 5E19 A26361 K527 Z100 1 5E19 Printed in Korea AG 0798 07 98 A26361 K527 Z100 1 5E19 ...

Page 5: ...or monitor Moniteur couleur Monitor de color Monitor a colori Färgskärm Kleurenbeeldscherm Betriebsanleitung Operating Manual Deutsch English Français Español Italiano Svenska Nederlands TCO 95 Ausgabe Juli 1998 July 1998 edition ...

Page 6: ...Fall der Patenterteilung oder GM Eintragung Liefermöglichkeiten und technische Änderungen vorbehalten VESA DDC and DPMS are registered trademarks of Video Electronics Standards Association Copyright ã Siemens AG 1998 All rights including rights of translation reproduction by printing copying or similar methods even of parts are reserved Offenders will be liable for damages All rights including rig...

Page 7: ...hecking the contents of the consignment 6 Installing an ergonomic video workstation 7 Connecting the monitor 8 Operation of the monitor 9 Switching the monitor on 9 Switching the monitor off 9 Notes on power management 10 Changing the monitor settings 10 Notes on ergonomic color adjustment 15 Technical data 15 VESA DDC compatible VGA interface 16 Preset operating modes 17 Pin assignment D SUB 15 p...

Page 8: ......

Page 9: ...works together closely with the screen controller graphics card of your PC It processes the data supplied to it by the screen controller The screen controller the associated driver software is responsible for setting the modes resolution and refresh rate Target group You don t need to be an expert to perform the operations described here Do however read the chapter with the important notes in the ...

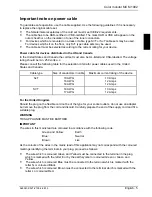
Page 10: ...results in a magnetic field around the metal edge of the picture tube which may damage the data on data carriers nearby Therefore never keep magnetic data carriers near the monitor The device automatically sets itself to the correct voltage within the range from 100 V to 240 V Ensure that the local mains voltage lies within these limits The device must be installed in such a way that the user has ...

Page 11: ......

Page 12: ...frequency energy and if not installed and used in strict accordance with the instructions may cause harmful interference to radio communications However there is no guarantee that interference will not occur in a particular installation If this equipment does cause harmful interference to radio or television reception which can be determined by turning the equipment off and on the user is encourag...

Page 13: ...ates and Canada Cable type Size of conductors in cable Maximum current rating of the device SJT 18 AWG 16 AWG 14 AWG 10 Amps 12 Amps 12 Amps SVT 18 AWG 17 AWG 10 Amps 12 Amps For the United Kingdom Should the plug on the flexible cord not be of the type for your socket outlets do not use an adapter but remove the plug from the cord and discard Carefully prepare the end of the supply cord and fit a...

Page 14: ...inued If you have any questions on disposal please contact your local office our service department or directly Siemens AG Recycling Center D 33094 Paderborn Tel 49 5251 81 80 10 Fax 49 5251 81 80 15 Checking the contents of the consignment Ê Unpack all the individual parts Ê Remove any plastic caps from the plugs for the cables in the consignment Ê Check the delivery for damage incurred during tr...

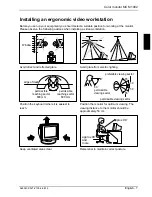
Page 15: ...t and reflected glare Avoid glare from electric lighting 30 30 65 65 0 60 0 edge of desk permissible viewing sector permissible reaching sector 600 mm permissible reaching sector 600 mm preferable viewing sector permissible viewing sector Position the keyboard where it is easiest to reach Position the monitor for optimum viewing The viewing distance to the monitor should be approximately 50 cm app...

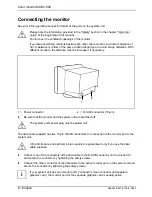
Page 16: ...connector 15 pin Ê Be sure that the monitor and the system unit are switched off The system unit s power plug must be pulled out The data cable supplied has two 15 pin D SUB connectors for connection to the monitor and to the system unit CE conformance and optimum picture quality are guaranteed only if you use the data cable supplied Ê Connect one of the connectors of the data cable to the D SUB c...

Page 17: ...ciated driver software Operation of the monitor 1 2 3 1 Control panel with buttons for screen setting 2 Power indicator 3 ON OFF switch Switching the monitor on Ê Press the ON OFF switch 3 The power indicator 2 lights up green when the system unit is turned on i If your PC has a power management function energy saving mode you should read the notes on power management of the monitor in this chapte...

Page 18: ... redrawn and full power is restored The length of the individual stages is determined by the power management system of the PC For detailed information on how energy saving mode operates refer to the Operating Manual or Technical Manual of your PC i The service life of your monitor will be extended if the OFF mode is switched to after 30 minutes at the earliest setting in screen saver or in your P...

Page 19: ... contrast control clockwise to increase the contrast or counter clockwise to reduce it Adjusting the horizontal and vertical position Position Ê With the menu off press the Position Size button once The Position setting window will appear Ê Press the or button to adjust the vertical position of the monitor s entire display Ê Press the or button to adjust the horizontal position of the monitor s en...

Page 20: ...the parallelogram distortion Ê Press the Equalization Rotation button once to close the setting window Settings with the OSD menu To set the OSD menu perform the following steps Ê With the menu switched off press the menu button to open the OSD menu Ê Press the or button to select the function you want If you wish to exit the OSD menu select EXIT Ê Press the menu button The setting window will app...

Page 21: ...shion distortion tilt distortion and moiré reduction Ê Call the Recall setting window Ê Press the button for YES to activate the factory settings or press the button for NO to retain your own settings If you have selected YES all settings listed above will be reset to the factory settings All other settings will remain the same Setting menu position Menu Position This function allows you to move t...

Page 22: ...t operating modes section If the Display Timing window is only selected without pressing the menu key the current operating mode is displayed i The window is only used to display the information You cannot select a different setting here Details of how you set the resolution and refresh rate are provided in the documentation on your screen controller the associated driver software Ê Call the Displ...

Page 23: ...ckground Characters black white purple blue cyan green yellow red black white purple blue cyan green yellow red Color combination very suitable light background colors are only suitable for devices which are operated with a refresh rate of at least 75 Hz Color combination not suitable because color locations are too close together thin characters are not identifiable or rigorous focusing is demand...

Page 24: ...operation Humidity Limit range of operation Humidity 15 C 35 C 20 85 5 C 40 C 20 85 Condensation must be avoided VESA DDC compatible VGA interface Your monitor is equipped with a VESA DDC compatible VGA interface VESA DDC Video Electronics Standard Association Display Data Channel is used as the communications interface between the monitor and the PC If your PC is equipped with a VESA DDC compatib...

Page 25: ...8 7 kHz 0 5 kHz 80 8 kHz 0 5 kHz 91 2 kHz 0 5 kHz 93 1 kHz 0 5 kHz 60 Hz 2 Hz 70 Hz 2 Hz 100 Hz 2 Hz 85 Hz 2 Hz 100 Hz 2 Hz 85 Hz 2 Hz 100 Hz 2 Hz 85 Hz 2 Hz 100 Hz 2 Hz 640 x 480 720 x 400 640 x 480 800 x 600 800 x 600 1024 x 768 1024 x 768 1280 x1024 1152 x 864 For ergonomic reasons we recommend a refresh rate of at least 75 Hz and a maximum resolution of 1280 x 1024 pixels Pin assignment D SUB ...

Page 26: ...stem unit is switched on Ê Check whether the power cable on the monitor is connected correctly The screen is blank power indicator lights Ê Check whether the system unit is switched on Ê Check whether the data cable for the monitor is correctly attached to the monitor and the monitor port on the system unit Ê Check whether the monitor connection of the system unit used is active Ê Press any key on...

Page 27: ...nitor Screen display has lines Moiré is dull or blurred Ê Set the brightness and contrast with the controls see Operation of the monitor Ê Degauss the monitor with the OSD menu see Operation of the monitor Ê Adjust the moiré reduction function see Operation of the monitor The screen display is flickering Ê Set an ergonomic refresh rate 75 Hz using the PC software see documentation for your PC or y...

Reviews: