background image

Individual phone configuration

127

Step by Step

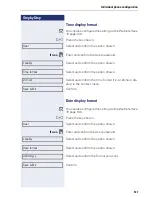
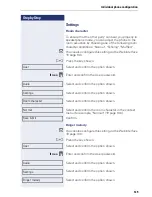
Time display format

z

You can also configure this setting via the Web interface 

Æ

page 136.

N

Press the key shown.

Select and confirm the option shown.

if nec. 

j

Enter and confirm the User password. 

Select and confirm the option shown.

Select and confirm the option shown.

Select and confirm the time format (12- or 24-hour dis-
play) in the context menu.

Confirm.

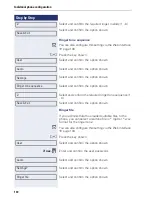
Date display format

z

You can also configure this setting via the Web interface 

Æ

page 136.

N

Press the key shown.

Select and confirm the option shown.

if nec. 

j

Enter and confirm the User password. 

Select and confirm the option shown.

Select and confirm the option shown.

Select and confirm the format you want.

Confirm.

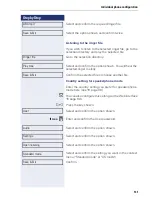
User

Locality

Time format

24 hour

Save & Exit

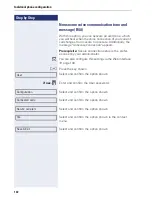
User

Locality

Date format

dd/mm/yyy

Save & Exit

Summary of Contents for OpenStage 40 G SIP

Page 1: ...Communication for the open minded Siemens Enterprise Communications www siemens com open Documentation HiPath 8000 OpenStage 40 OpenStage 40 G OpenStage Key Module 40 Operating Manual ...

Page 2: ...ld be disposed of separately from the municipal waste stream via designated collection facilities appointed by the government or the lo cal authorities Proper disposal and separate collection of your old appli ance will help prevent potential damage to the environment and human health It is a prerequisite for reuse and recy cling of used electrical and electronic equipment For more detailed inform...

Page 3: ...expose the telephone to direct sunlight or any other source of heat as this is liable to damage the electronic components and the plastic casing Do not operate the telephone in damp environments such as bath rooms Online documentation This and other documentation can be found on the Internet at http www enterprise communications siemens com Products Phones Clients select product Downloads To view ...

Page 4: ...one 12 The OpenStage 40 40 G user interface 12 Ports on the underside of the phone 13 Using network ports more efficiently 14 OpenStage Key Module 40 15 Keys 16 Function keys 16 Audio keys 16 Navigator 17 Programmable sensor keys 18 Trunk keys on multi line phones only 19 Keypad 21 Display 23 Idle mode 23 Idle display view and icons 23 Context dependent displays 24 Telephony interface 26 Single li...

Page 5: ...En bloc dialing 40 On hook dialing 41 Dialing with a headset connected 41 Redial 42 Consulting a second party 43 Switching to the held party alternating 44 Connecting parties 45 Call forwarding 46 Programming call forwarding 47 Activating deactivating call forwarding 49 Activating call forwarding for all calls 50 Callback 51 Requesting callback 51 Responding to a callback 52 Permitting callback on...

Page 6: ...ries 83 Delete all entries 83 Making calls with multiple lines 84 Incoming calls 84 Accepting calls for the primary line 84 Accepting calls for secondary lines 84 Making calls 85 Manual trunk seizure 85 Automatic trunk seizure 86 Dial last dialed number 86 During calls 87 Making and receiving calls on a single line 87 Making and receiving calls with multiple lines 87 Direct station selection keys ...

Page 7: ...n with forced delayed logoff at a remote phone 106 HiPath 8000 functions 108 Feature toggle key 108 Using system call forwarding 109 Call forwarding busy line 109 Call forwarding don t answer 110 Call forwarding unconditional 111 Call forwarding selective 112 Making anonymous calls 113 Deactivating 113 Activating 113 Temporarily activating anonymous calling for the next call 114 Temporarily deacti...

Page 8: ...ime display format 127 Date display format 127 Audio 128 Volumes 128 Settings 129 Nonsecure voice communication tone and message R4 4 132 Setting the language and country 133 Selecting a language 133 Country specific setting 134 Network information 135 Web interface WBM 136 General 136 Calling up the Web interface 136 Administrator Pages 136 User pages 137 User menu 138 Fixing problems 141 Caring ...

Page 9: ... strictly complied with to avoid operating errors and ensure optimum use of your multifunctional telephone in the network These instructions should be read and followed by every person installing operating or programming an OpenStage phone This user guide is designed to be simple and easy to understand providing clear step by step instructions for operating your OpenStage phone Administrative task...

Page 10: ...nformation ready when you contact our service depart ment regarding faults or problems with the product Speakerphone quality and display legibility To ensure good speakerphone quality the area in front of the telephone front right should be kept clear The optimum handsfree distance is 20 in 50 cm Proceed as follows to optimize display legibility Turn the phone to tilt the display This ensures you ...

Page 11: ...ssigned an individual phone number which you can use to make and receive calls The programmable sensor keys function as line keys on multi line phones Æ page 19 The Overview tab on the telephony interface provides information about the lines configured on your phone and the current status of each line Æ page 27 A number of specific features must be considered when using a multi line phone to make ...

Page 12: ... your telephone by assigning phone numbers and functions to the programmable sensor keys Æ page 23 4 You can use function keys when conducting a call to access fre quently used functions such as Disconnect or to open the Pro gram Service menu and mailbox Æ page 16 5 Audio keys are also available allowing you to optimally configure the audio features on your telephone Æ page 16 6 The 5 way navigato...

Page 13: ...OpenStage 40 40 G LCD Display 40 x 6 characters Illuminated display Programmable sensor keys 6 6 Full duplex speakerphone function Headset 10 100 Mbps Ethernet Switch Æ page 18 1000 Mbps Ethernet Switch Æ page 18 Interface for key modules Wall mounting Power supply unit PC Network switch Headset Key module Handset ...

Page 14: ...thernet switch OpenStage 40 G has a built in 1000 Mbps Ethernet switch This means that you can connect a PC to the LAN directly via the phone Using this connection option saves one network port for each switch used and requires fewer or shorter network cables when arranged correctly OpenStage 40 40 G Network switch PC ...

Page 15: ... can assign and use these sensor keys according to your needs in the same way as the keys on the telephone Æ page 18 You can attach up to two OpenStage Key Module 40 to your OpenStage 40 Other technical explanations safety notices and installation instruc tions can be found in the relevant documentation You can download these from the Internet at http www siemens com enterprise Downloads Installat...

Page 16: ...ding is activated N Open Program Service menu Æ page 31 Red Menu is active O View messages Æ page 28 Red New voicemail Key Function when key is pressed p Activate deactivate microphone also for speakerphone mode o Activate deactivate headset Decrease the ring handset and loudspeaker volume n Activate deactivate loudspeaker for speakerphone mode and open listening Increase the ring handset and loud...

Page 17: ...Call up the context menu in the idle display Press a Short press Go up a level Long press held down Go back to the first level Extended long press Return to idle mode Cancel function Quit the context menu In input fields Delete character to the left of the cursor Press d Scroll downwards Select element below Long press held down Jump to the end of the list menu Press b Scroll upwards Select elemen...

Page 18: ...name is displayed next to the key The status of a function is shown by the LED on the corresponding sensor key Meaning of LED displays on function keys Increase the number of programmable sensor keys by connecting a key module Æ page 15 Only for repdial keys can you also program the second level for di rect destination selection LED Meaning of function key S Off The function is deactivated T Flash...

Page 19: ... line on that telephone Phantom line Phantom lines are not used as primary lines by any telephones in the LAN Phantom lines are established when the number of lines provided by a communications system exceeds the number of available telephones Line utilization Private line A line that is used by a single telephone This line cannot be used as a secondary line by another telephone Shared line A line...

Page 20: ...call on the line Æ page 84 Hold reminder is activated Æ page 65 Flickering Outgoing call on the line The incoming call was prioritized and select ed in accordance with the Automatic line se lection for incoming calls option Fast blinking The line is on Hold Blinking Call forwarding is activated R Illuminated The line is busy ...

Page 21: ...ering the text all available characters for this key are dis played After a short while the character in focus is displayed in the input field Character overview depends on the current language setting To speed up the input you can confirm your entry by pressing g on the navigator after you have selected the required character To enter a digit in an alphanumerical input field press the relevant ke...

Page 22: ...ers in lower and upper case and straightforward digit entry You can select further editor functions via the navigator OK Confirm and terminate the entire input Cancel Cancel your entries without saving Mode Setting with the key 123 ABC Numerical entry ABC Abc Upper case characters Abc abc Initial character upper case abc 123 Lower case characters Move cursor left to add or delete characters Move c...

Page 23: ...ys The right area is used for labeling the programmable sensor keys Idle display view and icons The time weekday and date are displayed in the status bar In addition different icons represent different situations and switches Icon Explanation The ring tone is deactivated The Do not disturb function is activated The phone lock is activated A mobile user is logged on to the telephone The microphone ...

Page 24: ...ls in your absence You have two new voice messages that you can open by pressing O Æ page 28 Icons for events Context menus An arrow beside a selected entry indicates the existence of a context menu that you can open by pressing the i or g buttons on the navigator Æ page 17 The range of functions available is situation specific Icon Explanation Callback requests are active You received new voice m...

Page 25: ... opens and offers suitable functions for selection with the navigator A pop up window automatically closes as soon as you have performed an action To suppress information pop up windows press i on the navigator First entry selected when you call up the menu if you have already dialed a phone number Selected entry Only available when config ured to support mobility Redial 1 1234 Ringer off Do not d...

Page 26: ...ab Icon Explanation The call is active The call has been disconnected You have placed the call on hold e g consultation hold Your call partner has placed the call on hold The voice connection is secure The voice connection is not secure Detailed descriptions of the various functions can be found in the sections Basic phone functions Æ page 33 and Enhanced phone functions Æ page 61 Smith Michael 3 ...

Page 27: ... key Example The status icons provide information about the state of the relevant line Icon Explanation Call for the corresponding line Call from a DSS line Call for a line with suppressed ring tone Æ page 94 Hold reminder is activated Æ page 65 The line is currently not available The line is busy Please note the LED displays for the line keys Æ page 20 Level 2 My phone Line 1 Line 2 Line status L...

Page 28: ...LED on the O Æ page 16 key lights up To access the menu Press the O key and use the navigator to select and confirm the relevant submenu Voicemail You will find voicemails in the Messages directory Messages Directory The following default entry appears in the list Voice mail Alternative call Hold down the O key If your system is appropriately configured contact the relevant administra tor you can ...

Page 29: ... calls to your phone are timestamped and logged in consecutive order in the call lists Each call list may contain up to 30 entries Once this limit is reached the oldest entry in the log is deleted Multiple calls from the same number are only listed once The number of call attempts is logged in the Details context menu as well as in the Missed log on the list display The list contains the phone num...

Page 30: ...try specific context menu You can select the following functions for an individual entry Dial Æ page 74 Details Æ page 83 Call attempts with date and time up to ten can be saved Delete Æ page 83 Missed Benz Karlg 10 25 Options g Lessing Ephraim 7 22 Busch Wilhelm 12 11 Time of call Selected new entry with context menu Old entry 11178 2 235689 1 2568900 1 Number of call attempts ...

Page 31: ...our User using the OpenStage menu Settings You can specify call related settings in the User menu This menu con tains several options for customizing the appearance of your telephone Select one of the following menus with the navigator Æ page 17 Date and time Æ page 124 Audio Æ page 128 Configuration for instance Æ page 62 or Æ page 79 Phone Æ page 55 Æ page 122 Locality Æ page 124 Security Æ page...

Page 32: ...en tering the administration password Refer to the administration manual supplied with your phone for more de tailed information on this topic Contact your administrator or refer to the OpenStage Administra tion Manual for more on the network information values listed here During a software update the phone must not be disconnected from the power supply unit the LAN line or the phone line An updat...

Page 33: ...e signal set when an incoming call is received The call is also visu ally signaled on the call display If transmitted calling party information name phone number appears on the graphic display Answering a call via the handset The phone is ringing The caller is displayed Lift the handset if nec Set the call volume Please read carefully the introductory chapter Getting to know your OpenStage phone Æ...

Page 34: ...eakerphone function is activated if nec Set the call volume Suggestions for using speakerphone mode Tell the other party that speakerphone mode is ac tive Adjust the call volume while speakerphone mode is active The ideal distance between the user and the phone in speakerphone mode is 50 cm Answering a call via the headset Prerequisite A headset is connected The phone is ringing The audio key o fl...

Page 35: ...lleague and the function is provided for you in the HiPath 8000 The phone of a colleague rings Select this option from the contect menu and confirm resp Replace the handset or n Press the key shown Select and confirm j Enter the internal call number of the phone in question and confirm You are connected to the caller either via handset or in speakerphone mode Gezielte Übernahme Gezielte Übernahme ...

Page 36: ...e If the country setting is set to US you do not have to hold down the loudspeaker key when replacing the handset to switch to speakerphone mode n Press the key shown Replace the handset Proceed with your call or Make note of the two different processes and ac tivate if necessary your preferred setting Æ page 131 If voice communication is secure a closed pad lock icon will appear on the graphic di...

Page 37: ...own goes out Open listening You can let other people in the room join in on the call Let the other party know that you have turned on the loudspeaker Prerequisite You are conducting a call via the handset Activating n Press the key shown Deactivating n Press the lit key Switching to speakerphone mode n Hold down the lit key and replace the handset ...

Page 38: ...a conversation for instance with a colleague in the same room Prerequisite You are conducting a call Deactivating the microphone p Press the key shown Activating the microphone p Press the lit key Ending a call s Press the key shown or Select and confirm the option shown in the connec tions s context menu or Lit key pressed or In speakerphone mode n Press the lit key Disconnect ...

Page 39: ...rting tone The group call can be picked up both by lifting the handset and via the Pickup call menu option The group call be picked up via the Pickup call menu option but not by just lifting the handset A key is programmed for call pickup A group call is waiting and is indicated on the display by Pickup Caller for Party Picking up a group call The pop up menu opens Confirm or Lift the handset only...

Page 40: ... Dialing in speakerphone mode j Enter the station number Use the navigator Æ page 17 to correct entries as necessary n The speaker key lights up The party you are calling answers via loudspeaker You can also use speakerphone mode En bloc dialing j Enter the station number Use the navigator Æ page 17 to correct entries as necessary Lift the handset or n Press the key shown or In the pop up menu Con...

Page 41: ...p up menu Select and confirm the option shown The connection is set up as soon as your input in com plete Dialing with a headset connected Prerequisite The headset is connected j Enter the station number o The headset key lights up The connection is set up as soon as your input in com plete Redial 1 S Hawking ...

Page 42: ...d confirm the option shown The last phone number entered is dialed Redialing from the idle menu Select and confirm from the idle display context menu Æ page 25 The last phone number entered is dialed or Only calls to the primary line are received on multi line phones Æ page 11 Niels Bohr 07 06 am Redial 1 S Hawking Redial 1 S Hawking If voice communication is secure a closed pad lock icon will app...

Page 43: ...ding a consultation call Select and confirm the option shown in the second par ty s context menu The consultation call is disconnected The call with the first party is resumed Ending the first call Select and confirm the option shown in the first call s context menu The connection to the second party remains active If the called party does not answer In the pop up menu Select and confirm the optio...

Page 44: ...call is disconnected The active call continues Disconnecting the active call Select and confirm the option shown in the active con nection s context menu The active call is disconnected The held call remains on hold and can be managed via the context menu Alternate It does not matter which context menu is open when alternating The Alternate function ap pears in both menus active and passive connec...

Page 45: ...nsultation call are cleared down or Connect by hanging up or n Replace the handset or if you are in speakerphone mode press the loudspeaker key The other two parties are now connected to one another Allowing call joining z You can also configure this setting via the Web interface Æ page 136 N Press the key shown Confirm if nec j Enter and confirm the User password Select and confirm the option sho...

Page 46: ...Æ page 29 There are three Destination options in the Edit call for warding menu These destination options are assigned to the forwarding types All calls off on Destination Busy off on Destination No reply off on Destination One phone number may already be assigned to each destination The destination option could then be Desti nation 12345 for instance HiPath 8000 also supports system based call fo...

Page 47: ...ars Select the destination option for one of the following forwarding types All calls Busy No reply Confirm the destination selected Select and confirm the option shown in the context menu Select and confirm the option shown j Enter and confirm the destination phone number Define additional destination phone numbers for desti nation 2 to 5 as necessary Select and confirm the option shown Edit call...

Page 48: ...ion before call forwarding on no reply You can define how often the phone should ring before the No reply form of call forwarding activates z You can also configure this setting via the Web interface Æ page 136 Prerequisite The phone is idle r Press the key shown The pop up menu opens Select and confirm the option shown An overview of call forwarding settings appears Select and confirm the option ...

Page 49: ...grammed Æ page 48 r Press the key shown The pop up menu opens Select and confirm the option shown An overview of call forwarding settings appears Select and confirm the option shown or Select and confirm the option shown or Select and confirm the option shown Select and confirm On or Off in the context menu Select and confirm the option shown Edit call forwarding All calls Busy No reply On Save Ex...

Page 50: ...enu opens Select and confirm the option shown The r key lights up Call forwarding is activated If the phone is idle the call forwarding icon K appears on the graphic display with the destination phone num ber Deactivating call forwarding for all calls r Press the lit key The pop up menu opens The pop up menu disappears after around five seconds and the r key goes out or Select and confirm the opti...

Page 51: ...ting callback requests You can delete scheduled callback requests if you no longer need to return a call for example at the end of the working day Prerequisite At least one callback was requested Select and confirm the option shown in the idle display Æ page 25 context menu Confirm in the pop up menu All callback requests are deleted This option must be activated by your administra tor On multi li...

Page 52: ...ck icon The pop up menu opens Accepting a callback Select and confirm the option shown Rejecting a callback Select and confirm the option shown The callback request is deleted The caller hears the busy signal The caller s phone number is added to the missed calls list Forwarding a callback Select and confirm the option shown j Enter and confirm the phone number Accept Reject Deflect ...

Page 53: ... the option shown if nec j Enter and confirm the User password Select and confirm the option shown Select and confirm the option shown Select and confirm the option shown or Select and confirm the option shown Select and confirm the option shown in the context menu Select and confirm the option shown User Configuration Outgoing calls Callback busy Callback no reply Yes Save Exit ...

Page 54: ...ist provides information on the missed call and lets you call back the number directly call lists see also Æ page 29 O Press the key shown Select and confirm the option shown Select and confirm the option shown Select and confirm the appropriate list entry The phone number associated with the list entry is dialed On multi line telephones Æ page 11 only the calls missed on your primary line are log...

Page 55: ...itch between the two programmable sensor key lev els The labels for the programmable sensor keys are dis played on the right side of the display The programmable sensor keys can also be pro grammed via the Web interface Æ page 136 List of available functions 1 Unallocated 14 Conference 2 Selected dialling 15 Headset 3 Repeat dialling 16 Do not disturb 4 Forward all calls 17 Group pickup 5 Forward ...

Page 56: ...Select and confirm the option shown You are prompted to press the key you wish to program S Press the sensor key you want to program until the field opens The programmable sensor key lights up Select and confirm the option shown to program the first level or Select and confirm the option shown to program the second level Select and confirm the required function in the list for instance Do not dist...

Page 57: ...xt menu Select and confirm the option shown if you want to change the label on the graphic display j Enter and confirm the label you want Select and confirm this option to enter a destination phone number j Enter and confirm a stations s destination phone num ber You can select and insert special characters in the dial ing sequence Clear call Make consultation Make normal call Pause The pop up men...

Page 58: ... a code j Enter and confirm the code for example 96 contact your administrator Select and confirm the option shown Forwarding S Press the sensor key you want to program until the field opens The programmable sensor key lights up z You can also configure this setting via the Web interface Æ page 136 Select and confirm the option shown to program the first level for instance Select a forwarding type...

Page 59: ...ave pressed a programmable sensor key Example 1 Accessing a stored contact or phone number Prerequisite The idle menu is displayed on the graphic display S Press the programmable sensor key for the stored con tact until the connection setup procedure appears on the graphic display The programmable sensor key lights up Example 2 Deactivating the ring tone for incoming calls S Press the Ringer off p...

Page 60: ...j Enter and confirm the user password Select and confirm the option shown to switch to the Reset user data menu Select the option shown Select and confirm the option shown in the context menu to delete the content of all sensor keys Select and confirm the option shown User Reset Function key data Yes Perform reset ...

Page 61: ...t Deflecting a call Using call deflection Prerequisite An incoming call is displayed or signaled In the pop up menu Select and confirm the option shown The call is immediately deflected if a destination phone number is programmed Æ page 62 or If you did not set a phone number when programming call deflection a pop up menu appears prompting you to enter a destination phone number for call deflectio...

Page 62: ... number to which the sta tion should be deflected or Deflecting to a DSS number A call can be deflected to a direct station selection DSS subscriber using the DSS key if the key is config ured and the deflect function is activated by your admin istrator Æ page 90 Select and confirm the option shown Select and confirm the option shown in the context menu Select and confirm the option shown User Con...

Page 63: ...hapter Call forwarding Æ page 46 Configuring call forwarding V1 R3 x or higher Select and confirm the option shown For a description of the settings see the chapter Call forwarding Æ page 46 Setting alerts V1 R3 x or higher Use the Call forward alerts menu to enable and dis able visual and audible alerts for call forwarding not possible with the Forwarding key Select and confirm the option shown R...

Page 64: ...nfirm the option shown in the connec tions s context menu Retrieving a held call Select and confirm the option shown in the connec tions s context menu Using line keys On multi line telephones you can use the line keys to place ongoing calls on hold R To do this press the corresponding line key The line key LED starts flickering The call is now on hold Retrieving a held call T To do this press the...

Page 65: ...onfirm the option shown to disconnect the call Activating deactivating the hold reminder tone z You can also configure this setting via the Web interface Æ page 136 N Press the key shown Select and confirm the option shown if nec j Enter and confirm the User password Select and confirm the option shown Select and confirm the option shown Select and confirm the option shown Select and confirm the o...

Page 66: ...sword Select and confirm the option shown Select and confirm the option shown Select and confirm the option shown j Enter a value between 3 and 15 and confirm Select and confirm the option shown Music on hold If the Music on hold option is active music is played back when you are placed on hold by another party z You can also configure this setting via the Web interface Æ page 136 N Press the key ...

Page 67: ...pting a second call Prerequisite You are conducting a call and call waiting is allowed Æ page 68 In the pop up menu Select and confirm the option shown You can talk to the second party The connection to the first party is on hold Select and confirm the option shown in the second call s context menu The call with the second party is disconnected and the connection to the first party is retrieved Re...

Page 68: ... number for instance or Connect by hanging up Prerequisite Connect by hanging up is activated con tact your administrator or n Replace the handset or if you are in speakerphone mode press the loudspeaker key The other two parties are now connected to one another Allowing call waiting Prerequisite The option was programmed by your ad ministrator z You can also configure this setting via the Web int...

Page 69: ...shown in the connec tions s context menu j Enter and confirm the phone number of the second par ty to whom you want to transfer the call Transferring with consultation You can announce a call to a recipient before transfer ring it Prerequisite You are conducting a call The options Al low call transfer and Transfer on ring were allowed Æ page 70 Select and confirm the option shown in the connec tio...

Page 70: ...ive press the lit n key to transfer the call If the party does not answer you will be called back by the first party Allowing call transfer z You can also configure this setting via the Web interface Æ page 136 N Press the key shown Select and confirm the option shown if nec j Enter and confirm the User password Select and confirm the option shown Select and confirm the option shown Select and con...

Page 71: ...this setting via the Web interface Æ page 136 N Press the key shown Select and confirm the option shown if nec j Enter and confirm the User password Select and confirm the option shown Select and confirm the option shown Select and confirm the option shown Select and confirm the option shown in the context menu Select and confirm the option shown User Configuration Outgoing calls Transfer on ring ...

Page 72: ... sounds when an incoming call is automatically accepted z You can also configure this setting via the Web interface Æ page 136 Prerequisite The option was programmed by your ad ministrator N Press the key shown Select and confirm the option shown if nec j Enter and confirm the User password Select and confirm the option shown Select and confirm the option shown Select and confirm the option shown ...

Page 73: ...d by your ad ministrator z You can also configure this setting via the Web interface Æ page 136 N Press the key shown Select and confirm the option shown if nec j Enter and confirm the User password Select and confirm the option shown Select and confirm the option shown Select and confirm the option shown Select and confirm the option shown Select and confirm the option shown Select and confirm th...

Page 74: ...rect destination key is programmed Æ page 55 R Press the programmed DDS key Dialing is initiated Dialing a phone number from a list The following call lists are available in the CallLog direc tory Missed Dialled Received Forwarded O Press the key shown Select and confirm the option shown Select and confirm the required call list Select and confirm the entry you want The phone num ber associated wi...

Page 75: ...l lowing activities i Press the key shown This always works Lift the handset off hook This only works if the phone number was entered when the phone was idle or if it was entered for a consultation call when the handset was off hook n Press the key shown This only works if the phone number was entered when the phone was idle and the loudspeaker key was not lit or if the phone num ber was entered f...

Page 76: ...xpires to set up a call when dialing with the handset on hook N Press the key shown Select and confirm the option shown if nec j Enter and confirm the User password Select and confirm the option shown Select and confirm the option shown Select and confirm the option shown j Specify a value and confirm your entry Select and confirm the option shown The setting does not affect automatic emergency nu...

Page 77: ...interface Æ page 136 N Press the key shown Select and confirm the option shown if nec j Enter and confirm the User password Select and confirm the option shown Select and confirm the option shown Select and confirm the option shown Select and confirm the option shown in the context menu Select and confirm the option shown User Configuration Outgoing calls Busy when dialling Yes Save Exit You will ...

Page 78: ...t and confirm the option shown in the context menu You are now involved in a one to one call with the remaining call party or You can initiate a conference by calling the Con ference function in the context menu of either the active or held call Conference User Disconnect If you already are involved in a secure connection with a party when you initiate a consultation call the original party is pla...

Page 79: ...a party Select and confirm any of the connections in the con text menu Both connections are cleared down the conference is cleared down Allowing a local conference This option allows or blocks the Conference function z You can also configure this setting via the Web interface Æ page 136 N Press the key shown Select and confirm the option shown if nec j Enter and confirm the User password Select an...

Page 80: ...onfigure this setting via the Web interface Æ page 136 N Press the key shown Select and confirm the option shown if nec j Enter and confirm the User password Select and confirm the option shown Select and confirm the option shown Select and confirm the option shown Select and confirm the option shown in the context menu Select and confirm the option shown User Configuration Connected calls Join in...

Page 81: ...nference Conducting a consultation call Select and confirm the option shown in the Confer ence context menu If the party answers you can toggle between the party and the conference connect the consultation call to another called party end the consultation call and return to the confer ence add the consultation call party to the conference Adding a party Prerequisite You are conducting a consultati...

Page 82: ...r instance The other par ticipants remain connected or Exit Conf If using the Centralized Conference option the Conference row contains a closed padlock icon for a secure voice connection and an open pad lock icon for a nonsecure voice connection Æ page 33 The display depends on whether the conference server supports secure voice communication The appropriate display is set by the conference serve...

Page 83: ... the list Select the list entry Displaying details Select and confirm the option shown in the context menu For display and information shown Æ page 30 Delete the entry Select and confirm the option shown in the context menu The entry is deleted Delete all entries O Press the key shown Select and confirm the option shown For instance select and confirm the list of dialed num bers Select the option ...

Page 84: ...llowing sec tions for a detailed description of the individual compo nents Introduction to multi line phones Æ page 11 Lines and line keys Æ page 19 Multi line telephony interface Æ page 27 Individual settings Æ page 91 Incoming calls Depending on your individual settings you will be noti fied of incoming calls Æ page 129 Accepting calls for the primary line In this case the telephone behaves in t...

Page 85: ...iority Manual trunk seizure or n or o Lift the handset or press the speakerphone mode or headset key S Press the required trunk key or h Press the key shown to open the Overview tab Æ page 27 Select and confirm the required line e g line 2 The se lected line is displayed on the screen j Enter the phone number or use redial for example The connection is set up Accept If you have seized a secondary ...

Page 86: ... defined during configuration is seized j Enter the station number The connection is set up Dial last dialed number Regardless of the line used the last number dialed on your telephone is displayed for redialing in the selected number s context menu or n or o Lift the handset or press the speakerphone mode or headset key S Press the required line key Æ page 85 In the pop up menu Confirm The connec...

Page 87: ...8 Functions available exclusively for the primary line Call lists Æ page 29 Voicemail Æ page 28 Call forwarding Æ page 46 Do not disturb Æ page 96 Making and receiving calls with multiple lines Incoming call on another line when dialing a num ber Prerequisite You are in the process of dialing a number Æ page 85 At the same time a call is incoming on an other line You can answer the call as normal ...

Page 88: ...Press line key for line 1 Retrieve call on line 1 Depending on the settings for Rollover you will be notified of incoming calls Æ page 94 Accept All multi line users that share the line on which the call is being held Æ page 19 can now pick up the held call To prevent other users from an swering the held call you must place the call on Consultation hold Æ page 43 Depending on the configuration by ...

Page 89: ...Select and confirm the DSS line The key lights up and a connection is established Consultation with the DSS station Prerequisite You are conducting a call and administra tor have configured the DSS key for consultation S Press the relevant DSS key for the consultation The key lights up and a connection is established If the called party answers you can toggle transfer the first call or initiate a ...

Page 90: ...the DSS key The call is routed to your primary line and rings Select and confirm the option shown in the pop up menu The caller hears a busy signal Direct pickup Prerequisite The auto answer function must be acti vated Æ page 72 T Press the DSS key The call is routed to your primary line and you are immediately connected with the other par ty via speakerphone Deflecting a call to a DSS station Pre...

Page 91: ...ed Displaying the line in the Overview tab Specify here if the selected line should be displayed in the Overview tab z You can also configure this setting via the Web interface Æ page 136 N Press the key shown Select and confirm the option shown if nec j Enter and confirm the User password Select and confirm the option shown Select and confirm the option shown Select and confirm the option shown S...

Page 92: ...on shown if nec j Enter and confirm the User password Select and confirm the option shown Select and confirm the option shown Select and confirm the option shown Select and confirm the required line for example line 1 Select and confirm the option shown j Enter and confirm a delay value Select and confirm the option shown You can activate and deactivate the set delay time for all line keys using a...

Page 93: ...elect and confirm the option shown All lines that are displayed in the overview are listed Select and confirm the required line for example line 1 Select one of the following options from the context menu to move an individual line Move up Move down Move to top Move to bottom or Select and confirm the option shown to arrange the lines in the same sequence as the line keys or Select and confirm the...

Page 94: ...tone via the currently ac tive microphone and the corresponding line key blinks or Z T The ringer melody set sounds briefly approx 3 seconds via the loudspeaker and the corresponding line key blinks Z T k The telephone rings using the configured call signal the corresponding line key blinks and a pop up menu con taining the available information is displayed The ringer melody is not played in spea...

Page 95: ...The icon disappears You can also switch the function on and off using the op tion in the idle menu Select and confirm the option shown or Deactivating the ringer tone using a programmable sensor key Prerequisite The Ringer off programmable sensor key must be programmed Æ page 55 R Press the Ringer off programmable sensor key An incoming call is signaled by a single ring tone burst T The programmab...

Page 96: ...r pickup groups are however connected R Press the lit programmable key once more to deactivate the Do not disturb function or Enabling do not disturb via the idle menu Select and confirm the option shown in the idle menu The Do not disturb icon appears in the header or Select and confirm the option shown in the idle menu The Do not disturb icon is deleted On multi line telephones Æ page 11 you can...

Page 97: ... and confirm the option shown if nec j Enter and confirm the User password Select and confirm the option shown Select and confirm the option shown Select and confirm the option shown Select and confirm the option shown Select and confirm the option shown Select and confirm the option shown User Configuration Incoming calls Handling Allow DND Yes Save Exit ...

Page 98: ...ption shown if nec j Change and confirm User password Select and confirm the option shown Select and confirm the option shown j Specify a new password at least six characters text en try see Æ page 22 and confirm your entry Select and confirm the option shown j Enter the password again and confirm Select and confirm the option shown The preset password 000000 corresponds to a blank password In oth...

Page 99: ...ress this key to delete the previous password j Enter 6 zeros 000000 to deactivate the password for text entry see Æ page 22 Select and confirm the option shown j Enter 6 zeros 000000 once more and confirm Select the option shown and confirm twice The deactivation of the password request is not valid for the web interface Æ page 136 not for the OpenStage Manager and also not for CTI ap plications ...

Page 100: ...s on the display when you use the line on a locked phone Activating the phone lock Hold down the key shown until Phone lock Confirm locking the phone appears Confirm The phone is locked or N Press the key shown Select and confirm the option shown j Enter and confirm the User password Select and confirm the option shown Select and confirm the option shown Select and confirm the option shown Select ...

Page 101: ...Privacy security 101 Step by Step Unlocking the phone Confirm j Enter and confirm the User password The phone is un locked if the password is correct Unlock phone ...

Page 102: ...ollowing scenarios are possible Logging on and off at the same phone Log on as a mobility user Æ page 103 Log off as a mobility user Æ page 104 Logging on and off at different phones In these cases administrator may have made the fol lowing settings Log on at a remote phone with forced logon when the user is still logged on at that phone Æ page 105 Delayed logon at a remote phone with forced logon...

Page 103: ...ct and confirm the option shown j Enter and confirm the mobility code generally your of ficial phone number Select and confirm the option shown j Enter the user password and confirm with OK select the input mode if necessary Select and confirm the option shown in the context menu The following messages appear on the display Logging on mobile user Validating Registering Downloading user data Once l...

Page 104: ...ired Select and confirm the option shown You will see the prompt Please enter mobility password j Enter user password Select and confirm the option shown The logoff procedure begins In the graphic display the following messages appear Logging off mobile user Uploading user profile Registering Downloading user data After you have logged off the mobility icon is hid den Mobile logoff Please Enter Pa...

Page 105: ...rogress without setting a time the sys tem does not consider whether or not the remote phone is busy Logon via a key If one of the program keys is configured for the mobility function S Press the Mobility program key or Logon via a menu Select and confirm the option shown in the telephony interface context menu Æ page 26 The Mobility logon dialog appears Select and confirm the option shown j Enter...

Page 106: ...ress with a set timeout forced logoff does not occur until this timeout expires Logon via a key S Press the Mobility program key You are prompted to enter your mobility password or Logon via a menu Select and confirm the option shown in the telephony interface context menu Æ page 26 The Mobility logon dialog appears Select and confirm the option shown j Enter and confirm the mobility code generall...

Page 107: ...the Mobility program key LED lights up and the mobility icon appears in the graphic display At the same time the graphic display on the busy remote phone shows Forced logoff pend ing After the timeout set by your administrator the active call is ended and remote logoff is per formed ...

Page 108: ...rver and can therefore change without any of the programma ble sensor keys being pressed If one of the programmable sensor keys is pressed you can see the status of the function on the graphic dis play Example Switching between Line busy and Line free see also Æ page 119 Prerequisite Your administrator configured a program mable sensor key with the function Busy make line busy for the hunt group Æ...

Page 109: ...s code table Æ page 121 or if you also want to set the forwarding destination j enter the access code with a phone number such as 901234567 to activate call forwarding Z You hear a confirmation tone Deactivating Lift the handset j Enter the access code see access code table Æ page 121 to deactivate call forwarding Z You hear a confirmation tone All call forwarding types described in this section r...

Page 110: ...e handset j Enter the access code see access code table Æ page 121 or if you also want to set the forwarding destination j enter the code with a phone number such as 901234567 to activate call forwarding Z You hear a confirmation tone Deactivating Lift the handset j Enter the access code see access code table Æ page 121 to deactivate call forwarding Z You hear a confirmation tone Your administrato...

Page 111: ...s phone answers you can inform him or her that your calls are being forwarded Now the r key lights up and the forwarding is indica ted on the display If the party does not answer or the station is busy activate the feature once again If you complete this operation within two minutes you will hear the con firmation tone followed by the dial tone The System does not output an acoustic signal to info...

Page 112: ...g number can be another phone or another party a voice mailbox an announcement service If the caller s number is not in the call forwarding list your phone rings as usual Activating Lift the handset j Enter the access code see access code table Æ page 121 You are requested to add members to a list and then ac tivate the property accordingly The list can also be man aged by your administrator Deact...

Page 113: ...ows Lift the handset j Enter the access code see access code table Æ page 121 to transmit the caller information Z You hear a confirmation tone Activating If your administrator activated caller ID transmission for your phone you can deactivate this setting as follows Lift the handset j Enter the access code see access code table Æ page 121 to suppress the caller ID Z Wait until you hear the confir...

Page 114: ...he phone number of the party you want to contact Caller ID transmission is reactivated after this call Temporarily deactivating anonymous calling for the next call If your administrator suppressed caller ID transmission for your phone you can enable this setting for the next call as follows Lift the handset j Enter the access code see access code table Æ page 121 Z Wait until you hear the confirma...

Page 115: ... a message that the party refuses to accept any calls from this number or the call is forwarded to an external phone number Contact your administrator for information on how your System is configured on site Lift the handset j Enter the access code see access code table Æ page 121 Various announcements deliver the following informa tion the name of the feature selective call acceptance the current...

Page 116: ...s no tified that the called party rejects calls from this num ber If the caller s number is not in the selection list the call is to you as usual Lift the handset j Enter the access code see access code table Æ page 121 Various announcements deliver the following informa tion the name of the feature selective call rejection the current status active or inactive the current scope of the selection l...

Page 117: ...from being transmitted In this case you are not informed that a call was reject ed Lift the handset j Enter the access code see access code table Æ page 121 Accepting You can also accept calls from parties that activated a data protection feature for example caller ID suppres sion to prevent their phone number from being trans mitted Lift the handset j Enter the access code see access code table Æ...

Page 118: ...nction lets you dial faster by simply entering nu merical sequences For using three digit sequences up to 1000 destinations can be stored The centrally stored list is managed by the administrator Lift the handset j Enter the access code see access code table Æ page 121 followed by a number between 0 and 999 for the call number The number is dialed automatically ...

Page 119: ...nes If you want another member of the group to pick up an incoming call you can set your telephone to signal the busy status for your line to the other members of the hunt group Hunt group calls will then no longer be for warded to your telephone This feature is configured using the feature toggle key Æ page 108 Making a line busy This prevents this line being used for calls in a hunt group Activa...

Page 120: ...ee line in the hunt group chain after it reaches this line Activating Lift the handset j Enter the access code see access code table Æ page 121 Z Wait until you hear the confirmation tone Deactivating Unmark the line as the end of the hunt group chain Lift the handset j Reenter the access code see access code table Æ page 121 Z Wait until you hear the confirmation tone ...

Page 121: ...1 Call forwarding unconditional off Æ page 111 Call forwarding selective on Æ page 112 Call forwarding selective off Æ page 112 Making anonymous calls off Æ page 113 Making anonymous calls on Æ page 113 Temporarily activate anonymous calls Æ page 114 Temporarily deactivate anonymous calls Æ page 114 Creating list for call acceptance Æ page 115 Creating list for call rejection Æ page 116 Rejecting ...

Page 122: ...ions z You can also configure this setting via the Web interface Æ page 136 N Press the key shown Select and confirm the option shown if nec j Enter and confirm the User password Select and confirm the option shown Select and confirm the option shown Select and confirm the option shown gh Set and confirm the contrast Confirm User Phone Display Contrast Save Exit The administrator can set a time in...

Page 123: ...you can set contrast for it N Press the key shown Select and confirm the option shown if nec j Enter and confirm the User password Select and confirm the option shown Select and confirm the option shown Select and confirm the option shown gh Set and confirm the contrast Confirm User Phone Display Key mod contrast Save Exit ...

Page 124: ...rd Select and confirm the option shown Select and confirm the option shown j Enter and confirm the time Confirm Setting the date N Press the key shown Select and confirm the option shown if nec j Enter and confirm the User password Select and confirm the option shown Select and confirm the option shown j Enter and confirm the date Confirm You must set the date and time manually if your phone is no...

Page 125: ...onfigure this setting via the Web interface Æ page 136 N Press the key shown Select and confirm the option shown if nec j Enter and confirm the User password Select and confirm the option shown Select and confirm the option shown Select and confirm the option shown in the context menu Confirm User Date and time Daylight saving Yes Save Exit ...

Page 126: ...own Select and confirm the option shown j Enter and confirm the difference between daylight and standard time in minutes Confirm Automatic daylight saving time The Auto DST setting is provided for information pur poses and can only be changed by your administrator z You can also access this information via the Web inter face Æ page 136 N Press the key shown Select and confirm the option shown if n...

Page 127: ... option shown Select and confirm the time format 12 or 24 hour dis play in the context menu Confirm Date display format z You can also configure this setting via the Web interface Æ page 136 N Press the key shown Select and confirm the option shown if nec j Enter and confirm the User password Select and confirm the option shown Select and confirm the option shown Select and confirm the format you ...

Page 128: ...hown Select and confirm the option shown if nec j Enter and confirm the User password Select and confirm the option shown Select and confirm the option shown Select and confirm the volume you want to adjust for example Handset gh Set and confirm the volume An acoustic sample of the current volume is output via audio feedback when you adjust the volume Confirm User Audio Volumes Handset Save Exit ...

Page 129: ...er and confirm the User password Select and confirm the option shown Select and confirm the option shown Select and confirm the option shown Select and confirm the room character in the context menu for example Normal Æ page 138 Confirm Ringer melody z You can also configure this setting via the Web interface Æ page 136 N Press the key shown Select and confirm the option shown if nec j Enter and c...

Page 130: ...confirm the required ringer tone sequence 1 3 Select and confirm the option shown Ringer file If your administrator has loaded suitable files to the phone you can select a realtone file in mp3 or wav format for the ringer tone z You can also configure this setting via the Web interface Æ page 136 N Press the key shown Select and confirm the option shown if nec j Enter and confirm the user password...

Page 131: ... another file Country setting for speakerphone mode Enter the country setting you prefer for speakerphone mode here see Æ page 36 z You can also configure this setting via the Web interface Æ page 136 N Press the key shown Select and confirm the option shown if nec j Enter and confirm the User password Select and confirm the option shown Select and confirm the option shown Select and confirm the o...

Page 132: ...te Secure connection setup is the prefer ence set by your administrator z You can also configure this setting via the Web interface Æ page 136 N Press the key shown Select and confirm the option shown if nec j Enter and confirm the User password Select and confirm the option shown Select and confirm the option shown Select and confirm the option shown Select and confirm the option shown in the con...

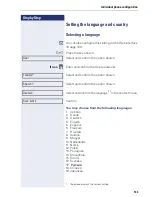
Page 133: ...assword Select and confirm the option shown Select and confirm the option shown Select and confirm the language 1 in the context menu Confirm You may choose from the following languages 1 Ceština 2 Dansk 3 Deutsch 4 English 5 Español 6 Français 7 Hrvatski 8 Italiano 9 Magyar 10 Nederlands 11 Norsk 12 Polski 13 Português 14 Slovenčina 15 Suomi 16 Svenska 17 18 Chinese 19 Japanese User Locality Spee...

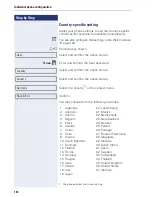
Page 134: ...hown Select the country 1 in the context menu Confirm You may choose from the following countries User Locality Country Germany 1 The phone displays the current setting Save Exit 1 Argentina 20 Luxembourg 2 Australia 21 Mexico 3 Austria 22 Netherlands 4 Belgium 23 New Zealand 5 Brazil 24 Norway 6 Canada 25 Poland 7 China 26 Portugal 8 Chile 27 Russian Federation 9 Croatia 28 Singapore 10 Czech Rep...

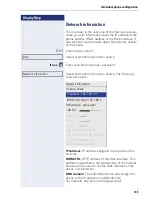
Page 135: ... following overview opens IP Address IP address assigned to the phone in the network WBM URL HTTP address of the Web interface This address is specified in the address line of the Internet browser and is used to call the Web interface of the phone in the browser DNS domain The administrator can also assign the phone to the IP address of a DNS domain for example http my openStage phone User Network...

Page 136: ...s This area lets you configure settings for administering your phone and the network environment Access to the Administrator Pages is protected by the admin password For more information contact your administrator or refer to the administration manual For more information on the IP address the Web interface address and how to connect the telephone to the network refer to the sec tion entitled Netw...

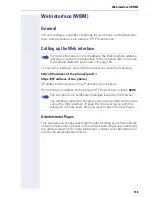
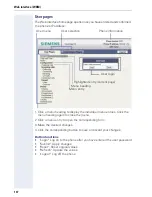
Page 137: ...2 Click a menu entry to open the corresponding form 3 Make the desired changes 4 Click the corresponding button to save or discard your changes Button functions Login Log on to the phone after you have entered the user password Submit Apply changes Reset Reset original values Refresh Update the values Logout Log off the phone User menu User login Phone information User selection Highlighted entry ...

Page 138: ...V Æ page 131 User Configuration Outgoing calls Autodial delay seconds V Æ page 76 Allow callback busy V Æ page 53 Allow callback no reply V Æ page 53 Allow busy when dialling V Æ page 77 Allow transfer on ring V Æ page 71 Incoming calls Deflecting Allow deflection V Æ page 62 Default deflect destination V Æ page 62 Deflect to DSS V Æ page 62 Forwarding Settings Forwarding Favourites Destination 1 ...

Page 139: ...page 45 Allow exit conference V Æ page 80 Allow hold reminder V Æ page 65 Hold reminder delay minutes V Æ page 66 Allow music on hold V Æ page 66 Allow conferences V Æ page 79 Allow tone for secure call V Æ page 132 Keyset Lines Ring delay seconds V Æ page 92 Allow in overview V Æ page 91 Address1 Primary line 1 Ring on off 1 Selection order 1 Overview Use FPK order V Æ page 93 Add all lines V Æ p...

Page 140: ...Normal Edit V Æ page 56 Shifted Edit V Æ page 56 Key Module 1 if available such as Program keys Key Module 2 if available such as Program keys Locality Country V Æ page 134 Language V Æ page 133 Date format V Æ page 127 Time format V Æ page 127 Authentication Old password New password V Æ page 98 Confirm password ...

Page 141: ...y does not respond Check if the key is stuck Telephone does not ring Check whether the Do not disturb function is activated on your telephone Do not disturb appears on the screen Æ page 23 If so deactivate it The displayed time is incorrect The time is corrected automatically over night after 24 hours at the latest You cannot dial an external number Check whether your telephone is locked Phone loc...

Page 142: ...ns 23 Display settings contrast 122 Do not disturb 96 DSS call call deflection 90 DSS key consultation 89 indirect pickup 90 reject call 90 During calls multi line 87 F Forced logoff 106 Function keys 16 G General information 9 Graphic display 23 call lists 30 icons indicating call status 26 voicemail 28 Graphic display settings contrast 122 H Headset 61 HiPath 8000 108 accepting anonymous calls 1...

Page 143: ...s 2 P Padlock icon 33 Phantom line 19 Phone number directories 83 Phone settings 122 Pop up menu 26 Primary line 19 Privacy 95 Private line 19 Program Service menu 31 Programmable sensor keys 18 55 R Redial 42 Redialing multi line 86 Repdial keys 74 Ringer off 95 S Second call 67 Secondary line 19 Security 95 Sensor keys immediate ring 59 Settings 122 Shared line 19 Single line telephone 11 Speake...

Page 144: ... change as a result of further development of the products An obligation to provide the respective characteristics shall only exist if expressly agreed in the terms of contract Subject to availability Right of modification reserved The trademarks used are owned by Siemens Enterprise Communications GmbH Co KG or their re spective owners Siemens Enterprise Communications www siemens com open Communi...

Reviews: