background image

DIAPHRAGM PUMP INFORMATION 


WARNING:  

ALWAYS wear protective 

clothing, face shield, safety glasses and gloves 
when working near or performing and 
maintenance or replacement on your pump.  See 
MSDS Sheet from polymer supplier foe 
additional precautions. 
 

OUTPUT ADJUSTMENT CONTROLS 
 

In most external controlled pumps the uppermost 
knob serves as speed control.  Graduations for 
the Speed Knob appear directly on the face of the 
control panel.  The largest knob below is Stroke 
Control. 


1.  Speed adjustment:  Speed control provides 

adjustment of the percent of maximum strokes 
per minute.  Turning this clockwise increase 
stroke frequency.  

Note AA7 Series Only:  

When operating pump in the external mode, the 
speed control knob should be fully turned counter 
clockwise.  A click indicates pump is in external 
mode.  
 

2.  Stroke Adjustment; Stroke control 

provides adjustment of percent of maximum 
Liquifram (diaphragm) travel.  Turning this knob 
counterclockwise increases percent output per 
stroke.  Only adjust while pump is running. 
 

PRIMING THE PUMP 
 

Hold tip of syringe firmly in fitting with one 
hand while using the other hand to pull back on 
plunger.  Repeat until a small amount of polymer 
is drawn into the syringe.  The pump is now 
primed. 
 

PUMP CALIBRATION 
 

Perform calibration if your system application 
requires it.  Normally calibration is NOT required. 
 
You will need:  

- A watch 
- A calculator 
- Calibrated cylinder (with at least 1000 ml 

capacity. 

- Length of hose or tubing (same I.D. as 
pump ports) 


1.  Maintain all usual connections to the 

PolyBlend unit except disconnect the polymer 
suction line at pump input.  The flow meter and 
pump setting should be those used for normal 
service. 


2.  Connect hose or tubing to the pump input.  

Place the free end of the tubing in the graduated 
cylinder. 


3.  Fill the cylinder with polymer to its 

measured capacity (for example, 1000 ml etc.). 


4.  Turn on the metering pump.  Allow the 

pump to run until all air has been exhausted from 
the tubing and pump and polymer is injected into 
the mixing chamber. 


5.  Stop the pump. 


6.  Refill the cylinder to the measured 

capacity. 


7.  Start the pump again, and start timing as 

the pump runs.  For best results, let the pump run 
long enough to pump at least half of the polymer 
out of the graduated cylinder.  (in general, the 
longer the calibration period, the greater the 
accuracy of the measurement). 


8.  Stop the pump.  Record the time and level 

of the polymer remaining in the cylinder.  Fill in 
the following equation to find the volume of 
polymer pumped per one unit of time (a minute, 
an hour, or a day). 
 
Starting ml - Remaining ml = ml/Time 
        Calibration period 


9.  Compare the actual volume pumped to the 

desired volume, and adjust pump controls.   


10.  Check volume again to confirm the new 

settings. 
 

11

Summary of Contents for PolyBlend PB200-2

Page 1: ...PolyBlend PB200 2 02 07 Siemens Water Technologies Corp PO Box 389 Bradley IL 60915 815 932 8154 Phone 815 932 0674 Fax ...

Page 2: ...d Spare Parts 3 Pump Replacement 3 Troubleshooting 4 WARRANTY 5 6 APPENDIX Differential Pressure Switch 7 8 Digital Display Controller REM 1E 9 10 LMI Diaphragm Pump Information 11 14 Bodine AC Motor 15 16 Parker Solenoid Valve 17 20 PARTS LISTS Overall Parts List and Exploded Diagram 21 22 Mixing Chamber Assembly Parts List and Exploded Diagram 23 24 Flowmeter Assembly Parts List and Exploded Dia...

Page 3: ... s 1 1 6 HP 120VAC 3 6 AMPS INSTALLATION LOCATION Select a location that provides Electrical Supply Potable Water Clean Proximity to the Point of Use Easy Handling and Storage of Polymer Access to Unit Protection Against Severe Weather UNPACKING Examine package contents for damage Report any to freight forwarder Check plastic bag s for contents against individual packing list s NOTE Disregard any ...

Page 4: ...NOTE For optimum pump performance keep stroke frequency as high as possible This is done by decreasing the stroke length setting More stroke repetition with a shorter length is better than fewer strokes with a long stroke length If stroke length is too short pump prime may be affected Step 7 Adjust water flow at mixing chamber by turning control valve The other control valve should be turned for p...

Page 5: ...ormal operation once settings are adjusted based on operation parameters the system can simply be turned ON or OFF Special operating instructions for Seasonal operation do not apply EMERGENCY OPERATING INSTRUCTIONS Emergency operating instructions do not apply to Siemens Water Technologies Stranco Products equipment In case of an emergency TURN OFF POWER TO STOP RUNNING DISASSEMBLY REPAIR REASSEMB...

Page 6: ...gh water flow Make sure pump is in ON position Make sure all water valves supply and discharge are open Take discharge line apart check for blockage and clean if necessary Reduce Back pressure on unit Increase water flow or adjust water monitoring device flow switch DP Switch etc setpoint lower than the desired flow rate Clogged Injection Check Valve Debris or Clumps in Polymer Valve is stuck open...

Page 7: ...Technologies Corp within thirty 30 days of start up and vii for equipment which is destined for extended storage such equipment must have been stored in accordance with the Storage Requirements detailed in the operation and maintenance manual storage of equipment does not extend the Warranty Period The foregoing warranty does not extend to and Siemens Water Technologies Corp assumes no responsibil...

Page 8: ...OF THE PURCHASER ARE BASED IN CONTRACT IN TORT INCLUDING NEGLIGENCE OR OTHERWISE WITH RESPECT TO OR ARISING OUT OF THE WORK PERFORMED HEREUNDER LIMITATION OF LIABILITY NOTWITHSTANDING ANYTHING ELSE TO THE CONTRARY SIEMENS WATER TECHNOLOGIES CORP AND ITS SUPPLIERS AND ANY AFFILIATED COMPANIES SHALL NOT BE LIABLE FOR ANY CONSEQUENTIAL INCIDENTAL SPECIAL PUNITIVE OR OTHER INDIRECT DAMAGES AND SIEMENS...

Page 9: ...oint of solution application increases enough to affect flow rate the differential pressure across the rotameter and valve decreases This causes power to be interrupted to the polymer pump and prevents damage to the mixing system caused by extremely high viscosity developing in the mixing chamber NOTICE If system pressure or flow are not adequate investigate the cause of lack of flow For example i...

Page 10: ...mer pump is disabled 3 Back off the differential pressure knob until the red alarm light goes off The pump starts again 4 4a If you want very close control of flow leave the knob at this setting Atthissetting anyloss of flow asobservedbythe rotameter resultsinthe pumpbeingdisabled 4b If you want to make the system more forgiving prior to shutdown continue to turn the knob another 1 2 turns Thefurt...

Page 11: ...ough the 4 conductor cable The controller output in the form of contact closures of 80 ms duration triggers the LMI pump In the internal mode output is 0 100 strokes per hour sph or 0 100 strokes per minute spm A touch of the pressure sensitive keys varies the output which is displayed in large easy to read LCD digital format Changes left for longer than 5 seconds are saved in non volatile memory ...

Page 12: ...6 Siemens Water Technologies Corp REM 1E PART NOS The information provided in this brochure contains merely general descriptions or characteristics of performance which in case of actual use do not always apply as described or which may change as a result of further development of the products An obligation to provide the respective characteristics shall only exist if expressly agreed in terms of ...

Page 13: ... if your system application requires it Normally calibration is NOT required You will need A watch A calculator Calibrated cylinder with at least 1000 ml capacity Length of hose or tubing same I D as pump ports 1 Maintain all usual connections to the PolyBlend unit except disconnect the polymer suction line at pump input The flow meter and pump setting should be those used for normal service 2 Con...

Page 14: ...ion on proper zeroing 3 With the unit off unscrew the Liquifram by carefully grasping the outer edge of the Liquifram and turning it counter clockwise Discard old Liquifram disk if so equipped locate behind the Liquifram and check that the size code matches the size code on the replacement Liquifram see illustration 4 Reinstall the disk so alignment pin on the disk if present seats in the recessed...

Page 15: ...of seal ring and ball See illustration 2 Carefully disconnect one tubing connection and fitting at a time and remove the worn seal ring and ball Carefully loosen sealing by prying side to side using a small screw driver through the center hole of the seal ring 3 Install new seal ring and ball in each location IMPORTANT Note correct orientation 4 Install the new spring valve in the Injection Check ...

Page 16: ...gns with zero on the nameplate or end of the black or red band 8 Push down on the outer section a snap sound indicates parts are locked together 9 Replace the yellow cap over the outer section of the knob aligning the tabs on the cap with the slots inside the knob Type III Collet Knob Rezeroing and Stroke Knob Disassembly and Assembly 1 Remove yellow cap 2 Hold knob with soft jaw pliers 3 Disconne...

Page 17: ...15 ...

Page 18: ...16 ...

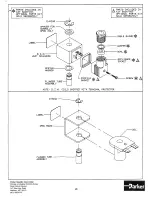
Page 19: ...17 ...

Page 20: ...18 ...

Page 21: ...19 ...

Page 22: ...20 ...

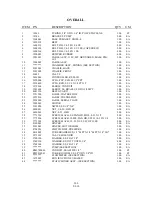
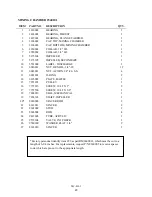
Page 23: ...0 4681310 BELT GUARD 1 00 EA 21 5551209 LABEL WATER FLOW 2 00 EA 22 5551210 LABEL POLYBLEND 1 00 EA 23 5554000 LABEL SERIAL PLATE 1 00 EA 24 5902001 MOTOR 1 00 EA 25 5963028 NIPPLE SS 1 4 X 4 1 00 EA 26 6020031 NUT 1 4 20 HEX SS 6 00 EA 27 6020962 NUT 8 32 HEX 2 00 EA 28 7771558 SCREW MACH SS PAN HD PHIL 8 32 X 1 2 2 00 EA 29 7772506 SCREW MACH 304SS PAN HD SLTD 10 32 X 3 8 2 00 EA 30 7772508 SCRE...

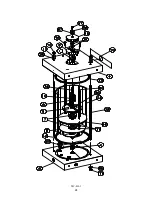
Page 24: ...200 D 007 ...

Page 25: ...NUT ACORN 1 4 20 S S 4 13 6091801 O RING 2 14 6676002 PLATE BAFFLE 1 15 7071201 PULLEY 1 16 7772216 SCREW 10 32 X 1 2 17 7772506 SCREW 10 32 X 3 8 1 18 7802910 SEAL MECHANICAL 1 19 7854303 SHAFT IMPELLER 1 20 8140005 SPACER ROD 2 21 8143011 SPACER 2 22 8603002 STUD 2 23 8603004 ROD 4 24 9412606 TUBE ACRYLIC 1 25 9572304 VALVE INJ CHECK 1 26 9740300 WASHER FLAT 1 4 9 27 8143010 SPACER 1 Factory per...

Page 26: ...MC 0101 24 ...

Page 27: ... ITEM PART NO DESCRIPTION QTY UM 1 4291102 FLOWMETER KING 100GPH 1 EA 2 6091301 O RING BUNA N 2 EA 3 1040093 ADAPTER SPUD 1 EA 4 2735634 CONNECTOR TUBE 1 4 FPT X 3 8 OD COMP 1 EA 5 1048401 ADAPTER FLOWMETER 1 EA 6 9579301 VALVE KING 1 EA 25 ...

Page 28: ...Blank Page 26 ...

Page 29: ...ING PVC 1 2 FPT 1 5 3570005 ELBOW 90 PVC TXT 3 4 1 6 3585634 ELBOW COMP 90 NP 3 8 OD X 1 4 FPT 1 7 4291102 FLOWMETER KING 100GPH 1 8 4480001 GAUGE PRESSURE 0 160PSI 1 9 5850002 MIXER STATIC 1 10 5960061 NIPPLE PVC 1 2 X CLOSE 1 11 5960064 NIPPLE PVC 1 2 X 2 1 12 5963063 NIPPLE SS 1 2 X 1 1 2 304SS 1 13 6619012 PIPING SUB ASSY MIXER STATIC 1 14 8850004 TEE PVC 1 2 FPT 1 15 8850005 TEE PVC 3 4 FPT 1...

Page 30: ...OPD 0001 Post Dilution Static Mixer Assembly P N 5860001 28 ...

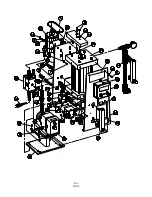
Page 31: ...on Supplement Series AA7 Electronic Metering Pump Metering Pump Component Diagram 201 Ivyland Road Ivyland PA 18974 USA TEL 215 293 0401 FAX 800 327 7563 http www Imipumps com 1975 A 08 03 ISO 9001 Certified 29 ...

Page 32: ...Series AA7 Drive Assembly Exploded View Diagram 30 ...

Page 33: ...ssembly 115V 1 AA742 AA752 AA762 AA772 AA782 1 AA743 AA753 AA763 AA773 AA783 AA745 AA755 AA765 AA775 AA785 48017 Control Panel Assembly 230 250V 1 AA746 AA756 AA766 AA776 AA786 AA747 AA757 AA767 AA777 AA787 AA741 AA751 48034 EPU w Stroke Adjustment 115V 1 AA742 AA743 AA745 AA746 AA747 AA752 AA753 AA755 AA756 AA757 48035 EPU w Stroke Adjustment 230 250V 1 AA761 48036 EPU w Stroke Adjustment 115V 1 ...

Page 34: ... 2003 LMI Milton Roy USA All Rights Reserved Printed in USA Specifications subject to change without notice Series AA7 Control Panel Detail Series AA7 Wiring Diagram 32 ...

Page 35: ...33 ...

Page 36: ...34 ...

Reviews: