background image

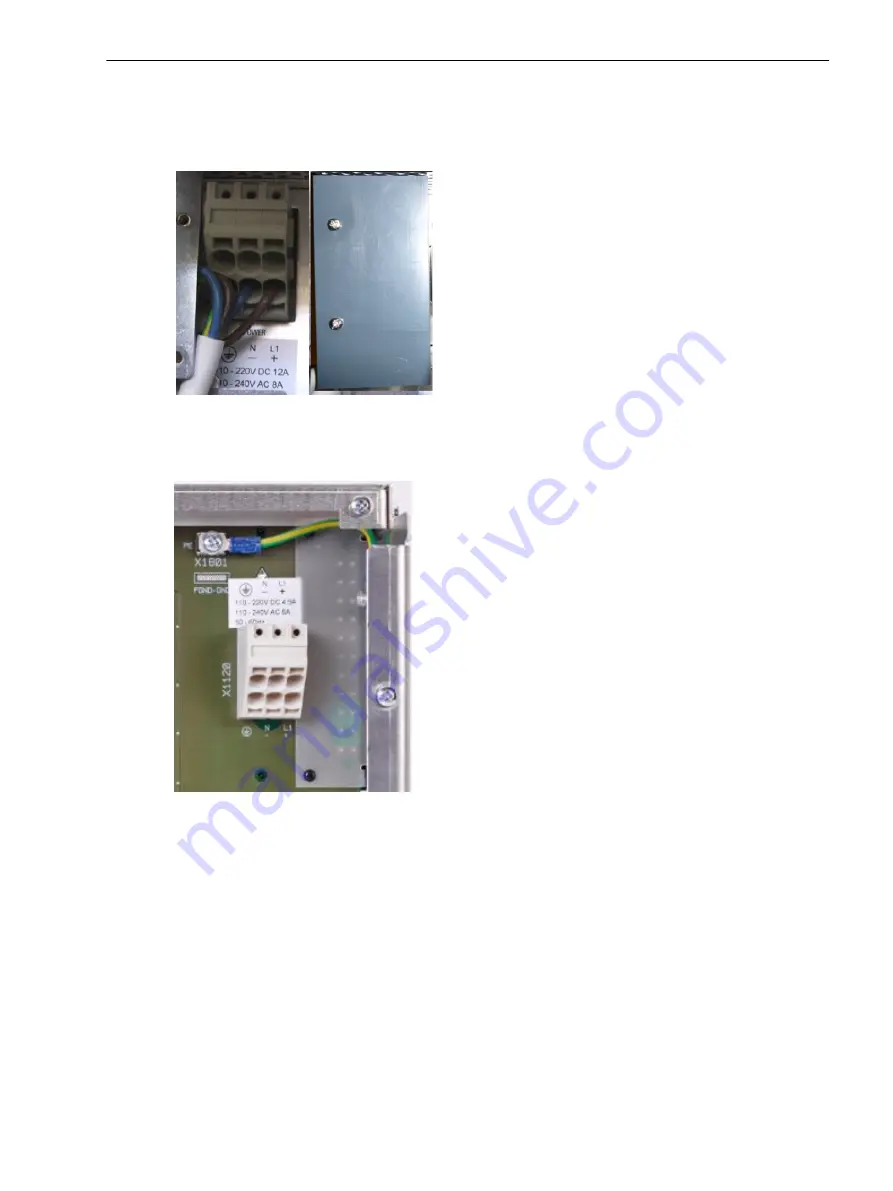
Connection of the Supply Voltage

PowerLink 100

[sc_consuv, 1, --_--]

Figure 4-2

Connection of the supply voltage for PowerLink 100

PowerLink 50

[PL50-ps-connection, 1, --_--]

Figure 4-3

Connection of the supply voltage for PowerLink 50

General

The AC supply voltage is connected to the terminals PE-N-L1.
In case of DC voltage the (-) is connected to the N and (+) to the L1 terminal.
The terminals are covered.

4.2

Connecting the Device

4.2 Connection of the Supply Voltage

Smart Communications, PowerLink 100 and PowerLink 50, Product Information

35

E50405-U53-X-B3-7670, Edition 11.2014

Summary of Contents for PowerLink 100

Page 1: ...uct Information E50405 U53 X B3 7670 Preface Open Source Software Table of Contents Safety Instructions 1 PowerLink Description in Brief 2 Installation of the Module Frames 3 Connecting the Device 4 The Connector Panel 5 Commissioning 6 Service Program PowerSys 7 ...

Page 2: ...act or of business relations nor does it change these All obligations of Siemens AG are stated in the relevant contractual agree ments Siemens AG reserves the right to revise this document from time to time Document version E50405 U53 X B3 7670 01 Edition 11 2014 Version of the product described P3 5 Copyright Copyright Siemens AG 2014 All rights reserved The disclosure duplication distribution an...

Page 3: ...equipment and operating personnel in electrical installation and power plants Scope This manual is valid for the PowerLink device family Further Documentation dw_prefac prodinfo 2111147 1 en_US Equipment Manual The Equipment Manual describes the functions and applications of a specific PowerLink device Additional Support For questions about the system please contact your Siemens sales partner Supp...

Page 4: ...oid death or severe injuries CAUTION Caution means that medium severe or slight injuries can occur if the specified measures are not taken Comply with all instruction in order to avoid moderate or minor injuries CAUTION Electrostatic sensitive devices ESD means that a device or component can be damaged by common static charges built up on people tools and other non conductors or semiconductors Com...

Page 5: ...ct to the Open Source Software shall prevail The Open Source Software is provided free of charge If stipulated by the Open Source Software license agreement the source text of the software is available until the end of the third year after purchasing the product Shipping charges will apply separately We are liable for the product including the Open Source Software according to the license agreemen...

Page 6: ...6 Smart Communications PowerLink 100 and PowerLink 50 Product Information E50405 U53 X B3 7670 Edition 11 2014 ...

Page 7: ...ice 13 1 4 4 Safety Notes 14 1 4 5 Performing the Electrical Inspection 14 1 5 Electrostatic Sensitive Devices 15 1 6 Installation 17 1 6 1 Preparing Installation 17 1 6 2 Power Supply 17 1 6 3 Completing Installation 18 1 7 Replacement 19 1 7 1 Preparing for Replacement 19 1 7 2 Completing Replacement 20 2 PowerLink Description in Brief 21 2 1 Overview 22 2 2 Transmission Mode 23 2 3 Frequency Ra...

Page 8: ...Board 39 5 3 PowerLink 50 HF Connection 40 6 Commissioning 41 6 1 Overview 42 6 2 Switching on the Supply Voltage 43 6 3 Switching on the Device 44 6 4 Mounting of Modules in the PowerLink 45 7 Service Program PowerSys 49 7 1 About the Service Program PowerSys 50 7 2 PC Requirements 51 7 3 Installation of the Service Program PowerSys 52 Table of Contents 8 Smart Communications PowerLink 100 and Po...

Page 9: ...age and Storage 11 1 3 Incoming Inspection 12 1 4 Electrical Inspection 13 1 5 Electrostatic Sensitive Devices 15 1 6 Installation 17 1 7 Replacement 19 1 Smart Communications PowerLink 100 and PowerLink 50 Product Information 9 E50405 U53 X B3 7670 Edition 11 2014 ...

Page 10: ...e manuals of PowerLink The Product Information with a detailed system description and all necessary instructions for installation and alarm handling For further details refer to the attached DVD 1 1 Safety Instructions 1 1 Scope of Delivery 10 Smart Communications PowerLink 100 and PowerLink 50 Product Information E50405 U53 X B3 7670 Edition 11 2014 ...

Page 11: ...g Put the accessories supplied and the test certificate in the packing with the device Storing the Device Only store devices on which you have carried out an incoming inspection thus ensuring that the warranty remains valid The incoming inspection is described in Chapter Incoming Inspection The device must be stored in rooms which are clean dry and dust free Devices or associated spare parts must ...

Page 12: ...ized might represent a hazard during servicing If you do not comply with the safety notes this will result in medium severe or slight injuries Comply with all instruction in order to avoid moderate or minor injuries Performing a Follow Up Inspection on a Device Visually check for external damage as soon as you have unpacked the devices they must not show any signs of dents or cracks Checking Rated...

Page 13: ...ed to the device The cross section of the ground wire must be at least 2 5 mm2 AWG14 The following consequences can occur if the cross section of the ground wire is not properly installed The device can be damaged Touching the device can cause a flashover and health damage if the device is not sufficiently grounded A faulty activation can occur by undefined states The cross section of the ground w...

Page 14: ...e the normal operating state process mode if the configuration connection and transmission have been set up successfully The device must communicate with the PC If not discon nect and check the installation of the device and the installation and configuration of the service program PowerSys refer to Chapter 4 If a defect of the device is suspected please contact the Customer Support prior to a ret...

Page 15: ...oderate or minor damage Before carrying out any work on the system ground yourself with a wrist strap When working on modules always place them on a grounded conductive surface Transport modules only in suitable protective bags The following points must also be observed during installation Before installing the device lay and connect the grounding wire to ground potential Connect the grounding wir...

Page 16: ...wire must not be disconnected until all work has been completed if you are disassembling the system If possible do not touch the modules and wiring before the work has been completed Safety Instructions 1 5 Electrostatic Sensitive Devices 16 Smart Communications PowerLink 100 and PowerLink 50 Product Information E50405 U53 X B3 7670 Edition 11 2014 ...

Page 17: ...rectly into the optical fiber terminals of the active optical plug in modules not even with optical devices De energize the device i i NOTE Laser class 1 is adhered to in compliance with EN 60825 1 and EN 60825 2 in the case of 62 5 μm 125 μm optical fibers Undo the fastening screw and remove the cover plate from the plug in module position Power Supply Dangerous voltages are present within this p...

Page 18: ...recognize the new plug in module In case you installed a new module configure the settings of the new module in PowerSys i i NOTE Only qualified electrical engineering personnel is authorized to reset the hardware parameters 1 6 3 Safety Instructions 1 6 Installation 18 Smart Communications PowerLink 100 and PowerLink 50 Product Information E50405 U53 X B3 7670 Edition 11 2014 ...

Page 19: ...um severe or slight injuries Do not look directly into the optical fiber terminals of the active optical plug in modules not even with optical devices The laser beams can damage your eyes De energize the device i i NOTE Laser class 1 is adhered to in compliance with EN 60825 1 and EN 60825 2 in the case of 62 5 μm 125 μm optical fibers i i NOTE If you have not cabled the optical fiber plug in modu...

Page 20: ...mpleting Replacement Set the jumpers of the module for operation mode The device shall recognize the new plug in module In case you installed a new module configure the settings of the new module in PowerSys i i NOTE Only qualified electrical engineering personnel is authorized to reset the hardware parameters 1 7 2 Safety Instructions 1 7 Replacement 20 Smart Communications PowerLink 100 and Powe...

Page 21: ...mission Mode 23 2 3 Frequency Range 24 2 4 Frequency Grid 25 2 5 Mechanical Construction 26 2 6 PowerLink 100 CFS 2 Part 27 2 7 PowerLink 50 28 2 Smart Communications PowerLink 100 and PowerLink 50 Product Information 21 E50405 U53 X B3 7670 Edition 11 2014 ...

Page 22: ...ications like voice data or protection signal transmission with the SWT 3000 the equipment can be extended by integrating modules VFM VFS resp VFO for connecting a modem or external teleprotec tion as well as for various telephony services cdbldipl 200813 01 tif 1 en_US Figure 2 1 PowerLink block diagram VF Voice frequency iSWT integrated SWT 3000 VFO VF interface FXO vMUX versatile MUX VFS VF int...

Page 23: ...using the single side band method amplitude modulation with suppressed carrier 2 2 PowerLink Description in Brief 2 2 Transmission Mode Smart Communications PowerLink 100 and PowerLink 50 Product Information 23 E50405 U53 X B3 7670 Edition 11 2014 ...

Page 24: ...24 kHz to 1000 kHz The frequency positions of the HF send and receive band can be selected regular or inversed 2 3 PowerLink Description in Brief 2 3 Frequency Range 24 Smart Communications PowerLink 100 and PowerLink 50 Product Information E50405 U53 X B3 7670 Edition 11 2014 ...

Page 25: ... resp 4 kHz The frequency adjustment is possible in steps of the half grid 1 25 kHz resp 2 kHz 2 4 PowerLink Description in Brief 2 4 Frequency Grid Smart Communications PowerLink 100 and PowerLink 50 Product Information 25 E50405 U53 X B3 7670 Edition 11 2014 ...

Page 26: ...hese module frames corre spond to the 19 mounting system in accordance with DIN 41494 and can be installed directly into 19 swing frame cubicles or mounting frames without any additional fixing brackets The modules of a module frame are electrically connected to each other via a backplane with the appropriate sockets and plug connectors The module frames are connected to each other by plug in conn...

Page 27: ...le multiplexer vMUX At the right hand part of the frame module slots are located for the mounting of the modules CSPi VFx and vMUX in double height euro card format The modules have a common front cover with a cut out for the service interface and the displays resp operating elements of the CSPi module Alongside on the left the slot positions for the power supply and the 2 alarm modules are locate...

Page 28: ... the modules CSPi VFx and vMUX in double height euro card format The modules have a common front cover with a cut out for the service interface and the operating elements of the CSPi module The mounting positions for the integrated SWT 3000 can be equipped with the processing unit PU4 and 2 interface modules IFC or a IEC61850 EN100 module The ports for the external interfaces are located on the re...

Page 29: ...allation of the Module Frames 3 1 Introduction 30 3 2 Dimensions of the PowerLink System 31 3 Smart Communications PowerLink 100 and PowerLink 50 Product Information 29 E50405 U53 X B3 7670 Edition 11 2014 ...

Page 30: ...es The fastening elements which are required are included in the scope of delivery No special tools are needed for the instal lation 3 1 Installation of the Module Frames 3 1 Introduction 30 Smart Communications PowerLink 100 and PowerLink 50 Product Information E50405 U53 X B3 7670 Edition 11 2014 ...

Page 31: ...sys 110111 01 tif 1 en_US Figure 3 1 Dimensions of a PowerLink 100 3 2 Installation of the Module Frames 3 2 Dimensions of the PowerLink System Smart Communications PowerLink 100 and PowerLink 50 Product Information 31 E50405 U53 X B3 7670 Edition 11 2014 ...

Page 32: ... of height 1 75 inches or 44 45 mm i i NOTE A flyback diode should be used for any relays that is connected to an output of PowerLink or iSWT to avoid EMC influences Installation of the Module Frames 3 2 Dimensions of the PowerLink System 32 Smart Communications PowerLink 100 and PowerLink 50 Product Information E50405 U53 X B3 7670 Edition 11 2014 ...

Page 33: ...ecting the Device 4 1 Protective Earth Connection 34 4 2 Connection of the Supply Voltage 35 4 Smart Communications PowerLink 100 and PowerLink 50 Product Information 33 E50405 U53 X B3 7670 Edition 11 2014 ...

Page 34: ...ve earth conductor of the PowerLink must be connected with the housing The connection of the PE conductor on PowerLink 50 is shown in Figure 4 3 4 1 Connecting the Device 4 1 Protective Earth Connection 34 Smart Communications PowerLink 100 and PowerLink 50 Product Information E50405 U53 X B3 7670 Edition 11 2014 ...

Page 35: ...n of the supply voltage for PowerLink 50 General The AC supply voltage is connected to the terminals PE N L1 In case of DC voltage the is connected to the N and to the L1 terminal The terminals are covered 4 2 Connecting the Device 4 2 Connection of the Supply Voltage Smart Communications PowerLink 100 and PowerLink 50 Product Information 35 E50405 U53 X B3 7670 Edition 11 2014 ...

Page 36: ...nnect the equipment from all energy sources to ensure that no dangerous voltage is present CAUTION An easily accessible all pole disconnect device with a contact gap of at least 3 0 mm must be included installed in the building installation wiring The value of the external fuse has to be max 16A Connecting the Device 4 2 Connection of the Supply Voltage 36 Smart Communications PowerLink 100 and Po...

Page 37: ...ion of PLPA Unit and CFS 2 38 5 2 Interconnection of PLPA Unit and HF Connecting Board 39 5 3 PowerLink 50 HF Connection 40 5 Smart Communications PowerLink 100 and PowerLink 50 Product Information 37 E50405 U53 X B3 7670 Edition 11 2014 ...

Page 38: ... SUB D plug on the PLPA The Tx and Rx BNC jacks on the CFS 2 have to be connected to the corresponding BNC jacks on the PLPA sclnplcf 110111 01 tif 1 en_US Figure 5 1 Interconnection of PLPA and CFS 2 section for PowerLink 100 5 1 The Connector Panel 5 1 Interconnection of PLPA Unit and CFS 2 38 Smart Communications PowerLink 100 and PowerLink 50 Product Information E50405 U53 X B3 7670 Edition 11...

Page 39: ..._US Figure 5 2 Overall connection diagram from the PLE unit to the HF connecting board i i NOTE Please make sure that the a and b conductors are not exchanged In case of 75 Ohm impedance the b wire and GND are linked 5 2 The Connector Panel 5 2 Interconnection of PLPA Unit and HF Connecting Board Smart Communications PowerLink 100 and PowerLink 50 Product Information 39 E50405 U53 X B3 7670 Editio...

Page 40: ...erLink 50 HF connection PowerLink_50S_rueck_offen 1 _ Figure 5 3 PowerLink 50 HF connection 5 3 The Connector Panel 5 3 PowerLink 50 HF Connection 40 Smart Communications PowerLink 100 and PowerLink 50 Product Information E50405 U53 X B3 7670 Edition 11 2014 ...

Page 41: ...2 6 2 Switching on the Supply Voltage 43 6 3 Switching on the Device 44 6 4 Mounting of Modules in the PowerLink 45 6 Smart Communications PowerLink 100 and PowerLink 50 Product Information 41 E50405 U53 X B3 7670 Edition 11 2014 ...

Page 42: ...Death or severe injuries can occur if specified instructions are not observed Before any maintenance work the device must be isolated with the specified separators 6 1 Commissioning 6 1 Overview 42 Smart Communications PowerLink 100 and PowerLink 50 Product Information E50405 U53 X B3 7670 Edition 11 2014 ...

Page 43: ...ce switched off switch S1 enable disable Power Supply on CSPi in down position LED i red lights up on the PSPA2 power supply unit s 6 2 Commissioning 6 2 Switching on the Supply Voltage Smart Communications PowerLink 100 and PowerLink 50 Product Information 43 E50405 U53 X B3 7670 Edition 11 2014 ...

Page 44: ...remote station and receive levels are set correctly Correction of the receive Level is only possible with the PowerSys service program tdfcppmc 130111 01 tif 1 en_US Figure 6 1 Front cover of the PowerLink processor module CSPi partial covered i i NOTE For more details concerning the commissioning of the PowerLink and integrated SWT 3000 we refer you to the PowerLink Equipment Manual 6 3 Commissio...

Page 45: ...14 1 _ Figure 6 2 Slot positions of the PowerLink 100 Modules 1 CFS 2 part 2 Intergrated SWT 3000 2 3 Intergrated SWT 3000 1 6 4 Commissioning 6 4 Mounting of Modules in the PowerLink Smart Communications PowerLink 100 and PowerLink 50 Product Information 45 E50405 U53 X B3 7670 Edition 11 2014 ...

Page 46: ... mentioned If a device is damaged its reliability decreases drastically although the effects of the damage are noticeable a long time before In order to ensure that electrostatic charges are completely eliminated when working on the system comply with the following instructions in order to avoid moderate or minor damage Before carrying out any work on the system ground yourself with a wrist strap ...

Page 47: ... of exchanging an existing module the system should work after the power supply is enabled When inserting a new module the first time the system needs a new commissioning configuration level setting etc Please refer to the corresponding instructions in chapter Commissioning of the Power Link 50 100 equipment manual Commissioning 6 4 Mounting of Modules in the PowerLink Smart Communications PowerLi...

Page 48: ...48 Smart Communications PowerLink 100 and PowerLink 50 Product Information E50405 U53 X B3 7670 Edition 11 2014 ...

Page 49: ...1 About the Service Program PowerSys 50 7 2 PC Requirements 51 7 3 Installation of the Service Program PowerSys 52 7 Smart Communications PowerLink 100 and PowerLink 50 Product Information 49 E50405 U53 X B3 7670 Edition 11 2014 ...

Page 50: ...wing description applies to the program versions P3 5 x and higher The term SWT 3000 is employed for stand alone protection signaling units and iSWT for devices integrated in Power Link 7 1 Service Program PowerSys 7 1 About the Service Program PowerSys 50 Smart Communications PowerLink 100 and PowerLink 50 Product Information E50405 U53 X B3 7670 Edition 11 2014 ...

Page 51: ...ck Minimum 1 GHz System memory 1 GB DVD drive Ethernet interface 10 100Base T Serial local interface USB Additional needed software Microsoft NET Framework 7 2 Service Program PowerSys 7 2 PC Requirements Smart Communications PowerLink 100 and PowerLink 50 Product Information 51 E50405 U53 X B3 7670 Edition 11 2014 ...

Page 52: ...r than German or English UK can cause problems Siemens strongly recommends that you switch Windows to one of the mentioned settings Start Control panel Regional and Language Options Reasons for the problems are the different formats for numbers date and time With the installation setup of the PowerSys software a hardware driver for the SWT 3000 PU4 CP2102 USB to UART Bridge Controller is pre insta...

Page 53: ... supplied with the device The power supply of the SWT 3000 can be switched ON or OFF With the PowerSys software the SWTStraps program is also delivered The program is useful to carry out the jumper settings for the SWT 3000 as well as iSWT modules You can find the SWTStraps program on the PowerSys DVD Service Program PowerSys 7 3 Installation of the Service Program PowerSys Smart Communications Po...

Page 54: ...54 Smart Communications PowerLink 100 and PowerLink 50 Product Information E50405 U53 X B3 7670 Edition 11 2014 ...

Reviews: