background image

Siemens Industry, Inc.
Building Technologies  Division

P/N 315-048553-5

6

F

igur

e 6

B

a

ttery And A

C

 P

o

w

e

Connection 

Diagr

am 

F

o

PSC-1

2/PSX-1

2

(Maximum Configuration)

Summary of Contents for PSX-12

Page 1: ...llows it to switch the system power to stand by batteries during loss or reduction of the AC power The PSX 12 incorporates a 18A circuit breaker on the battery input The PSX 12 communi cates directly to the NCC to report fault conditions and allows the NCC to query the status of the power supply extender The PSX 12 mounts at the back of the COM 1 enclosure and occupies one location on the studs in...

Page 2: ...ions on the PSX 12 Terminal Blocks The PSX 12 has one reset switch six LEDs three address switches one circuit breaker two terminal blocks two terminal connections and two 60 pin flat ribbon connections as shown in Figure 2 A reset switch is located on the top of the front panel Pushing the reset switch re initializes the PSX 12 operation The LEDs located at the top left of the module and are defi...

Page 3: ...put power limited non power limited must not exceed 12A Over current draw will initiate a PSX 12 shut down The main AC power line must be turned OFF prior to installation P9 Connects the back up battery to the PSX 12 Always apply AC power first followed by the battery P12 AC input connector from the PTB terminals P4 or P5 60 pin Connects the PSX 12 to the system It is a straight through connection...

Page 4: ...prior installing the module in the enclosure Verify that the dedicated circuit breaker for the PSX 12 is turned OFF at the mains Battery Circuit Breaker Set this circuit breaker to the OFF position Network Address Switch Set the three digit HNET network address for the PSX 12 using the three rotary dial address switches located below the LEDs on the front panel Refer to Figure 2 for the location o...

Page 5: ...X 12 over the four screws on the Mounting Plate and slide it down or towards you to rest on the four screws Refer to Figure 4 When the PSX 12 is in the correct position it will be flush with the top bottom and right side of the Mounting Plate 3 Tighten the four screws WIRING The PSX 12 has removable terminal blocks and connectors at the top and bottom of the module The terminal block at the top of...

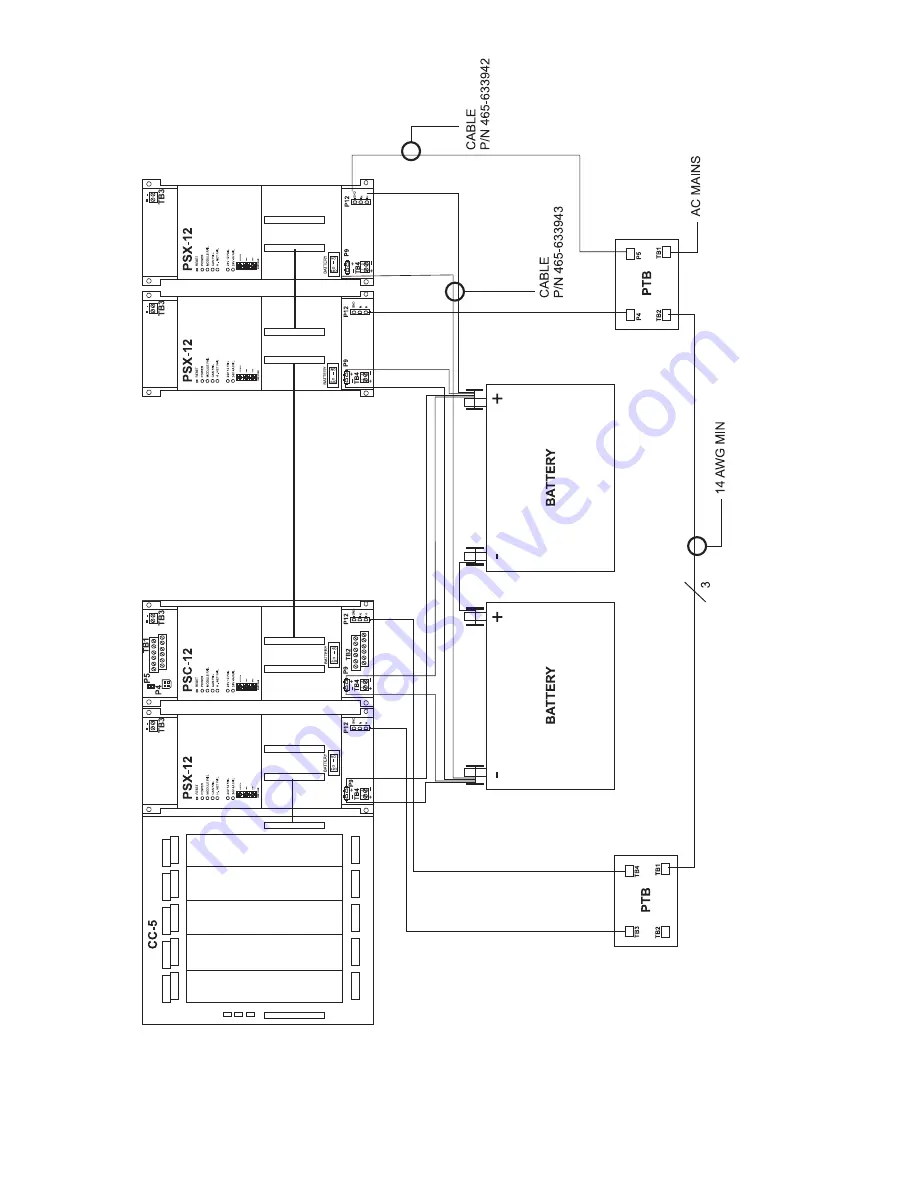
Page 6: ...Siemens Industry Inc Building Technologies Division P N 315 048553 5 6 Figure 6 Battery And AC Power Connection Diagram For PSC 12 PSX 12 Maximum Configuration ...

Page 7: ...the form and follow the procedure listed below M R O F N O I T A L U C L A C D A O L Y L P P U S R E W O P d r a C e l u d o M y t i t n a u Q t n e r r u C V 4 2 l a n i m r e T w e r c S e l u d o M d r a C r e P C D V 4 2 l a t o T t n e r r u C 4 B U H A m 0 0 4 0 C C I N 0 0 d e e c x e t o n t s u M n i s p m A 5 2 1 y b d n a t s m r a l A n i s p m A 1 Enter the quantity of each card modul...

Page 8: ...nnect to the negative battery terminal with the 10 32 x 3 4 screws and lock nuts supplied with the PSC 12 2 Attach the red battery wire to the quick disconnect on the positive terminal and the black battery wire to the quick disconnect on the negative terminal e g a t l o V t u p n I z H 0 5 z H 0 6 C A V 0 2 1 t n e r r u C t u p n I C A V 0 2 1 x a M A 5 3 t n e r r u C V 4 2 l a n i m r e T w e...

Reviews: