background image

Table of Contents

Preface ............................................................................................................................................ v

Related Documents .................................................................................................................  v

Accessing Documentation .......................................................................................................  v

Disclaimer of Liability ..............................................................................................................  v

Registered Trademarks ............................................................................................................  v

Training .................................................................................................................................. vi

Customer Support ..................................................................................................................  vi

Contacting Siemens ............................................................................................................... vii

1

Introduction ........................................................................................................................... 1

1.1

Feature Highlights ................................................................................................. 1

1.2

Description ............................................................................................................ 2

1.3

Required Tools and Materials ................................................................................. 4

1.4

Decommissioning and Disposal .............................................................................  4

1.5

Cabling Recommendations ....................................................................................  4

1.5.1

Supported Fiber Optic Cables ................................................................................  5

2

Installing the Device .............................................................................................................  7

2.1

Unpacking the Device ...........................................................................................  7

2.2

Installing the Device in Hazardous Locations .......................................................... 8

2.3

Mounting the Device ............................................................................................. 9

2.3.1

Mounting the Device on a DIN Rail ........................................................................ 9

2.3.2

Mounting the Device to a Panel ..........................................................................  11

2.4

Connecting the Failsafe Alarm Relay .................................................................... 12

2.5

Connecting Power ............................................................................................... 13

2.5.1

Connecting High AC/DC Power ............................................................................  14

2.5.2

Connecting Low DC Power ..................................................................................  16

3

Device Management ...........................................................................................................  19

3.1

Connecting to the Device .................................................................................... 19

3.2

Configuring the Device ........................................................................................ 20

4

Communication Ports .......................................................................................................... 21

4.1

Copper Ethernet Ports .........................................................................................  21

4.2

Fiber Optic Ethernet Ports ...................................................................................  23

4.3

Serial Ports .......................................................................................................... 23

4.3.1

Serial RS232/RS485/RS422 DB9 Ports ................................................................... 24

4.3.2

Serial RS232/RS485/RS422 RJ45 Ports ..................................................................  25

4.3.3

Serial RS232/RS485/RS422 Fiber Ports .................................................................. 25

4.3.4

Connecting Multiple RS485 Devices ..................................................................... 26

RUGGEDCOM RS910

Installation Manual, 02/2020, C79000-G8976-1029-09

iii

Summary of Contents for RUGGEDCOM RS910

Page 1: ...Edition 02 2020 Installation Manual SIMATIC NET Rugged Ethernet Switches RUGGEDCOM RS910 https www siemens com ...

Page 2: ...ed Ethernet Switches RUGGEDCOM RS910 Installation Manual Preface Introduction 1 Installing the Device 2 Device Management 3 Communication Ports 4 Technical Specifications 5 Certification 6 02 2020 C79000 G8976 1029 09 ...

Page 3: ... personnel are those who based on their training and experience are capable of identify ing risks and avoiding potential hazards when working with these products systems Proper Use of Siemens Products Note the following WARNING Siemens products may only be used for the applications described in the catalog and in the relevant technical documentation If products and components from other manufactur...

Page 4: ... 3 Mounting the Device 9 2 3 1 Mounting the Device on a DIN Rail 9 2 3 2 Mounting the Device to a Panel 11 2 4 Connecting the Failsafe Alarm Relay 12 2 5 Connecting Power 13 2 5 1 Connecting High AC DC Power 14 2 5 2 Connecting Low DC Power 16 3 Device Management 19 3 1 Connecting to the Device 19 3 2 Configuring the Device 20 4 Communication Ports 21 4 1 Copper Ethernet Ports 21 4 2 Fiber Optic E...

Page 5: ...Specifications 29 5 6 Serial Port Specifications 30 5 7 Operating Environment 30 5 8 Mechanical Specifications 31 5 9 Dimension Drawings 31 6 Certification 35 6 1 Approvals 35 6 1 1 CSA 35 6 1 2 European Union EU 36 6 1 3 FCC 36 6 1 4 FDA CDRH 37 6 1 5 ISED 37 6 1 6 TÜV SÜD 37 6 1 7 ACMA 37 6 1 8 RoHS 38 6 1 9 Other Approvals 38 6 2 EMC and Environmental Type Tests 38 iv RUGGEDCOM RS910 Installati...

Page 6: ...lable online at https support industry siemens com To request or inquire about a user document con tact Siemens Customer Support Disclaimer of Liability Siemens has verified the contents of this document against the hardware and or soft ware described However deviations between the product and the documentation may exist Siemens shall not be liable for any errors or omissions contained herein or f...

Page 7: ...ion about training services and course availability visit https www siemens com or contact a Siemens Sales representative Customer Support Customer support is available 24 hours 7 days a week for all Siemens customers For technical support or general information contact Siemens Customer Support through any of the following methods Online Visit http www siemens com automation support request to sub...

Page 8: ...try Sector 300 Applewood Crescent Concord Ontario Canada L4K 5C7 Telephone Toll free 1 888 264 0006 Tel 1 905 856 5288 Fax 1 905 856 1995 E Mail ruggedcom info i ia siemens com Web https www siemens com RUGGEDCOM RS910 Installation Manual 02 2020 C79000 G8976 1029 09 vii ...

Page 9: ...Preface Contacting Siemens viii RUGGEDCOM RS910 Installation Manual 02 2020 C79000 G8976 1029 09 ...

Page 10: ...ments found on plant floors and curb side traffic control cabinets An operating temperature range of 40 to 85 C 40 to 185 F coupled with hazardous location certification Class I Division 2 op tional conformal coating and a galvanized steel enclosure allows the RUGGEDCOM RS910 to be placed in almost any location The RUGGEDCOM RS910 can be mounted on a DIN rail or panel for efficient use of cabinet ...

Page 11: ...Location Certification Class I Division 2 40 to 85 C 40 to 185 F ambient operating temperature no fans 20 AWG Galvanized Steel DIN or panel mounting options provide secure mechanical reliability Optional Conformal coated printed circuit boards Universal Power Supply Options Fully integrated power supply Universal high voltage range 125 250 VDC or 100 240 VAC Hazardous Environments 88 300 VDC or 85...

Page 12: ...ia the serial console port refer to Connect ing to the Device Page 19 Communication Ports Communication ports in general receive and transmit data as well as provide access to the RUGGEDCOM RUGGEDCOM RS910 Web in terface For more information about the various ports available re fer to Communication Ports Page 21 Failsafe Alarm Relay Latches to default state when a power disruption or other alarm c...

Page 13: ...maintenance by a third party make sure it has been fully decommissioned For more information refer to the associated Configuration Manual Recycling and Disposal For environmentally friendly recycling and disposal of this device and related acces sories contact a facility certified to dispose of waste electrical and electronic equip ment Recycling and disposal must be done in accordance with local ...

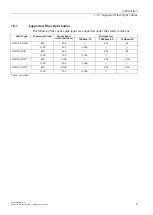
Page 14: ...ditions Distance m Cable Type Wavelength nm Modal Band width MHz km 100Base FX 1000Base SX 10GBase SR 850 200 275 33 OM1 62 5 125 1300 500 2000 850 500 550 82 OM2 50 125 1300 500 2000 850 1500 550 300 OM3 50 125 a 1300 500 2000 850 3500 550 400 OM4 50 125 a 1300 500 2000 a Laser optimized RUGGEDCOM RS910 Installation Manual 02 2020 C79000 G8976 1029 09 5 ...

Page 15: ...Introduction 1 5 1 Supported Fiber Optic Cables 6 RUGGEDCOM RS910 Installation Manual 02 2020 C79000 G8976 1029 09 ...

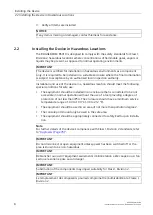
Page 16: ...T This product contains no user serviceable parts Attempted service by unauthorized personnel shall render all warranties null and void Changes or modifications not expressly approved by Siemens AG could invalidate specifications test results and agency approvals and void the user s authority to operate the equipment IMPORTANT This product should be installed in a restricted access location where ...

Page 17: ... that is considered to be not accessible in normal operation without the use of a tool providing a degree of protection of not less than IP54 The enclosure should have a minimum service temperature range of 40 to 100 C 40 to 212 F The equipment should be used in an area of not more than pollution degree 2 The console port should only be used in the safe area The equipment should be appropriately c...

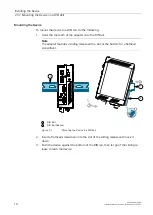
Page 18: ...tional airflow Forced airflow is not required However any increase in airflow will result in a reduc tion of ambient temperature and improve the long term reliability of all equipment mounted in the rack space Note For detailed dimensions of the device with either DIN rail or panel hardware installed refer to Dimension Drawings Page 31 2 3 1 Mounting the Device on a DIN Rail The RUGGEDCOM RS910 ca...

Page 19: ...liding release with a slot at the bottom for a flathead screwdriver 1 2 3 2 1 1 1 DIN Rail 2 DIN Rail Adapter Figure 2 1 Mounting the Device to a DIN Rail 2 Insert a flathead screwdriver into the slot of the sliding release and move it down 3 Push the device against the bottom of the DIN rail then let go of the sliding re lease to latch the device 10 RUGGEDCOM RS910 Installation Manual 02 2020 C79...

Page 20: ...ing the bottom of the device away from the DIN rail 3 Lift the device off the DIN rail 2 3 2 Mounting the Device to a Panel For panel installations the RUGGEDCOM RS910 can be equipped with panel adapters pre installed on the top and bottom of the chassis The adapters allow the device to be attached to a panel using screws To mount the device to a panel do the following 1 Prepare mounting holes in ...

Page 21: ...red and there are no ac tive alarms If the device is not powered or if an active alarm is configured the relay opens the NO contact and closes the NC Normally Closed contact Note Control of the failsafe relay output is configurable through RUGGEDCOM RS910 One common application for this relay is to signal an alarm if a power failure occurs For more information refer to the RUGGEDCOM RS910 User Gui...

Page 22: ...led For 125 250 VDC rated equipment an appropriately rated DC circuit breaker must be installed Use minimum 16 gage copper wiring when connecting terminal blocks Equipment must be installed according to applicable local wiring codes and standards All line to ground transient energy is shunted to the Surge Ground terminal In cases where users require the inputs to be isolated from ground remove the...

Page 23: ...l hazard risk of damage to equipment Before testing the dielectric strength HIPOT in the field remove the braided ground cable connected to the surge ground terminal and chassis ground This cable connects transient suppression circuitry to chassis ground and must be removed in order to avoid damage to transient suppression circuitry during testing Note Torque all terminal connections to 0 6 N m 5 ...

Page 24: ...om the power source to the positive live L termi nal on the terminal block 4 1 2 3 1 Positive Live L Terminal 2 Negative Neutral N Terminal 3 Surge Ground Terminal 4 Braided Ground Cable Figure 2 5 Terminal Block Wiring RUGGEDCOM RS910 Installation Manual 02 2020 C79000 G8976 1029 09 15 ...

Page 25: ...rom the power source to the chassis groun terminal on the terminal block 2 5 2 Connecting Low DC Power RUGGEDCOM RS910 s equipped with 24 or 48 V power supply inputs feature reverse polarity protection and dual power supply inputs allowing the device to accept re dundant connections to a single DC power supply To connect a low DC power supply to the device do the following Note Torque all terminal...

Page 26: ...erminal block 1 3 2 4 1 Positive Terminal 2 Negative Terminal 3 Surge Ground Terminal 4 Braided Ground Cable Figure 2 7 Terminal Block Wiring Single DC Power Supply Inputs 3 Connect the negative wire from the power source to the negative terminal on the terminal block RUGGEDCOM RS910 Installation Manual 02 2020 C79000 G8976 1029 09 17 ...

Page 27: ... Terminal Block Wiring Dual DC Power Supply Inputs 5 Using a braided wire or other appropriate grounding wire connect the surge ground terminal to the chassis ground connection The surge ground terminal is used as the ground conductor for all surge and transient suppression circuitry in ternal to the unit 6 Connect the ground wire from the power source to the chassis groun terminal on the terminal...

Page 28: ...nergized Console Port Connect a workstation directly to the RS232 serial console port to access the boot time control and RUGGEDCOM RS910 console interface The console port provides access to RUGGEDCOM RS910 s console interface IMPORTANT The serial console port is intended to be used only as a temporary connection during initial configuration or troubleshooting and should only be used in a safe ar...

Page 29: ...ernet Ports Connect any of the available Ethernet ports on the device to a management switch and access the RUGGEDCOM RS910 console and Web interfaces via the device s IP address The factory default IP address for the RUGGEDCOM RS910 is https 192 168 0 1 For more information about available ports refer to Communication Ports Page 21 3 2 Configuring the Device Once the device is installed and conne...

Page 30: ...pe 1 and 2 Serial Ports 3 and 4 Copper 10 100Base TX or Fiber Optic 100Base FX Ethernet Ports 9 Fast Ethernet Port 10 100Base TX or 100Base FX 4 1 Copper Ethernet Ports The RUGGEDCOM RS910 supports multiple 10 100Base TX Ethernet ports that allow connection to standard Category 5 CAT 5 shielded or unshielded twisted pair cables with RJ45 male connectors RUGGEDCOM RS910 Installation Manual 02 2020 ...

Page 31: ...y LED Figure 4 2 RJ45 Port LEDs LED State Description Yellow The port is op erating at 100 Mbps Speed Off The port is op erating at 10 Mbps Yellow Solid Link estab lished Yellow Blink ing Link activity Link Activity Off No link detect ed Pin Out The following is the pin out for the RJ45 male connectors 1 8 Figure 4 3 RJ45 Ethernet Port Pin Config uration Pin Name Description 1 RX Receive Data 2 RX...

Page 32: ...or 2 Rx Connector Figure 4 5 LC Port 2 1 1 Tx Connector 2 Rx Connector Figure 4 6 SC Port 2 1 1 Tx Connector 2 Rx Connector Figure 4 7 ST Port LEDs Each port features an LED that indicates the link activity state of the port State Description Yellow Solid Link established Yellow Blinking Link activity Off No link detected Specifications For specifications on the available fiber optic Ethernet port...

Page 33: ...stem to operate in RS232 RS485 or RS422 mode For more information refer to the RUGGEDCOM RS910 User Guide for the RS910 The following is the pin out description for the RS232 RS485 RS422 DB9 ports 1 5 9 6 Figure 4 8 RS232 RS485 RS422 DB9 Seri al Console Port Name Pin a RS232 Mode RS485 Mode RS422 Mode 1 b DCD 2 TX TX RX TX 3 RX RX 4 b DTR 5 Common Isolated Ground c 6 b DSR RX 7 d CTS e TX RX TX 8 ...

Page 34: ... c CTS d 8 c RTS d TX RX TX Shield Chassis Ground a No internal termination is provided b Connected internally c Connected internally d In RS232 mode this pin enters a high impedance state A DTE that asserts RTS will see CTS asserted although the device will not perform hardware flow control 4 3 3 Serial RS232 RS485 RS422 Fiber Ports The RS910 can be equipped with serial RS232 RS485 RS422 fiber po...

Page 35: ...uence or ring The number of devices wired should not exceed 32 and total distance should be less than 1219 m 4000 ft at 100 kbps The Common terminals should be connected to the common wire inside the shield The shield should be connected to earth ground at a single point to avoid loop currents The twisted pair should be terminated at each end of the chain The following shows the recommended RS485 ...

Page 36: ...100 VAC 240 VAC 3 15 A T 4 kVAC 10 W 24 12 VDC 24 VDC 3 15 A T 1 5 kVDC 10 W 48 37 VDC 72 VDC 3 15 A T 1 5 kVDC 10 W a T denotes time delay fuse b Power consumption varies based on configuration Non Hazardous Environments Input Voltage Power Sup ply Type Minimum Maximum Internal Fuse Rating a Isolation Maximum Power Con sumption b 88 VDC 300 VDC 3 15 A T 4 kVAC 10 W HI 85 VAC 264 VAC 3 15 A T 5 5 ...

Page 37: ...ts Description IEEE 802 1D ü ü ü MAC Bridges IEEE 802 1p ü ü ü Priority Levels IEEE 802 1Q ü ü ü VLAN Virtual LAN Tagging IEEE 802 3ab ü 1000Base Tx IEEE 802 3x ü ü ü Full Duplex Operation IEEE 802 3z ü 1000Base LX 5 4 Copper Ethernet Port Specifications The following details the specifications for copper Ethernet ports that can be ordered with the RUGGEDCOM RS910 Speed a Connector Duplex a Cable ...

Page 38: ...ype Tx λ nm a Cable Type µm Mini mum Maxi mum Rx Sen sitivity dBm Rx Satu ration dBm Dis tance km a Power Budget dB 62 5 125 850 16 9 18 MM ST 50 125 850 19 8 12 8 34 11 2 2 14 2 a Typical 100Base FX Fiber Optic Tx dBm Mode Connec tor Type Tx λ nm a Cable Type μm Mini mum Maxi mum Rx Sen sitivity dBm Rx Satu ration dBm Dis tance km a Power Budget dB 50 125 22 5 14 33 5 14 2 11 MM MTRJ 1300 62 5 12...

Page 39: ...300 5 0 34 3 50 29 SM LC 9 125 1300 5 0 35 3 50 30 SM SC 9 125 1300 0 5 37 0 90 37 SM LC 9 125 1300 0 5 37 0 90 37 MM LC 50 125 1300 22 5 14 31 14 2 8 5 a Typical 5 6 Serial Port Specifications The following details the specifications for serial ports that can be ordered with the RUGGEDCOM RS910 Copper Serial Ports Baud Rate 300 to 230 kbps Connector DB9 or RJ45 Isolation 2 5 kV Fiber Serial Ports...

Page 40: ...midity b 5 to 95 Maximum Altitude 2000 m 6562 ft a Measured from a 30 cm 12 in radius surrounding the center of the enclosure b Non condensing 5 8 Mechanical Specifications Weight 1 2 kg 2 7 lbs Enclosure 20 AWG Galvanized Steel 5 9 Dimension Drawings Note All dimensions are in millimeters unless otherwise stated RUGGEDCOM RS910 Installation Manual 02 2020 C79000 G8976 1029 09 31 ...

Page 41: ...Technical Specifications 5 9 Dimension Drawings 65 13 116 59 187 96 168 66 7 87 99 06 Figure 5 1 Overall Dimensions 32 RUGGEDCOM RS910 Installation Manual 02 2020 C79000 G8976 1029 09 ...

Page 42: ...l Specifications 5 9 Dimension Drawings 13 64 101 6 11 2 78 74 120 65 194 06 83 20 183 90 130 4 Figure 5 2 Panel and DIN Rail Mount Dimensions RUGGEDCOM RS910 Installation Manual 02 2020 C79000 G8976 1029 09 33 ...

Page 43: ...Technical Specifications 5 9 Dimension Drawings 34 RUGGEDCOM RS910 Installation Manual 02 2020 C79000 G8976 1029 09 ...

Page 44: ...afety Part 1 General Requirements CAN CSA C22 2 No 0 M91 General Requirements Canadian Electrical Code Part II CAN CSA C22 2 No 142 M1987 Process Control Equipment Industrial Products CAN CSA C22 2 No 213 16 Non Incendive Electrical Equipment for Use in Class I and II Division 2 and Class III Divisions 1 and 2 Hazardous Classified Locations Bi National Standard with ANSI ISA 12 12 01 2016 UL 916 S...

Page 45: ...Measurement The device is marked with a CE marking and can be used throughout the European community A copy of the CE Declaration of Conformity is available from Siemens AG For contact information refer to Contacting Siemens Page vii 6 1 3 FCC This device has been tested and found to comply with the limits for a Class A digital device pursuant to Part 15 of the FCC Rules These limits are designed ...

Page 46: ...ipment Safety Part 1 General Requirements Bi National standard with UL 60950 1 UL 60950 1 Information Technology Equipment Safety Part 1 General Requirements 6 1 7 ACMA This device meets the requirements of the following Australian Communications and Media Authority ACMA standards under certificate ABN 98 004 347 880 Radiocommunications Compliance Labelling Devices Notice 2014 made un der Section ...

Page 47: ...Electronic Informa tion Products A copy of the Material Declaration is available online at https support indus try siemens com cs ww en view 109738831 6 1 9 Other Approvals This device meets the requirements of the following additional standards IEEE 1613 IEEE Standard Environmental and Testing Requirements for Communications Networking Devices in Electric Power Substations IEC 61000 6 2 Electroma...

Page 48: ...V Line to Line 4 Signal Ports 10 V 3 DC Pow er Ports 10 V 3 AC Pow er Ports 10 V 3 IEC 61000 4 6 Induced Conducted RFI Earth Ground Ports 10 V 3 IEC 61000 4 8 Magnetic Field Enclo sure Ports 40 A m Continuous 1000 A m for 1 s IEC 61000 4 11 Voltage Dips and Interrupts AC Pow er Ports 100 for 5 Periods 100 for 50 Periods Signal Ports 2 5 kV Common Mode 1 MHz 1 kV Differential Mode 1 MHz 3 DC Pow er...

Page 49: ...rements for an all fiber configuration and Class 1 requirements for copper ports Class 1 allows for temporary communica tion loss while Class 2 requires error free and interrupted communications Description Test Levels Enclosure Contact 8 kV ESD Enclosure Air 15 kV Radiated RFI Enclosure Ports 35 V m Signal Ports 4 kV 2 5 kHz DC Power Ports 4 kV AC Power Ports 4 kV Fast Transient Earth Ground Port...

Page 50: ...evels IEC 60068 2 1 Cold Temperature Test Ad 40 C 40 F 16 Hours IEC 60068 2 2 Dry Heat Test Bd 85 C 185 F 16 Hours IEC 60068 2 30 Humidity Damp Heat Cyclic Test Db 95 Non Con densing 55 C 131 F 6 Cycles IEC 60255 21 1 Vibration 2 g 10 to 150 Hz Class 2 IEC 60255 21 2 Shock 30 g 11 ms Class 2 RUGGEDCOM RS910 Installation Manual 02 2020 C79000 G8976 1029 09 41 ...

Page 51: ...Certification 6 2 EMC and Environmental Type Tests 42 RUGGEDCOM RS910 Installation Manual 02 2020 C79000 G8976 1029 09 ...

Page 52: ...ttps www siemens com ruggedcom Industry Online Support service and support https support industry siemens com Industry Mall https mall industry siemens com Siemens AG Digital Industry Process Automation Postfach 48 48 90026 NÜRNBERG GERMANY ...

Reviews: