RUGGEDCOM RUGGEDCOM RS940G
Installation Guide
Chapter 1
Introduction
Description
3
2
3
4
1
1
6
8
7
9
5
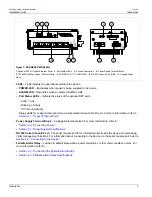
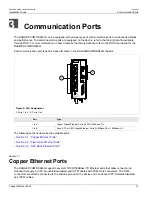
Figure 1: RUGGEDCOM RS940G
1.
Optional SFP or Copper Ethernet Ports
2.
Port Status LEDs
3.
Ground Connection
4.
Power Supply Terminal Block
5.
10/100/1000 Mbps Copper Ethernet Ports
6.
POWER LED
7.
ALARM LED
8.
RS-232 Console Port (DB9)
9.
Failsafe Alarm
Relay
•
LEDs
– LEDs indicate the operational status of the device.
▪
POWER LED
– Illuminates when power is being supplied to the device.
▪
ALARM LED
– Illuminates when an alarm condition exists.
▪
Port Status LEDs
– Indicate the status of the optional SFP ports:
○ Solid = Link
○ Blinking = Activity
○ Off = No link/activity
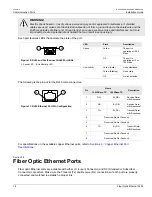
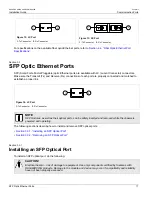
Status LEDs for copper Ethernet ports are incorporated into each RJ-45 port. For more information, refer to
Section 3.1, “Copper Ethernet Ports”
.
•
Power Supply Terminal Block
– A pluggable terminal block. For more information, refer to:
▪
Section 2.2, “Connecting Power”
▪
Section 4.1, “Power Supply Specifications”
•
RS-232 Serial Console Port
– The serial console port is for interfacing directly with the device and accessing
initial management functions. For information about connecting to the device via the serial console port, refer to
Section 2.4, “Connecting to the Device”
.
•
Failsafe Alarm Relay
– Latches to default state when a power disruption or other alarm condition occurs. For
more information, refer to:
▪
Section 2.3, “Connecting the Failsafe Alarm Relay”
▪
Section 4.2, “Failsafe Alarm Relay Specifications”


