background image

SATURN 

 EPABX

 Test Procedures

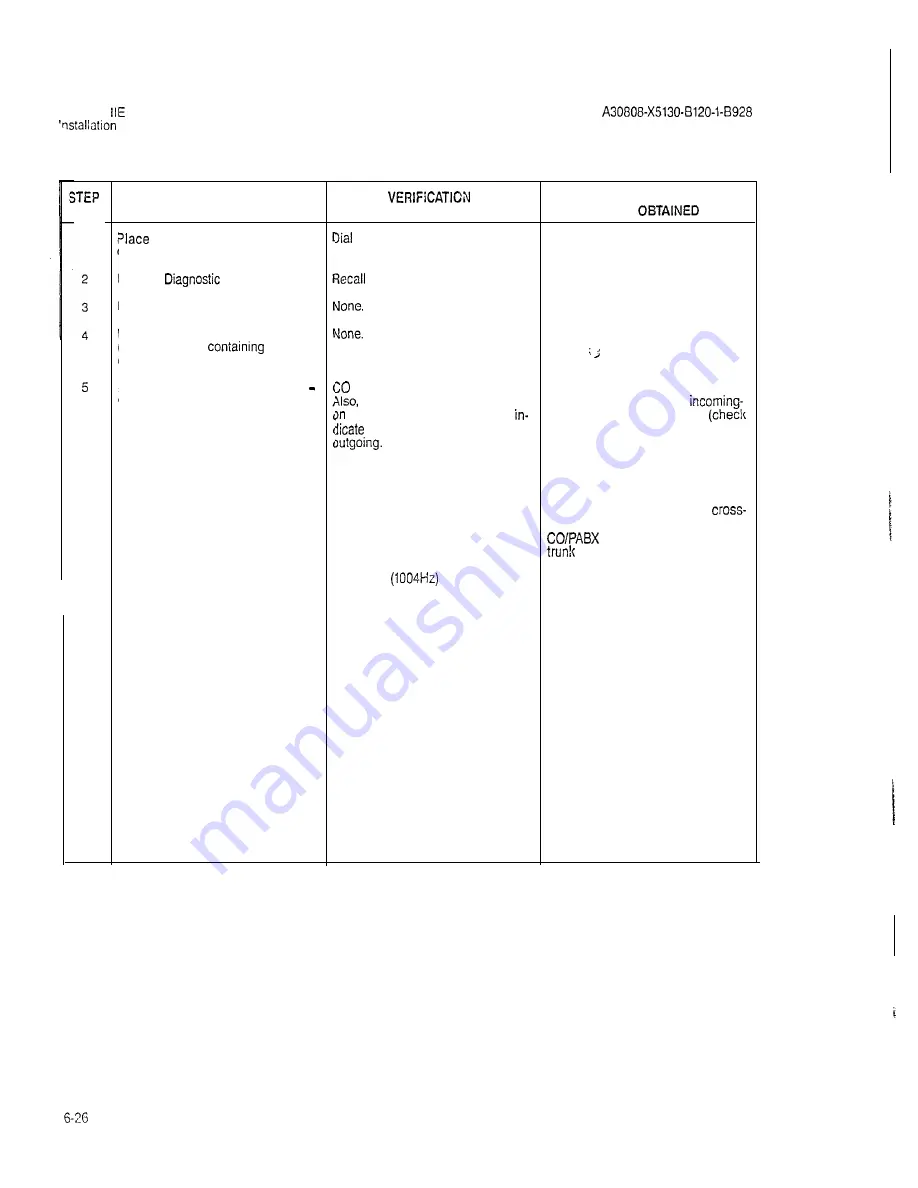
Table 6.11 Outgoing Trunk Test

Issue 1, May 1986

1

6

7

8 A

8 B

PROCEDURE

  m a i n t e n a n c e   t e s t   p h o n e

o f f - h o o k .

D i a l   t h e  

  T e s t   A c c e s s   C o d e .

Dial 2 to enable trunk test.

Dial the two-digit trunk group number
(00 through 31) 

 the trunk

circuit to be tested.

Dial the two-digit trunk number (00 
99) of the trunk circuit to be tested.

For CO-type trunks (i.e., TMBM PCB),

dial the test tone number provided by

the local phone company.

Verify that the returned test tone lev-
el is correct, using a TMS.

If additional tests or procedures are

to be performed, hook-flash the main-

tenance test phone and dial the next
code (Diagnostic Test Access Code is
not redialed).

I f   n o   a d d i t i o n a l   t e s t s   o r   p r o c e d u r e s   a r e

to be performed, place the main-
tenance test phone on-hook.

 tone is returned.

 dial tone is returned.

 or PABX dial tone is returned.

 the associated irunk circuit LED

 the trunk PCB is lit steadily to 

 the trunk has been seized

Test tone 

 is returned

Recall dial tone is returned.

N o n e .

IF VERIFICATION

IS NOT 


If reorder tone is returned, the select-

ed trunk circuit is either an 
type, invalid, or not assigned 
data base assignments).

If busy tone is reiurned, the selected

trunk is in use, retry later.

If CO or PABX dial tone is not
returned, verify trunk MDF 
connections and attempt to access

 trunk using a butt set. If the

 is working properly replace the

trunk PCB under test and retry test.

If the reiurned test tone level is weak,
replace PCB with another having the
same characteristics and retry test. If
returned test tone level increases con-
siderably, trunk PCB is defective and
should be replaced. If the test tone
level is still weak, contact CO repair
service to verify trunk facility.

i

Summary of Contents for SATURN IIE

Page 1: ...n Series A30808 X5130 8120 1 8928 1 Issue 1 May 1986 1 Issued by Office Systems Group 5500 Broken Sound Boulevard N W Boca Raton Florida 33431 ___________ Siemcns Information Systems Inc 305 994 8100 l Telex 515052 Printed in U S A ...

Page 2: ...ections U s i n g S L M D P C B 6 05 SATURN Attendant Console Cross Connections 6 06 CO and CID Trunk Cross Conneciions 6 07 Two Wire Type I E M Trunk Cross Connec ions 6 08 Four Wire T lce I E M Trunk Cross Connections 6 3 6 3 G 4 E 5 G 5 G S _ 6 09 Two Wire Type II E M Trunk Cross Connections 6 6 6 10 Four Wire ype II E M Trunk Cross Connections 6 7 6 il Recorded Anncuncement DID and Tie Trunk V...

Page 3: ...l Pulse D T E Da a Terminal Equipment D T M F Dual Tone Multifrequency E I A Electronics Industries Association E P A B X Electronic Private Automatic Branch Exchange FDD Floppy Disk Drive IRAM Input Random Access Memory L T U Line Trunk Unit L T U P S Line Trunk Unit Power Supply LED Light Emitting Diode MCA Memory Control and Attenuation MDF Main Distribution Frame MEM3 25Gkb Memory MEM4 1Mb Mem...

Page 4: ...ne Module Analog Station SLMD Subscriber Line Module Digital S M X T G Signal Multiplexer Tone Generator SPC Stored Program Controlled S P G Single Point Ground TMBA 2 Two Wire E M Trunk TMBA 4 Four Wire E M Trunk TMBM Central Office Trunk TMIE Direct Inward Dialing Trunk TMS Transmission Measuring Set T S T A P P Test Apparatus TSTDIAG Test Maintenance Diagnostic T T Y Teletypewriter UNA Universa...

Page 5: ...base into system memory when the standard data base format is supplied with the SATURN IIE System d Transmission Measuring Set A transmission measur ing set TMS used to measure the transmission qual ity of a trunk or station Hewlett Packard HP 355iA or equivalent Refer to the manual On Line DiagnostiC Tests Outgoing Trunk Test and Station Line Tosl 2 03 handling Precautions for PCBs wifh MCS Integ...

Page 6: ...FDD and remove floppy disk before removing PCB After new PCB is inserted reinsert floppy disk close FDD set BASK PS circuit breaker on PSU to on and press reset switch on CIOP 3 VVait for in process ca ls i0 complete 4 Removal places one half of ports in shelf out of service 5 Before removal set related LTUPS circuit breaker on PSU to off Removal places all ports in shelf out of service 6 Battery ...

Page 7: ... backplane connector 6 Check that the DIP switch settings for the CIOP board are set SATURN IIE EPABX Installation to meet the operating characteristics of the particular data Procedures Practice Section 4 00 service terminal to be used to input the installation dependent data i e data base into system memory when the standard data base format is supplied with the SATURN IIE System 7 Check that ea...

Page 8: ...w 3 w13 I I SATURN IIE EPABX xtallation Test Procedures A30808 X5130 B120 l 5928 Issue 1 May 1986 Figure 2 00 Signal Cable Distribution for the SATURN IIE System Basic Cabinet ...

Page 9: ...Test Procedures A30808 X5130 B120 l 8928 issue 1 May 1986 W 2 3 EXPANSION CABINET I 1 FDD i wi i L i _ __ LiTJ r W 2 2 BASIC CA NET A5040 2 313186 Figure 2 01 Signal Cable Distribution for the SATURN IIE System Expansion Cabinet 2 5 ...

Page 10: ...Test Procedures A30808 X5130 8120 1 8928 Issue 1 May 1986 LTUSO LINE TRUNK UNIT SHELF J42 J43 r JP L Jl BASS BASIC SHELF E l a J46 J47 E2 05039 1 wmG Figure 2 02 Power Ground Distribution for the SATURN IIE System Basic Cabinet 2 6 ...

Page 11: ...A30808 X5130 B120 l 8920 Issue 1 May 1986 EXPANSION CABINET REF L M e BASIC CABINET REF A5U38 1 4 3 86 Figure 2 03 Power Ground Distribution for the SATURN IIE System Expansion Cabinet 2 7 2 8 blank ...

Page 12: ...iercon netted with the busbar flanges and adequately secured into position Table 3 00 System Ground Test PROCEDURE VERlFlCATlON IF VERlFlCATION IS NOT OBTAINED l If connected remove ac power cord from commercial power outlet 2 Short digital multimeter tesi leads together and noie resistance of test leads 3 Set digital multimeter to lowest Resistance measured should be If a reading greater ihan 2 o...

Page 13: ...Facility ES 5 B D Power co PSU f llOVAC GOi fZ El El Neulral Ground hlatn Cabmel Rear View Recommended B gauge iwtsted Copper Wire conductor not exceedmg i26 feet m length I Ootlonall I 1 f Master Ground Busbar Earth Ground Note Single Point Ground SPG configuration IS shown Figure 3 00 System Ground Test Connections 3 2 ...

Page 14: ...N D Lug No E5 7 Recommended 6 Guage twisted copper wire conductor not exceeding 126 feet in length I Rear View Busbar Grounded at Fuse Box Facility I L _ I Power Cord Plug 7 Master Ground Busbar Earth Ground Note Single Point Ground SPG configuration is shown Figure 3 01 Shelf Ground Continuity Test Connections 3 3 3 4 blank ...

Page 15: ...PROCEDtJRE f not previously done extract each CB in the system from its respec ive backplane connector in basic md LTU shelves Check that all circuit breakers on the SU are in the off positions and that 311 fuses are inserted in their cor esponding locations Jsing the digital multimeter or an 3c polarity indicator verify that the ommercial ac power receptacle Jsed for powering the systsm has the I...

Page 16: ...e measured should read bo If reading is not within to erance J46 shown in Figure 4 00 take tween 43 and 53Vdc check the 48P BASIC fuse in PSU readings beiween pins 2 and 3 If fuse is good replace 48PSO c Set digital multimeter to ap Voltage measured should be be If the voltage is not present check propriate Vat scale and take tween 75 and 100 Vat and replace RGEN fuse or RAC BAS reading between pi...

Page 17: ...ps 8A a on basic backplane connectors through e except that t S at ter J46 J47 J48 and terminals minal El should read between 4 85 El E4 as indicated in step 8A and 5 15Vdc under load 9A To measure the unloaded LTU shelf input voltages if applicable proceed as follows a On the LTU backplane con nector J42 shown in Figure 4 01 take a reading between the following pins 1 Pins 1 and 3 Voltage measure...

Page 18: ...d 12 7Vdc replace LTUPSO d On LTU backplane connector Voltage measured should read be If reading is not within tolerance J44 shown in Figure 4 01 take tween 4 5 and 55Vdc check 5V cabling between be a reading between pins 1 and tween basic shelf and LTU 2 or pins 1 and 3 98 Repeat steps 9A a through d for ex pansion cabinet LTU shelf voltages if applicable substituting 48PSl for 48Vdc power supply...

Page 19: ...I SATURN IIE EPABX lnstallatlon Test Proccdurcs A30808 X5130 8120 1 8928 Issue I May 1986 J46 P46 J47 P47 Figure 4 00 Location of Input Voltage Connectors 011 Basic Bockplnnc ...

Page 20: ...SATURN IIE EPABX A30808 X5130 8120 1 8928 nstallation Test Procedures Issue 1 May 1986 i I I 42 42 J43 P43 J44lP44 Figure 4 0 1 Location cf Input Voltage Connectors on LTU Dackp ane ...

Page 21: ...the SATURN EPABX Data Base Preparation practice and SATURN EPABX Customer Memory Update CMU Proce dures practice 5 02 boadjng Operating D a After satisfactoriiy complet ing the Power Up Output Voltage Tests in Section 4 00 the system s operating program contained on the floppy Uisks is loaded into the FDD modules for the initial processor in itialization Both floppy disks are loaded with either di...

Page 22: ...d in Ta nonmetallic object to depress 1 THE SIB SIDE IS READY FOR ble 5 02 the switch USE Should any of the failures described 2 READY TO START BOOT in Table 5 02 occur during processor LOADER initialization remove the floppy disks 3 BOOT LOADER COMPLETE from FDDs and insert the spare flop py disks into the FDDs If no failures After the last message the red cccur the floppy disks previously re STO...

Page 23: ...installation dependent data to the system memory Table 5 01 CIOP DIP Switch Settings CAUTION Before removing GOP PCB to set switches place BASIC PS circuit brea er on lhe PSU to the off c own position After replacement of ClOP PCB place circuit breaker back to the on up position SWITCH NUMBER SWITCH ON CLOSED SWITCH OFF OPZX 1 Maintenance Test Normal 2 Not Used Not Used 3 4 Baud Rate see note Baud...

Page 24: ...OFF ON ON ON ON ON ON ON ON Notes IST1 LED OFF OFF OFF OFF ON ON ON ON ON F OFF OFF OFF S T 2 LED OFF OFF ON ON OFF OFF OFF OFF ON F OFF ON ON S T 3 LED OFF ON OFF ON OFF ON OFF ON OFF ON OFF ON OFF ON OFF ON ACTION _ _________ ________ Note 1 Note 1 Notes 1 and 3 N o i e 1 Note 1 Note 1 Note 1 NOieS 1 and 3 Note 1 Note 1 Note 1 ______ ___ ___ ____ Note 1 Note 2 Note 2 1 Upon failure retry loading...

Page 25: ...I SATURN IIE EPABX Installation Test Procedures A30808 X5130 6120 1 8928 Issue 1 May 1986 LATCH O P E N LATCH CLoSED 25 0 WRITE PROTECT NOTCH FLOPPY DiSi c Figure 5 02 Floppy Dish Loading Proceduics ...

Page 26: ... SATURN IIE EPABX Installation Test Procedures A30800 X5130 6120 l 8928 Issue 1 May 1986 LED LED Red ST3 LED ACTW r LED Connector Service Terminal witch Figure 5 03 CIOP Printed Circuit Coard 5 6 6 pages ...

Page 27: ...n refer to Figure 6 01 for details The subscriber line circuit to be used for modem ap plication must be assigned to a class of service in which the Data Line Security DATASEC classmark has been enabled After the above initial MDF cross connections have been performed the DTMF telephone set to be used as the maintenance phone can be connected to the modular jack designated MTCE PHONE on the PSU if...

Page 28: ...rovided tG TIP M a j o r N C RING Major Common 0 1 4 D FUBL TIP Major NO Dry contact closures for remoie miner and major alarm indica tions customer provided Syslem Maiafcnancc Connecting Blsck Figure 6 00 Mainienance Phone and Mainienance Related Cross Conneciions System MDF Cable 144 from Basic Shelf rSystem T R Connecting Block Cross connect to SLMA circuit i designated for Modem application No...

Page 29: ...Dashed lilies represent installation dependent cross connections Figure 6 02 Sing e Line Telephone Cross Connections Using SLMA PC5 SINGLE LINE I HOUSE TELEPHONE i CABLING I EWIPMENT ROOM I Interfacing Connecting Block r System T R yecling Block System MDF Cable J321J33 J34 J35 J3EN37 J381J39 J401J41 J42 J43 or J441J45 from the Basic shelf or J26N27 J28N29 J3O J31 J32 J33 J34 J35 J36 J37 J38 J39 o...

Page 30: ...8 J40 J42 or J44 from the Basic shelf or J26 J28 J30 j J32 J34 J36 J38 or J40 from the LTU shelf Note Dashed lines represent installation dependent cross connections SAbRN ATTENDANT CONSOLE H O U S E i EQUIPMENT ROOM I CABLING Interfacing Connecting Block System T R Connecting Block System MDF Cable J32 J34 J36 J38 J40 J42 i or J44 from the Basic shelf or J25 J28 J30 J32 J34 J36 J38 or J40 from th...

Page 31: ... the LTU shelf L System T R Connecting Dock NO Dashed lines represcnl ins allalion dependenr cross CCnnEcfions Figure G 06 63 and DID Trunk Cross Connections DISTANT OFFICE OR SlGNALING EQUIPMENT T R U N K i CUSTOMER PREMlSES FACILITV 1 Interfacing Connecting Block System T R Connecting Block ystem MDF Cable J32 J34 J36 J33 J40 J42 or 44 from the Dasic shelf or J26 J28 J30 J32 J34 36 J38 or J40 fr...

Page 32: ...J29 J31 J33 J35 J37 J39 or J41 from the LTU she f L System E M Connecting 6lock A5135 1 4 W3 3 Figure 6 06 Four Wire Type E M Trunk Cross Connections DISTANT I T R U N K f OFFICE t FACILITY OFI SIGNALING I EQUIPIMENT I i I t CUSTOMER PREMISES Interfacing Connecting Block System T R Connecting B ock i I a System MDF Cable J32 J34 J36 J38 J40 J42 or J44 from the Basic shelf or J26 J28 J30 J32 J34 J3...

Page 33: ...pendent crcc connections Figure 6 10 Four Wiro Type ii E M Tiunlc Cross ConnecZions Cable J32 J34 J36 J33 J40 J42 or J44 from the Basic shelf or J26 J28 J30 J32 J34 J36 J38 or J40 from the LTU shelf Audio G output 8 1 SMl S M 2 SZl a ___ sz2 a u Typical Announcement Equipment System MDF Cable J33 J35 J37 J39 J4 J43 or J45 from the Basic shelf or J27 J29 J31 J33 Some ann uncemenl machines send both...

Page 34: ... J42 or J44 from the Basic shelf or J25 J28 J30 J32 J34 J36 J38 or J40 from the LTU sheif Il i 4 oIES Figure 6 12 Code Cailing With or Without Answcrba h Cross Comedons stem MDF Cable J32 J34 J36 J38 J42 or J44 from the Basic shelf or J28 J30 J32 J34 J36 J38 or J40 m the LTU shelf Notes Dashed lines represent installation dependent cross connections Bi directional connecction to DTMF dictation equ...

Page 35: ...dcast type connection from music source shown Two kinds of music source can be cross connected con tinuous type and demand type For continuous mustc the E M leads are not used and for demand music the E M leads are EQUIPMENT ROOM T Interfacing Connecting Sloc c System T R Connecting Block Figure 6 15 Music on Hold Cross Connections Using SLMAiSLAl6 PCB Music Source System MDF Cable J32 J34 J36 J36...

Page 36: ...3 J35 J37 J39 or J41 from the LTU shelf A5 59 4 9 66 Figure 6 16 Paging With Answerback Cross Connections Typical Paging Equipment Audio 8 Input i 0 BSYl 0 BSY2 0 PGl 0 PG2 0 Interfacing Connecting Block Optional IO used pJ k j I r m7 i w 1 System T R connecting Block System MDF Cable J32 J34 J36 J36 J40 J42 or J44 from the Basic shelf or JZG J28 J30 J32 J34 I J36 J38 or J40 from the LTU shelf 1 L...

Page 37: ...n dependent cross connections System MDF Cable connections are shown for an SLMA PCS For SLA16 connections refer to Figure 6 03 An AC signaling device operated by 20Hz ringing voltage must be con nected to an SLMA circuit used for UNA Each UNA circuit will drive up to four equivalent ringer loads For installations requiring 48Vdc or a dry contact closure for UNA appropriate external equipment must...

Page 38: ...agnostic test routine verifies that the data and speech highways to and from an attendant console are operating properly The test also verifies that the console LED indicators alphanu meric display unit and audible alerting device are oper f 9 h i j A30808 X5130 5120s1 8928 Issue 1 May 1986 ating properly The test is performed from the console under test Refer to Table 6 05 for the necessary proce...

Page 39: ...res are to be performed placa the main tenance test phone on hook Nono iab a 6 00 Tone Generator Test PCDCECURE V E R I F I C A T I O N T E S T NUMBER 0 0 0 1 0 2 0 3 0 4 0 5 0 6 0 7 0 8 0 9 10 11 12 13 14 15 16 17 18 19 2 0 2 1 2 2 2 3 2 4 2 5 2 6 2 7 IF VERIFICATION IS NOT OBTAINED s If any tone s is returned distortad retry test two mere times If distortion con tinues replace the SMXTG PCB Ncto...

Page 40: ...y Retry later If intercept tone is returned the DTMF receiver circuit is not assigned check data base assignment If intercept tone is returned at any time either the DTMF receiver or the maintenance phone s key pad is nc operating properly or the buttons were depressed in the wrong se quence Retry test with another DTMF phone If intercept tone is returned again replace the DTMF receiver circuit Ta...

Page 41: ...hone Dial tone is returned off boo Dial the Diagnostic Test Access Code Recall dial done is returned Dial 2 to disable test routine N o n e Place maintenance phone on hook N o n e Tab e 6 04 DTMF Fad Test NOTES 1 If the system option flag TSTDIAG has been enabled in the data base or the station under test is classmaiked with the TSTAPP feature the maintenance test phone is not required to enable o...

Page 42: ...dditional apparatus tests are to be performed proceed as foilows Place maintenance test phone Dial tone is returned off hoo Dial the Diagnostic Test Access Code Recall dial tone is returned Dial 2 to disable the Apparatus Tests N o n e Place maintenance test phone None on hook Table 6 05 Console Test NOTES 1 If the system option flag TSTDIAG has been enabled in the data base the maintenance test p...

Page 43: ...displayed under whether the PIMD circuit or the con depressing any key on the console score character the display unit is sole is defective If proper verificaiion and resumed in the same manner cleared and the following LEDs is obtained replace the associa ed momentarily light then extinguish in PIMD PCB If proper verification is not the following sequence obiained or busy tone is returned again r...

Page 44: ...installation Test Procedures Issue 1 May 1986 TRUNK GGOUPSTATUS nnnnnnnn k ALPHANUMERIC DISPLAY L NI SOUlxi OESTIXATION 0 0 0 0 0 0 0 0 li 18 19 20 21 22 23 24 ALERT CL 1 Figure 6 19 Attendant Console Keypad and Feature Button Depression Sequence ...

Page 45: ...3 4 4 4 4 4 4 4 4 55555555 66666666 7 7 7 7 7 7 7 7 8 8 8 8 8 8 8 8 9 9 9 9 9 9 9 9 C TPffSf S OQOQ ORDER CHARACTER 3 3 A A A A A A A A 34 BBBBBBBB c c c c c c c c ii D D D D D D D D 37 E E E E E E E E F F F F F F F F i G G G G G G G G 40 H H H H H H H H 41 I I I I I I I I 4 2 J J J J J J J J 43 K K K K K K I K 44 L L L L L L L L 45 MMMMMMMM 46 N N N N N N N N 4 7 0 0 0 0 0 0 0 0 48 P P P P P P P ...

Page 46: ...st normal operation If no additional Apparatus Diagnostic Test routines are to be performed pro ceed as follows Place maintenance test phone off hook Dial tone is returned Dial the Diagnostic Test Access code Recall dial tone is returned Dial 2 to disable the Apparatus Diag nostic Test N o n e Place maintenance test phone on hook None N o n e Iial tone is returned qecall dial tone is returned onfi...

Page 47: ...ation Test Procedures A30808 X5130 8120 1 8928 Issue 1 May 1986 IS BUTTON DYAD 26 BUTTON DYAD S E E N O T E NOTE These buttons do not contain LEDs SEE NOTE y I Figure 6 20 Siemens DYAD Telephone Button Depression Sequence 6 21 ...

Page 48: ...n use try later 7 Depress the Siemens JR DYAD Tele Ii proper verification is net obtainsd or phone keypad buttons as follows 1 busy tone is returned at any iime 2 3 4 5 6 7 8 9 0 either the keypad buttons or feature buttons were depressed out of se 8 Depress the JR DYAD feature buttons Button LEDs light when depressed quence the JR DYAD Telephone is in the sequence shown in Figure 6 21 and extingu...

Page 49: ...8 X5130 B120 l 8928 Installation Test Procedures Issue 1 May 1986 N O T E S These feature buttons are not testable Buttons 9 through 13 do not contain LEDs Figure 6 21 Siemeno JR DYAD Telephone Button Depression Sequence 6 23 ...

Page 50: ...f reorder tone is returned the Sie test access code cess code is momentarily displayed mens Digital Telephone Display Test then the display unit clears is being used retry later 7 Depress any button in the Siemens Groups of 16 of each of the displaya If verification is not obtained either Digital Telephone under test to initiate ble characters are scrolled in the se the Siemens Digital Telephone o...

Page 51: ...L L L L L L L L 1 3 45 M M M M M M M M M M M M M M M M 14 46 N N N N N N N N N N N N N N N N 1 5 GE 47 0 0 0 0 0 0 0 0 0 0 0 0 0 0 0 0 1 6 0 0 0 0 0 0 0 0 0 0 0 0 0 0 0 0 48 P P P P P P P P P P P P P P P P 1 7 1 1 1 1 1 1 1 1 1 1 1 1 1 1 1 1 49 QQQQQQQQQQQQQQQQ 1 8 2 2 2 2 2 2 2 2 2 2 2 2 2 2 2 2 50 RRRRRRRRRRRRRRRR 1 9 3 3 3 3 3 3 3 3 3 3 3 3 3 3 3 3 51 ssssssssssssssss 20 4 4 4 4 4 4 4 4 4 4 4 4...

Page 52: ...on hook Iial tone is returned jecall dial tone is returned done done 20 or PABX dial tone is returned 41 0 the associated irunk circuit LED In the trunk PCB is lit steadily to in licate the trunk has been seized Iutgoing Test tone 1004Hz is returned Recall dial tone is returned N o n e IF VERIFICATION IS NOT OETAINED I j If reorder tone is returned the select ed trunk circuit is either an incoming...

Page 53: ...al t s or procedures are Recall dial tcne is returned to be performed hoolcilash the main tenance test phcne and dial the next code Diagnostic Test Access Code is not redialed 5B If no additional tests or procedures are N o n e to be performed place the main tenance test phone on hook Table 6 73 Taking Ci cuit s Out et Service S T E P PROCEDURE VERIFICATION IF VERlFtCATION IS NOT OBTAINED 1 Place ...

Page 54: ... VERIFICATION IF VERIFICATION IS NOT OBTAINED 5A If additional tests or procedures are Recall dial tone is returned to be performed hook flash the main tenance test phone and dial the next code Diagnostic Test Access Code is not redialed 5B If no additional tests or procedures are None to be performed place the main tenance test phone on hook j 6 28 28 pages ...

Page 55: ...he installation test proce dures contained in this practice each installation test proce dure performed should be recorded to ensure that all tests have been completed satisfactorily Use Table 7 00 Installa iion Test Procedures Checklist for this purpose This table can be used as a sign off sheet if required Table 7 00 Installation Test Procedures Checklist 7 l 7 2 bl nnL ...

Reviews: