background image

Electrical Connection

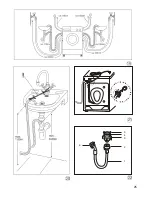
Drainage

  When installing the machine, do not bend the

    drain hose or pull on it.

!

   When draining into a sink the drain hose

    must not slip out of the sink and fall 
    onto the floor. To prevent flooding, ensure
    that the water is draining fast enough out
    of the sink and that the plug is not restricting
    the outflow. 
    Installation see Fig.  

20

en

Caution
!

   The washing machine must only be 

    connected to alternating current and 
    using a properly installed socket outlet 
    with earthing contact.

!

   The mains voltage must correspond to the

    voltage specification on the washing 
    machine (nameplate). Connection 
    specifications as well as the required fuses 
    are stipulated on the appliance nameplate.

!


Make sure that:

    - the mains plug fits the socket outlet.
    - the cable cross-section is permissible.
    - the earthing system is properly installed.

!   

The mains cable may be replaced by an 

    electrician only.


Replacement mains cable available from

    customer service.

!   

Do not use multiple plugs / connectors or

    extension cables.

!


In the event that an earth-leakage circuit

    breaker is to be used, only use types 
    marked with following symbol:         . Only 
    this symbol can guarantee compliance with 
    all current  regulations.

!   

Do not insert / remove the mains plug with

    wet or damp hands.

!   

Handle the plug body only when removing 

    the plug from the socket.

22

Water Supply Intallation

If you use Chinese type water inlet pipe,
water connection see fig. 

19

 ,  

21

 , 

22 

Please observe the following install steps
carefully.
1.  Pull down the block ring 2 (Fig.  

22

 ). Sepa-

     rating the water pipe form the main joint.
2.  Unscrew the sealing ring3.
3.  Loose the four screws 4.
4.  Press the main joint against the tap with 
     force, then fix the screws simultaneously.
5.  Screw the sealing ring 3 upward to make
     the connection tight and water proof.
6.  Fix the end of the pipe 6 on the connection
     pipe of the electrovalve.
7.  Push down the block ring 2, fix the pipe
     onto the water tap.
8.  Open the tap at the Max. Position, checking
     if there is any water leakage. If any water
     leakage, then you should assemble it again.
9.  The main joint can be apart from the pipe
     easily. It is not necessary to disassemble
     the main joint from the water tape.

The edge fo the water tape must be even.

Summary of Contents for Silver WD 1000

Page 1: ...en Silver WD 1000 Silver WD 1000 S TOP WD 1200 TOP WD 1200 Stop Í Stop Í Stop Í Operating and installation instructions ...

Page 2: ...ts in a safe place for future referen ce if you have any doubt please contact our local service center depot or dealer If you need an English user manual please contact our local CS center station specified in the Washing Machine CS network in your washing machine package or call our customer service free hotline 8008289828 for free supply Thanks http www siemens ha com cn Careline China BSHG com ...

Page 3: ...Washing and drying Ing the door loading the machine closing the door Setting the programme starting the programme programme sequence altering the programme End of programme switching off the machine Cleaning Maintenance Frost protection Cleaning your machine Cleaning the detergent drawer Descaling the machine Cleaning the drum Water inlet hose Cleaning the pump Cleaning the filters in the water in...

Page 4: ...2 3 1 4 5 6 7 9 10 8 2 3 1 11 12 13 14 15 17 16 S Stop Í Stop Í Stop Í Stop Í Stop Í Stop Í 11 12 13 14 15 17 16 Stop Í Stop Í Stop Í 2 ...

Page 5: ...ibly damaged do not plug it in If you are in doubt contact your customer service representative or dealer When washing and drying Operate the machine with cold tap water only Due to the use of the condensation princi ple in drying please keep the connected water tap open during the drying process Your washing machine is designed for domestic use only i e for washing machine washable textiles in a ...

Page 6: ...mal How to save water energy and detergent Do not pre wash lightly to normally soiled laundry How to save energy and time For lightly soiled laundry select the short programme appropriate to the type of textile How to save detergent Add the correct amount of detergent accor ding to water hardness how dirty the laundry is and the amount of laundry to be washed Observe the instructions for use shown...

Page 7: ...cted programme The power indi cator light illuminates Caution for reasons of safety the machine will not run if the door is not properly closed even if the ON light is illuminated and the ON OFF button has been pressed During the washing process the door cannot be opened In order to open the door the machine must first be switched OFF ON OFF but ton Make sure that the ON light is not illumi nated ...

Page 8: ...achine is in the spin process of dewatering the washing machine will automatically sense the unbalanced load caused by the clothes If the load is over the setting value the washing drying machine will continue the spin operation at a lower speed 90 rpm for dewatering or stop the spin operation This function is specially designed for protecting the machine and the benefit of the user See Troublesho...

Page 9: ...pin Gentle Dry Max Amount of laundry Programme for easy care fabrics Easy care Temperature selector in LC Detergent and fabric softener Additional functions Programme duration approx in minutes 5 kg 2 5 kg 1 5 kg 1 5 kg 1 5 kg 1 5 kg 1 5 kg 1 5 kg 30 90 60 90 40 60 30 40 40 60 30 40 0 40 Compartment I Compartment II Compartment Spin stop Wool Spin speed 124 5 109 5 84 58 5 6 69 54 3 90 55 36 Short...

Page 10: ...Gentle spin Gentle Dry Max Amount of laundry Programme for easy care fabrics Easy care Temperature selector in LC Detergent and fabric softener Additional functions Programme duration approx in minutes 5 kg 2 5 kg 1 5 kg 1 5 kg 1 5 kg 1 5 kg 1 5 kg 1 5 kg 30 90 60 90 40 60 30 40 40 60 30 40 0 40 Compartment I Compartment II Compartment Wool Spin speed 124 5 109 5 84 58 5 6 69 54 3 90 55 36 Short 1...

Page 11: ...ctor 50 60 40 50 60 70 50 60 60 70 70 80 70 80 90 Programme selector Easy care synthetics Dry weight in kg Easy care Acrylics 0 5 1 0 1 5 Drying time selector 30 35 40 45 25 25 30 50 55 Programme selector Times are approximate and refer to standard loads The maximum selectable drying time is 120 minutes Dry Gentle Dry 9 en ...

Page 12: ... its manufacturer Attention When the prewash mode is selected do not put the liquid lotion or other liquid materials into the compartment II to prevent it from flowing out immediately Frequent use of insufficient detergent will even tually become noticeable as follows washing appears grey or not properly clean grey brown stains grease marks appear on the washing the heating elements become furred ...

Page 13: ...Remove any loose items or metal objects such as safety pins paper clips etc from the laundry Practical tips Brush sand coins etc out of pockets and cuffs Close zips and button up cushion covers duvet covers etc Remove curtain runners or secure them in a net bag Particularly delicate items such as tights or lace curtains or smaller items such as tiny socks or handkerchiefs should only be was hed in...

Page 14: ...acity when sorting the laundry Do not overload the washer dryer Maximum drying loads Cottons Linens 2 5 kg Easy care 1 5 kg Economy tip Always wash a full load of cottons linens 5 0kg You can then divide up the load for tumble drying Practical tips Only tumble dry textiles which have been washed rinsed and spun Remove as much water as possible from the laundry Do not press the button for reducing ...

Page 15: ...hen the programme has ended press the ON OFF button to switch the machine off Open the door Pull the handle on the door towards you Fig 10 Put washing into the machine Any items which have been pre treated with solvent based cleaners such as stain remo vers and petrol based agents must be aired before they are put into the machine Explosion hazard Before loading the machine ensure that there are n...

Page 16: ...Before pressing the ON OFF button turn the programme selector clockwise until it reaches the required programme Fig 13 2 Set the temperature selector to the required temperature 3 Set the drying time selector to the required time 4 Press the buttons for any additional functions that are required Washing and drying without any interruption Starting the programme 1 Make sure that the door is closed ...

Page 17: ...folded up Easy care synthetics Hang shirts and blouses individually on hangers All programmes end automaticaly after the spin cycle and then door lock lamp will turn on Switching the machine OFF 1 When the door lock lamp is on press the ON OFF button the power indication lamp and the door lock lamp will turn off when the machine is shut down 2 After appox 2 minutes you wll be able to open the door...

Page 18: ...ent check the description of contents on the pack Never use steel wool Water inlet hose To avoid water damage arrange for the hose to be checked by a specialist every 5 years Cleaning the pump Fig 15 16 17 The pump must be cleaned if the pump has been blocked by some foreign object such as a button or paper clip and water cannot be pumped out after washing very fluffy items Before cleaning the pum...

Page 19: ... tap and hold the end of the hose in a container 3 Switch ON any of the washing programmes for approximately 40 seconds Water left inside the inlet hose will be drained out 4 Screw the hose back onto the tap en 1 Turn off the tap 2 Set the programme selector to Cottons Linens Normal and the temperature selector to cold Press the ON OFF button After approx 40 seconds switch off the machine by press...

Page 20: ...drawer Too much detergent or top loading detergent was used Switch off the machine for approximately 5 10 minutes To reduce the amount of suds put a tablespoon of fabric softener mixed with 1 2 litre water into the detergent drawer For the next washing adjust the amount of detergent accordingly Foam still visible after last rinse Certain detergents tend to produce more foam but this does not affec...

Page 21: ...Connection voltage Fuse Water pressure 59 5 cm 85 0 cm 56 0cm approx 70 kg see rating plate 220V 240 V 10A 0 1 1 MPa inside the washing machine then the machine can only operate at lower speed or stop operation Turn off the power for about 2 minutes open the door and spread the clothes out and reset the spin process en The machine does not tumble dry no drying programme set no drying time set or i...

Page 22: ...ard that is at least 30 mm thick and is screwed to the floor If possible the ma chine should be sited in the corner of a room Secure the machine by attaching retaining straps to the feet If the machine is installed on a plinth the machine s feet must be secured with brack ets straps to prevent it sliding while spinning Fig 9 Keep the transit bolts for any future trans port movinghouse Transport th...

Page 23: ...ter pressure of 0 1 MPa is required with tap full ON at least 8 liters of water must flow out in one minute If the water pressure exceeds 1 MPa a pressure reducing valve must be added Never connect the machine to the mixer tap of a pressureless hot water heater Caution Connections are under full water pressure check for leaks with tap turned fully ON The filters at the free end of the inlet hose a...

Page 24: ...bles In the event that an earth leakage circuit breaker is to be used only use types marked with following symbol Only this symbol can guarantee compliance with all current regulations Do not insert remove the mains plug with wet or damp hands Handle the plug body only when removing the plug from the socket 22 Water Supply Intallation If you use Chinese type water inlet pipe water connection see f...

Page 25: ...18 18 5 4 7 6 8 23 ...

Page 26: ...10 11 12 13 14 15 16 17 9 18 24 ...

Page 27: ...20 19 25 21 22 5 4 3 2 1 6 ...

Page 28: ...Product Standard GB 4706 1 1998 GB 4706 24 2000 GB 4706 26 2000 Part No 5120003356 Version 01 Valid date 2003 1 Contents of this brochure could be changed without written notice ...

Reviews: