background image

Installing the Device
2.1 General Procedure

2.1

General Procedure

The general procedure for installing the device is as follows:

NOTICE

The user is responsible for the operating environment of the device, including

maintaining the integrity of all protective conductor connections and checking

equipment ratings. Make sure to review all operating and installation instructions

before commissioning or performing maintenance on the device.

1. Review the relevant certification information for any regulatory requirements.

For more information, refer to 

"Approvals (Page 23)"

.

2. Mount the device.
3. Connect the failsafe alarm relay.
4. Connect power to the device and ground the device to safety Earth.
5. Connect the device to the network.
6. Configure the device.

2.2

Unpacking the Device

When unpacking the device, do the following:
1. Inspect the package for damage before opening it.
2. Visually inspect each item in the package for any physical damage.
3. Verify all items are included.

IMPORTANT

If any item is missing or damaged, contact Siemens for assistance.

2.3

Mounting the Device

The RUGGEDCOM i802 can be ordered with a DIN rail adapter pre-installed on the

back of the chassis. Use the adapter to latch the mount the device to a standard 35

mm (1.4 in) by 15 mm (0.6 in) IEC/EN 60715 or TS35 DIN rail.

NOTICE

Heat generated by the device is channeled outwards from the enclosure. As such, it

is recommended that 2.5 cm (1 in) of space be maintained on all open sides of the

device to allow for some convectional airflow.
Forced airflow is not required. However, any increase in airflow will result in a

reduction of ambient temperature and improve the long-term reliability of all

equipment mounted in the rack space.

6

RUGGEDCOM i802

Installation Manual, 01/2021, C79000-G8976-1004-06

Summary of Contents for SIMATIC NET RUGGEDCOM i802

Page 1: ...Edition 01 2021 Installation Manual SIMATIC NET Rugged Ethernet Switches RUGGEDCOM i802 https www siemens com ...

Page 2: ...ged Ethernet Switches RUGGEDCOM i802 Installation Manual Preface Introduction 1 Installing the Device 2 Device Management 3 Communication Ports 4 Technical Specifications 5 Certification 6 01 2021 C79000 G8976 1004 06 ...

Page 3: ...ied personnel are those who based on their training and experience are capable of identifying risks and avoiding potential hazards when working with these products systems Proper Use of Siemens Products Note the following WARNING Siemens products may only be used for the applications described in the catalog and in the relevant technical documentation If products and components from other manufact...

Page 4: ...ting the Device 6 2 4 Connecting the Failsafe Alarm Relay If Equipped 8 2 5 Connecting Power 9 3 Device Management 11 3 1 Connecting to the Device 11 3 2 Configuring the Device 12 3 3 Inserting Removing the MicroSD MicroSDHC Card 12 4 Communication Ports 15 4 1 Copper Ethernet Ports 15 4 2 Fiber Optic Ethernet Ports 17 5 Technical Specifications 19 5 1 Power Supply Specifications 19 5 2 Failsafe A...

Page 5: ... 6 1 Approvals 23 6 1 1 CSA 23 6 1 2 ATEX IEC Ex 24 6 1 3 European Union EU 24 6 1 4 FCC 25 6 1 5 FDA CDRH 25 6 1 6 ISED 25 6 1 7 ISO 26 6 1 8 ACMA 26 6 1 9 RoHS 26 6 1 10 Other Approvals 27 6 2 EMC and Environmental Type Tests 27 iv RUGGEDCOM i802 Installation Manual 01 2021 C79000 G8976 1004 06 ...

Page 6: ...red Trademarks RUGGEDCOM and ROS are trademarks of Siemens AG Other designations in this manual might be trademarks whose use by third parties for their own purposes would infringe the rights of the owner Warranty Siemens warrants this product for a period of five 5 years from the date of purchase conditional upon the return to factory for maintenance during the warranty term This product contains...

Page 7: ...ed with domain knowledge in the utility transportation and industrial markets allows Siemens to provide training specific to the customer s application For more information about training services and course availability visit https www siemens com or contact a Siemens Sales representative Customer Support Customer support is available 24 hours 7 days a week for all Siemens customers For technical...

Page 8: ...y Contacting Siemens Address Siemens AG Industry Sector 300 Applewood Crescent Concord Ontario Canada L4K 5C7 Telephone Toll free 1 888 264 0006 Tel 1 905 856 5288 Fax 1 905 856 1995 E Mail ruggedcom info i ia siemens com Web https www siemens com RUGGEDCOM i802 Installation Manual 01 2021 C79000 G8976 1004 06 vii ...

Page 9: ...Preface Contacting Siemens viii RUGGEDCOM i802 Installation Manual 01 2021 C79000 G8976 1004 06 ...

Page 10: ...r optionally 40 to 85 C 40 to 185 F coupled with hazardous location certification Class 1 Division 2 allows the RUGGEDCOM i802 to be placed in almost any location The RUGGEDCOM i802 features a full array of intelligent functionality for high network availability and manageability The embedded Rugged Operating System ROS provides advanced Layer 2 and Layer 3 networking functions and advanced cyber ...

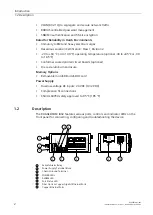
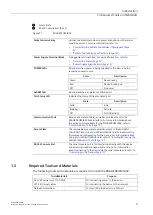
Page 11: ...st aluminum enclosure Memory Options Removable microSD microSDHC card Power Supply Dual low voltage DC inputs 24 VDC 9 32 VDC Compression fit connections CSA UL 60950 safety approved to 85 C 185 F 1 2 Description The RUGGEDCOM i802 features various ports controls and indicator LEDs on the front panel for connecting configuring and troubleshooting the device 4 9 10 8 2 1 3 5 6 7 1 Failsafe Alarm Re...

Page 12: ...ll as provide access to the RUGGEDCOM i802 Web interface For more information about the various ports available for the RUGGEDCOM i802 refer to Communication Ports Page 15 Access Plate The removable access plate provides access to the microSD microSDHC slot Use a microSD microSDHC card to load store the firmware and configuration for the device For information about using a microSD microSDHC card ...

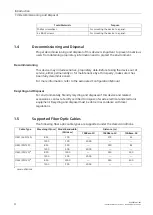
Page 13: ...nformation refer to the associated Configuration Manual Recycling and Disposal For environmentally friendly recycling and disposal of this device and related accessories contact a facility certified to dispose of waste electrical and electronic equipment Recycling and disposal must be done in accordance with local regulations 1 5 Supported Fiber Optic Cables The following fiber optic cable types a...

Page 14: ...edures other than those specified herein may result in hazardous radiation exposure NOTICE This product contains no user serviceable parts Attempted service by unauthorized personnel shall render all warranties null and void Changes or modifications not expressly approved by Siemens AG could invalidate specifications test results and agency approvals and void the user s authority to operate the eq...

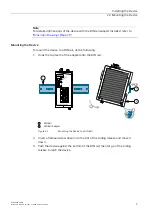
Page 15: ...packing the device do the following 1 Inspect the package for damage before opening it 2 Visually inspect each item in the package for any physical damage 3 Verify all items are included IMPORTANT If any item is missing or damaged contact Siemens for assistance 2 3 Mounting the Device The RUGGEDCOM i802 can be ordered with a DIN rail adapter pre installed on the back of the chassis Use the adapter...

Page 16: ...do the following 1 Hook the top teeth of the adapter onto the DIN rail 1 1 2 2 3 1 DIN Rail 2 DIN Rail Adapter Figure 2 1 Mounting the Device to a DIN Rail 2 Insert a flathead screw driver into the slot of the sliding release and move it down 3 Push the device against the bottom of the DIN rail then let go of the sliding release to latch the device RUGGEDCOM i802 Installation Manual 01 2021 C79000...

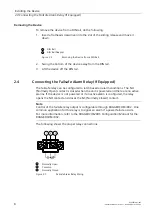
Page 17: ...alarm conditions The NO Normally Open contact is closed when the unit is powered and there are no active alarms If the device is not powered or if an active alarm is configured the relay opens the NO contact and closes the NC Normally Closed contact Note Control of the failsafe relay output is configurable through RUGGEDCOM i802 One common application for this relay is to signal an alarm if a powe...

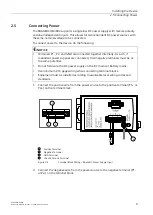
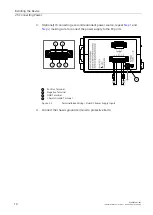
Page 18: ... the same potential Do not field wire the DC power supply on the DC mains or Battery mains Use minimum 16 gage wiring when connecting terminal blocks Equipment must be installed according to applicable local wiring codes and standards 1 Connect the positive wire from the power source to the positive terminal P1 or P2 on the terminal block 1 2 3 4 1 Positive Terminal 2 Negative Terminal 3 GND Termi...

Page 19: ...ng sure to connect the power supply to the P2 ports 1 2 1 2 3 4 1 Positive Terminal 2 Negative Terminal 3 GND Terminal 4 Chassis Ground Terminal Figure 2 5 Terminal Block Wiring Dual DC Power Supply Inputs 4 Connect the chassis ground terminal to protective Earth 10 RUGGEDCOM i802 Installation Manual 01 2021 C79000 G8976 1004 06 ...

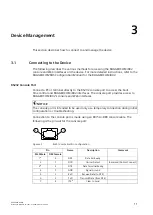
Page 20: ...t provides access to RUGGEDCOM i802 s console and Web interfaces NOTICE The console port is intended to be used only as a temporary connection during initial configuration or troubleshooting Connection to the console port is made using an RJ45 to DB9 console cable The following is the pin out for the console port 1 8 Figure 3 1 RJ45 Console Port Pin Configuration Pin RJ45 Male DB9 Female Name Desc...

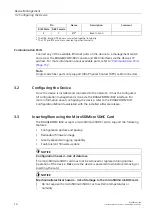
Page 21: ...uration management is done via the RUGGEDCOM i802 interface For more information about configuring the device refer to the RUGGEDCOM ROS Configuration Manual associated with the installed software release 3 3 Inserting Removing the MicroSD MicroSDHC Card The RUGGEDCOM i802 accepts a microSD microSDHC card to support the following features Configuration update and backup Redundant firmware image Gr...

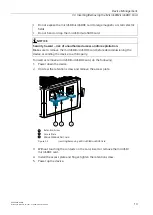
Page 22: ...vice or sending the device to a third party To insert or remove a microSD microSDHC card do the following 1 Power down the device 2 Unscrew the retention screw and remove the access plate 1 2 3 1 Retention Screw 2 Access Plate 3 MicroSD MicroSDHC Card Figure 3 2 Inserting Removing a MicroSD MicroSDHC Card 3 Without touching the contacts on the card insert or remove the microSD microSDHC card 4 Ins...

Page 23: ...Device Management 3 3 Inserting Removing the MicroSD MicroSDHC Card 14 RUGGEDCOM i802 Installation Manual 01 2021 C79000 G8976 1004 06 ...

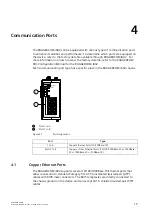
Page 24: ...GEDCOM i802 chassis 1 2 1 Ports 1 to 6 2 Ports 7 to 8 Figure 4 1 Port Assignment Port Type 1 to 6 Copper Ethernet Ports 10 100Base TX Ports 7 to 8 Copper or Fiber Ethernet Ports 10 100 1000Base TX or 1000Base SX or 1000Base LX or 100Base FX 4 1 Copper Ethernet Ports The RUGGEDCOM i802 supports several 10 100 1000Base TX Ethernet ports that allow connection to standard Category 5 CAT 5 unshielded t...

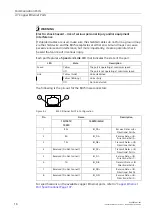
Page 25: ...inking Link activity Link Off No link detected The following is the pin out for the RJ45 male connectors 1 8 Figure 4 2 RJ45 Ethernet Port Pin Configuration Name Pin 10 100TX 100FX 1000TX SX LX Description 1 RX BI_DA Receive Data or Bi Directional Pair A 2 RX BI_DA Receive Data or Bi Directional Pair A 3 TX BI_DB Transmit Data or Bi Directional Pair B 4 Reserved Do Not Connect BI_DC Transmit Data ...

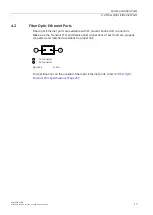
Page 26: ... sure the Transmit Tx and Receive Rx connections of each port are properly connected and matched to establish a proper link 2 1 1 Tx Connector 2 Rx Connector Figure 4 3 LC Port For specifications on the available fiber optic Ethernet ports refer to Fiber Optic Ethernet Port Specifications Page 20 RUGGEDCOM i802 Installation Manual 01 2021 C79000 G8976 1004 06 17 ...

Page 27: ...Communication Ports 4 2 Fiber Optic Ethernet Ports 18 RUGGEDCOM i802 Installation Manual 01 2021 C79000 G8976 1004 06 ...

Page 28: ... VDC 2 A 60 W 125 VDC 0 24 A 30 W 125 VAC 0 5 A 62 5 W 220 VDC 0 24 A 60 W 250 VAC 0 25 A 62 5 W 1500 Vrms for 1 minute 5 3 Copper Ethernet Port Specifications The following details the specifications for copper Ethernet ports that can be ordered with the RUGGEDCOM i802 Order Code Speed Connector Duplex a Cable Type b Wiring Standard c Maximum Distance d Isolation e CG01 10 100 1000Base TX RJ45 FD...

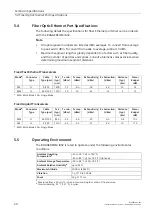
Page 29: ...et dB SM LC 9 125 1300 15 8 0 38 3 0 20 23 MM LC 62 5 125 1310 19 14 32 14 2 13 a MM Multi Mode SM Single Mode Fixed Gigabit Transceivers Mode a Connector Type Cable Type μm Tx λ typ nm Tx min dBm Tx max dBm Rx Sensitivity dBm Rx Saturation dBm Distance typ km Power Budget dB MM LC 62 5 125 850 9 5 4 0 20 0 0 0 4 10 5 SM LC 9 125 1310 9 5 3 0 21 3 0 10 11 5 a MM Multi Mode SM Single Mode 5 5 Opera...

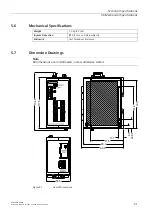
Page 30: ... Protection IP40 1 mm or 0 04 in objects Enclosure Cast Aluminum Enclosure 5 7 Dimension Drawings Note All dimensions are in millimeters unless otherwise stated 134 5 117 5 56 5 99 5 95 3 77 5 11 7 6 3 22 84 97 4 112 3 Figure 5 1 Overall Dimensions RUGGEDCOM i802 Installation Manual 01 2021 C79000 G8976 1004 06 21 ...

Page 31: ...Technical Specifications 5 7 Dimension Drawings 22 RUGGEDCOM i802 Installation Manual 01 2021 C79000 G8976 1004 06 ...

Page 32: ...2 2 No 62368 1 14 Information Technology Equipment Safety Part 1 General Requirements CAN CSA C22 2 No 0 M91 General Requirements Canadian Electrical Code Part II CAN CSA C22 2 No 14 05 Industrial Control Equipment CAN CSA C22 2 No 142 M1987 Process Control Equipment Industrial Products CAN CSA C22 2 No 213 M1987 Non Incendive Electrical Equipment for Use in Class I Division 2 Hazardous Locations ...

Page 33: ...s IEC EN 60079 15 2005 Electrical Apparatus for Explosive Gas Atmospheres Part 15 Construction Test and Marking of Type of Protection N Electrical Apparatus It is specifically approved for use in hazardous locations defined as EEx nC IIC T4 Ex II 3 G 12 24 VDC 2A Class III 6 1 3 European Union EU This device is declared by Siemens AG to comply with essential requirements and other relevant provisi...

Page 34: ...o frequency energy and if not installed and used in accordance with the instruction manual may cause harmful interference to radio communications Operation of this equipment in a residential area is likely to cause harmful interference in which case users will be required to correct the interference at their own expense NOTICE Changes or modifications not expressly approved by the party responsibl...

Page 35: ...ection 182 of the Radiocommunications Act 1992 Telecommunications Labelling Customer Equipment and Customer Cabling Notice 2001 made under Section 407 of the Telecommunication Act 1997 The device is marked with an RCM symbol to indicate compliance when sold in the Australian region A copy of the Declaration of Conformity is available via Siemens Industry Online Support at https support industry si...

Page 36: ...IEC 61000 4 5 Surge DC Power ports 0 5 kV line to earth line Signal ports DC Power ports IEC 61000 4 6 Induced Conducted RFI Earth ground ports 10 V IEC 61000 4 8 Magnetic Field Enclosure ports 30 A m IEC 61000 4 29 Voltage Dips DC Power ports 30 reduction for 0 3 seconds 60 reduction for 1 second Signal ports 2 5 kV common 1 kV differential mode 1 MHz IEC 61000 4 12 Damped Oscillatory DC Power po...

Page 37: ...rts 2 5 kV common 1 kV differential mode 1MHz Environmental Type Tests Test Description Test Levels IEC 60068 2 1 Cold Temperature Test Ad 40 C 40 F 16 Hours IEC 60068 2 2 Dry Heat Test Bd 85 C 185 F 16 Hours IEC 60068 2 30 Humidity Damp Heat Cyclic Test Db 95 non condensing 55 C 131 F 6 cycles IEC 60068 2 6 Vibration 1 g 10 500 Hz IEC 60068 2 27 Shock 30 g 11 ms 28 RUGGEDCOM i802 Installation Man...

Page 38: ...ttps www siemens com ruggedcom Industry Online Support service and support https support industry siemens com Industry Mall https mall industry siemens com Siemens AG Digital Industry Process Automation Postfach 48 48 90026 NÜRNBERG GERMANY ...

Reviews: