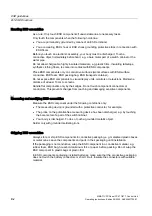
background image

Technical specifications 


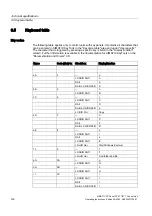
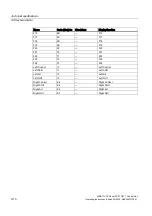
9.5 Keyboard table 


SIMATIC PC Panel PC 677/877, Control Unit 

9-6


Operating Instructions, Edition 04/2005, A5E00407724-01 

Name 

Code (Hex) 0x  Check box 

Display/function 

u U 

18 

— 


L Shift/R Shift 


R Alt 

ú 


R Alt+L Shift/R Shift  Ú 

v V 

19 

— 


L Shift/R Shift 

Fp 


L Ctrl/R Ctrl 

Inserting 

w W 

1A 

— 


L Shift/R Shift 


R Alt 

å 


R Alt+L Shift/R Shift  Å 

x X 

1B 

— 


L Shift/R Shift 


L Ctrl/R Ctrl 

Cut 

y Y 

1C 

— 


L Shift/R Shift 


R Alt 

ü 


R Alt+L Shift/R Shift  O 

z Z 

1D 

— 


L Shift/R Shift 


R Alt 

æ 


R Alt+L Shift/R Shift  Æ 


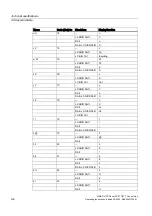
L Ctrl/R Ctrl 


1 ! 

1E 

— 


L Shift/R Shift 


R Alt 

¡ 


R Alt+L Shift/R Shift  ¹ 

2 @ 

1F 

— 


L Shift/R Shift 


R Alt 

² 

3 # 

20 

— 


L Shift/R Shift 


R Alt 

³ 

4 $ 

21 

— 


L Shift/R Shift 


R Alt 

¤ 


R Alt+L Shift/R Shift  £ 

5 % 

22 

— 


L Shift/R Shift 


R Alt 

€ 

6 ^  

23 

— 


L Shift/R Shift 


R Alt 

¼ 

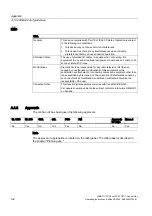
Summary of Contents for SIMATIC Panel PC 677

Page 1: ...________ ______________ ______________ Preface Safety Information 1 Description 2 Application planning 3 Installation 4 Connecting 5 Operation 6 Operating and parametrizing 7 Maintenance and service 8 Technical specifications 9 Dimensional Drawings 10 Appendix A ESD guidelines B List of abbreviations C SIMATIC PC Panel PC 677 877 Control Unit Operating Instructions Edition 04 2005 A5E00407724 01 ...

Page 2: ...re defined as persons who are authorized to commission ground and label devices systems and circuits in accordance with established safety practices and standards Prescribed Usage Note the following Warning This device may only be used for the applications described in the catalog or the technical description and only in connection with devices or components from other manufacturers which have bee...

Page 3: ...l notes carefully Basic knowledge required A solid background in personal computers and Microsoft operating systems is required to understand this manual General knowledge in the field automation control engineering is recommended Scope of the manual This manual applies to devices with the following order numbers 6AV780 6AV781 Changes in Comparison to the Previous Version Panel PC 677 and 877 supp...

Page 4: ...agnostics Hardware Referred to as operating instructions for the control unit in the following SIMATIC Panel PC 677 Operating Instructions for Computer Unit SIMATIC Panel PC 877 Operating Instructions for the Computer Unit with the following information Expansion options Configuration Fault diagnostics Hardware Referred to as operating instructions for the computer unit in the following SIMATIC Pa...

Page 5: ...ontrol unit and computer unit is uniformly refered to as the device in these operating instructions The full term is only used when a concrete reference is necessary Note A note is important information about the product handling the product or a reference to specific sections of the documentation that require special consideration Registered trademarks All names labeled with symbol are registered...

Page 6: ...Preface SIMATIC PC Panel PC 677 877 Control Unit iv Operating Instructions Edition 04 2005 A5E00407724 01 ...

Page 7: ...Guidelines for Handling Electrostatic Sensitive Devices EMC 3 3 3 5 Mounting positions and fastening 3 4 3 5 1 Installation notes 3 4 3 5 2 Permitted mounting positions 3 5 3 5 3 Type of fixation 3 6 3 5 4 Degree of protection 3 6 3 6 Mounting cut out 3 6 3 6 1 Select and complete recessed mounting cut out 3 6 3 6 2 Dimensions 3 7 4 Installation 4 1 4 1 Securing with clamps 4 1 4 2 Securing with s...

Page 8: ...therboard 7 14 7 3 6 TouchInput 7 14 7 3 7 Set brightness 7 15 7 3 8 CheckLanguageID 7 15 7 3 9 Multilingual settings for the operating system 7 16 7 3 10 DVD ROM CD RW 7 17 7 3 11 USB keyboard controller driver and USB stack 7 18 8 Maintenance and service 8 1 8 1 Service 8 1 8 2 Maintenance and replacement parts 8 2 8 3 Separating the control unit from the computer unit 8 2 8 3 1 Separating Panel...

Page 9: ...04 2005 A5E00407724 01 vii B ESD guidelines B 1 B 1 ESD Directives B 1 C List of abbreviations C 1 C 1 Abbreviations C 1 Glossary Index Tables Table 3 1 Measurements for the mounting cut out in mm 3 7 Table 10 1 Panel PC 677 dimensions in mm 10 2 Table 10 2 Panel PC 877 dimensions in mm 10 4 ...

Page 10: ...Table of contents SIMATIC PC Panel PC 677 877 Control Unit viii Operating Instructions Edition 04 2005 A5E00407724 01 ...

Page 11: ...ot connect any cables High frequency radiation Caution Unintentional operating situations High frequency radiation e g from cell phones can cause unintentional operating situations under some circumstances For more details consult the technical data in the EMC Requirements chapter Handling and disposal of lithium batteries Warning Danger of explosion and the release of harmful substances Do not th...

Page 12: ...jected to extreme changes in temperature Commissioning Allow the device to slowly adjust to room temperature before commissioning the device Do no place the device near heat radiation If moisture condensation occurs wait at least about 12 hours before you switch on the device Vibration CD DVD drives are sensitive to vibration Prohibited vibration during operation may result in loss of data or dama...

Page 13: ...ls are not bunched in one location Refer to the Technical Specifications chapter for more information TFT LC display A permanent picture with bright images can lead to a burn in effect on the TFT LCD If a screen saver is activated please observe the following The liquid crystals in screen savers which actuate active black when the backlighting is on e g flying stars starfield simulation renew them...

Page 14: ...Safety Information 1 2 General Notes SIMATIC PC Panel PC 677 877 Control Unit 1 4 Operating Instructions Edition 04 2005 A5E00407724 01 ...

Page 15: ...different configurations Centralized configuration Computer unit and control unit form an entity Distributed configuration Computer unit and control unit are in separate locations Principle In a centralized configuration the computer is secured to the back of the control unit with two mounting rails Figure 2 1 Panel PC 677 as a complete device with centralized configuration 1 Control unit 2 Comput...

Page 16: ...ys numeric keys cursor keys and control keys Function keys and softkeys Integrated mouse LEDs for power supply temperature softkeys Shift and ACK keys Front mounted USB 2 0 port for connecting external I O modules The front mounted USB port is sealed and unusable for some device variations Touch screen variants Color display with backlighting 12 TFT technology resolution 800 x 600 pixels or 15 TFT...

Page 17: ...ails Figure 2 2 Panel PC 877 as a complete device with centralized configuration 1 Control unit 2 Computer unit Short description The device is available with different control units which are distinguished by the size of the display and by the membrane keyboard or touch screen Keyboard variants Color display with backlighting 12 TFT technology with 800 x 600 resolution or 15 TFT technology with 1...

Page 18: ...onal information refer to the specifications 2 3 2 3 Accessories Components The options comprise the following components Accessories Order no Direct control key submodule 6AV7671 7DA00 0AA0 Film for protecting the touch screen panel against dirt and scratches for the 12 touch screen variant for the 15 touch screen variant for the 19 touch screen variant 6AV7671 2BA00 0AA0 6AV7671 4BA00 0AA0 6AV76...

Page 19: ...ear cabinets Swivel arms booms In consoles Note In the following the term switchgear cabinet also refers to rack mounting rack switchboard operator panel and console The term device represents the Panel PC and its variants 3 2 3 2 Unpacking and checking the delivery unit Procedure 1 Please check the packaging material for transport damage upon delivery 2 If any transport damage is present at the t...

Page 20: ...ges contents are incomplete or damaged Warning Make sure that a damaged device is not installed nor put into operation 8 Note the identification information as described in the QuickStart document 3 3 3 3 Make note of identification data Procedure 1 Write down the Microsoft Windows Product Key of the Certificate of Authenticity COA in the table at the end of this section The product key is located...

Page 21: ...gnetic compatibility The device fulfills the requirements of the EMC law of the Federal Republic of Germany as well as the EMC Guidelines of the Single European Market The device is designed as a built in model with front sided Protection Class IP 65 Ensure compliance with the EN 61000 4 2 standard by installing the device in grounded metal cabinets e g MC cabinets Siemens catalog NV21 Note Please...

Page 22: ...d CD DVD are not suitable for continous operation Applies to devices which are installed in swivel arm housings Avoid rapid or jerky movements of the swivel arm during operation The ensuing forces could lead to possible irreversible damage of the hard disk The device with DC power supply is considered an open means of operation on the part of the voltage supply Therefore make sure that the switchg...

Page 23: ...ll struts where necessary Avoid extreme environmental operating conditions Protect your device against dust moisture and heat Install the device in such a way that it poses no danger e g by falling over During assembly please comply with the approved installation positions Notice If the device is installed in an unapproved position the licenses expire in accordance with UL 508 and EN 60950 For add...

Page 24: ...the mounting cut out is at least 2 mm The deviation of the evenness of the mounting cut out for installed control units relating to the outside dimensions of the control unit is 0 5 mm Degree of protection IP65 and Nema 4 The degree of protection IP65 and Nema 4 are only guaranteed when clamps are secured together with an encircling seal IP54 degree of protection This degree of protection is provi...

Page 25: ... for clamp 3 setscrews 4 Clamp 5 RZ 120 in the seal area 6 Seal area Table 3 1 Measurements for the mounting cut out in mm Control units L1 L2 L3 1 L4 1 L5 L6 2 L7 2 L8 2 L9 2 A1 A2 A3 S1 S2 S3 S4 S53 S63 S73 Tolerance 1 1 0 2 0 2 0 5 0 5 0 5 0 5 1 1 1 1 1 1 1 1 1 1 key panels 12 TFT 15 TFT 450 450 290 326 465 465 235 279 112 112 186 135 25 165 16 16 10 17 1 5 min to 6 max 78 51 78 51 78 51 78 51 ...

Page 26: ...24 01 1 M6 thread or drill hole with a diameter of 7 mm 2 Cut outs for the shafts of the insert strip are only necessary for 15 key panels 3 Only for 19 touch panel fronts are two clamps necessary for vertically securing clamps More information about device dimensions e g mounting depth can be found in the Dimensional Drawings section ...

Page 27: ...completed Clamps are readily available in the accessories Clamp and grub screws are included in the contents of delivery Figure 4 1 Clamp assembly Procedure 1 Follow the installation guidelines 2 Working from the front insert the device into the installation cut out 3 Secure the control unit in the installation cut out from behind with the clamps as shown in the installation cut out in the dimensi...

Page 28: ...tion cut out in accordance with the specifications for L4 and L5 as shown in the installation cut out in the dimension diagrams 3 Carefully drill the respective holes in the control unit at the designed location 1 from the rear Caution Ensure that no metal cuttings enter the device Cover the device with film or when drilling use removal by suction Figure 4 2 Designated location for holes on the co...

Page 29: ...e When the cover over the USB port is opened in order to connect a USB component the degree of protection for the device is no longer guaranteed When using standard USB peripherals please bear in mind that their EMC immunity level is frequently designed for office applications only These device may be used for commissioning and servicing However only industry standard devices are allowed for indus...

Page 30: ... unit Figure 5 1 Other ports on the computer unit 1 Display cable K2 and display cable K3 2 USB cable 3 USB peripheral cable K1 Only for 19 touch panel fronts The LVDS display cable K2 1 LVDS channel at X300 X400 and the LVDS display cable K3 2 LVDS channel at X310 X410 only for 19 touch panel connect the control unit display with the computer unit The USB cable for the USB port on the front side ...

Page 31: ... applications and to the computer unit operating instructions 6 2 6 2 Operator controls on key panels 6 2 1 Overview The device has the following keypads 2 x 8 vertical key with softkey functions 2 x 10 horizontal keys with function keys F1 F20 Optional 32 direct key functions The number of keys their labeling and function is the same on all key panels The various panel types differ only in the ar...

Page 32: ...n on the device cannot be excluded Activate function keys and softkeys only in sequence Use KeyTools as described in the chapter Additional Drivers and Applications The following applies when the Security features of KeyTools is deactivated When the additional function keys F13 and S16 are used or when using your own key code table serious malfunctions of the user software can occur because the ke...

Page 33: ...integrated LED Figure 6 2 Function keys and softkeys Control keys The control keys activate editing functions and control functions in different applications Figure 6 3 Control keys 1 Cancel 2 Acknowledge 3 Enter 4 Delete 5 Insert and Print Screen 6 ALT key application specific functions and special key codes compare keyboard table in the appendix 7 CTRL key application specific functions and spec...

Page 34: ... between lowercase and uppercase letters Enter the lower case letters using the pre defined assignment of the alphanumeric keys To enter an upper case letter proceed as follows 1 Hold down the Shift key 2 Activate the desired alphanumeric key at the same time The displayed upper case letter will be entered 3 To enter lower case letters release the Shift key Numeric keys Enter the numerals 0 to 9 a...

Page 35: ...ignment again release the FN key Cursor keys Navigate scroll or move the writing mark using the cursor keys The cursor keys correspond to the usual keys of the PC keyboard Figure 6 6 Cursor keys 1 Left key 2 Up key 3 Right key 4 Down key 5 Pos 1 key 6 Page up key 7 Page down key External keyboards The keyboard layout has been set to English USA international If you use a keyboard with a layout oth...

Page 36: ...on the system to be observed Procedure 1 Label the DIN A4 film with a laser printer with the printing templates from the options for example 2 Cut the labeling strips along the pre printed lines Note Do not insert handwritten labeling strips until the ink has dried 3 Insert the labeling strips into the slots provided on the rear side of the control unit Figure 6 7 Rear side of the control unit wit...

Page 37: ...ount of pressure determines the speed of the cursor You can also connect an external mouse to the front USB port 6 3 6 3 Operator controls of the touch screen panels 6 3 1 Overview The 12 variant and the 15 variant differ in their dimensions and the size of the display The 12 variant has no drill hole covers on the sides The following figure is therefore only an example using the front view of the...

Page 38: ...our finger the function assigned to the button is activated Caution Only touch one point on the touch screen and not several points at one time You may otherwise trigger unintended reactions Do not touch the screen in the following situations When the device is booting until the boot process is completed When plugging or unplugging USB components The following types of pressure are permissible Usi...

Page 39: ... This also applies if the device is subjected to extreme changes in temperature Wait 12 hours before switching the device on Allow the device to slowly adjust to room temperature before commissioning the device Do not subject the device to direct heat radiation from devices such as heaters I O modules Connect the I O modules using shielded cable and metal plugs Otherwise the specified norms and sp...

Page 40: ...r plug of the supplied power supply cable in the AC DC power supply connector of the computer unit 2 Lock the power plug in place 3 Plug the power supply cable of the computer unit into a socket with a grounded protective conductor 4 Plug the computer unit into the power switch The POWER LED will light up The device starts up and boots Self Test After connection to the power supply the device perf...

Page 41: ... unchanged If required adjust the regional settings of the operating system only after commissioning 3 Enter the company names and user names 4 If his PC name is already in use as you attempt to connect the device to a network Enter a new PC name for identification The operating system will restart automatically The system settings are updated The desktop is set up The setup of the operating syste...

Page 42: ...screen panels 2 In the following dialog click on the screen size that corresponds to your device The display resolution of the device will be adjusted correspondingly Figure 7 2 Touchscreen panel selecting the screen size 3 Click on Finish to end the Panel Wizard Note Screen keyboard The check box is activated by default You enter the administrator password for example using a screen keyboard whic...

Page 43: ... point touch calibration click on OK Carry out the following steps carefully Figure 7 4 Start touch screen calibration 5 Briefly touch the touch screen at every cross hair Figure 7 5 Touch screen calibration 6 After the last calibration point the dialog Check calibration appears for a limited time see illustration Click on OK within this time The calibration settings are adopted and the touch scre...

Page 44: ...ns for the control unit described under Setting the touch screen in the Additional drivers and applications section Calibration has ended The device restarts cold start Setting the key panel This section applies only to control units with key panels 7 In the following dialog click on the screen size that corresponds to your device The display resolution of the device will be adjusted corresponding...

Page 45: ... ones Further information is available in the description of KeyTools on the supplied Documentation Drivers CD Complete commissioning 10 No administrator password is assigned in the factory state When the logon dialog appears the next time the device starts up therefore leave the field empty and close the dialog with the OK button Notice Then configure an administrator password for security The in...

Page 46: ...e information please refer to the chapter Additional drivers and applications The proper ambient and environmental conditions according to the specifications for the device and the connected I O modules have been observed Procedure Warning Danger of incorrect operations The following applies to external input devices or combinations of external input devices and control units with key panels Ambig...

Page 47: ... screen keyboards 7 2 2 Turning off the device Introduction To turn off the device shut down the device and disconnect it from the power supply Procedure 1 Exist the operating system session of the computer unit properly Caution When using the operating systems Windows 98 Windows 2000 and Windows XP wait until the display has turned dark Applies to the decentralized design When the computer unit i...

Page 48: ...the device during the installation of drivers and applications Otherwise parts of the software which are necessary for trouble free operation will be lost Note The supplied drivers and applications have been tested for the system and released for this device No warranty can be provided for other software Press the Help button to obtain information concerning the buttons of a dialog 7 3 2 Setting t...

Page 49: ...her information press the Help button Special features Warning Faulty operation If you touch the touch screen while configuring it or if the screen saver is active the SIMATIC process visualization software e g ProTool Pro will carry out the functions which happen to be behind it Caution Only touch one point on the touch screen and not several points at one time You may otherwise trigger unintende...

Page 50: ... Operating Instructions Edition 04 2005 A5E00407724 01 7 3 3 Windows Security Center Start Start menu Start command Settings Control panel Security Center Function Activates and deactivates the following functions on the device Firewall Automatic updates Virus Protection Alarms Figure 7 11 Windows Security Center ...

Page 51: ... the menu Info About KeyTools consists of the following tools Keycode table previously KeyPad Loading and editing of key code tables WinCC hotkey function previously KeyHook WinCC hotkey function activation und deactivation Security features prevents two function keys from being activated simultaneously This prevents incorrect operations and undefined states of the application program Warning For ...

Page 52: ...tarted Function The open window displays information concerning for example the current temperature the internal temperature of the device and the I O modules Set limit values as needed For additional information please refer to the chapter Functions in the computer unit operating instructions Figure 7 13 SIMATIC SOM 7 3 6 TouchInput Start TouchInput symbol on the desktop Function TouchInput provi...

Page 53: ...01 7 15 Figure 7 14 TouchInput 7 3 7 Set brightness Start Set brightness symbol on the desktop Function The intensity of the backlighting is adjusted using Set brightness Figure 7 15 Set brightness 7 3 8 CheckLanguageID Area of validity The following applies to Windows 2000 Multi Language and Windows XP Multi Language Start c drivers checklang checklangid exe ...

Page 54: ...face language Notice All three languages displayed should be assigned to the same ID 7 3 9 Multilingual settings for the operating system Windows 2000 MultiLanguage MUI operating system enables users to set the language of the GUI to their individual preference Some elements are not localized however and remain in the original language of the system English You should therefore always install Engl...

Page 55: ...player software This software is included on the CD supplied with the device Insert the CD in the drive run setup and follow the instructions on the screen Information on burning CD Rs CD RWs Caution Data may be corrupted when burning CD R or CD RW Burning operation is permissible only in an undisturbed environment i e shock and vibration stress must be avoided Because of heavy fluctuation in the ...

Page 56: ...y The following applies to Windows 2000 and Windows XP Start The USB keyboard controller is installed by default Functions The following functions are provided by the USB keyboard controller Activation of the LEDs of the integrated function keys with SIMATIC ProTool and WinCC flexible Alteration of the keyboard table with the applications KeyTools and Keypad Adjustment of the backlighting brightne...

Page 57: ...on key panels Cleaning agents Use dish soap or foaming screen cleaner only as cleaning agents Caution Do not clean the device with agressive solvents or scrubbing agents or with pressurized air or steam cleaner Procedure 1 Switch off the device This prevents the accidental triggering of functions when the keys are touched 2 Dampen the cleaning cloth 3 Spray the cleaning agent on the cloth and not ...

Page 58: ...15 TFT 19 TFT 6AV7672 1AB10 0AA0 6AV7672 1AD10 0AA0 6AV7672 1AA10 0AA0 6AV7672 1AC10 0AA0 6AV7672 1AE10 0AA0 Set of clamps 6FC5248 0AF06 0AA0 Plastic cap USB interface A5E0037892 Lithium battery W79084 E1003 B1 For more information please refer to the chapter Description 8 3 8 3 Separating the control unit from the computer unit 8 3 1 Separating Panel PC 677 Introduction The control unit is separa...

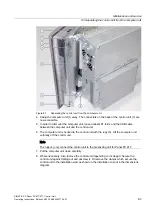
Page 59: ...bels K1 to Kx and the USB cable between the computer unit and the control unit 6 The computer unit is hooked to the control unit with the lugs 5 Lift the computer unit vertically off the control unit Note The lugs 4 only connect the control unit to the processing unit for Panel PC 877 7 Put the computer unit down carefully 8 Where necessary also remove the control unit depending on its design Secu...

Page 60: ...pletely and separate the control unit and computer unit from one another in an uninstalled state So that the processing unit which is swung away from the control unit does not bend the lugs place a surface under the processing unit 8 3 2 Separating Panel PC 877 Introduction The control unit is separated from the computer unit to carry out repairs or to replace the control unit for example Procedur...

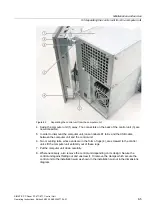
Page 61: ...ount the computer unit loosen cabels K1 to Kx and the USB cable between the computer unit and the control unit 6 Two mounting rails whose ends are in the form of lugs 4 are screwed to the control unit Lift the computer unit vertically out of these lugs 7 Put the computer unit down carefully 8 Where necessary also remove the control unit depending on its design Secure the control unit against falli...

Page 62: ...it and computer unit from one another in an uninstalled state So that the processing unit which is swung away from the control unit does not bend the lugs 4 place a surface under the processing unit 8 3 3 Remount the device Installing the device To reinstall the device follow the reverse procedure Caution When you swing the control unit and processing unit together make sure that the flatband cabl...

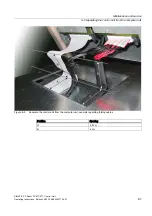
Page 63: ...unit from the computer unit SIMATIC PC Panel PC 677 877 Control Unit Operating Instructions Edition 04 2005 A5E00407724 01 8 7 Figure 8 5 Separate the control unit from the computer unit example regarding folding cables Position Spacing Q 4 5 cm B 4 cm ...

Page 64: ...Maintenance and service 8 3 Separating the control unit from the computer unit SIMATIC PC Panel PC 677 877 Control Unit 8 8 Operating Instructions Edition 04 2005 A5E00407724 01 ...

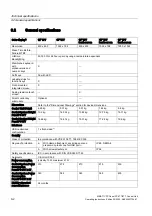
Page 65: ...C 24 500 V 1 kV symmetrical 2 kV unsymmetrical with intermediate unit Dehnrail 24 FML order number 901 104 Immunity to discharges of static electricity ESD EN 61000 4 2 8 kV with air discharge 6 kV on contact direct indirect Interference criterion B Interference immunity against radiated radio frequency electromagnetic field EN 61000 4 3 EN 61000 4 3 80 1000 MHz 10 V m Modulation 80 AM with 1 kHz ...

Page 66: ...fer to the Dimensional Drawings section for device dimensions Control Unit Weight 4 89 kg 9 01 kg 5 51 kg 7 44 kg 9 8 kg Control System Weight Panel PC 677 10 2 kg 14 32 kg 10 82 kg 12 75 kg 15 11 kg Control System Weight Panel PC 877 14 69 kg 18 81 kg 15 31 kg 17 24 kg 19 6 kg Interfaces USB centralized configuration 1 x front sided 2 Security Class of protection In accordance with VDE 0106 T1 19...

Page 67: ...load during operation 10 to 58 Hz 0 075 mm 58 to 500 Hz 1 g IEC 60068 2 6 Shock load during operation 50 m s2 ca 5 g 30 ms 3 shocks per axis IEC 60068 2 27 Climatic ambient conditions Cooling Using natural convection Temperature limit values during operation with CD RW DVD drive during storage transport 5 C 45 C 5 C 40 C 20 C 60 C IEC 60068 2 1 IEC 60068 2 2 IEC 60068 2 14 Relative humidity limits...

Page 68: ...function column Further information is available in the documentation for SIMATIC KeyTools on the Documentation and Drivers CD Name Code Hex 0x Check box Display function a A 4 a L Shift R Shift A R Alt á R Alt L Shift R Shift Á b B 5 b L Shift R Shift B c C 6 c L Shift R Shift C R Alt R Alt L Shift R Shift L Ctrl R Ctrl Copy d D 7 d L Shift R Shift D R Alt ð R Alt L Shift R Shift Ð e E 8 e L Shif...

Page 69: ...hift M R Alt µ L Gui R Gui Minimize all windows n N 11 n L Shift R Shift N R Alt ñ R Alt L Shift R Shift Ñ o O 12 o L Shift R Shift O R Alt ó R Alt L Shift R Shift Ó L Ctrl R Ctrl Open p P 13 p L Shift R Shift P R Alt ö R Alt L Shift R Shift Ö L Ctrl R Ctrl Print q Q 14 q L Shift R Shift Q R Alt ä R Alt L Shift R Shift Ä r R 15 r L Shift R Shift R R Alt L Gui R Gui Display Run dialog s S 16 s L Sh...

Page 70: ... Ctrl R Ctrl Inserting w W 1A W L Shift R Shift W R Alt å R Alt L Shift R Shift Å x X 1B x L Shift R Shift X L Ctrl R Ctrl Cut y Y 1C y L Shift R Shift Y R Alt ü R Alt L Shift R Shift O z Z 1D z L Shift R Shift C R Alt æ R Alt L Shift R Shift Æ L Ctrl R Ctrl 1 1E 1 L Shift R Shift R Alt R Alt L Shift R Shift 2 1F 2 L Shift R Shift R Alt 3 20 3 L Shift R Shift R Alt 4 21 4 L Shift R Shift R Alt R A...

Page 71: ...ft R Alt 9 26 9 L Shift R Shift R Alt 0 27 0 L Shift R Shift R Alt Return 28 Return Escape 29 Escape Backspace 2A Backspace Tab 2B Tab Space 2C Space _ 2D L Shift R Shift _ R Alt 2E L Shift R Shift R Alt R Alt L Shift R Shift 2F L Shift R Shift R Alt 30 L Shift R Shift R Alt 31 L Shift R Shift R Alt R Alt L Shift R Shift Europe 1 32 Europe 1 33 L Shift R Shift R Alt R Alt L Shift R Shift 34 L Shif...

Page 72: ...t Caps Lock 39 Caps Lock F1 3A F1 L Shift R Shift F13 L Ctrl R Ctrl S5 F2 3B F2 L Shift R Shift F14 L Ctrl R Ctrl S6 F3 3C F3 L Shift R Shift F15 L Ctrl R Ctrl S7 F4 3D F4 L Shift R Shift F16 L Ctrl R Ctrl S8 F5 3E F5 L Shift R Shift F17 L Ctrl R Ctrl S9 F6 3F F6 L Shift R Shift F18 L Ctrl R Ctrl S10 F7 40 F7 L Shift R Shift F19 L Ctrl R Ctrl S11 F8 41 F8 L Shift R Shift F20 L Ctrl R Ctrl S12 F9 4...

Page 73: ...4E Page Down Right Arrow 4F Right Arrow Left Arrow 50 Left Arrow Down Arrow 51 Down Arrow Up Arrow 52 Up Arrow Num Lock 53 Num Lock Keypad 54 Keypad Keypad 55 Keypad Keypad 56 Keypad Keypad 57 Keypad Keypad Enter 58 Keypad Enter Keypad 1 End 59 Keypad 1 End Keypad 2 Down 5A Keypad 2 Down Keypad 3 PageDn 5B Keypad 3 PageDn Keypad 4 Left 5C Keypad 4 Left Keypad 5 5D Keypad 5 Keypad 6 Right 5E Keypad...

Page 74: ...1 Name Code Hex 0x Check box Display function F16 6B F16 F17 6C F17 F18 6D F18 F19 6E F19 F20 6F F20 F21 70 F21 F22 71 F22 F23 72 F23 F24 73 F24 Left Control I0 Left Control Left Shift I1 Left Shift Left Alt I2 Left Alt Left GUI I3 Left GUI Right Control E4 Right Control Right Shift E5 Right Shift Right Alt E6 Right Alt Right GUI E7 Right GUI ...

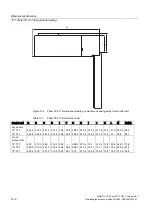
Page 75: ... Panel PC 677 877 Control Unit Operating Instructions Edition 04 2005 A5E00407724 01 10 1 Dimensional Drawings 10 10 1 10 1 Panel PC 677 dimensional drawing 3 3DQHO 3 Figure 10 1 Panel PC 677 dimensional drawing ...

Page 76: ... mm Control unit Q B C D I F G H I J K L M N lbf key panels 12 TFT 15 TFT 482 6 482 6 310 3 354 8 447 2 447 2 314 9 314 9 30 8 49 8 39 8 59 8 288 3 324 4 270 4 270 4 104 5 123 5 121 9 140 9 10 5 10 5 41 9 30 350 6 369 59 3 48 1 Touch screen front 12 TFT 15 TFT 19 TFT 400 482 6 482 6 310 3 310 3 400 366 447 2 447 2 314 9 314 9 314 9 48 3 46 6 56 1 58 6 68 1 288 3 288 3 378 270 4 270 4 270 4 123 120...

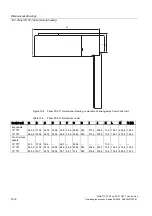
Page 77: ...anel PC 877 dimensional drawing SIMATIC PC Panel PC 677 877 Control Unit Operating Instructions Edition 04 2005 A5E00407724 01 10 3 10 2 10 2 Panel PC 877 dimensional drawing 3 3DQHO 3 Figure 10 3 Panel PC 877 dimensional drawing ...

Page 78: ...877 dimensions in mm Control unit Q B C D I F G H I J K L M N lbf key panels 12 TFT 15 TFT 482 6 482 6 310 3 354 8 447 2 447 2 392 8 392 8 30 8 49 8 39 8 59 8 288 3 324 4 285 285 191 4 210 4 208 9 227 9 10 5 10 5 145 7 146 7 460 8 479 8 163 2 164 2 Touch screen panels 12 TFT 15 TFT 19 TFT 400 482 6 482 6 310 3 310 3 400 366 447 2 447 2 392 8 392 8 48 3 46 6 56 1 58 6 68 1 288 3 288 3 378 285 285 2...

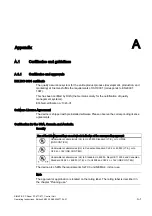
Page 79: ...shipped with preinstalled software Please observe the corresponding license agreements Certification for the USA Canada and Australia Security One of the following markings on a device is indicative of the corresponding approval Underwriters Laboratories UL to UL 60950 Standard I T E or to UL508 IND CONT EQ Underwriters Laboratories UL to Canadian Standard C22 2 nr 60950 I T E or to C22 2 nr 142 I...

Page 80: ...ons Siemens AG is not responsible for any radio television interference caused by unauthorized modifications of this equipment or the substitution or attachment of connecting cables and equipment other than those specified by Siemens AG The correction of interference caused by such unauthorized modification substitution or attachment will be the responsibility of the user Canadian Notice This clas...

Page 81: ...raining center or the central training center in D 90327 Nuremberg Phone 49 911 895 3200 Internet http www sitrain com Technical Support You can access technical support for all A D projects via the following Support Request form on the web http www siemens de automation support request Phone 49 180 5050 222 Fax 49 180 5050 223 Additional Technical Support information http www siemens com automati...

Page 82: ...Appendix A 2 Additional support SIMATIC PC Panel PC 677 877 Control Unit A 4 Operating Instructions Edition 04 2005 A5E00407724 01 ...

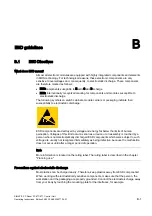
Page 83: ...rostatic discharge ESD components are destroyed by voltage and energy far below the limits of human perception Voltages of this kind occur as soon as a device or an assembly is touched by a person who is not electrostatically discharged ESD components which were subject to such voltage are usually not recognized immediately as being defective because the malfunction does not occur until after a lo...

Page 84: ...ce of at least 10 cm to screens Handle flat components only by their edges Do not touch component connectors or conductors This prevents charges from reaching and damaging sensitive components Measuring and modifying ESD assemblies Measure the ESD component under the following conditions only The measuring device is grounded with a protective conductor for example The probe on the potential free m...

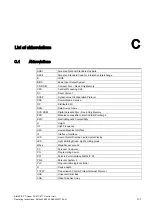
Page 85: ...e DP Distributed I O DSN Data Source Name DVD ROM Digital Versatile Disc Read Only Memory ESD Modules susceptible to ElectroStatic Discharge EMC ElectroMagnetic Compatibility H Height HF High Frequency HMI Human Machine Interface IF Interface Interface LCD Liquid Crystal Display Liquid crystal display LED Light Emitting Diode Light emitting diode Mbps Megabits per second PC Personal Computer PG Pr...

Page 86: ...List of abbreviations C 1 Abbreviations SIMATIC PC Panel PC 677 877 Control Unit C 2 Operating Instructions Edition 04 2005 A5E00407724 01 ...

Page 87: ...A boot disk is a bootstrap loader diskette which has a boot sector which loads the operating system from the diskette Booting The starting or restarting of the computer During the boot sequence the operating system is loaded from the system data carrier into RAM C Cache High speed access buffer often used for interim storage buffering of requested data The computer has two cache levels the 2 level...

Page 88: ...ently This programmed module is then inserted into the prepared slots of the automation systems Ethernet Local network with Bus structure for data communication with a transmission speed of 10 100 1000 baud F Formatting Basic partitioning of memory space on a magnetic data carrier into tracks and segments Formatting deletes all data on a data carrier All data carriers must be formatted prior to th...

Page 89: ...rinters User connects a peripheral device plug Afterwards the peripheral device can be used immediately play without having to configure the operating system manually The Plug and Play PC requires both a BIOS that supports Plug and Play and a corresponding expansion card R RAM The main memory represents the complete RAM area on a PC PG Recovery CD Contains the DOS tools for installing drivers in h...

Page 90: ...Glossary SIMATIC PC Panel PC 677 877 Control Unit 4 Operating Instructions Edition 04 2005 A5E00407724 01 ...

Page 91: ... Restrictions under Microsoft Windows NT 7 17 CE label ii Certificates A 1 CheckLanguageID 7 15 Checklist 7 1 Chipset 1 Clamp 4 1 Class of protection 9 2 Cleaning agents 8 1 Closing 7 7 Start up 7 7 Cold start 1 COM interface 1 commissioning 1 2 5 1 7 1 Device 7 1 Components 2 4 Components susceptible to ElectroStatic Discharge B 1 Computer unit 2 1 2 3 8 2 8 4 Separating from the control unit 8 2...

Page 92: ... 3 Entering 6 5 Arithmetic symbols 6 5 Signs 6 5 Special characters 6 5 EPROM 2 ESD B 1 B 2 Guideline B 1 Handling B 2 Measuring B 2 modify B 2 Shipping B 2 Ethernet 2 Ethernet address 3 3 F Faulty operation 6 2 Field of application 3 1 Firewall 7 12 Fixation 4 1 4 2 Securing with clamps 4 1 Securing with screws 4 2 Formatting 2 G Gender Changer 2 Glossary 1 Guidelines for Handling Electrostatic S...

Page 93: ... Mounting 3 3 4 1 4 2 8 6 Device 4 1 4 2 8 6 Installing the device according to EMC guidelines 3 3 Mounting rail 2 1 2 3 Mouse 2 2 5 1 6 7 9 2 External mouse 5 1 Integrated mouse 6 7 Mouse pointer 6 7 Direction 6 7 Speed 6 7 N Navigation 6 5 Notation iii Note 1 1 1 2 3 4 General Notes 1 2 Installation notes 3 4 Safety instruction 1 1 O Operating 6 8 Touch screen 6 8 Operating elements 6 7 For touc...

Page 94: ...ds ii Start up 7 7 Closing 7 7 Status 8 4 8 6 Uninstalled state 8 4 8 6 Status display 6 1 Structure 2 2 2 3 3 3 8 2 Centralized configuration 8 2 Distributed configuration 2 2 2 3 EMC compliant design 3 3 Switching on 7 8 Device 7 8 switching over 6 4 Toggling between lowercase and uppercase letters 6 4 T Temperature change 9 3 Temperature limit 9 3 Temperature threshold 6 1 TFT technology 2 2 2 ...

Reviews: