Installation
5.4 Installing a load current supply
Automation system
116
System Manual, 12/2017, A5E03461182-AE
Installing a load current supply
Watch video sequence (
http://www.automation.siemens.com/salesmaterial-as/interactive-
manuals/getting-started_simatic-s7-1500/videos/EN/mount/start.html
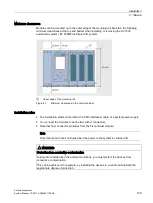
To install a load current supply, follow these steps:
1.
Hook the load current supply on the mounting rail.
2.
Swivel the load current supply to the rear.
Figure 5-5
Installing a load current supply
3.
Open the front cover.
4.
Disconnect the power cable connector from the load current supply.
5.
Tighten the screw for the load current supply (torque 1.5 Nm).
6.
Insert the already wired-up power cable connector into the load current supply.
For a description on how to wire the power cable connector, refer to the section Connecting
system power supply and load current supply (Page 140).
Note
Load current supplies can only be mounted on the left or right side outside the S7-1500
automation system/ET 200MP distributed I/O system. If you mount a load current supply on
the right of the configured setup, the heat development of the load current supply may make
a gap to the configured setup necessary. For additional information, refer to the relevant
manuals. The number of load current supplies that can be used is unlimited.
Summary of Contents for Simatic S7-1500/ET 200MP
Page 1: ......

