background image

Device Data

3-47

E

 Siemens AG, 2003 All rights reserved

SIMOTION C230-2, 04.2003 Edition

3.3

Diagnosis using the LEDs

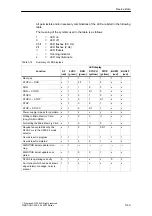
The LEDs are explained in the order in which they are positioned on the C230-2.

Table 3-13

Diagnostic LEDs on the C230-2 

Display

Function

Explanations

SF (red)

LED – ON

LED – flashes
(0.5 Hz)

LED – OFF

System fault

This LED indicates a fault on the C230-2.

An interrupt which can be acknowledged is present (alarm,
message, note).

(see Description of Functions SIMOTION Technology Func-
tions, Alarm Description.
)

No license exists for technology/optional objects under license.
Technology/optional objects under license are, for example:

S

Position (position axis)

S

Cam (following axes with connected cam)

S

Gear (following axes with gearing)

S

Ethernet (Ethernet interface)

S

TControl (Temperature Control)

C230-2 is operating correctly.

5 VDC  (green)

LED – ON

LED – OFF

Power supply for
the electronics

This LED indicates that the power supply is ready for operation.

The power supply of the C230-2 is functioning correctly.

If this is not illuminated, possible faults are:

S

No connected or switched-on network

S

No specified load power supply connected

S

Module not connected correctly

S

Module defective

RUN (green)

LED – ON

LED – flashes
(2 Hz)

C230-2 in RUN

This LED indicates that the user program is running.

The time from when the “RUN” operating mode is selected until
this operating mode has been attained is indicated by the LED
flashing.

STOPU (yellow)
LED – ON

LED – flashes
(2 Hz)

LED – “flickers”

C230-2 in STOP
User Program

This LED indicates that the technology packages are active. No
user program is being executed.

The time from when the “STOPU” operating mode is selected
until this operating mode has been attained is indicated by the
LED flashing.

Formatting the Micro Memory Card

Summary of Contents for SIMOTION C230-2

Page 1: ...trol 2 Device Data 3 Installation 4 Addressing the I O 5 Wiring 6 Networking 7 Commissioning 8 Maintenance 9 Appendices Standards and Approvals A EC Declaration of Conformity B ESD C References Index 04 2003 Edition SIMOTION C230 2 Equipment Manual SIMOTION 6AU1 900 0AB30 0BA0 ...

Page 2: ...mmended by Siemens This product can only function correctly and safely if it is transported stored set up and installed cor rectly and operated and maintained as recommended Trademarks SIMATICR SIMATIC HMIR SIMATIC NETR and SIMOTIONR are registered trademarks of SIEMENS AG Other names in this publication might be trademarks the use of which by a third party for his own purposes may violate the rig...

Page 3: ...lains the design of the mechanical configuration and how to install the SIMOTION C230 2 components S Addressing the I O Chapter 5 This part contains the information you will require to define the module initial addresses of the modules used S Wiring Chapter 6 This part describes the connection and wiring for the drives encoders and digi tal inputs outputs onboard S Networking Chapter 7 This part c...

Page 4: ...TION C230 2 is an environmentally friendly product It includes the following features S In spite of its excellent resistance to fire the flame resistant agent in the plastic used for the housing does not contain halogens S Identification of plastic materials in accordance with DIN 54840 S Less material used because the unit is smaller and with fewer components thanks to integration in ASICs The C2...

Page 5: ...ax 49 9131 98 2176 E mail motioncontrol docu erlf siemens de Fax form See remarks form at the end of this document Additional support We offer a range of courses to help you get started with the SIMOTION C230 2 system For more information please contact your regional training center or the central training center in D 90027 Nuremberg Phone 49 911 895 3202 Siemens Internet address You can obtain co...

Page 6: ...quipment Manual Documentation for SIMOTION SIMOTION Engineering Order No 6AU1 900 0BA30 0BA0 SIMOTION Function Library Order No 6AU1 900 0BC30 0BA0 SIMOTION Hardware Order No 6AU1 900 0BB30 0BA0 You are here SIMOTION Technology Functions Order No 6AU1 900 0BE30 0BA0 SIMOTION Reference Lists Order No 6AU1 900 0BF30 0BA0 SIMOTION Plastics Order No 6AU1 900 0CX30 0BA0 6AU1 900 0CN30 0BA0 SIMOTION D43...

Page 7: ... 6 Accessories and spare parts 3 56 4 Installation 4 57 4 1 Design and configuration using SIMOTION C modules 4 58 4 1 1 Horizontal and vertical configuration 4 58 4 1 2 Clearances 4 59 4 1 3 Mounting dimensions of modules 4 60 4 1 4 Layout of modules on a rack 4 61 4 1 5 Layout of modules on several racks 4 62 4 2 Installation 4 64 4 2 1 Fitting the mounting rail 4 64 4 2 2 Installing modules on ...

Page 8: ...ernet subnet 7 109 7 4 MPI subnet 7 110 8 Commissioning 8 111 8 1 Prerequisites for commissioning 8 112 8 2 Inserting and changing the Micro Memory Card 8 114 8 3 Switching on for the first time 8 115 8 4 Writing formatting and erasing the Micro Memory Card 8 116 8 5 Performing an overall reset on the C230 2 8 118 8 6 User memory concept 8 120 8 7 Resetting the C230 2 to the default setting as del...

Page 9: ...eclaration of Conformity B 141 C Directive for the Handling of Electrostatically Sensitive Devices ESD C 145 C 1 What does ESD mean C 145 C 2 Electrostatic discharge from persons C 146 C 3 Basic measures to protect against the discharge of static electricity C 147 References References 149 Index Index 157 ...

Page 10: ...Table of Contents Contents 10 E Siemens AG 2003 All rights reserved SIMOTION C230 2 04 2003 Edition ...

Page 11: ...ends on the set system cycle clocks i e more than four axes can be operated with longer cycle times The C230 2 is a powerful module for positioning independent single axes or mo tions in an axis grouping Both rotary axes and linear axes can be operated The configuration parameterization commissioning programming and diagnostics of the C230 2 is carried out via the Engineering System ES For which a...

Page 12: ...control e g positioning synchronous operation Logic The system approach of SIMOTION The fusion of motion control logic and other technology functions Fig 1 1 System solution for production machines Individual automation tasks for production machines are formulated in a uniform and consistent user interface Logic and motion functions are programmed in this graphic programming tool The logic command...

Page 13: ...reserved SIMOTION C230 2 04 2003 Edition The following figure shows a system configuration with SIMOTION C230 2 SIMA TIC S7 SIMATIC HMI device PROFIBUS DP S7 300 C230 2 SMs ET 200 ET 200 PROFIBUS DP isochronous PS PG PC Ethernet Fig 1 2 System overview ...

Page 14: ...ts S Inputs for measuring inputs S User addressable process inputs outputs Drive devices with 10 V analog interfaces can be connected to the onboard drive interface Incremental encoders or absolute encoders can be connected to the measuring system interface Power supply PS converts the line voltage 120 230 VAC into an operating voltage of 24 VDC to supply the C230 2 Signal modules SM adapt various...

Page 15: ...th the programming device PG PC Note All approved devicles are listed in the PM 10 catalog and in Subsection 3 1 5 Table 1 3 Further components that can be connected to the C230 2 Component Function Programming device PG PC configures parameterizes programs and tests SIMOTION and C230 2 SIMATIC HMI device is used for operating and monitoring functions It is not abso lutely essential for the operat...

Page 16: ...Product Overview 1 16 E Siemens AG 2003 All rights reserved SIMOTION C230 2 04 2003 Edition ...

Page 17: ...1 Servo system with converter e g SIMODRIVE 611 analog with external incremental encoder Incremental encoder Encoders are generally connected for position measurement These supply counting pulses according to their resolution for the incremental distance travelled They can be either rotary or linear A homing referencing operation must be performed in order to determine the absolute position refere...

Page 18: ...nformation via an interface that emulates an incremental en coder e g incremental shaft encoder WSG interface with SIMODRIVE A sepa rate position measuring system is not required in this case Position controlled motion control for servo axes PROFIBUS DP The C230 2 allows the position controlled motion of axes via PROFIBUS DP The following PROFIBUS protocol is used for specifying the speed setpoint...

Page 19: ...s chapter contains information on S Layout of the module S Mode selector S Memory module slot S PROFIBUS DP and drive interface S Analog drive interface S Measuring system interface S I O interface S Clock S Diagnosis using the LEDs S Technical data S Dimension drawing S Accessories and spare parts 3 ...

Page 20: ...ays Drive interface X2 Bus connector for P bus SF 5 VDC RUN Mode selector Connection for power supply X10 Mounting rail I O interface X1 Front connector X2 X3 X4 X5 X6 Ethernet interface X7 Memory module slot for micro memory card Rating plate X1 PROFIBUS DP1 interface X8 Micro Memory Card MMC STOPU STOP BUS1F BUS2F MRES STOP STOPU RUN Status displays dig inputs outputs PROFIBUS DP2 MPI interface ...

Page 21: ...s X1 for connecting the fast digital inputs outputs including measuring inputs BEROs and for wiring the READY relay See Subsection 3 1 8 Power supply connection 4 pin screw type terminal connection X10 for connecting the 24 V load power supply See Subsection 6 2 1 Memory module slot 7 pin connector for Micro Memory Card See Subsection 3 1 2 PROFIBUS DP1 interface 9 pin Sub D socket X8 for connecti...

Page 22: ...User Program This LED indicates that the technology packages e g synchronous operation cam are active The user program is not active See Section 3 3 STOP yellow C230 2 in STOP This LED indicates that no user program is running The technology packages are not active See Section 3 3 BUS1F red group fault This LED indicates a fault on the C230 2 s PROFIBUS DP1 interface X8 See Section 3 3 BUS2F red g...

Page 23: ...duct development authorizations and designations not yet granted etc 6AU1230 2AA00 0AA0 1P Vers A C230 2 INPUT 24 VDC 2 A SIEMENS SIMOTION Module name Product version Order number Connection parameters AXIS CONTROL 8DO 24 VDC 0 25 A 0 5 A 18DI 24 VDC Made in Germany S T P12345678 Serial number Barcode order no 1P6AU1230 2AA00 0AA0 Barcode product no A5E00128707 A5E00128707 Barcode serial no ST P12...

Page 24: ...ogy packages are active Test and commissioning func tions can be executed The user program is not active S The I O modules SMs are in a secure state In this position the key can be removed so that no unauthorized person can change the operating modes STOP S The C230 2 is not executing a user program S It is possible to load a complete user program S All system services communications etc are activ...

Page 25: ...ork with a transmission rate of 10 100 Mbit s The C230 2 offers the following functions via the Ethernet interface S Communications with STEP 7 and SIMOTION SCOUT The SIMATIC NET SOFTNET PG Protocol TPC IP RFC 1006 software must be installed on the PG PC for this function S Communications between SIMOTION and SIMATIC NET OPC The SIMATIC NET SOFTNET S7 S7 OPC Server software must be installed on th...

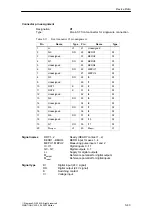
Page 26: ...PI X8 DP1 C230 2 X7 SIEMENS X7 Ethernet address MAC address e g 08000673238B 1 8 Fig 3 3 Position of connector X7 Connector pin assignment Designation X7 Ethernet Type 8 pin RJ45 socket Table 3 4 Assignment of X7 connector Pin Name Type Pin Name Type 1 TDP O 5 Unassigned 2 TDM O 6 RDM I 3 RDP I 7 Unassigned 4 Unassigned 8 Unassigned Signal names RDP RDM Receive Data TDP TDM Transmit Data Signal ty...

Page 27: ...nized to the DP slave X8 can be monitored by the ap plication DP slave synchroniza tion mechanisms DP master not isochronous DP slave isochronous Application running freely or automatically synchronized to the DP slave X9 can be monitored by the ap plication DP slave synchroniza tion mechanisms DP master isochronous DP master isochronous Application synchronized with DP master X8 X9 None DP master...

Page 28: ...s S PG PC S SIMATIC HMI devices S S7 controllers with PROFIBUS DP interface S Distributed I Os e g ET 200M The updating of the digital inputs outputs is carried out in the position control cycle clock S C230 2 S Teleservice adapter S Drives with digital interface e g SIMODRIVE 611 universal Note A teleservice adapter can only be connected to one of the two interfaces All approved modules and devic...

Page 29: ...X8 X9 Connector pin assignment Designation X8 X9 DP1 DP2 MPI Type 9 pin Sub D socket Table 3 5 Assignment of X8 X9 connector Pin Name Type Pin Name Type 1 Unassigned 6 P5 VO 2 M24 VO 7 P24 VO 3 B I O 8 A I O 4 RTS I 9 Unassigned 5 GND VO Signal names A B Data input output RS485 RTS Request to send P5 5 V supply 60 mA short circuit proof GND Ground for 5 V voltage P24 24 V supply 150 mA short circu...

Page 30: ...COFAST conform modules SIMATIC ET 200eco The compact economical I O system in the IP 67 degree of protection for use without a control cabinet and in the machine s proximity with the flexible and fast ECOFAST or M12 connection system S Other PROFIBUS DP I Os ADI 4 Analog Drive Interface for connecting drives with a 10 V analog setpoint interface Note Please note that not all modules of the above m...

Page 31: ...ted to SIMOTION These modules are inte grated via the GSD file of the device s manufacturer Note Please note that in individual cases further boundary conditions must be fulfilled in order to integrate a standard slave into SIMOTION Some modules need driver modules e g in the form of function blocks which make integration possible or much easier For the modules approved for SIMOTION e g S7 300 mod...

Page 32: ...face can be connected to the C230 2 s X2 50 pole Sub D socket In addition the C230 2 provides one enable signal per axis Position of the connector Fig 3 5 shows the installation position and the designation of the connector on the module X2 1 17 18 34 33 50 ANALOG OUT 1 4 STEPPER CTRL 1 4 X2 X3 X4 X6 X5 X1 X9 DP2 MPI X8 DP1 C230 2 SIEMENS X7 Fig 3 5 Position of the X2 connector ...

Page 33: ...ved O 23 Reserved O 39 Reserved O 7 Reserved O 24 Reserved O 40 Reserved O 8 Reserved O 25 Reserved O 41 Reserved O 9 Reserved O 26 Reserved O 42 Reserved O 10 Reserved O 27 Reserved O 43 Reserved O 11 Reserved O 28 Reserved O 44 Reserved O 12 Reserved O 29 Reserved O 45 Reserved O 13 Unas signed 30 Unassigned 46 Unassigned 14 CTREN1 1 K 31 Unassigned 47 CTREN1 2 K 15 CTREN2 1 K 32 Unassigned 48 C...

Page 34: ...e setpoint signal connected internally to logic ground S CONTROLLER ENABLE RF Contact assembly mated set NO contact used for axis specific enabling of the drive e g a SIMODRIVE drive unit The RF signal to the drive is set as soon as the controller enable is signalled by the user program Warning Brief voltage peaks may occur at the analog outputs when the supply voltage is switched on or off For th...

Page 35: ... 15 pin Sub D socket for the connection of incremental or absolute encoders SSI is provided for each axis Position of the connectors Fig 3 6 shows the mounting position and designation of the connectors on the module 1 15 8 9 X3 X6 ENCODER 3 4 ENCODER 1 2 X2 X3 X4 X6 X5 X1 X9 DP2 MPI X8 DP1 C230 2 SIEMENS X7 Fig 3 6 Position of connectors X3 to X6 ...

Page 36: ...S_N O 11 Z_N I 4 P5EXT VO 12 B_N I 5 P24EXT VO 13 B I 6 P5EXT VO 14 A_N DATA_N I 7 MEXT VO 15 A DATA I 8 Unassigned Signal names A A_N Track A non inverted and inverted incremental encoder B B_N Track B non inverted and inverted incremental encoder Z Z_N Zero mark non inverted and inverted incremental encoder CLS CLS_N SSI cycle clock shift pulse non inverted and inverted absolute encoder DATA DAT...

Page 37: ...encoders S Linear encoders with 5 V TTL RS422 interface S Linear encoders with SINUSOIDAL sig nals Direct Direct Direct Via SIMODRIVE drive control using incre mental shaft encoder WSG interface Via SIMODRIVE resolver control using in cremental shaft encoder WSG interface Direct Via EXE External Pulse shaper Electron ics Note If you operate drives via the PROFIBUS DP you do not need to connect any...

Page 38: ...s the Standard RS422 Output signals Track A as non inverted and inverted signal Ua1 Ua1 Track B as non inverted and inverted signal Ua2 Ua2 Zero signal Z as non inverted and inverted signal Ua0 Ua0 Max output frequency 1 MHz Phase shift of tracks A to B 90 30 Power consumption Max 300 mA Signal forms of incremental encoders 8 7 6 5 4 3 2 1 0 A A_N B B_N Z Z_N ÉÉÉ ÉÉÉ ÉÉÉ ÉÉÉ ÉÉÉ ÉÉÉ ÉÉÉ ÉÉÉ Counti...

Page 39: ...nsumption Max 300 mA Encoder supply 5 V The 5 V supply voltage for the encoders is generated inside the module and is therefore present at the Sub D socket This means you can supply the encoders via the connecting cable without the need for additional wiring The voltage supplied is protected electronically against short circuits and thermal overload and it is monitored The encoder supply is not is...

Page 40: ...nteed only if the following values are not exceeded Table 3 9 Maximum cable lengths depending on the encoder power supply Supply voltage Encoder supply voltage range Power con sumption Max cable length 5 VDC 4 75 V 5 25 V 300 mA 25 m 5 VDC 4 75 V 5 25 V 210 mA 35 m 24 VDC 20 4 V 28 8 V 300 mA 100 m 24 VDC 11 V 30 V 300 mA 250 m Table 3 10 Maximum cable lengths depending on the baud rate Encoder ty...

Page 41: ...connector X1 with single wire connection Position of the connector Fig 3 8 shows the position of the front connector Labeling of inside cover Front connector in wiring position 10 8 6 4 2 1 11 13 15 37 38 39 28 27 26 25 24 23 22 30 31 32 33 34 35 36 17 19 20 40 M L X1 1 10 11 20 21 30 31 40 9 2 3 4 5 6 7 8 22 23 24 25 26 27 28 29 32 33 34 35 36 37 38 39 12 13 14 15 16 17 18 19 29 M L RDY Fig 3 8 P...

Page 42: ...ic diagram for digital inputs outputs on the C230 2 Status displays green M1 B1 B2 B3 B4 7 0 1 2 3 4 5 6 0 1 2 M2 11 10 9 8 7 6 5 4 3 L 24 V Minput 24 V Moutput 21 22 1 2 4 6 8 10 20 19 17 15 13 11 23 24 25 26 27 28 29 40 39 38 37 36 35 34 33 32 31 30 M M M Internal schematic M C230 2 Fig 3 9 Wiring and schematic diagram of digital inputs outputs on the C230 2 ...

Page 43: ... I1 DI 10 RDY 1 K 30 I2 DI 11 RDY 2 K 31 I3 DI 12 Unassigned 32 I4 DI 13 Q4 DO 33 I5 DI 14 Unassigned 34 I6 DI 15 Q5 DO 35 I7 DI 16 Unassigned 36 I8 DI 17 Q6 DO 37 I9 DI 18 Unassigned 38 I10 DI 19 Q7 DO 39 I11 DI 20 Moutput VI 40 Minput VI Signal names RDY 1 2 Ready READY contact 1 2 BERO1 BERO4 BERO input for axes 1 4 MEPU1 MEPU2 Measuring pulse inputs 1 and 2 I0 I11 Digital inputs 0 11 Q0 Q7 Dig...

Page 44: ...BERO1 BERO4 With a signal edge at the relevant input the exact positions as indicated by the current encoder values for the relevant axes are recorded so that the home position coordinates can be recorded The inputs are assigned to the axes permanently BERO1 axis 1 Encoder at X3 BERO2 axis 2 Encoder at X4 BERO3 axis 3 Encoder at X5 BERO4 axis 4 Encoder at X6 S As inputs for measuring inputs MEPU1 ...

Page 45: ...h an accuracy of approx 125 µs READY output The ready signal RDY 1 RDY 2 is an isolated contact assembly make contact The contact can be used for the safe shutdown of parts of the system for exam ple through integration in the EMERGENCY STOP circuit The following table describes the states of the enables and outputs in the corre sponding C230 2 operating states with an open or closed READY contact...

Page 46: ... supply voltage 0 to 55_ C S At a switched off supply voltage 25_ C 20_ C to 70_ C Max deviation per day 9 s 2 s 2 s to 9 s Backup time Usually 4 weeks at 0 25_ C Charging time 1 h With POWER OFF The C230 2 s clock continues to operate with the POWER OFF for the battery backup time excluding software clock The battery is recharged with POWER ON No error message is output if the backup function is ...

Page 47: ...mperature Control C230 2 is operating correctly 5 VDC green LED ON LED OFF Power supply for the electronics This LED indicates that the power supply is ready for operation The power supply of the C230 2 is functioning correctly If this is not illuminated possible faults are S No connected or switched on network S No specified load power supply connected S Module not connected correctly S Module de...

Page 48: ...eset request is indicated by slow flashing see Sec tion 8 5 Writing to Micro Memory Card BUS1F X8 red or BUS2F X9 red LED ON LED flashes 0 5 Hz LED OFF LED ON LED flashes 0 5 Hz LED OFF Fault on interface This LED indicates a fault on the PROFIBUS DP interface Interface configured as slave Bus fault Searching for baud rate Parameterization error No cyclic data exchange Cyclic data exchange Interfa...

Page 49: ... 1 1 STOPU RUN x 1 2 1 1 0 x x RUN x 1 1 0 0 x x RUN STOPU x 1 1 2 1 0 x x STOPU x 1 0 1 0 x x STOPU STOP x 1 0 1 2 1 x x STOP x 1 0 0 1 x x STOP STOPU x 1 0 2 1 1 x x Power supply is ready for operation x 1 x x x x x Writing to Micro Memory Card Copy RAM to ROM x 1 0 0 l x x Formatting the Micro Memory Card x 1 0 l 0 x x Request an overall reset by the C230 2 or via the C230 2 s mode selector x 1...

Page 50: ...off on S Check Micro Memory Card S New commissioning procedure S Replace the C230 2 x 1 x l l l l No license exists for technology op tional objects under license 0 5 1 1 x x x x x PROFIBUS DP interface as slave Bus fault Searching for baud rate x 1 x x x 1 1 Parameterization error No cyclic data exchange x 1 x x x 0 5 1 0 5 1 Cyclic data exchange x 1 x x x 0 0 PROFIBUS P interface as master Bus f...

Page 51: ...clock 1 ms Interpolator cycle clock IPO cycle clock 1 ms A modification can be made in the Engineering System See SIMOTION SCOUT operating instructions for setting the system cycle clocks Address areas Input address area total 1 Kbyte Output address area total 1 Kbyte Process image inputs 64 bytes Process image outputs 64 bytes Connection values Supply voltage 24 VDC permissible range 20 4 28 8 V ...

Page 52: ...er 4 Rated voltage range 10 5 10 5 V Output current 3 3 mA Electrically isolated No Load impedance w 3 kOhm Resolution 16 bit including sign Contact assembly controller enable Number 4 Switching voltage Max 50 V Switching current Max 1 A Switching capacity Max 30 VA Mechanical service life Electrical service life Usually 109 switching cycles Usually 3 106 switching cycles at 24 V 1 A Cable length ...

Page 53: ...mA Tolerance 4 75 5 25 V Cable length for absolute encoder SSI 24 V encoder supply S Max 250 m at 187 5 kbit s S Max 10 m at 1 5 Mbit s Electrically isolated No Monitoring Short circuit in encoder supply and faulty wire Digital inputs according to IEC 1131 2 DIN EN 61131 2 characteristic curve type 2 Number of inputs 18 Supply voltage 24 VDC permissible range 20 4 28 8 V Input voltage S 0 signal 3...

Page 54: ...n Max leakage current Yes 0 signal 2 mA Output delay Q0 Q7 S 0 1 signal 500 µs type 150 µs at RL 60 Ohm S 1 0 signal 500 µs type 150 µs at RL 60 Ohm Electrical isolation between out puts Electrical isolation between out puts and logic Isolation No Yes 500 V 1 VL Supply voltage of outputs Note The connection cable between the voltage source and the load current supply con nector L and the associate...

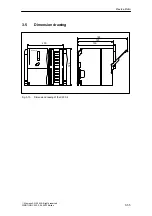
Page 55: ...Device Data 3 55 E Siemens AG 2003 All rights reserved SIMOTION C230 2 04 2003 Edition 3 5 Dimension drawing 125 200 130 120 180 C230 2 Fig 3 10 Dimension drawing of the C230 2 ...

Page 56: ...nd C230 2 6ES7 390 7BA00 0AA0 X 2 key for C230 2 for mode selector 6ES7 911 0AA00 0AA0 X Micro Memory Card 6AU1 700 0AA00 0AA0 X Labeling plate 10 pieces 6ES7 392 2XX00 0AA0 X Slot number plate 6ES7 912 0AA00 0AA0 X Front connector 40 pin S Screw type S Spring tension type 6ES7 392 1AM00 0AA0 6ES7 392 1BM01 0AA0 X Shield connecting element 6ES7 390 5AA00 0AA0 X Shield connection terminals for S 2 ...

Page 57: ... mount the SIMOTION C modules you must pay attention to the design of the electrical configuration For this please read Chapter 6 on Wiring Open equipment The modules are open equipment This means they may only be installed in hous ings cabinets or in electrical equipment rooms that can only be entered or ac cessed with a key or tool Housings cabinets or electrical operating areas may only be acce...

Page 58: ... rack S Layout of modules on several racks 4 1 1 Horizontal and vertical configuration Configuration You can install the rack either horizontally or vertically The horizontal configuration should be used if possible Permissible ambient temperature S Horizontal configuration From 0 to 55 _C S Vertical configuration From 0 to 40 _C Horizontal configuration Vertical configuration C230 2 and the power...

Page 59: ...he mounting height of the rack to 205 mm To guarantee the functionality clearances of 40 mm must be maintained Note If you use a shield connecting element see Section 6 3 the dimensions stated are measured from the lower edge of the shield connecting element Clearances Fig 4 2 shows the clearances between the individual racks and the clearance to adjacent equipment cable ducts cabinet walls etc 40...

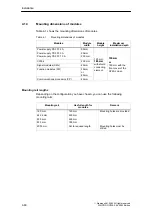
Page 60: ... 50 mm 80 mm 200 mm 130 mm C230 2 200 mm 125 mm 185 mm 130 mm or Signal modules SMs 40 mm 185 mm with shield or 180 mm with the Function modules FM 40 mm or 80 mm connecting element front cover of the C230 2 open Communications processors CP 40 mm Mounting rail lengths Depending on the configuration you have chosen you can use the following mounting rails Mounting rail Useful length for modules Re...

Page 61: ... C230 2 S The number of insertable modules is also limited by their power consumption from the backplane bus see Technical data table of the individual modules in the manual S7 300 Automation Systems M7 300 module data The total power consumption from the backplane bus of all modules that are mounted on a rack must not exceed 1 2 A Fig 4 3 shows the order of the modules in an installation with 8 I...

Page 62: ...ection via a 1 m long connection cable The total power consumption of the inserted I O modules of both racks must not exceed 1 2 A the power consumption from rack 1 is limited to 800 mA Rules The following rules apply with respect to the layout of the modules on two racks S The interconnection module always occupies Slot 3 and is always left of the first signal module S No more than 8 modules may ...

Page 63: ...03 All rights reserved SIMOTION C230 2 04 2003 Edition 2 tier layout Fig 4 4 shows the 2 tier layout with C230 2 PS C230 2 IM 365 S IM 365 R I O modules Rack 1 Rack 0 Connection cable I O modules Fig 4 4 Layout of modules on two racks ...

Page 64: ...2 One hole for a protective conductor mounting screw 3 Is the mounting rail longer than 830 mm If yes Then you must drill additional holes for more mounting screws Mark these additional holes along the groove in the middle of the mounting rail see Fig 4 5 These additional holes should be each made after approx 500 mm If no No additional work required 4 Drill the 6 5 0 2 mm dia holes where marked f...

Page 65: ...istance a Distance b 160 mm 10 mm 140 mm 482 6 mm 8 3 mm 466 mm 530 mm 15 mm 500 mm 830 mm 15 mm 800 mm Mounting screws Choose one of the following types of screw to mount the mounting rail For You can use Explanation Outer mounting screws M6 cylindrical screw as per ISO 1207 ISO 1580 DIN 84 DIN 85 Select a screw length that is ap propriate to your configuration In addition you require 6 4 M6 hexa...

Page 66: ... mount ing rail and the substrate If the surface of the metal is say painted or anod ized use suitable electro lubricant or contact washers If no No special action required 3 Connect the mounting rail with the protective conductor An M6 protective con ductor screw is provided on the mounting rail for this purpose Minimum cross section of cable to protective conductor 10 mm2 Note Always make sure t...

Page 67: ...ide the electrical connections between the modules 1 labeling plate To label the inputs and outputs on the module Sequence in which modules are affixed to the mounting rail 1 Power supply module 2 C230 2 3 Signal module s Installation sequence The individual steps for the installation of the modules are described below 1 A bus connector is included with each signal module but not with the C230 2 W...

Page 68: ...the C230 2 Assigning the slot numbers After mounting you can assign each module a slot number This eases the assign ment of the modules to the configuration table in the Engineering System Table 4 4 shows the assignment of the slot numbers Table 4 4 Slot numbers for S7 modules and C230 2 Slot no Module Remark 1 Power supply PS 2 C230 2 3 Reserved 4 1 I O module On the right next to C230 2 5 2 I O ...

Page 69: ...G 2003 All rights reserved SIMOTION C230 2 04 2003 Edition Inserting slot numbers Fig 4 8 shows how you insert the slot numbers The slot number plates are sup plied with the C230 2 1 2 Fig 4 8 Inserting slot numbers on the modules ...

Page 70: ...Installation 4 70 E Siemens AG 2003 All rights reserved SIMOTION C230 2 04 2003 Edition ...

Page 71: ...n Addressing the I O Overview This chapter contains information on S Assigning addresses on the basis of the module slot default addresses S User assignable addressing on the C230 2 S Addressing the I Os S Addressing the integrated digital inputs and outputs of the C230 2 5 ...

Page 72: ... of module these are different addresses for digital analog FM and CP modules see Table 5 1 In this section we will show you which module initial address is assigned to which slot number You need this information to determine the module initial addresses of the modules used Maximum configuration Fig 5 1 shows one configuration of a rack and the possible slots A 2 tier layout with IM 365 is possibl...

Page 73: ...he input addresses and output addresses start from the same module initial address Table 5 1 Module initial addresses of signal modules Rack Module Slot number initial ad dresses 1 2 3 4 5 6 7 8 9 10 11 0 Digital Analog 1 PS C230 2 IM 365 S 0 256 4 272 8 288 12 304 16 320 20 336 24 352 28 368 1 Digital Analog 1 IM 365 R 32 384 36 400 40 416 44 432 48 448 52 464 56 480 60 496 1 The FM and CP module...

Page 74: ...nputs outputs drives These are as signed in the hardware configuration see SIMOTION SCOUT operating instruc tions Here you specify the module initial address on which all further module ad dresses will then be based Advantages Advantages of user definable addressing S You can make the best possible use of the available address spaces because there are no address gaps between the modules S When cre...

Page 75: ... modules The address of an input or output of a digital module is made up of the byte ad dress and the bit address E g I 1 2 Input Byte address Bit address The byte address is governed by the module initial address You can note the bit address on the module Fig 5 2 shows the plan on which the addresses for the individual channels of the digital module are based Byte address Module initial address ...

Page 76: ...ained for a digital module that is inserted in slot 4 i e if the module initial address is 0 Slot number 3 is reserved as no interconnection module is present in the example Address 0 0 Address 1 1 Address 0 1 Address 0 7 Address 1 7 Address 1 0 Slot number 1 2 4 PS SM digital module C230 2 C230 2 Fig 5 3 Addresses for the inputs and outputs of the digital module in slot 4 ...

Page 77: ...mple which default channel addresses are ob tained if an analog module is plugged into slot 4 You will see that in the case of an analog input output module the analog input and analog output channels are ad dressed from the same address the module initial address Slot number 3 is reserved as no interconnection module is present in the example Slot number 1 2 4 PS C230 2 SM analog module Inputs Ch...

Page 78: ...Address 66 6 Address 66 7 Address 66 0 Address 67 3 Address 66 2 Address 66 3 Address 66 1 Address 66 4 Address 66 5 Address 66 6 Address 66 7 Address 67 0 Address 67 1 Address 67 2 Address 64 0 Address 64 1 Address 64 2 Address 64 3 Address 65 4 Address 65 5 Fig 5 5 Addresses of the integrated digital inputs outputs Note The addresses can be changed by the user in the hardware configuration see S...

Page 79: ...cor dance with the SIMODRIVE installation guidelines In addition in order to identify hazards we recommend that a risk analysis for the entire system be made in accordance with the basic safety requirements set out in Appendix 1 of EU Machinery Directive 89 392 EEC Other references Please also note the information in the following sections of this manual S Guidelines on Handling Electrostatically ...

Page 80: ...g table shows the points you have to take into account with respect to line voltage With then Stationary plants or systems without all pole power disconnector switches A mains disconnection switch or a fuse must be provided in the electrical installation for the building Load power supply power supply modules The set rated voltage range must corres pond to the local mains voltage All electric circ...

Page 81: ...red for their operation from the P bus as well as when necessary from an external load power supply S The power consumption of all I O modules from the P bus must not exceed 1 2 A This is the power that the C230 2 can supply to the P bus S PS 307 power supply modules are available for different loads 2 A 5 A 10 A The selection of the appropriate power supply depends on the sum of the power consump...

Page 82: ... incremental encoder RS422 E g ROD 320 built in en coder in 1FT5 motor FDD Setpoint cable Measuring system cable Ext 24 V power supply I RF E g SIMODRIVE 611 analog E g absolute encoder SSI E g linear position en coder with EXE X2 X3 X4 X6 X5 Axis 1 4 SIEMENS SIEMENS PG PC READY contact MP Front connector X1 Digital out puts X9 X8 PROFIBUS DP connecting cable E g SIMODRIVE 611 analog with resolver...

Page 83: ...e servo drive digital connection FDD FDD SIMODRIVE Digital inputs e g measuring in put Ext 24 V power supply I RF E g SIMODRIVE 611 universal SIEMENS PG PC READY contact MP Front connector PROFIBUS DP connecting cable Digital outputs Measuring in put C230 2 X2 X3 X4 X6 X5 SIEMENS X1 X9 X8 C230 2 X7 Ethernet connecting cable Fig 6 2 Overview of the cable connecting the C230 2 to the servo drive dig...

Page 84: ... Open strand ends X3 to X6 6FX2 002 2CE02 1VV0 v 35 m 6FX2 002 2CD01 VVV0 v 35 m at 5 VDC SIMODRIVE 611 universal with incremental shaft encoder WSG interface 6FX2 002 2CJ10 1VV0 v 50 m SIMODRIVE 611 analog closed loop control module for 1FK6 motors with resolver 6FX2 002 2CJ00 1VV0 v 50 m 6FX2 002 2CC11 VVV0 v 50 m at 500 kbit s v 300 m at 125 kbit s 6FX2 002 2CD01 1VV0 v 25 m PROFIBUS bus cable ...

Page 85: ...060 D4001 A101 BV For information about the PROFIBUS bus cable or Ethernet bus cable see Chap ter 7 For further information about PROFIBUS DP and Ethernet see Catalog IK PI Order no E86060 K6710 A101 BV Front connector For the wiring of the digital inputs outputs you need a 40 pole front connector screw type or spring tension type This must be ordered separately Order No Screw type 6ES7 392 1AM00 ...

Page 86: ...tial M should not exceed a maximum length of 10 m Table 6 1 Electrical parameters of load power supply Parameters Min Max Unit Conditions Voltage range mean value 20 4 28 8 V Ripple 3 6 Vpp Transient overvoltage 35 V 500 ms continuous 50 s recovery time Rated power consumption 2 2 A See Section 3 4 Connection values Starting current 8 A Pin connections The table below shows the pin connections on ...

Page 87: ...les with a cross section of 0 25 to 2 5 mm2 or AWG 18 to AWG 14 to connect the power supply If you only use one cable per connection a connector sleeve is not required You can use connector sleeves without an insulating collar in accordance with DIN 46228 Form A long version Power connector Use the power connector to connect the PS 307 power supply module to the C230 2 The power connector is suppl...

Page 88: ...sure that the system is de energized when you wire the system 1 Open the front covers of the PS 307 and the C230 2 2 Release the clip for the cable strain relief on the PS 307 3 Strip the mains cable 230 V 120 V strip off 12 mm and connect it to the PS 307 4 Tighten the clip for the cable strain relief 5 Insert the power connector and screw it tight 6 Close the front doors Power connector 230 V 12...

Page 89: ...sing a screwdriver 2 Set the switch for the relevant voltage supply 3 Refit the covering cap over the switch opening Reverse voltage protection If the connection is correct and the power supply is switched on the 5 VDC LED is illuminated green Note Your module will not work in the case of reverse polarity However a built in re verse polarity protection facility will protect the electronics against...

Page 90: ...hould not be grounded This is to separate low frequency interference from the analog setpoint signal The pre assembled cable available as an accessory provides the best possible immunity to interference Connection of drives e g SIMODRIVE 611 analog to the onboard drive interface The figure below shows how to connect the C230 2 to a SIMODRIVE 611 analog drive unit C230 2 I RF FDD FDD FDD SIMODRIVE ...

Page 91: ... cable is a pre assembled cable for four axes with an analog inter face terminal designation for SIMODRIVE drives The connecting cable is available in a choice of lengths See Catalog NC Z or Catalog NC 60 or Catalog ST 70 Connection diagram 14 47 SIMOTION C230 2 SIMODRIVE 611 A Shield on housing Wires twisted and shielded in pairs Connector sleeves with designations Shield Axis 2 Axis 3 Axis 4 9 6...

Page 92: ...S3 RF3 1 RF3 2 for axis 3 S SW4 BS4 RF4 1 RF4 2 for axis 4 Connection of drives e g SIMODRIVE 611 universal on the PROFIBUS DP The figure below shows the connection of a C230 2 to a SIMODRIVE 611 univer sal drive unit Please note that the PROFIBUS DP3 module must be fitted on your closed loop control module Connecting cable SIMODRIVE 611 universal drive unit FDD FDD SIMODRIVE I RF SIEMENS X2 X3 X4...

Page 93: ... Connecting cable Please see Chapter 7 on Networking for details about the bus cable bus connec tor and installation Note The maximum cable length is 100 m The terminating resistor must be switched in switch position On at the begin ning and end of the bus segment See Fig 7 2 Mixed operation of drives at the onboard drive interface and at the PROFIBUS DP Drives with analog and digital connections ...

Page 94: ...the best possible immunity to interference and adequately dimensioned cross sections for the power supply to the encoders C230 2 Connecting cable Axis 1 4 X2 X3 X4 X6 X5 X1 SIEMENS The following encoders can be connected S Incremental encoder with RS422 S ROD 320 built in encoder in 1FT5 S SSI absolute encoder S Linear position encoder with EXE S SIMODRIVE 611 analog closed loop control module 1FK...

Page 95: ...th resolver S Pre assembled cable for SIMODRIVE 611 universal with incremental shaft en coder interface The incremental shaft encoder interface is used to emulate an incremental en coder For this the value for the actual position is recorded by the encoder con nected to the drive unit and transmitted to the C230 2 as an incremental count ing pulse The encoder supply provided at the C230 2 is not u...

Page 96: ...Digital inputs outputs X2 X3 X4 X6 X5 X1 SIEMENS 10 8 6 4 2 1 11 13 15 37 38 39 28 27 26 25 24 23 22 30 31 32 33 34 35 36 17 19 20 40 M L 29 M C230 2 X7 Fig 6 10 Wiring the front connector Connecting cables Flexible cable cross section 0 25 to 1 5 mm2 Connector sleeves are not required You can use connector sleeves without an insulating collar in accordance with DIN 46228 Form A long version You c...

Page 97: ...he front connec tor 5 Pull the cable strain relief for the wiring loom tight Push the lock for the cable strain relief inwards to the left This will ensure that the space available for cables can be utilized more effectively 6 Tighten the mounting screw to move the front connector into operating position Note When the front connector is moved into operating position a front connector keying engage...

Page 98: ...ame criteria as the load power supply for the C230 2 2 Connect the shielded signal line to the encoders 3 Remove a sufficient length of the cable sheath at the control end so that you can connect the shield to the shield connecting element and the free cable ends to the front connector 4 Wire the signal line to the front connector X1 23 22 25 24 C230 2 L Mexternal Shield routed to shield connectin...

Page 99: ...7 modules to ground by directly connecting the shield connect ing element with the mounting rail Design of the shield connecting element The shield connecting element consists of S A retaining bracket with two threaded studs for connection to the rail Order No 6ES5 390 5AA00 0AA0 and S The shielding terminals You must use the following shielding terminal depending on the cable cross sec tion used ...

Page 100: ... them into the required position You can fit a maximum of four shielding terminals on each of the two rows Retaining bracket Shielding terminal Edge a Fig 6 12 Fitting the shield connecting element Laying the cables Only one or two shielded wires per shielding terminal may be attached see Table 6 3 Connect the cable to the stripped cable shield The stripped section of cable shield must have a mini...

Page 101: ...addresses So that all nodes can communicate with each other you must assign a PROFI BUS address to them before they are networked You set this PROFIBUS address individually for each node using the PG PC in the case of some PROFIBUS DP slaves also via the switch on the slave as well On the C230 2 address 2 and baud rate 1 5 Mbit s are parameterized as default settings for both PROFIBUS DP interface...

Page 102: ... be connected to the subnet if required Recommendation for the PROFIBUS address of the C230 2 for an exchange or a service call Reserve the address 2 for a C230 2 This way you avoid any occurance of doubled addresses after installation of a C230 2 with the default setting into the subnet for example when exchanging a C230 2 This means that you will assign other nodes in the subnet an address highe...

Page 103: ... may only contain a further 31 nodes However the number of RS 485 repeaters does not have any effect on the maximum number of nodes on the bus Up to 10 segments may be placed in a line S Activate the terminating resistor at the first and last node of a segment Components You connect the individual nodes via the bus connector and the PROFIBUS bus cable also see Section 7 2 Remember to provide a bus...

Page 104: ...G SIMODRIVE 611 universal drive SIMOTION C230 2 PS X9 X8 ET 200M PS IM 12 Mbits s Max line length 100 m from terminating resistor to terminating resistor À Terminating resistor activated À À À À Á DP Master  DP Slave 0 to x PROFIBUS DP node addresses Á Á      Max 1000 m À À À À  0 3 1 2 2 4 5 3 Network 1 Network 2 Network Highest PROFIBUS address Possible PROFIBUS node 1 2 15 0 to 15 5 0 to...

Page 105: ...For isolated interface Longer cable lengths If you have to use longer cable lengths in a segment than are permissible you must use RS 485 repeaters The maximum possible cable lengths between two RS 485 repeaters correspond to the line length of a segment see Table 7 1 How ever please note that with these maximum cable lengths no further node is per missible between the two RS 485 repeaters You can...

Page 106: ...No PROFIBUS bus line 6XV1 830 0AH10 PROFIBUS grounding cable 6XV1 830 3AH10 PROFIBUS trailing cable 6XV1 830 3BH10 Characteristics of the PROFIBUS bus cable The PROFIBUS bus cable is a two core twisted and shielded cable with the fol lowing characteristics Table 7 2 Characteristics of the PROFIBUS bus cable Features Values Surge resistance approx 135 to160 Ω f 3 to 20 MHz Loop resistance x 115 Ω k...

Page 107: ...e temperature range when laying cables 5_ C to 50_ C Operating temperature range in storage and in situ 30_ C to 65_ C 7 2 2 Bus connector Purpose of the bus connector The bus connector is used to connect the PROFIBUS bus cable to the PROFIBUS DP interfaces X8 X9 This is how you make the connection to other nodes The following bus connectors are available S Up to 12 Mbit s cable outlet 90_ Without...

Page 108: ...ation Terminating resis tor switched on Terminating resistor not switched on on off on off Fig 7 2 Bus connector 6ES7 Terminating resistor switched on and switched off Unplugging bus connector You can unplug the bus connector with the looped through bus cable from the PROFIBUS DP interface at any time without interrupting the data traffic on the bus Warning Disruption of data traffic on the bus po...

Page 109: ... CORD RJ45 RJ45 TP CORT pre fabricated with 2 RJ45 connectors Order no 6XV1850 2GVVV VVV length code You can receive further information on the wiring possibilities for Ethernet from your SIEMENS contact person Configuration via PROFIBUS DP For the configuration via Fast Industrial Ethernet the C230 2 must be supplied with an IP address the subnet dialog box and the router address For the configur...

Page 110: ...figuration of the PC the setting Take IP address automatically must be activated 1 Connect the Windows PC and the C230 2 directly via the RJ45 crossover cable 2 Boot the Windows PC The PC cannot find a DHCP server and automatically selects an IP address from the APIPA subnet Automatic Private IP Adressing 169 254 0 0 3 Load the new hardware configuration with the new IP address via Ethernet to the...

Page 111: ...Edition Commissioning Overview This chapter contains information on S Prerequisites for commissioning S Inserting and changing the Micro Memory Card S Switching on for the first time S Writing formatting and erasing the Micro Memory Card S Overall reset of the C230 2 8 ...

Page 112: ...Windows NT as of V4 0 Service Pack 5 or higher or Windows 2000 Service Pack 1 or higher the STEP 7 program as of V5 1 Service Pack 2 or higher and SIMOTION SCOUT as of V2 0 or higher must be installed on the program ming device PG or standard PC We recommend the standard mouse driver from Windows NT 4 0 SP5 Note Please take not of the information on the current CD for SIMOTION SCOUT In order to fu...

Page 113: ...t the PG PC to the C230 2 s PROFIBUS connector X8 or X9 with a connector cable see Section 7 2 Information on the cable lengths in each case for PROFIBUS DP can be found in Subsection 7 1 3 You can connect the PG PC via a shielded twisted pair cable to the Ethernet of the C230 2 connector X7 Information on wiring the Ethernet subnet 7 3 ...

Page 114: ...rd the module slot is equipped with an ejector Press the ejector and withdraw the Micro Memory Card To eject the Micro Memory Card use a small screwdriver or ball point pen 3 Insert the new Micro Memory Card with a slight pressure in the C230 2 mod ule slot until it latches Take care that the sloping corner of the Micro Memory Card is pointing towards the ejector see Fig 8 1 4 Switch on the power ...

Page 115: ... time Requirement Your system with the C230 2 is installed and wired The mode selector must be set to STOP Switching on for the first time Switch on the power supply module S The 24 VDC LED on the power supply module is illuminated S On the C230 2 The 5 VDC LED illuminates All other LEDs light up briefly approx 2 seconds ...

Page 116: ... data programs configuration data parameterization to the Micro Memory Card see SIMO TION SCOUT Operating Instructions S Write to the Micro Memory Card on the PG or PC This is how you can copy SIMOTION Kernels to the Micro Memory Card for updating see Section 9 1 For writing the Micro Memory Card you require adapters for the various ver sions of Windows We recommend the following adapters For Wind...

Page 117: ... Card with the mode selector proceed as fol lows 1 Switch off the power supply for the C230 2 2 Insert the Micro Memory Card into the C230 2 3 Turn the key on the mode selector to the MRES position Hold the key in this position and switch on the power supply for the C230 2 While formatting the STOPU LED flickers When the STOP LED is steadily lit turn the key back to the STOP position When formatti...

Page 118: ...es of the C230 2 X8 X9 S IP address subnet dialog box and router address of the C230 2 The content of the diagnostics buffer is retained The technology packages and user data configuration data programs parameter izations are transferred from the Micro Memory Card into the Volatile data area of the C230 2 After the overall reset a project existing on an inserted Micro Memory Card is valid and acti...

Page 119: ...il the STOP LED changes from flashing to permanently illuminated 3 Within 3 seconds you must release the switch and return it to the MRES posi tion The overall reset procedure is executed All LEDs illuminate during this time The C230 2 has completed the overall reset procedure when the STOP LED illuminates The C230 2 has completed the overall reset procedure t On Off 3 s Max 3 s STOP LED All LEDs ...

Page 120: ...w of the C230 2 s memory model and the procedures for certain operations Micro Memory Card S TPs S User data 1 Optional S SIMOTION Kernel 1 C230 2 S System data S SIMOTION Kernel SIMOTION Kernel S Retentive user area retain variables S Baud rate S PROFIBUS DP addresses S IP address subnet dialog box and router address Non volatile data Programming device Engineering System Volatile data S TPs S Us...

Page 121: ... their initial values from the Non volatile data area Note The current values of the Retain variables are not saved to the Micro Memory Card 3 As the C230 2 ramps up the SIMOTION Kernel basic system is loaded into the system area of the Volatile data 4 The contents of the Volatile data area are lost once the C230 2 is switched off When the C230 2 is switched on the following data is transferred fr...

Page 122: ...When the power supply is switched on the following data is still present on the C230 2 S SIMOTION Kernel S Data in the Non volatile data area Diagnostics buffer Baud rate PROFIBUS DP addresses of the C230 2 IP address subnet dialog box and router address of the C230 2 Retain variables The technology packages and user data configuration programs parameteriza tions have to be loaded either from the ...

Page 123: ... in the user program using the key word Retain S Diagnostics buffer S Clock The following data is retained S SIMOTION Kernel The following data is reset S Baud rate 1 5 Mbit s S PROFIBUS address for the interfaces X8 2 and X9 2 S IP address 169 254 11 22 subnet dialog box 255 255 0 0 and router address 169 254 11 22 Operations on the mode selector Proceed as follows 1 Switch off the power supply f...

Page 124: ...Commissioning 8 124 E Siemens AG 2003 All rights reserved SIMOTION C230 2 04 2003 Edition ...

Page 125: ...G 2003 All rights reserved SIMOTION C230 2 04 2003 Edition Maintenance Overview This chapter contains information on S SIMOTION Kernel update via Micro Memory Card S Exchanging modules S Module exchange without PG PC 9 ...

Page 126: ...ning the SIMOTION Kernel in the CD drive of your PG PC 3 Open the Windows Explorer Note The Micro Memory Card must be displayed as a drive with an arbitrary letter in the Windows Explorer 4 Copy the c230_2fw bin file from the CD to the Root Directory of the Micro Memory Card via the Windows Explorer 5 Remove the Micro Memory Card from the PG PC 6 Switch off the power supply for the C230 2 7 Insert...

Page 127: ...moving a faulty module Proceed as follows to remove the C230 2 1 Switch off the power supply 2 Open the front covers If necessary remove the labeling strip 3 Undo the connections on the terminal strip for the power supply 4 Unplug the Sub D connectors to the encoders X3 to X6 the drive unit X2 and the PROFIBUS DP interfaces X8 X9 5 Release the front connector X1 Loosen the mounting screw in the mi...

Page 128: ...ng it down and screw it in tightly 3 Plug in the front connector and move it into operating position tighten mounting screw The keying fitting adjusts so that the front connector only fits this mod ule type 4 Connect the Sub D connectors 5 Connect the load power supply on the terminal strip 6 Close the front covers and insert the labeling strip The control is now ready for operation again and can ...

Page 129: ...hat when you commissioned your project as described in Section 8 6 you saved from the Engineering System to the Micro Memory Card with the menu command Copy RAM to ROM The following data are on the Micro Memory Card and can be transferred to the new module S Technology packages S User data S Baud rate S PROFIBUS DP addresses S IP address subnet dialog box and router address Note The Retain variabl...

Page 130: ...Maintenance 9 130 E Siemens AG 2003 All rights reserved SIMOTION C230 2 04 2003 Edition ...

Page 131: ...published in the Official Gazettes of the European Community for program mable logic controllers 89 336 EEC Electromagnetic Compatibility EMC Directive The EC declaration of conformity is part of this manual see Appendix B EMC Directive SIMOTION products are designed for use in an industrial environment Application Requirement for Emitted interference Immunity to noise Industry EN 50081 2 1993 EN ...

Page 132: ...terference suppression Pulse shaped interference The following table shows the electromagnetic compatibility of modules with regard to pulse shaped interference Pulse shaped interference Tested with Corresponds to severity Electrostatic discharge n accordance with IEC 801 2 DIN VDE 0843 Part 2 8 kV 4 kV 3 air discharge 2 contact discharge Burst pulses rapid transient interfer ence in accordance wi...

Page 133: ...c to ENV 50141 corresponds to IEC 801 6 high frequency asymmetric amplitude modulated From 0 15 to 80 MHz 10 V RMS unmodulated 80 AM 1 kHz 150 W source impedance Emission of radio interference Emitted interference of electromagnetic fields in accordance with EN 55011 Limit Value Class A Group 1 From 20 to 230 MHz 30 dB mV m Q From 230 to 1000 MHz 37 dB mV m Q measured at a distance of 30 m Emitted...

Page 134: ... deployment If you use the C230 2 in residential areas ensure that the criteria in respect of the emission of radio interference comply with Limit Value Class B in accordance with EN 55011 Recommendation Install the C230 2 in grounded metal cabinets e g 8MC cabi nets see Catalog NV 21 Incorporate filters in the supply lines ...

Page 135: ...for the operation of the C230 2 Operational conditions The C230 2 is not protected against the weather and intended for non mobile use Operational conditions surpass the requirements set out in IEC 1131 2 The C230 2 meets the operational conditions for Class 3C3 in accordance with DIN EN 60721 3 3 use at locations with a high density of traffic and in close prox imity to industrial plants with che...

Page 136: ... Humidity RH load ing factor 2 in accordance with IEC 1131 2 Air pressure From 1080 to 795 hPa Corresponds to an altitude of 1000 to 2000 m Contaminant concentra tion SO2 0 5 ppm Relative humidity 60 no moisture condensation H2S 0 1 ppm Relative humidity 60 no moisture condensation Test 10 ppm 4 days 1 ppm 4 days Mechanical environmental conditions The mechanical environmental conditions for the C...

Page 137: ...ion on the type and extent of tests of mechan ical environmental conditions Test for Test standard Remarks Vibration Vibration test to IEC 68 Part 2 6 sinu soidal Severity 12 Vibration type Frequency sweeps with a rate of change of 1 octave per minute 10 Hz v f v 58 Hz constant amplitude 0 075 mm 58 Hz v f v 500 Hz constant acceleration 1 g Period of oscillation 10 frequency sweeps per axis in all...

Page 138: ... to DIN rail required Protection against foreign bodies and water Degree of protection IP 20 in accordance with IEC 529 i e protection against con tact with standard test fingers In addition Protection against foreign bodies with diameters greater than 12 5 mm No special protection against water A 5 Rated voltage to operate the C230 2 The C230 2 operates at a rated voltage Table A 1 lists the rate...

Page 139: ...can be initiated immediately S Monitoring the most important control components through online tests watch dog for C230 2 etc From the point of view of safety engineering these procedures are considered to be basic measures They avoid or control the majority of faults that may occur The risk Special safety standards must be applied to any system and therefore to the situ ation as well where if a f...

Page 140: ...s are made as regards safety in the area that is not safety critical because an electronic fault would not have any effect on the safety of the system However in the safety critical area only controls and circuits that meet the relevant specifications may be used Important note Even if the project design of an electronic control ensures that it provides maxi mum possible safety by virtue of its de...

Page 141: ...B 141 E Siemens AG 2003 All rights reserved SIMOTION C230 2 04 2003 Edition EC Declaration of Conformity B ...

Page 142: ...onents are used it is also permissible for the components to be mounted outside the cabinet Cable length between cabinet and external components 3 m 2 2 panel S All components that are indicated in the order documentation as being approved for use with SIMOTION C230 C230 2 comply with the Directive 89 336 EEC when they are used in this combination S See Appendix C for information on compliance wit...

Page 143: ... technical specification on emitted interference in an industrial environment EN 61000 6 2 3 Basic standards Area tested EN 61000 4 2 A1 4 Static discharge EN 61000 4 3 A1 5 Radio frequency radiation amplitude modulated EN 61000 4 4 6 Rapid transients bursts EN 61000 4 6 7 RF radiation on lines EN 61000 4 8 8 Magnetic fields with power engineering frequencies EN 61000 4 11 9 Voltage dips and break...

Page 144: ...EC Declaration of Conformity B 144 E Siemens AG 2003 All rights reserved SIMOTION C230 2 04 2003 Edition ...

Page 145: ...trostatically Sensitive Devices the abbreviation ESD is used interna tionally Electrostatically sensitive devices are identified by the following symbol Caution Electrostatically sensitive devices can be irreparably damaged by voltages that are far lower than anything a person can perceive These voltages occur if you touch a component or the electrical connection for a module without discharging a...

Page 146: ...ulate an electrostatic charge Fig C 1 indicates the maximum electrostatic voltages that can accumulate in a person who is operating equipment when he she comes into contact with the mate rials shown in the Figure These voltages comply with the data in IEC 801 2 Voltage in kV 1 2 3 4 5 6 7 8 9 10 11 12 13 14 15 16 kV 5 10 20 30 40 50 60 70 80 90 100 Relative humidity in 1 3 1 Synthetic material 2 W...

Page 147: ...This is how you can avoid static Avoid direct contact Never touch electrostatically sensitive devices if this can be avoided e g during maintenance work When you touch modules make sure that you do not touch either the pins on the components or the printed conductor If you follow these in structions electrostatic discharge cannot reach or damage sensitive compo nents If you have to take measuremen...

Page 148: ...Directive for the Handling of Electrostatically Sensitive Devices ESD C 148 E Siemens AG 2003 All rights reserved SIMOTION C230 2 04 2003 Edition ...
Page 149: ... No 6AU1 900 0AD30 0BA0 04 2003 Edition 3 SIMOTION MCC Programming Guide For the graphical SIMOTION programming language Motion Control Chart Order No 6AU1 900 0AF30 0BA0 04 2003 Edition 4 SIMOTION ST Programming Guide For the textual SIMOTION programming language Structured Text Order No 6AU1 900 0AG30 0BA0 04 2003 Edition 5 SIMOTION LAD Programming Guide For the graphical SIMOTION programming la...

Page 150: ...ating principle of the technology objects Output Cam External Encoder and Measuring Input and TController Order No 6AU1 900 0CC30 0BA0 04 2003 Edition 11 SIMOTION Motion Control Technology Functions Synchronous Operation Description of Functions Describes the operating principle of the technology objects Gearing and Camming for Motion Control Order No 6AU1 900 0CD30 0BA0 04 2003 Edition 12 SIMOTIO...

Page 151: ...Order No 6AU 1900 0CU30 0BA0 04 2003 Edition Documentation regarding Hardware This documentation package contains document 21 to 25 Order No 6AU1 900 0BB30 0BA0 04 2003 Edition 21 SIMOTION C230 2 Equipment Manual For CPU based hardware in the SIMOTION product range Order No 6AU1 900 0AB30 0BA0 04 2003 Edition 22 SIMOTION P350 Equipment Manual For PC based hardware in the SIMOTION product range Ord...

Page 152: ...AU1 900 0AV30 0BA0 04 2003 Edition 30 Supplement to the Serial Interface Module ET 200S Manual Order No 6AU1 900 0AW30 0BA0 04 2003 Edition 31 Standard Functions to Control Axes Manual Order No 6AU1 900 0BG30 0BA0 04 2003 Edition 32 Standard Functions for Roller Feed Manual Order No 6AU1 900 0CR30 0BA0 33 Reading and Writing Drive Data Manual Order No 6AU1 900 0AX30 0BA0 04 2003 Edition 34 Standar...

Page 153: ...BA0 02 2003 Edition Product information Product information is available through the product CD only 39 SIMATIC NET for SIMOTION Product Information SIMATIC Manual Collection incl SIMATIC NET 02 2003 Edition 40 Interfacing SIMOVERT MASTERDRIVES with Standard Telegram 5 Product Information Commissioning with SCRIPT FILES Drive ES SIMOVIS 02 2003 Edition 41 Interfacing SIMODRIVE 611U to SIMOTION Pro...

Page 154: ...log CA 01 Ordering Catalog Order No E86060 D4001 A100 B8 7600 46 Automation Systems for Machine Tools Catalog NC 60 Ordering Catalog Order No E86060 K4460 A101 A9 7600 47 Accessories and Equipment for Special Machines Catalog NC Z Ordering Catalog Order No E86060 K4490 A101 B1 7600 48 SIMATIC Components for Totally Integrated Automation Catalog ST 70 Ordering Catalog Order No E86060 K4670 A111 A8 ...

Page 155: ... Configuring and Parameterizing Order No 6ES7 341 1AH00 8BA0 04 2000 Edition 55 SIMATIC Functions Module FM 350 1 Manual Configuring and Parameterizing These manuals are part of the documentation package with Order No 6ES7 350 1AH00 8BG0 08 2000 Edition 56 SIMATIC Counter Module FM 350 2 Manual Configuring and Parameterizing These manuals are part of the documentation package with Order No 6ES7 35...

Page 156: ...IVE POSMO A User s Guide Distributed positioning motor on PROFIBUS DP Order No 6SN2 197 0AA00 0BP4 08 2002 Edition 64 SIMODRIVE 611 Universal Description of Functions Closed loop control component for speed control and positioning Order No 6SN1 197 0AB20 0BP5 02 2002 Edition 65 SIMOVERT MASTERDRIVES Motion Control Compendium Order No 6SE7 080 0QX50 01 2002 Edition 66 Distributed Servo Drive Techno...

Page 157: ...127 Cable lengths in subnet 7 105 Cables shielded connecting 6 99 CE marking A 131 Changing memory card 8 114 Clearances 4 59 Clock 3 46 Components for PROFIBUS DP subnet 7 103 7 106 Configuration Electrical project design 6 80 Horizontal 4 58 Layout of modules 4 61 4 62 Project design 4 58 Vertical 4 58 Connecting Bus connector 7 108 PG PC 8 113 Connecting cable 6 84 Ethernet bus cable 6 84 Measu...

Page 158: ...al encoder 3 36 Inserting memory card 8 114 Installation 4 64 Installing Modules 4 67 Mounting rails 4 64 Insulation testing A 138 Interconnection module 4 62 Connection cable 4 62 Interface positions 3 20 Interfaces 3 21 3 25 3 27 3 32 3 35 3 41 Analog drive interface 3 32 Drive interface 3 21 3 27 Ethernet interface 3 21 3 25 I O interface 3 21 3 41 Measuring system interface 3 21 3 35 Memory mo...

Page 159: ...ection against electrical phenomena 6 81 Protection rating A 138 Protective conductor connection on mounting rail 4 66 Pulse shaped interference A 132 R Radio interference emission of A 133 Rated voltages A 138 READY output 3 45 3 54 Removing C230 2 9 127 Rules for laying PROFIBUS bus cables 7 107 RUN 3 24 S Safety class A 138 Safety of Electronic Controls A 138 Safety regulations 6 79 Emergency s...

Page 160: ...iemens AG 2003 All rights reserved SIMOTION C230 2 04 2003 Edition W Weight 3 52 Wiring 6 79 Wiring diagram 6 82 Wiring the front connector 6 96 Writing the memory card 8 116 Writing formatting the Micro Memory Card 8 117 ...

Page 161: ... _ _ _ _ _ _ _ _ Your Company _ _ _ _ _ _ _ _ _ _ _ _ _ _ _ _ _ _ _ _ _ _ _ _ _ _ _ _ _ _ _ Street _ _ _ _ _ _ _ _ _ _ _ _ _ _ _ _ _ _ _ _ _ _ _ _ _ _ _ _ _ _ _ City _ _ _ _ _ _ _ _ _ _ _ _ _ _ _ _ _ _ _ _ _ _ _ _ _ _ _ _ _ _ _ Phone _ _ _ _ _ _ _ _ _ _ _ _ _ _ _ _ _ _ _ _ _ _ _ _ _ _ _ _ _ _ _ Please check the industry that applies to you r Automotive r Chemical r Electrical Machinery r Food r In...

Page 162: ... _ _ _ _ _ _ _ _ _ _ _ _ _ _ _ _ _ _ _ _ _ _ _ _ _ _ _ _ _ _ _ _ _ _ _ _ _ _ _ _ _ _ _ _ _ _ _ _ _ _ _ _ _ _ _ _ _ _ _ _ _ _ _ _ _ _ _ _ _ _ _ _ _ _ _ _ _ _ _ _ _ _ _ _ _ _ _ _ _ _ _ _ _ _ _ _ _ _ _ _ _ _ _ _ _ _ _ _ _ _ _ _ _ _ _ _ _ _ _ _ _ _ _ _ _ _ _ _ _ _ _ _ _ _ _ _ _ _ _ _ _ _ _ _ _ _ _ _ _ _ _ _ _ _ _ _ _ _ _ _ _ _ _ _ _ _ _ _ _ _ _ _ _ _ _ _ _ _ _ _ _ _ _ _ _ _ _ _ _ _ _ _ _ _ _ _ _ _ _ _...

Reviews: