background image

Engineering and remote access 


7.6 Cyclic and acyclic data 


PSU8600power supply systems 

218


Manual, 04.2016, A5E35883207-7-76 

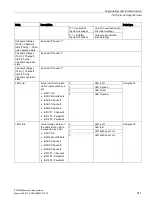
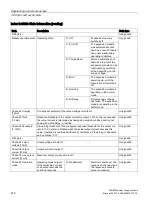
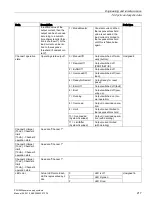
Data 

Description 

Data type 


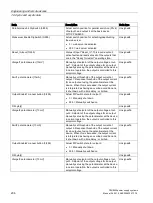
Bit0/1: OK 


Bit2/3: Channel1 


Bit4/5: Channel2 


Bit6/7: Channel3 


Bit8/9: Channel4 


Bit10-15: unused = 0 

LED lit yellow 

LED state 

Actual display status of 

the LEDs. Each LED is 

represented by 2 bits: 


Bit0/1: OK 


Bit2/3: Channel1 


Bit4/5: Channel2 


Bit6/7: Channel3 


Bit8/9: Channel4 


Bit10-15: unused = 0 

LED is off 

Unsigned16 

LED lights up 

LED flashes at 1 Hz 

LED flashes at 2 Hz 

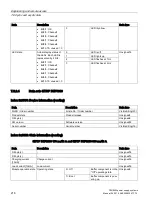
7.6.2.4


Data sets SITOP BUF8600 

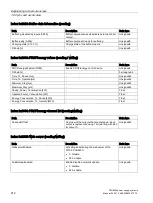
Index 0x0006: Device information (reading) 


Data 

Description 

Data type 

MLFB / Order number 

Article No. / Order number 

VisibleString(20) 

Product state 

Product release 

Unsigned8 

Fill byte(s) 

Unsigned8 

SW version 

Software version 

Unsigned32 

Serial number 

Serial number 

VisibleString(16) 

Index 0x0020: State information (reading) 

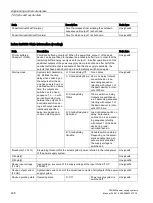
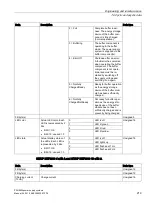
SITOP BUF8600 100 ms/40 A and SITOP BUF8600 300 ms/40 A 


Data 

Description 

Data type 

Fill byte(s) 

Unsigned16 

Fill byte(s) 

Unsigned16 

Charging current 

[10mA] 

Charge current 

Unsigned16 

Load current [10mA] 

Load current 

Unsigned16 

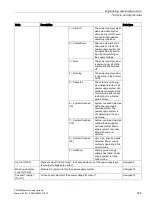
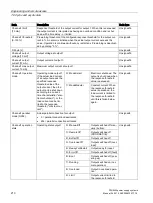
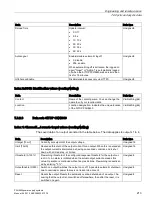
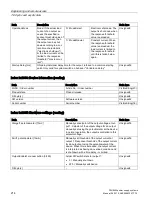
Module operation state  Operating state 

0 = Off 

Buffer component is in the 

"Off" operating state. 

Unsigned8 

1 = Boot 

Buffer component is pow-

ering up. 

Summary of Contents for SITOP BUF8600

Page 1: ...10 A 6EP3437 8MB00 2CY0 SITOP CNX8600 4 x 5 A 6EP4436 8XB00 0CY0 SITOP CNX8600 4 x 10 A 6EP4437 8XB00 0CY0 SITOP BUF8600 100 ms 40 A 6EP4297 8HB00 0XY0 SITOP BUF8600 300 ms 40 A 6EP4297 8HB10 0XY0 SITOP BUF8600 4 s 40 A 6EP4293 8HB00 0XY0 SITOP BUF8600 10 s 40 A 6EP4295 8HB00 0XY0 04 2016 A5E35883207 7 76 Overview Safety instructions 1 Description device design dimension drawing 2 Operator control...

Page 2: ...rated only by personnel qualified for the specific task in accordance with the relevant documentation in particular its warning notices and safety instructions Qualified personnel are those who based on their training and experience are capable of identifying risks and avoiding potential hazards when working with these products systems Proper use of Siemens products Note the following WARNING Siem...

Page 3: ...odules SITOP CNX8600 The voltage of each output can be adjusted in the range 5 28 V Electronic overload shutdown for each output the response threshold can be adjusted Integrated Ethernet PROFINET interfaces 2 port switch Diagnostics data and alarm messages available via Ethernet PROFINET Outputs can be switched controlled from a program and parameterized via Ethernet PROFINET Completely integrate...

Page 4: ... Buffer modules SITOP BUF8600 100 ms 40 A buffer module 300 ms 40 A buffer module 4 s 40 A buffer module 10 s 40 A buffer module 6EP4297 8HB00 0XY0 6EP4297 8HB10 0XY0 6EP4293 8HB00 0XY0 6EP4295 8HB00 0XY0 Validity This manual provides information on the following products Basic device SITOP PSU8600 24 V DC 20 A 4 5 A PN Article number 6EP3436 8MB00 2CY0 Product state 1 Firmware version V1 1 First ...

Page 5: ...OP BUF8600 100 ms 40 A Article number 6EP4297 8HB00 0XY0 Product state 1 Firmware version V1 1 Functional expansion with respect to the previous version Buffer operation can be activated deactivated via a remote command Buffer module SITOP BUF8600 300 ms 40 A Article number 6EP4297 8HB10 0XY0 Product state 1 Firmware version V1 1 Functional expansion with respect to the previous version Buffer ope...

Page 6: ...Overview PSU8600power supply systems 6 Manual 04 2016 A5E35883207 7 76 ...

Page 7: ... 35 2 7 Signaling contact control contact 37 2 7 1 Basic devices 37 2 7 2 Buffer modules 38 2 8 Block diagrams 40 2 9 Dimensions and weights 42 3 Operator control at the device 51 3 1 Setting the output voltage and response threshold value of the output current 53 3 1 1 Setting the output voltage 53 3 1 2 Setting the response threshold value of the output current 54 3 2 Switching in and switching ...

Page 8: ...pplementary modules 101 5 2 3 SITOP PSU8600 4 x 10 A basic device 103 5 2 4 SITOP PSU8600 4 x 10 A basic device and supplementary modules 105 6 Installation 107 6 1 Line side connection 107 6 2 Output side connection 109 6 3 Connecting the signaling contact reset terminal 111 6 4 Establishing a PROFINET connection 113 6 5 Establishing an additional ground connection 114 6 6 Connecting the control ...

Page 9: ...b server user interface 167 7 5 3 Functions of the web server 168 7 5 4 Loading the configuration commissioning 170 7 5 5 Diagnostics 170 7 5 5 1 Alarms 170 7 5 5 2 Operating data 172 7 5 5 3 Online functions 173 7 5 6 HW configuration 177 7 5 6 1 Configuring the PROFINET interface 179 7 5 6 2 Web server settings user administration 180 7 5 6 3 Configuring SITOP PSU8600 183 7 5 6 4 Loading and sav...

Page 10: ...35 9 6 MTBF 236 9 7 Mechanical system 237 9 8 Accessories 239 9 9 Dimension drawings 239 10 Safety approvals EMC 241 10 1 Safety 241 10 2 Test voltages 242 10 3 Approvals 243 10 4 EMC 244 11 Environmental conditions 245 12 Applications 247 12 1 Protection against brief power failures 247 12 2 Protecting against longer power failures 248 13 Environment 249 14 Service support 251 ...

Page 11: ...ult in death or serious injury Siemens provides products and solutions with industrial security functions that support the secure operation of plants solutions machines equipment and or networks They are important components in a holistic industrial security concept With this in mind Siemens products and solutions undergo continuous development Siemens recommends strongly that you regularly check ...

Page 12: ...Safety instructions PSU8600power supply systems 12 Manual 04 2016 A5E35883207 7 76 ...

Page 13: ... as the individual outputs The electronic overload shutdown is reset using the reset input and the buttons of the outputs Additional special functions of the devices can be activated using selector DIP switches The outputs of the devices can be controlled operating and diagnostics data transferred and externally visualized or processed via the two integrated industrial Ethernet PROFINET ports An i...

Page 14: ...Volt terminal Signaling contact remote reset Ethernet PROFINET interface LEDs OK MAN SF RUN P1 P2 DIN rail slider Convection Clearance above below Socket at the upper side of the device for the plug connection to optional expansion mod ules Buttons of the outputs with LEDs ON OFF RST Voltage potentiometer Current potentiometer from Selector switch special functions ...

Page 15: ...vidual outputs A maximum of four expansion modules can be used for each basic device The connection to the basic device or to the adjacent module is established using an integrated connecting plug Expansion module versions Designation Number of outputs Max current per output Article No 4 5 A expansion module 4 5 A 6EP4436 8XB00 0CY0 4 10 A expansion module 4 10 A 6EP4437 8XB00 0CY0 Connecting plug...

Page 16: ...t module is established using an integrated connecting plug For brief power failures the outputs of the power supply system are supplied without interruption using the energy stored in the buffer module Buffer module versions There are two BUF8600 buffer module versions available Buffer modules with electrolytic capacitors and buffer modules with double layer capacitors Table 2 2 BUF8600 buffer mo...

Page 17: ... When the buffer module with electrolytic capacitors is completely charged LED O K lights green power failures of 100 ms or 300 ms can be buffered with a load current of 40 A The buffer time is correspondingly increased for lower load currents Table 2 3 BUF8600 buffer modules with double layer capacitors Designation Buffer time Charge time for a rated input voltage of 400 V Article number 4 s 40 A...

Page 18: ...or additional modules Socket at the upper side of the device for the plug connection to additional modules O K LED Remote ON OFF and signaling contacts DIN rail slider Convection Clearance above below When the buffer module with double layer capacitors is completely charged LED O K lights green power failures of 4 s or 10 s can be buffered with a load current of 40 A The buffer time is correspondi...

Page 19: ... down in plenty of time before the buffer time expires in order to avoid data being lost If the supply voltage returns after the shutdown has already started the buffer mode is exited and the power supply resumes normal operation However the PC is run down completely If the PC does not have an ON OFF switch then it can only be rebooted by switching off the power supply and switching it on again Wh...

Page 20: ...5E35883207 7 76 module is completely charged LED O K lights green power failures of 3 s up to a maximum of 8 s can be buffered with a load current of 40 A However the Longlife mode is only possible when appropriately configured web server STEP 7 You can find additional information in Chapter Engineering and remote access Page 117 ...

Page 21: ...gnaling contact The reset terminal is used to remotely reset the electronic overload trip At the Ethernet PROFINET interface Ethernet PROFINET cable RJ plug connection 8P8C is connected for PROFINET operation Connections and terminal designations Line input L1 L2 L3 PE Plug in terminal with a screw connection Outputs 1 2 3 4 Two plug in terminals with screw connection for each output 0 Volt termin...

Page 22: ...NNEL link The interface corresponds to the standard full duplex up to 100 Mbit s electrical 100BASE TX according to IEEE 802 3 Properties of the interface Transfer rate 10 100 Mbit s Two RJ45 sockets i e integrated switch for RJ45 connector cable type 100Base TX CAT5 Auto negotiation Auto crossover communication via TCP IP and PROFINET The physics of the Ethernet PROFINET interface are implemented...

Page 23: ... connection to the basic device and to additional supplementary modules can be established using ground terminal Connections and terminal designations Outputs 1 2 3 4 Two plug in terminals with screw connection for each output Ground terminal GND Plug in terminal with three screw connections See the diagram under Description of the expansion modules Page 15 Terminal data 6EP4436 8XB00 0CY0 6EP4437...

Page 24: ... deactivated and or buffer mode exited Using signaling contact Sufficient buffer readiness RDY it can be interrogated as to whether the buffer module has reached an adequate charge state Using signaling contact Buffer mode OK the system signals that it is currently in the buffer mode Connections and terminal designations Control contact ON X1 X2 Common plug in terminal each with a screw connection...

Page 25: ...ing glass in the diagram No Designation labeling Function Voltage potentiome ter U V Sets the voltage of the relevant output see Setting the output voltage and response threshold value of the output current Page 53 Current potentiome ter I A Sets the response threshold of the output current of the relevant output see Setting the response threshold value of the output current Page 54 LED buttons ON...

Page 26: ... The operating elements with the exception of the buttons are protected against unauthorized operation by a transparent plastic cover When required this plastic cover can be sealed to prevent the operating elements being actuated by unauthorized personnel For sealing the sealing wire can be routed through an opening in the plastic cover and housing as shown in the diagram below See also Setting th...

Page 27: ...t see Setting the output voltage Page 53 Current potentiometer I A Sets the response threshold of the output current of the relevant output see Setting the response threshold value of the output current Page 54 LED buttons ON OFF RST Switches in and switches out the various outputs or resets the particu lar outputs after an electronic shutdown see Switching in and switch ing out outputs Page 55 as...

Page 28: ...drawing 2 5 Operator controls PSU8600power supply systems 28 Manual 04 2016 A5E35883207 7 76 See also Setting the output voltage and response threshold value of the output current Page 53 Overload shutdown and carrying out a reset Page 56 ...

Page 29: ...ols indicate the significance of each LED which are listed in the following table Signaling LED is off LED is continuously on x y LED flashes in the interval x s on and y s off 2 6 1 Basic devices No Labeling Signal type Signaling OK LED Device status MAN LED Mode SF LED Group error RUN LED RUN STOP P1 P2 LED Receive transmit port 1 and port 2 ON OFF RST LED buttons Operating state of the particul...

Page 30: ...stem overload Internal device fault Flashing red 0 25 0 25 Device ready for the automatic ERROR OFF shutdown to be reset or after a firmware update has been completed by switching off the supply voltage and switching it on again power OFF ON Incorrect hardware configuration REMOTE mode Yellow Power failure buffer mode active Flashing yellow 0 25 0 25 System overload in buffer mode Total output pow...

Page 31: ...on started successfully module OK Red Green Application started successfully module not OK Flashing red 0 1 0 1 Green Application running diagnostics can be called Flashing red 0 5 0 5 Off Device identification requested via DCP LED flashes for 3 s Flashing red 0 5 0 5 Flashing green 0 5 0 5 Firmware update Table 2 7 LED P1 P2 Signaling Off Device is OFF or is not connected with the controller Gre...

Page 32: ...d value for the duration of the overload CONSTANT CURRENT mode to the rated value for 60 s for system overload Red Output automatically shut down due to Overload exceeding the permissible time range ELECTRONIC SHUTDOWN mode Output 1 prioritized for buffer mode Overtemperature of the output in pairs Flashing red 0 25 0 25 After automatic shutdown due to overload or overtemperature output is ready f...

Page 33: ...nsion drawing 2 6 Displays PSU8600power supply systems Manual 04 2016 A5E35883207 7 76 33 2 6 2 Expansion modules No Labeling Signal type Signaling OK LED Device status ON OFF RST LED buttons Operating state of the particular output ...

Page 34: ... Firmware being updated Table 2 11 LED ON OFF RST Signaling Off Device is off or is powering up booting Or ERROR OFF shutdown Or incorrect hardware configuration REMOTE mode Or firmware being updated completed Green Normal operation output current response threshold value Flashing green 0 25 0 25 Overload at the output Output current 101 150 of the response threshold up to 149 operation permissibl...

Page 35: ...Description device design dimension drawing 2 6 Displays PSU8600power supply systems Manual 04 2016 A5E35883207 7 76 35 2 6 3 Buffer modules No Labeling Signal type Signaling OK LED Device status ...

Page 36: ...ue to overtemperature basic device phase dissymmetry Fault in the device or communication error to the basic device flashing red 1 1 Module deactivated via ON OFF contact or remote command no buffering when the power fails Flashing red 0 25 0 25 Device ready for the automatic ERROR OFF shutdown to be reset or after a firmware update has been completed by switching off the supply voltage and switch...

Page 37: ... ready all outputs are switched on or shut down either manually or via control com mand 11 12 closed quiescent state 11 14 open quiescent state In the ELECTRONIC SHUTDOWN mode One or several outputs shut down due to overload Other possible causes No output voltage e g as there is no supply voltage Basic device and supplementary modules shut down due to overtemperature Basic device and supplementar...

Page 38: ...tem deactivated when the power fails the system is not buffered The signaling contact Sufficient buffer readiness RDY is in the form of a relay contact NO contact terminals 13 and 14 and signals that the buffer module is charged to x factory setting 85 and is therefore ready for buffering The threshold value can be freely parameterized via Industrial Ethernet PROFINET interface For two BUF8600 buf...

Page 39: ... both modules simultaneously signal buffer mode using the signaling contact As a consequence it is sufficient to wire one of the two contacts The signal Buffer mode refers exclusively to the BUF8600 buffer modules with double layer capacitors in the system BUF8600 buffer modules with electrolytic capacitors in the system are not taken into account Signaling contact Explanation 23 24 open quiescent...

Page 40: ...escription device design dimension drawing 2 8 Block diagrams PSU8600power supply systems 40 Manual 04 2016 A5E35883207 7 76 2 8 Block diagrams Basic SITOP PSU8600 device Expansion modules SITOP CNX8600 ...

Page 41: ...nsion drawing 2 8 Block diagrams PSU8600power supply systems Manual 04 2016 A5E35883207 7 76 41 SITOP BUF8600 100 ms 40 A and SITOP BUF8600 300 ms 40 A buffer modules SITOP BUF8600 4 s 40 A and SITOP BUF8600 10 s 40 A buffer modules ...

Page 42: ...imension drawing 2 9 Dimensions and weights PSU8600power supply systems 42 Manual 04 2016 A5E35883207 7 76 2 9 Dimensions and weights SITOP PSU8600 basic devices Image 2 2 Dimension drawing 6EP3436 8MB00 2CY0 front and left views ...

Page 43: ...Description device design dimension drawing 2 9 Dimensions and weights PSU8600power supply systems Manual 04 2016 A5E35883207 7 76 43 Image 2 3 Dimension drawing 6EP3436 8MB00 2CY0 view from below ...

Page 44: ...Description device design dimension drawing 2 9 Dimensions and weights PSU8600power supply systems 44 Manual 04 2016 A5E35883207 7 76 Image 2 4 Dimension drawing 6EP3437 8MB00 2CY0 front and left views ...

Page 45: ...Description device design dimension drawing 2 9 Dimensions and weights PSU8600power supply systems Manual 04 2016 A5E35883207 7 76 45 Image 2 5 Dimension drawing 6EP3437 8MB00 2CY0 view from below ...

Page 46: ...g 2 9 Dimensions and weights PSU8600power supply systems 46 Manual 04 2016 A5E35883207 7 76 Expansion modules SITOP CNX8600 The dimensions are identical for both versions Image 2 6 Dimension drawing for 6EP4436 8XB00 0CY0 and 6EP4437 8XB00 0CY0 ...

Page 47: ...ription device design dimension drawing 2 9 Dimensions and weights PSU8600power supply systems Manual 04 2016 A5E35883207 7 76 47 Buffer modules SITOP BUF8600 Image 2 7 Dimension drawing 6EP4297 8HB00 0XY0 ...

Page 48: ...Description device design dimension drawing 2 9 Dimensions and weights PSU8600power supply systems 48 Manual 04 2016 A5E35883207 7 76 Image 2 8 Dimension drawing 6EP4297 8HB10 0XY0 ...

Page 49: ...evice design dimension drawing 2 9 Dimensions and weights PSU8600power supply systems Manual 04 2016 A5E35883207 7 76 49 Image 2 9 Dimension drawing 6EP4293 8HB00 0XY0 Image 2 10 Dimension drawing 6EP4295 8HB00 0XY0 ...

Page 50: ...x 2 0 kg 2 65 kg Expansion modules SITOP CNX8600 6EP4436 8XB00 0CY0 4 x 5 A 6EP4437 8XB00 0CY0 4 x 10 A Dimensions W H D in mm 60 125 150 60 125 150 Weight Approx 1 15 kg Approx 1 15 kg Buffer modules SITOP BUF8600 6EP4297 8HB00 0XY0 100 ms at 40 A 6EP4297 8HB10 0XY0 300 ms at 40 A 6EP4293 8HB00 0XY0 4s at 40 A 6EP4295 8HB00 0XY0 10 s at 40 A Dimensions W H D in mm 60 125 150 125 125 150 60 x 125 ...

Page 51: ...uttons and selector switches All operator controls are located at the front Note Settings made at the basic device using the voltage potentiometer current potentiometer and DIP switches are only made in the MANUAL mode see MANUAL and REMOTE operating modes Page 59 These operator controls are deactivated in the REMOTE mode The outputs can be switched on switched off and reset in any mode using butt...

Page 52: ...ntiometers and and buttons All operator controls are located at the front Note Settings made at the expansion module using voltage potentiometer and current potentiometer are only made in the MANUAL mode see MANUAL and REMOTE operating modes Page 59 These operator controls are deactivated in the REMOTE mode The outputs can be switched on switched off and reset in any mode using buttons ...

Page 53: ... REMOTE operating modes Page 59 changes made to the settings of the potentiometer for the output voltage and response threshold value of the output current have no effect Assigning the potentiometers to the outputs Output number Voltage potentiometer for the particular output Current potentiometer for the particular output 3 1 1 Setting the output voltage 1 Using the appropriate screwdriver rotate...

Page 54: ... of the output current 1 Using the appropriate screwdriver rotate the current potentiometer for the corresponding output so that the notch in the inner ring points to the required value the following diagram shows a setting for 2 A Depending on the type at the basic devices and expansion modules values of 0 5 to 5 A or from 0 5 to 10 A can be set When delivered the output current is set to the max...

Page 55: ...ow output manually switched off Note An output that has been manually switched off LED in the button is lit yellow can only be manually switched on again by manually pressing the button again It is neither possible to switch on an output that has been manually switched off using remote RESET nor using a control command in the REMOTE operating mode An output that has been manually switched off LED ...

Page 56: ...meter is continuously permissible LED ON OFF RST of the output is lit green In the range 101 149 of the setting value of the current potentiometer an overload current is permissible for 5 seconds LED ON OFF RST of the output flashes green then the output is electronically shut down LED ON OFF RST of the output is lit red In the range 149 of the setting value of the current potentiometer the curren...

Page 57: ...c shutdown as a result of an overload condition This is signaled using LED ON OFF RST in button LED in the but ton Meaning handling Lit red Electronic shutdown as a result of an overload wait time until a reset is possible 5 seconds Flashes red Output ready for a reset press the button to switch on the output again Lit green The reset was carried out the output was switched on again Procedure 1 Af...

Page 58: ...reset signal The non isolated 24 V input referred to terminal 0V of the device at terminal RST can be used A reset is carried out for an input level of 15 V for at least 100 ms Procedure Connect a voltage of 15 V for at least 100 ms to terminal RST The reset is carried out Note Using a remote reset signal at terminal RST all outputs that were shut down electronically due to an overload are reset a...

Page 59: ...he output is lit yellow Automatic shutdown due to overload LED ON OFF RST of the output is lit red or Ready for reset LED ON OFF RST of the output flashes red then these operating states are assumed again when the system starts In the REMOTE mode the operating states and parameters of the outputs can be changed in operation controlled by the program Note In the REMOTE mode in some instances extend...

Page 60: ...o activate the MANUAL mode Note When switching over from the REMOTE into the MANUAL mode in operation the outputs maintain their particular state Initially the reference parameters for remote operation remain active The voltage and current values can be changed by actuating the potentiometers at the device or as the case may be once the remote setpoints have been fallen below The DIP switches only...

Page 61: ...ially maintain their particular state The settings of the potentiometers and DIP switches at the device remain active until the new reference parameters can be loaded into the device from an associated control system This can happen undesirably as a result of a lost connection or when establishing a connection to the control for the first time and can cause a sudden change of the device operating ...

Page 62: ...y available buffer time for the remaining duration of the power failure LEDs ON OFF RST of the outputs that have been shut down are lit red When the line supply returns the outputs that have been shut down are automatically switched on again For the basic device type the nominal buffer time is typically 15 ms the buffer time can be extended using additional buffer modules Note The prioritization w...

Page 63: ... priority when buffering is required Prioritizing output 1 during buffering With the power supply system shut down bring DIP switch PRY 1 into position ON right so that output 1 of the basic device has priority when buffering is required Note Outputs 2 n which are shut down when the power fails as output 1 has priority are automatically switched on again when the line supply returns Note When outp...

Page 64: ... overload current is continually permissible U I curve according to a defined characteristic The overload current is limited to a maximum of 150 of the setting value of the current potentiometer for a duration of 5 seconds LED ON OFF RST of output 4 quickly flashes green the current is then limited to 100 of the setting value LED ON OFF RST of output 4 slowly flashes green as long as there is an o...

Page 65: ...e power supply system shut down bring DIP switch UI 4 into position OFF left to activate the ELECTRONIC SHUTDOWN mode Constant current With the power supply system shut down bring DIP switch UI 4 into position ON right to activate the CONSTANT CURRENT mode Note When outputs 3 and 4 are connected in parallel the defined overload response CONSTANT CURRENT applies to the common output ...

Page 66: ...00 ms for the previous output n it is additionally checked as to whether the output current lies below the selected response threshold value Output n 1 is switched on as soon as this is the case Outputs that have been shut down are not taken into account and are skipped Note The on delay time may only be switched over when the power supply system is in a no voltage state Note The on delay includes...

Page 67: ...3 7 Setting the on delay PSU8600power supply systems Manual 04 2016 A5E35883207 7 76 67 No on delay With the power supply system shut down bring both DIP switches STDA and STDB into position OFF left to deactivate on delay STDA STDB ...

Page 68: ...TDB into position OFF left in order to set the on delay to 25 ms STDA STDB 100 ms on delay With the power supply system shut down bring DIP switch STDA into position OFF left and STDB into position ON right in order to set the on delay to 100 ms STDA STDB Load optimized on delay With the power supply system shut down bring both DIP switches STDA and STDB into position ON right to activate load opt...

Page 69: ...sic unit This increases the available current rating Outputs 1 and 2 or 3 and 4 of the basic unit can be operated in parallel The switchover to parallel operation means that the outputs involved are synchronized and controlled together Note The switchover to parallel operation is only permissible when the power supply system is in a no voltage state The switchover is made at selector switch see op...

Page 70: ...P3 4 outputs 3 and 4 in position ON right to activate the parallel connection P1 2 or P3 4 The LEDs with the designation Parallel assigned to the relevant outputs are lit green After switching on again the output connected in parallel is in the operating state manually shut down LED ON OFF RST of output 1 or 3 is lit yellow You can switch on the output again by pressing the appropriate button Valu...

Page 71: ...ed Wiring outputs connected in parallel When connecting outputs 1 and 2 or 3 and 4 in parallel at the output wiring should be established so that both outputs connected in parallel have the same cable impedance This means that the cables with the same length and with the same cross section are routed to a common connection point external terminal Note If the parallel wiring is not correctly implem...

Page 72: ... and messages signals Further the actual module configuration can be viewed if necessary changed and externally saved to a file and archived In addition it is possible to read the MANUAL configuration and to transfer this into the Remote configuration The switchover is made at the DIP switch see operating elements designated WEN When delivered DIP switch WEN is in the OFF position web server deact...

Page 73: ...dule Note No write access when the connection is active If the SITOP PSU8600 has an active connection to a control system relation application then the parameters can only be read accessed It is still possible to update the firmware and save and delete the alarm list If there is no active connection then parameters can also be write accessed via the web server You can find additional information a...

Page 74: ...ns Page 245 Identifying a shutdown due to an inadmissible temperature Basic device If an inadmissibly high temperature is detected inside the basic device all of the outputs of the basic device and the expansion modules being used are switched off A shutdown as a result of an inadmissibly high temperature inside the basic device is signaled by Red LED OK at the basic device and at the supplementar...

Page 75: ...r the component involved to cool down depends on the ambient temperature 1 Allow the components involved to cool down After the basic device has cooled down LED OK at the basic device flashes red 2 Switch off the power supply for the SITOP PSU8600 for at least 10 seconds 3 Switch on the supply voltage again The complete system including the state of the individual outputs is brought into the opera...

Page 76: ...device as a result of dissymmetry of the supply voltage Identifying a shutdown due to phase dissymmetry If the power supply system is operated with an unsymmetrical supply phase dissymmetry then this is signaled by a green flashing LED OK 1 at the basic device If at rated load the permissible duration of approx 10 min for an unsymmetrical supply is exceeded all of the outputs of the basic device a...

Page 77: ...utdown due to phase dissymmetry 1 Switch off the supply voltage of the SITOP PSU8600 for at least 10 seconds and remove the cause of the phase dissymmetry 2 Switch on the supply voltage again The complete system including the state of the individual outputs is brought into the operating state before the phase dissymmetry shutdown 3 10 3 System overload monitoring In order to permit brief higher sw...

Page 78: ...utputs ensure that the sum of the set response threshold values of the output currents does not exceed the total power rating current rating of the system Alternatively by suitably configuring the load duty cycle of the individual outputs you can prevent the total power from being exceeded Identifying a shutdown due to system overload When exceeding the permissible duration of the dynamic overload...

Page 79: ...ng state the expansion modules return to operational readiness This state is signaled by Green in buffer operation yellow LED OK at the basic device Green in buffer operation yellow LED OK of the expansion modules Red flashing LEDs ON OFF RST of the outputs of the expansion modules Procedure 1 Press the LED buttons of the outputs at the expansion modules The LEDs in the buttons light up green The ...

Page 80: ...t or system Instead of the wire jumper the contact is closed and this must have 10 Ohm in the closed state The buffer components are charged irrespective of whether contacts X1 and X2 are connected or not Activating buffer operation 1 Close the connection between terminals X1 and X2 When the power fails the power supply system is automatically buffered using the buffer components Deactivating buff...

Page 81: ...d in a housing or a control cabinet The SITOP PSU8600 power supply system is a built in device It must be installed in a housing or control cabinet to which only qualified personnel have access 4 1 Connecting plug The basic device and the system components are connected with one another using the connecting plug at the upper side of the devices The procedure to establish a connection is described ...

Page 82: ...prevent it from being reclosed If this instruction is not observed touching live parts can result in death or serious injury When installing in a control cabinet basic devices can be snapped onto standard mounting rails see Chapter Mechanical system Page 237 Position the device with the mounting rail guide at the upper edge of the standard mounting rail and press down to lock it into place If it i...

Page 83: ...tegrated at the upper side of the module housing 1 Position the supplementary module with the mounting rail guide at the upper edge of the standard mounting rail as close as possible to the basic device and press down 2 to lock it into place 3 If it is difficult to snap it into place simultaneously press the slider as described for mounting the basic device 4 Move the supplementary module so that ...

Page 84: ...ximum output current is 20 A or 40 A Expansion modules PSU8600 power supply system Type Article No SITOP CNX8600 4x 5 A 6EP4436 8XB00 0CY0 SITOP CNX8600 4x 10 A 6EP4437 8XB00 0CY0 Buffer modules maximum number and compatibility A maximum of two buffer modules can be used with a basic device Note It is possible to use different buffer modules in one system This means that a buffer time of 400 ms 10...

Page 85: ...ous injury NOTICE Risk of damage by breaking off the connecting plug The components can only be safely and reliably removed when the connecting plugs have been released Release the connecting plugs before removing or replacing the basic unit and supplementary modules 1 Switch the basic unit into a no voltage condition 2 Release all of the connections at the plug in terminals and if necessary the P...

Page 86: ...l 04 2016 A5E35883207 7 76 4 Pull up the slider using a screwdriver 5 Detach the basic unit from the lower edge of the standard mounting rail 6 Remove the basic unit from the lower edge of the standard mounting rail 7 If required repeat steps 4 to 6 for each supplementary module ...

Page 87: ...c device and supplementary modules NOTICE Risk of damage as result of jamming when withdrawing Withdrawing individual components without taking the appropriate care can damage adjacent components Withdraw components carefully without applying excessive force Replacing an expansion module is shown as example The procedure is similar for all components Removing installed components 1 Switch the basi...

Page 88: ...omponents PSU8600power supply systems 88 Manual 04 2016 A5E35883207 7 76 4 Release the connecting plug at the component to be replaced 5 Release the connecting plug at the component to the right if this is available 6 Pull up the slider using a screwdriver ...

Page 89: ...the modules 8 Withdraw the component to be released from the upper edge of the standard mounting rail Installing a new component 1 Position the new component with the mounting rail guide at the upper edge of the standard mounting rail and press down to lock it into place If it is difficult to snap it into place simultaneously press the slider as described for rail mounting 2 Remove the plastic cov...

Page 90: ...ing an individual component it is not absolutely necessary that the new component has to be reparameterized If an identical component was used as replacement the assigned control system identifies this and automatically parameterizes the new component with the settings of the predecessor component However we recommend that the manual settings are aligned with those of the component that has been r...

Page 91: ...600 When the system starts or a configuration is loaded the system compares the saved system data with the actual system configuration Article numbers of the individual components installed Serial numbers of the installed individual components Positions of the individual components in the system configuration Firmware versions of the installed individual components MANUAL operating mode In the MAN...

Page 92: ...ividual component it must be ensured that the new component has the same settings as the component that has been replaced in order to avoid an incorrect response and damage after you switch on again After replacing the component ensure that the wiring via the plug in terminals is correct Note For replacing components by an identical component type proceed as described under Replacing individual co...

Page 93: ...by a buffer module with double layer capacitors or vice versa then the new module is automatically deactivated OK LED flashes red You can activate this module by loading a corrected configuration via the associated control system For expansion modules a compatibility check is carried out For expansion modules with a higher power rating after switching on again the outputs are in the operating stat...

Page 94: ...itching on again the outputs are in the operating state manually shut down the LEDs of the outputs are lit yellow The outputs are switched on by pressing their associated buttons Response after adding a component and powering up in the REMOTE mode The new module is deactivated LED OK flashes red LEDs of the expansion module outputs are dark You can activate the module by loading a correct configur...

Page 95: ...e installation location of an expansion module A compatibility check is carried out for buffer modules If a buffer module with electrolytic capacitors is replaced by a buffer module with electrolytic capacitors then the new module is automatically commissioned If a buffer module with double layer capacitors is replaced by a buffer module with double layer capacitors then a more powerful module is ...

Page 96: ...n of the module is not identical with the function of the previous module at the installation location buffer module at the installation location of an expansion module or vice versa The module is deactivated LED OK flashes red LEDs of the expansion module outputs are dark You can activate the module by loading a correct configuration via the associated control system ...

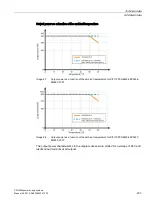
Page 97: ... output terminals are at the bottom to ensure correct cooling A clearance of at least 50 mm should be maintained above and below the power supply system maximum depth of the cable duct 50 mm No clearance is required at the side Output current as a function of the ambient temperature Image 5 1 SITOP PSU8600 4 5 A basic device Output current in the standard mounting position Image 5 2 SITOP PSU8600 ...

Page 98: ...A5E35883207 7 76 Image 5 3 SITOP PSU8600 4 10 A basic device Output current in the standard mounting position Image 5 4 SITOP PSU8600 4 10 A basic device and supplementary modules Output current in the standard mounting position Output current as a function of the altitude derating Image 5 5 Mounting height derating ...

Page 99: ...ust be observed in accordance with the following diagrams Note In the case of mounting positions that deviate from the standard mounting position reduced mechanical resistance of the devices against vibration and shock must be expected Particularly when installing on a vertically fastened standard mounting rail additional measures may be required e g to prevent the device from slipping on the stan...

Page 100: ...osition mounting clearances 5 2 Other mounting positions PSU8600power supply systems 100 Manual 04 2016 A5E35883207 7 76 Image 5 8 Mounting position 3 Image 5 9 Mounting position 4 Image 5 10 Mounting position 5 ...

Page 101: ...her mounting positions PSU8600power supply systems Manual 04 2016 A5E35883207 7 76 101 5 2 2 SITOP PSU8600 4 x 5 A basic device and supplementary modules Image 5 11 Mounting position 1 Image 5 12 Mounting position 2 Image 5 13 Mounting position 3 ...

Page 102: ...Mounting position mounting clearances 5 2 Other mounting positions PSU8600power supply systems 102 Manual 04 2016 A5E35883207 7 76 Image 5 14 Mounting position 4 Image 5 15 Mounting position 5 ...

Page 103: ...ances 5 2 Other mounting positions PSU8600power supply systems Manual 04 2016 A5E35883207 7 76 103 5 2 3 SITOP PSU8600 4 x 10 A basic device Image 5 16 Mounting position 1 Image 5 17 Mounting position 2 Image 5 18 Mounting position 3 ...

Page 104: ...Mounting position mounting clearances 5 2 Other mounting positions PSU8600power supply systems 104 Manual 04 2016 A5E35883207 7 76 Image 5 19 Mounting position 4 Image 5 20 Mounting position 5 ...

Page 105: ...er mounting positions PSU8600power supply systems Manual 04 2016 A5E35883207 7 76 105 5 2 4 SITOP PSU8600 4 x 10 A basic device and supplementary modules Image 5 21 Mounting position 1 Image 5 22 Mounting position 2 Image 5 23 Mounting position 3 ...

Page 106: ...Mounting position mounting clearances 5 2 Other mounting positions PSU8600power supply systems 106 Manual 04 2016 A5E35883207 7 76 Image 5 24 Mounting position 4 Image 5 25 Mounting position 5 ...

Page 107: ...se AC line systems TN or TT line system according to VDE 0100 T 300 IEC 364 3 with a rated voltage of 3 AC 400 500 V 50 60 Hz or IT line system with a rated voltage of 3 AC 400 500 V 50 60 Hz The line supply is connected using terminals L1 L2 L3 and PE of the basic device and must be implemented according to IEC 60364 and EN 50178 A protective device miniature circuit breaker or circuit breaker an...

Page 108: ... circuit protection acc to UL 489 Protection for 6EP3437 8MB00 2CY0 Protection required 3 pole coupled miniature circuit breaker IEC 898 characteristic C 10 16 A or 3RV2011 1DA10 circuit breaker setting of the thermal overcurrent release 3 A or 3RV2711 1DD10 circuit breaker branch circuit protection acc to UL 489 The protective conductor of the line supply must be connected at the PE terminal Othe...

Page 109: ... the system for example the 0 V rail to terminal 0V of the basic device Ensure that the cable between the system collection point and the 0V terminal is dimensioned to be able to conduct the total current NOTICE Overload of the wiring When using expansion modules it is not permissible that terminal GND at the expansion module is used for the 0 V potential of the loads to be supplied All 0 V potent...

Page 110: ...Installation 6 2 Output side connection PSU8600power supply systems 110 Manual 04 2016 A5E35883207 7 76 See also Establishing an additional ground connection Page 114 Technical data Page 227 ...

Page 111: ...perating states of the power supply system and the outputs to be processed Contact rating 60 V DC 0 3 A The precise function of the signaling contact is described under Basic devices Page 37 You can obtain more information about the assignment of the signaling contact under Connections and terminal designations Page 21 Reset terminal A reset can be alternatively carried out using a remote reset si...

Page 112: ...sing edge of the reset signal is evaluated this means for an additional reset signal the voltage level must first drop down to below 13 V You can obtain more information about the overload shutdown and reset under Overload shutdown and carrying out a reset Page 56 See also Connections and terminal designations Page 21 Basic devices Page 21 ...

Page 113: ...s Configuring and monitoring in the REMOTE mode Integration and communication of the SITOP PSU8600 with other open automation components in the Siemens and open environment for instance IPC PLC HMI Firmware update of the device via STEP 7 or web server WARNING Risk of explosion For use in a hazardous zone an Ethernet PROFINET connector with strain relief must be used Strain relief for use in a haz...

Page 114: ...es to increase the noise immunity and to reduce noise emission Route the additional ground connection from terminal 0V of the basic device to terminal GND of the first expansion module and from there to additional expansion modules by looping through the cable as shown in the diagram below The possible wire conductor cross section for the additional ground connection is max 2 5 mm2 NOTICE Overload...

Page 115: ...ontact 23 and 24 Control contact The control contact is implemented as contact pair and when delivered has a wire jumper Instead of the wire jumper a floating contact can be switched in the plant or system This means for a scheduled operational shutdown of the power supply buffer operation is prevented therefore unnecessarily discharging the buffer module Buffer operation is immediately exited if ...

Page 116: ...aling contacts are NO contacts and allow information about the operating state of the buffer module to be processed further Note The contact rating is 60 V 0 3 A DC The precise function of the signaling contacts is described under Buffer modules Page 38 You can obtain more information about the assignment of the signaling contacts under Connections and terminal designations Page 21 ...

Page 117: ...TEP 7 in the TIA Portal from Version 13 After SITOP PSU8600 has been saved in the hardware catalog of STEP 7 in the TIA Portal it can be integrated into projects parameterized and diagnosed SIMATIC STEP 7 SITOP PSU8600 can be used with STEP 7 from version V5 5 and higher After SITOP PSU8600 has been saved in the hardware catalog of STEP 7 it can be integrated into projects parameterized and diagno...

Page 118: ...Package HSP To use SITOP PSU8600 and the supplementary modules with STEP 7 in the TIA Portal you must install the corresponding hardware support package HSP You can obtain the HSP at our SITOP homepage http www siemens com sitop or directly at https support industry siemens com cs ww en view 102254062 Procedure To install the hardware support package proceed as follows 1 Start STEP 7 V13 in the TI...

Page 119: ...ling hardware support packages in the manual of your STEP 7 software 7 3 2 Geräte Stammdaten Datei GSD installieren To use SITOP PSU8600 and the supplementary modules with STEP 7 in the TIA Portal as an alternative to the hardware support package HSP you can install the appropriate generic station description file GSD The GSD file is available through our SITOP homepage http www siemens com sitop ...

Page 120: ...600 into a project To be able to use the SITOP PSU8600 you must assign an IO controller as IO device SIMATIC S7 control Further the SITOP PSU8600 in the project can be equipped with one or several supplementary modules The main views used to configure the SITOP PSU8600 are the Network view and the Device view Note Additional information on the Network view and Device view as well as the Topology v...

Page 121: ...general station description file In the Catalog palette navigate to the SITOP PSU8600 under Other field devices PROFINET IO I O Siemens AG SITOP PSU PSU8600 5 Select the required SITOP PSU8600 with a mouse click In the Information area you can see information about the SITOP PSU8600 and when necessary change the preselected version 6 Drag the SITOP PSU8600 and drop it into the Network view Alterna...

Page 122: ... the symbol of the PSU8600 A menu opens with the controllers that are available 2 Select a controller in the menu 3 Select the connection between the controller and PSU8600 4 Make the required settings in the Network data editor 5 Double click on PSU8600 to display it in the device view 6 Select the PROFINET interface 7 In the inspector window under Properties General Profinet interface X1 Etherne...

Page 123: ...outputs with max 5 A per output Article number 6EP4436 8XB00 0CY0 4 outputs with max 10 A per output Article number 6EP4437 8XB00 0CY0 Note You can combine both expansion module versions with a basic device You can freely select the arrangement at the slots The number of expansion modules that can be configured is limited to four Preconditions STEP 7 in the TIA Portal has been opened and a project...

Page 124: ... default version 4 Drag the expansion module and drop it into the Device view Alternatively the expansion module can also be added by double clicking on the entry in the Hardware catalog 5 Drag and drop the expansion module to the required slot to the right of the SITOP PSU8600 The expansion module is inserted into the selected slot 6 Save the hardware configuration You have assigned an expansion ...

Page 125: ...B10 0XY0 BUF8600 buffer modules with double layer capacitors Buffer time of 4 s at 40 A Article number 6EP4293 8HB00 0XY0 Buffer time of 10 s at 40 A Article number 6EP4295 8HB00 0XY0 Note It is possible to use different buffer modules in one system This means for example that a buffer time of 10300 ms 10000 ms 300 ms can be implemented The number of buffer modules that can be configured is limite...

Page 126: ...ffer module and when necessary change the preselected version 4 Drag and drop the buffer module in the Device view Alternatively the buffer module can also be added by double clicking on the entry in the Hardware catalog 5 Drag and drop the buffer module to the required slot to the right next to the SITOP PSU8600 The buffer module is inserted in the selected slot 6 Save the hardware configuration ...

Page 127: ...ritization for output 1 for buffering when the pow er fails Define the parallel connection of the outputs of the basic de vice Define a threshold to issue an alarm An alarm is output if this threshold is continually exceeded for 5 s Define the system start characteristics Define the dead time for system overload alarm message Define the dead time for buffering mode alarm Buffering The parameters a...

Page 128: ... General Make the following settings Possibility of accessing via a web server yes no Automatic logoff when closing the web server yes no Permit access only via HTTPS yes no Automatic up date Make the following settings Activate automatic update yes no Time interval for the update A detailed description of the individual parameters is provided in Sections Parameterizing the basic unit Page 130 and...

Page 129: ... individual parameters of the subgroup is provided in Section Parameterizing outputs Page 136 Note In addition under Module configuration Output 1 4 by activating the point The configuration of the output can differ during runtime because it is controlled remotely a note can be saved as to whether the parameters for the output are controlled from a PLC program during the runtime For a download thi...

Page 130: ...ned project Procedure 1 Select the SITOP PSU8600 in the Device view 2 In the inspector window select Properties General Device configuration Entries for parameterization are provided in the navigation area Parameters general Parameter Value range Default setting Prioritized buffering of out put 1 Yes no No Parallel switch on output 1 and output 2 Yes no No Parallel switch on output 3 and output 4 ...

Page 131: ...ontinuous maximum current of an individual output of the basic device This increases the available current rating The switchover to parallel operation means that the outputs involved are synchronized and controlled together Prewarning threshold When changes are made the prewarning threshold for the summed current allows you to quickly check the utilization of the overall system This is especially ...

Page 132: ...sing a control command If the parameters are to be activated then all of the buffer components in the system are deactivated System buffering using buffer components is therefore deactivated this function can be used for smoothly commissioning the system Note Deactivation via control command is independent of deactivation via control contact and further has the same priority as deactivation using ...

Page 133: ...start of short time interruption Using the parameter the time is defined that must elapse until after the start of buffer operation an alarm message Buffer operation is output This means that very short power failures can be easily buffered and the alarm message suppressed For power failures that last for a longer period of time the alarm message can then be used to initiate other specific measure...

Page 134: ...o operate 0 2147483647 0 ms Time min length of stay 0 2147483647 0 ms Time max length of stay 0 2147483647 0 ms Save power consumption 0 000 100000 000 0 00 kW Operate power consumption 0 000 100000 000 0 00 kW Energy consum to pause 0 000 100000 000 0 00 kWh Energy consum to operate 0 000 100000 000 0 00 kWh PROFIenergy output parameters The outputs are selected by setting a checkmark Parameters ...

Page 135: ...ver on this module Define as to whether the device may be accessed via the web server You will find further information on the web server under Web server Page 165 Enable automatic logoff Define whether a user should be automatically logged off after closing the web server Permit access only with HTTPS Define whether access is only permissible with HTTPS Enable automatic update When you enable Aut...

Page 136: ...e this must be assigned to the SITOP PSU8600 Procedure 1 Select the SITOP PSU8600 or the expansion module in the Device view 2 In the inspector window in the navigation area open the range of the required output 3 You can see the possible subgroups for parameterization Output parameters Parameter Value range Default setting Setpoint output voltage 4 28 V 24 0 V Response threshold of the output cur...

Page 137: ... time between the outputs or load optimized When the variable on delay is activated you can assign individual on delay times to the individual outputs Mode Two overload responses can be defined for all outputs In the ELECTRONIC SHUTDOWN mode overload is permitted for a defined time The output is electronically shut down after the limit value has been exceeded see Overload shutdown and carrying out...

Page 138: ...n the network the SF LED flashes By checking the flashing LEDs you can uniquely identify all SITOP PSU8600 in a network 8 Note the Device name and the IP address of the required SITOP PSU8600 in order to load a configuration Changing the Device name of a SITOP PSU8600 1 In STEP 7 in the tabular area of the Network view select the Network overview table 2 In the Device column overwrite the name in ...

Page 139: ...sioning you must load the project data that you created offline into the connected SITOP PSU8600 This project data results from the configuration of the hardware networks and connections in STEP 7 Initially the complete project data is loaded Only the changes are subsequently loaded Preconditions The project data is consistent The Device name must be identical offline and online The SITOP PSU8600 ...

Page 140: ... in submenu Download to device select option Hardware configuration The project data are compiled The Load button is activated as soon as loading is possible 3 Click on Load Data is loaded The Result of the load operation dialog window is opened In this dialog you can check whether the load task was successful and select any further actions 4 Click on the Finish button The selected project data ha...

Page 141: ...facturer Serial number Copyright entry Profile Profile details Diagnostic status Status List of detailed information Default diagnostics List of detailed information PROFINET interface Ethernet address network connection MAC address Ethernet address IP pa rameter IP address Subnet mask Default router IP settings IP setting time Ports List of ports Functions Assign an IP address MAC address IP addr...

Page 142: ...s command Device view 1 Open the Device view of the Device configuration 2 Select the SITOP PSU8600 3 In the shortcut menu or in the Online main menu select the Online diagnostics command Network view 1 Open the Network view of the Device configuration 2 Select the SITOP PSU8600 3 In the shortcut menu or in the Online main menu select the Online diagnostics command 4 Click on Connect online The in...

Page 143: ...ttings This affects for example IP address Device name Parameter values for the SITOP PSU8600 and assigned supplementary modules Proceed as follows to reset the SITOP PSU8600 factory settings 1 Select SITOP PSU8600 in the Network view and change to the Device view 2 Click on the Go online button 3 In the SITOP PSU8600 shortcut menu select Online diagnostics 4 In the Functions folder select the Res...

Page 144: ... under https support industry siemens com cs ww en view 102254061 Preconditions STEP 7 has been opened and a project has been created At least one station has been added You know where the GSD file is saved Procedure 1 Download the GSD from the Internet 2 Close all stations in HW Config 3 Select the menu command Options Install GSD files Dialog Install GSD files opens 4 Select the GSD file and cli...

Page 145: ...e the SITOP PSU8600 you must assign an IO controller as IO device SIMATIC S7 control Preconditions The GSD file of the SITOP PSU8600 has been installed STEP 7 has been opened and a project has been created with an IO controller SIMATIC S7 control Creating a subnet 1 Open the hardware view HW Config 2 Call the shortcut menu of line PN IO and select Insert PROFINET IO system ...

Page 146: ... In dialog field Properties Ethernet interface PN IO select the Parameter tab set the IP address of the PROFINET interface and create a new subnet 4 Confirm the properties of the new subnet and close the Properties Ethernet interface PN IO dialog box The subnet is displayed as a horizontal line in the hardware view ...

Page 147: ...dware catalog navigate to SITOP PSU8600 under PROFINET IO I O PSU8600 4 Click the desired SITOP PSU8600 keep the left mouse button pressed and drag the SITOP PSU8600 to the subnet 5 Double click on SITOP PSU8600 In the open dialog box enter the device name device number and IP address in the Ethernet 6 Save the hardware configuration You have now inserted the SITOP PSU8600 into the project The rec...

Page 148: ...4436 8XB00 0CY0 4 outputs with max 10 A per output Article number 6EP4437 8XB00 0CY0 Note You can combine both expansion module versions with a basic device You can freely select the arrangement at the slots The number of expansion modules that can be configured is limited to four Preconditions STEP 7 is opened and a project with an IO controller is created A SITOP PSU8600 basic device has been in...

Page 149: ...expansion module to the basic device How you parameterize the expansion module is described under Parameterizing outputs Page 159 Assigning a buffer module A buffer module permits buffering when the power fails A SITOP PSU8600 basic device can be equipped with a maximum of two SITOP BUF8600 buffer modules Buffer module versions BUF8600 buffer modules with electrolytic capacitors Buffer time of 100...

Page 150: ...r time of 10300 ms 10000 ms 300 ms can be implemented Preconditions STEP 7 is opened and a project with an IO controller is created A SITOP PSU8600 basic device has been integrated in the project Procedure 1 In the graphic editor select the hardware configuration of the basic device to display the PSU8600 station window 2 Navigate in the Hardware catalog to the buffer modules under PROFINET IO I O...

Page 151: ...ssigned a buffer module to the basic device 7 4 4 Parameter assignment 7 4 4 1 Parameterizing SITOP PSU8600 The procedure is the same for all parameters This section describes the general procedure to reach the configuration dialog The individual parameters and their possible values are described in the following subsections Preconditions The SITOP PSU8600 has been integrated in the opened project...

Page 152: ...e basic device Subgroup Description General Make the following settings in this subgroup Define the prioritization for output 1 for buffering when the power fails Define the parallel connection of the outputs of the basic device Define a threshold for the output of an alarm An alarm is output if this threshold is continually exceeded for 5 s Define the system start characteristics Define the dead ...

Page 153: ...h HTTPS General I M Contact Location ID A detailed description of the individual parameters of the subgroups is provided in Sections Parameterizing the basic unit Page 154 and Parameterizing outputs Page 159 Parameters of the expansion modules Subgroups Outputs 1 4 are relevant when parameterizing expansion modules Subgroup Description Outputs 1 4 In these subgroups make the following settings for...

Page 154: ...the basic unit The procedure is the same for all parameters This section describes the general procedure to reach the configuration dialog The individual parameters and their possible values are described in the following subsections Preconditions The SITOP PSU8600 was integrated in the opened project Procedure 1 Select SITOP PSU8600 in the HW Config view 2 Double click on the Basic unit module 3 ...

Page 155: ... current of an individual output of the basic unit This increases the available current rating The switchover to parallel operation means that the outputs involved are synchronized and controlled together Prewarning threshold When changes are made the prewarning threshold for the summed current allows you to quickly check the utilization of the overall system This is especially of interest when ex...

Page 156: ...FE operat ing mode Yes no No Threshold value for suffi cient buffer readiness 10 90 85 Enable short time interrup tion at output 1 Yes no No Dead time for start of short time interruption 0 60 000 ms 3 000 ms Wait time up to short time interruption 0 300 000 ms 15 000 ms Duration of the short time interruption 0 60 000 ms 5 000 ms Examples for conversion ms milliseconds s seconds m minutes 3 000 3...

Page 157: ... maximum amount of energy that can be stored for several buffer components in the system the sum of the maximum amounts of energy that can be stored This means that it can be ensured that a process is only started if sufficient buffer energy is available to buffer a possible power failure Enable short time interruption at output 1 If the function is activated then when the power supply returns dur...

Page 158: ...47 0 ms Time max length of stay 0 2147483647 0 ms Save power consumption 0 000 100000 000 0 00 kW Operate power consumption 0 000 100000 000 0 00 kW Energy consum to pause 0 000 100000 000 0 00 kWh Energy consum to operate 0 000 100000 000 0 00 kWh PROFIenergy output parameters The outputs are selected using a binary number which is converted into a decimal value Example Binary number 1111101001 i...

Page 159: ...h the actual values are sent to the web server Enable automatic logoff Define whether a user should be automatically logged off after closing the web server Permit access only with HTTPS Define whether access is only permissible via HTTPS 7 4 4 4 Parameterizing outputs The procedure is the same for all parameters This section describes the general procedure to reach the configuration dialog The in...

Page 160: ...ewarning threshold ON delay In order to reduce the load on the overall SITOP PSU8600 power supply system as a result of simultaneous switch on current peaks of the loads at the various outputs an on delay between the outputs can be selected when switching on When the on delay is activated the outputs are sequentially switched on with a 25 ms or 100 ms delay time between the outputs or load optimiz...

Page 161: ... nodes The Accessible nodes window is opened with the following displays The station The SITOP PSU8600 The following table shows which information is displayed in the Object name column Accessible nodes Object name Description S7 CPU PC station Name of the station The Details view also shows the operating state module type and if available information from the associated STEP 7 project station nam...

Page 162: ...figured device names to each of the individual IO devices including the SITOP PSU8600 For the procedure described below the SITOP PSU8600 and the station for the PG PC must be accessible online on the Ethernet 1 Open HW Config 2 In the Target system Ethernet menu click on Assign device name 3 In the Assign device name dialog in the Device name field select SITOP PSU8600 4 In the Available devices ...

Page 163: ...carefully The files for updating the firmware are available online at https support industry siemens com cs ww en view 102295547 7 4 8 Reset to factory settings With STEP 7 Version 5 5 it is possible to restore the factory setting of modules using the Target system Edit Ethernet node Click the Browse button in the Edit Ethernet node dialog to select the MAC address of the SITOP PSU8600 where the f...

Page 164: ...Engineering and remote access 7 4 SIMATIC STEP 7 PSU8600power supply systems 164 Manual 04 2016 A5E35883207 7 76 ...

Page 165: ...via Ethernet The SITOP PSU8600 has an IP address that you know In the MANUAL mode DIP switch WEN web server enable is set to ON See Activating the web server on the module Page 72 In the REMOTE mode Web server access is activated The following sections explain how to activate access to the web server For SIMATIC STEP 7 in the TIA Portal under Parameter assignment Page 127 For SIMATICSTEP 7 under P...

Page 166: ... admin Password admin The license information of the SITOP PSU8600 as well as the current web server certificate can be downloaded to the logon page Note Change the password after the first login The password must satisfy the following minimum requirements min 8 characters min 1 uppercase letter min 1 lowercase letter min 1 digit min 1 special character The following characters are possible a z0 9...

Page 167: ...ed in the following sections You access the submenus from the navigation submenus The associated settings possible in the selected submenu are made in the editor area You load the configuration to the devices by pressing button The language selection is used to select the user interface language of the web server German English French Italian Spanish and Chinese are available as languages Click on...

Page 168: ...erver The functions of the web server are split up between the two menus Diagnostics and HW Configuration Use the Download to device function to load changes that you have made to the device see Loading the configuration commissioning Page 170 Diagnostics You can find the following submenus here Alarms for an overview of past and active alarms see Alarms Page 170 Operating data for an overview of ...

Page 169: ...e PROFINET interface Page 179 Change web server settings see Web server settings user administration Page 180 User administration see Web server settings user administration Page 180 Configure the basic device SITOP PSU8600 and the expansion modules see Configuring SITOP PSU8600 Page 183 Further you can save the configurations and load the existing configurations into the device see Loading and sa...

Page 170: ... 7 5 5 1 Alarms The SITOP PSU8600 system internally saves a total of 1024 alarm entries Of these there are a maximum of the last 256 entries in the web sorted according to time of display whereby using the severity filter the list can be restricted to the following severities NORMAL INFO MAINTENANCE REQUIRED MAINTENANCE DEMANDED DIAGNOSIS The list of alarms is saved to a CSV file by pressing Save ...

Page 171: ... is provided in this list Note After a system restart the last 50 open alarms before the restart are displayed separated by Reboot When the power is interrupted for a longer period of time the date and time of the alarm entries can be lost whereby the alarm sequence is retained The alarm list is completely deleted by pressing Clear history ...

Page 172: ...ating data The following operating data are displayed via the web server Submenu Entries Data PSU8600 PROFINET device name Device name in PROFINET Article No Article number Serial number Serial number Hardware Hardware version Firmware Firmware version General Operating state Mode Actual input voltage System load current ...

Page 173: ...on General Operating state PSU8600 CNX8600 Values of the outputs Switch on output Setpoint of the output voltage Response threshold of the out put current Response threshold of the out put current Mode On delay 7 5 5 3 Online functions The procedure to use the online functions of the web server is described below Note With the exception of the firmware update function all online functions for the ...

Page 174: ... system reset it is not possible to switch on outputs again after an automatic shutdown Only outputs that were switched off after a firmware update are switched on again Procedure 1 Select menu Diagnostics 2 Select submenu Online functions 3 Select the Reset system entry 4 In the editor area click on Reset system 5 Acknowledge the confirmation prompt with OK Reset to factory settings A reset to th...

Page 175: ...ccess 7 5 Web server PSU8600power supply systems Manual 04 2016 A5E35883207 7 76 175 3 Select entry Reset to factory setting 4 In the editor area click on Reset to factory settings 5 Acknowledge the confirmation prompt with OK ...

Page 176: ...on again using the Reset outputs function Outputs that were switched off manually or using the remote configuration are not switched on using the Reset the outputs function Procedure 1 Select menu Diagnostics 2 Select submenu Online functions 3 Select the Switch output on off entry 4 In the editor area click on Reset of all outputs 5 Acknowledge the confirmation prompt with OK ...

Page 177: ...ration System synchronization Note If modules are added or removed the system must always be synchronized before parameters are changed You can carry out the following synchronization operations in the system Synchronize device configuration Using function Transfer MANUAL configuration to REMOTE configuration synchronize configuration you load the hardware configuration of all installed devices in...

Page 178: ...Hardware configuration menu 2 Select submenu General 3 Select the System configuration entry 4 To transfer the actual system expansion stage in the editor area click on Synchronize configuration 5 To transfer potentiometer and switch settings into the web server in the editor area click on MANUAL REMOTE 6 The system is synchronized ...

Page 179: ...following points General I M identification maintenance Define the location ID Define the contact Define the device name Define whether the IP address is dynamically assigned activate DHCP or whether it should be fixed PROFINET interface Procedure 1 Select the Hardware configuration menu 2 Select submenu General 3 Select the Communication interface entry 4 In the editor area under Device name ente...

Page 180: ...e data to the device see Loading the configuration commissioning Page 170 7 5 6 2 Web server settings user administration Here you can make general settings and define which actions should be automatically executed User administration is also located here Settings Parameters Value range Default setting Web server is enabled MANUALLY Yes no No Activate web server on this module Yes no No Permit acc...

Page 181: ...ou can download the certificate for encrypted connection via HTTPS by pressing the Download certificate button Log off automatically after 15 minutes Define whether a user should be automatically logged off after closing the web server Update interval Define the interval in which the actual values are sent to the web server Procedure for changing the administrator password 1 Select the Hardware co...

Page 182: ...strator password 5 In the editor area under Password enter a new password 6 Repeat the new password 7 Load the data to the device see Loading the configuration commissioning Page 170 Procedure for setting up a guest access 1 Select the Hardware configuration menu 2 Select submenu General Communication interface Web server 3 Select entry User administration 4 In the editor area under Add new user e...

Page 183: ...d Outputs 1 and 2 connected in parallel Outputs 3 and 4 connected in parallel System start characteristics Prewarning threshold output current Prewarning threshold output currents in the MANUAL mode Dead time for system overload alarm Dead time for power supply failure alarm Under PROFIenergy you can activate and configure energy management with PROFIenergy Under Buffering you can change parameter...

Page 184: ...nual 04 2016 A5E35883207 7 76 Settings under General and PROFIenergy Parameters general Parameters Value range Default setting Prioritized buffering of out put 1 Yes no No Output 1 and output 2 con nected in parallel Yes no No Output 3 and output 4 con nected in parallel Yes no No ...

Page 185: ...on again when the line supply returns For the basic device the typical buffer time is 15 ms additional buffer modules extend the buffer time Parallel connection of output 1 and output 2 output 3 and output 4 Two outputs of a basic device can be connected in parallel to supply a load branch with a current that is higher than the continuous maximum current of an individual output of the basic device...

Page 186: ...m is only initiated if the power continuously fails for a time that is longer than the set dead time PROFIenergy parameters Parameters Value range Default setting Enable PROFIenergy on this device Yes no No Time to pause 0 2147483647 0 ms Time to operate 0 2147483647 0 ms Time min length of stay 0 2147483647 0 ms Time max length of stay 0 2147483647 0 ms Save power consumption 0 000 100000 000 0 0...

Page 187: ...etting Buffer component disabled via control command Yes no No Enable LONGLIFE operat ing mode Yes no No Threshold value for suffi cient buffer readiness 10 90 85 Short time interruption at output 1 is enabled Yes no No Dead time for buffering mode alarm 0 60 000 ms 3 000 ms Wait time up to short time interruption 0 300 000 ms 15 000 ms Duration of the short time interruption 0 60 000 ms 5 000 ms ...

Page 188: ...pacitors these can be operated in the LONGLIFE mode with reduced buffer capacity When the buffer module is completely charged power failures of up to a maximum of 3 s 6EP4293 8HB00 0XY0 or up to a maximum of 8 s 6EP4295 8HB00 0XY0 can be buffered with a load current of 40 A Threshold value for sufficient buffer readiness The charge state of the buffer components in the system can be interrogated u...

Page 189: ...Switch on delay Variable Dependent on the settings in the basic device Mode ELECTRONIC SHUTDOWN CONSTAN T CURRENT ELECTRONIC SHUTDOWN Switch on output Here you specify whether the output is switched on Setpoint output voltage Define the required output voltage Using the MANUAL REMOTE button you load the value set using the potentiometer at the front of the device into the REMOTE configuration of t...

Page 190: ... The output is electronically shut down after the limit value has been exceeded see Overload shutdown and carrying out a reset Page 56 In the CONSTANT CURRENT mode an overload current is continually permissible U I curve according to a defined characteristic The overload current is limited to a maximum of 150 of the setting value of the current potentiometer for a duration of 5 seconds LED ON OFF ...

Page 191: ...uration menu 2 Select submenu Load Save 3 The zip file now displayed can be saved as a file using the Save target as function of the shortcut menu call by pressing the right hand mouse key 4 Enter a file name 5 Click on OK to save the configuration as zip file Procedure for loading the configuration 1 Select the Hardware configuration menu 2 Select submenu Load Save 3 In the editor area click on B...

Page 192: ...lues Actual values from the device are updated via the cyclic input data of the control within 10 ms if one of the following conditions are satisfied for an output voltage change at the basic device 0 5 V for an output voltage change at the expansion modules 1 V for an output current change at the basic device 0 5 A for an output current change at the expansion modules 1 A The actual values are up...

Page 193: ...m Unsigned8 Buffer ready 0 255 The power supply system is ready for buffering and has sufficient buffer readi ness only relevant for systems with SITOP BUF8600 4 s 10 s Unsigned8 Charging state 0 100 The system charge state as a percent age i e the total charge state of all SITOP BUF8600 4 s 10 s buffer compo nents in the power supply system Note If only the SITOP BUF8600 100 ms 300 ms exists in t...

Page 194: ...peration state Operating state of the expansion mod uleSITOP CNX8600 Unsigned8 Channel1 output voltage 10mV Actual voltage at output 1 of the power supply system Unsigned16 Channel1 output current 10mA Actual load current at output 1 of the power supply system Unsigned16 Channel1 operation state Operating state at output 1 of the power supply system Unsigned8 1 16 3 Channel2 output voltage 10mV Ac...

Page 195: ...rating state of the buffer module SITOP BUF8600 Unsigned8 Charging state 0 100 Charge state of the buffer module SITOP BUF8600 Unsigned8 Buffering disabled by input 0 255 Buffer module SITOP BUF8600 was deactivated via the control contact Unsigned8 Detailed information about the individual operating states can be found in Section Operating states SITOP BUF8600 Page 200 7 6 1 2 Output data In the f...

Page 196: ... output 1 When this is exceeded the output current is interpreted as having an overload condition and is shut down with a time delay or limited Output 5 A 0 0 A 5 0 A default setting 5 0 A Output 10 A 0 0 A 10 A default setting 10 A Unsigned16 Channel1 Ithreshold Prewarning threshold of the config ured response threshold for the output current in An alarm is initiated when the actual output curren...

Page 197: ...having an overload condition and is shut down with a time delay or limited Output 5 A 0 0 A 5 0 A default setting 5 0 A Output 10 A 0 0 A 10 A default setting 10 A Unsigned16 Channel1 Ithreshold Prewarning threshold of the config ured response threshold for the output current in An alarm is initiated when the actual output current exceeds this value Opera tion is continued without any re striction...

Page 198: ...er in admissible operating conditions 2 CooledDown After an automatic shutdown due to a fault the power supply system can be reactivated by switching off and switching on the supply voltage 3 Boot The power supply system is powering up all of the outputs are still switched off 4 Running The power supply system is operating in the normal mode 5 Phasefail Phase failure of the supply voltage detected...

Page 199: ...utput switched off powering up 7 Running Output switched on normal operation 8 OverLoad Output in overload operation The output current is above the specified response threshold but still within the permissible overload profile 9 Limit Output current limited to the response threshold The output is in the overload mode The output current is limited to the configured response threshold 10 OverloadDe...

Page 200: ... threshold but still within the permissible overload profile 9 Limit Output current limited to the response threshold The output is in the overload mode The output current is limited to the configured response threshold 10 Overloaded AfterSystemOverload Output in overload operation system overload 11 LimitAfter SystemOverload Output current limited system overload 7 6 1 5 Operating states SITOP BU...

Page 201: ...00 10 bytes Writing Adjustable parameters for generally configuring the SITOP PSU8600 10 bytes 1 0 3 Channel1 Reading Configuring output 1 of the SITOP PSU8600 10 bytes Writing Adjustable parameters for output 1 of the SITOP PSU8600 10 bytes 1 0 4 Channel2 Reading Configuring output 2 of the SITOP PSU8600 10 bytes Writing Adjustable parameters for output 2 of the SITOP PSU8600 10 bytes 1 0 5 Chann...

Page 202: ...writing data sets SITOP CNX8600 Index Slot Subslot Data set Type Description Data size 1 1 6 1 Channel1 Reading Configuring output 1 of the expansion module SITOP CNX8600 10 bytes 1 1 6 0 Channel1 Writing Adjustable parameters for output 1 of the expansion module SITOP CNX8600 10 bytes 1 1 6 2 Channel2 Reading Configuring output 2 of the expansion module SITOP CNX8600 10 bytes 1 1 6 1 Channel2 Wri...

Page 203: ...PSU8600 Index 1 General reading writing Data Description Data type Priority buffered Channel 1 0 255 Prioritized buffering of output 1 When the power fails output 1 of the basic device can be prioritized to increase the available buffer time In order that the remaining buffer energy is only used for output 1 in buffer operation all of the additional outputs of the power supply system are shut down...

Page 204: ...omatic overload shutdown of all outputs As suming that the outputs are not switched off elsewhere then after the reset they are switched on again Unsigned8 System overload alarm threshold time ms Time delay before an alarm is issued after a system overload was detected Unsigned16 Main power outage alarm threshold time ms Time delay before an alarm is issued after failure of the power supply voltag...

Page 205: ...delay Unsigned16 Index 0x0006 Device information reading Data Description Data type MLFB Order number Article No Order number VisibleString 20 Product state Product release Unsigned8 Fill byte s Unsigned8 SW version Software version Unsigned32 Serial number Serial number VisibleString 16 Index 0x0007 Hardware settings reading Data Description Data type Man remote DipSwitch 0 255 Actual position of...

Page 206: ...is is exceeded the output current is interpreted as having an overload condition and is shut down with a time delay or limited Unsigned16 Output Enable1 manual button 0 255 Actual DIP switch state for output 1 0 Manually shut down 255 Manually switched on Unsigned8 Fill byte s Unsigned8 Utarget2 potentiometer 10 mV Manually set setpoint of the output voltage at out put 2 Setpoint of the output vol...

Page 207: ...g an overload condition and is shut down with a time delay or limited Unsigned16 Output Enable4 manual button 0 255 Actual DIP switch state for output 4 0 Manually shut down 255 Manually switched on Unsigned8 Fill byte s Unsigned8 ModuleIdentNumber slot0 MainUnit Module identification number for slot 0 basic de vice Unsigned32 ModuleIdentNumber slot 1 Module identification number for slot 1 Unsign...

Page 208: ...cal delay time between the outputs For a variable switch on de lay each output uses an individually specified delay time based on a common starting point 0 StartupDelayOff No on delay Unsigned8 1 StartupDelay25 ms 25 ms on delay Outputs are switched on in an ascending sequence starting with output 1 of the basic device in inter vals of 25 ms 2 StartupDelay 100ms 100 ms switch on delay Outputs are ...

Page 209: ...perate in the normal mode without any restrictions for a limited period of time 6 SystemOverload IP System overload detected within the permissible overload profile The power supply system is still operating in the nor mal mode 7 SystemOverload OP System overload detected outside the permissible overload profile Power supply system only oper ating with some re strictions 8 SystemOverload PL Very h...

Page 210: ...an output exceeds the specified response threshold value of the output current then the output can be shut down according to a current time characteristic elec tronic shutdown or the load current can be lim ited to the response threshold constant cur rent 0 ModeSelect Electronic shutdown The output is shut down when the response threshold value is exceeded Unsigned8 1 ModeModular Constant current ...

Page 211: ...Channel 1 Channel4 Utarget 10 mV Channel4 Ilimit 10 mA Channel4 operation state See data Channel 1 LED color Actual LED color Each LED is represented by 2 bits Bit0 1 OK Bit2 3 Man Remote Bit4 5 Channel1 Bit6 7 Channel2 Bit8 9 Channel3 Bit10 11 Channel4 Bit12 13 Parallel12 Bit14 15 Parallel34 0 LED is off Unsigned16 1 LED lit green 2 LED lit red 3 LED lit yellow LED state Actual display status of ...

Page 212: ... device Unsigned8 Fill byte s 3xUnsigned8 Time_To_Pause ms Unsigned32 Time_To_Operate ms Unsigned32 Minimum_Stay ms Unsigned32 Maximum_Stay ms Unsigned32 Saving_Power_Consumption kW Float Operate_Power_Consumption kW Float Energy_Consumption_To_Pause kWh Float Energy_Consumption_To_Operate kWh Float Index 0x0031 PROFIenergy channel list reading writing Data Description Data type ChannelsOffList Ov...

Page 213: ...mote target values reading writing The saved data of an output are listed in the table below The data applies to outputs 1 to 4 Data Description Data type Utarget 10mV Currently set setpoint of the output voltage Unsigned16 Ilimit 10mA Response threshold of the output current for an output When this is exceeded the output current is interpreted as having an overload condition and is shut down with...

Page 214: ...ay Unsigned16 Index 0x0006 Device information reading Data Description Data type MLFB Order number Article No Order number VisibleString 20 Product state Product release Unsigned8 Fill byte s Unsigned8 SW version Software version Unsigned32 Serial number Serial number VisibleString 16 Index 0x0007 Hardware settings reading Data Description Data type Utarget1 potentiometer 10mV Manually set setpoin...

Page 215: ...eration the output is controlled to this setpoint voltage Unsigned16 Ilimit3 potentiometer 10mA Manually set threshold of the output current at output 3 Response threshold of the output current for an output set using the potentiometer at the device When this is exceeded the output current is interpreted as having an overload condition and is shut down with a time delay or limited Unsigned16 Outpu...

Page 216: ...0mV Currently set setpoint of the output voltage for output 1 Unsigned16 Channel1 Ilimit 10 mA Response threshold of the output current for output 1 When this is exceeded the output current is interpreted as having an overload condition and is shut down with a time delay or limited Unsigned16 Channel1 Ithreshold 0 100 Prewarning threshold of the configured response threshold for the output cur ren...

Page 217: ...PROFINET IE 2 BufferOff Output switched off 3 OverLoadOff Output switched off over load 4 ReadyForRestart Output ready for reset reset 5 ErrorOff Output switched off fault 6 Boot Output switched off pow ering up 7 Running Output switched on nor mal operation 8 OverLoad Output in overload opera tion 9 Limit Output current limited to the response threshold 10 Overloaded SystemOverload Output in over...

Page 218: ...2 Hz 7 6 2 4 Data sets SITOP BUF8600 Index 0x0006 Device information reading Data Description Data type MLFB Order number Article No Order number VisibleString 20 Product state Product release Unsigned8 Fill byte s Unsigned8 SW version Software version Unsigned32 Serial number Serial number VisibleString 16 Index 0x0020 State information reading SITOP BUF8600 100 ms 40 A and SITOP BUF8600 300 ms 4...

Page 219: ...argedReady Ready for buffer operation as the energy storage device of the buffer mod ule has been sufficiently charged 6 NotFully ChargedNotReady Not ready for buffer oper ation as the energy stor age device of the buffer module has not been sufficiently charged and is presently being charged Fill byte s Unsigned8 LED color Actual LED color Each LED is represented by 2 bits Bit0 1 OK Bit2 15 unuse...

Page 220: ...nt is not opera tional and must be re started by switching off the supply voltage and switching it on again 5 NotFully ChargedReady Ready for buffer operation as the energy storage device of the buffer mod ule has been sufficiently charged 6 NotFully ChargedNotReady Not ready for buffer oper ation as the energy stor age device of the buffer module has not been sufficiently charged and is presently...

Page 221: ...Engineering and remote access 7 6 Cyclic and acyclic data PSU8600power supply systems Manual 04 2016 A5E35883207 7 76 221 Data Description Data type Bit0 1 OK Bit2 15 unused 0 3 LED flashes at 2 Hz ...

Page 222: ...Engineering and remote access 7 6 Cyclic and acyclic data PSU8600power supply systems 222 Manual 04 2016 A5E35883207 7 76 ...

Page 223: ...ncorrect checksum Defective firmware detected Device must be reactivated with a new firmware up date 256 2 F Device failure Device failure 256 3 MD Maintenance demanded Maintenance request 256 4 MR Maintenance required Maintenance required 256 5 F Module failure Module failure 256 6 F Unexpected module type The module has a module type that dif fers from the configuration The module cannot be oper...

Page 224: ... the nominal limits Automatic derating limited perfor mance can occur when the voltage is low 257 5 MD High resistance internal supply High resistance internal supply detected Check connections 257 6 F Shutdown due to system overload System load current is outside the per missible overload profile Outputs of all expansion modules have been switched off 257 7 MD System overload System load current ...

Page 225: ... detected Unexpected module type detected 257 27 MD Module with reduced power detected A module with reduced performance was detected A different system response is possible 257 28 F Incompatible module detected The module type is incompatible to the configuration The module cannot be commissioned 257 29 F Unexpected empty slot detected Unexpected empty slot detected 257 30 MR Short time interrupt...

Page 226: ...stored 259 F Error in the buffer expansion module Error in the buffer expansion module 259 1 MR Buffer mode The power supply system is supplied via the buffer expansion module s 259 2 F Insufficient charge level Insufficient charge level 260 F Communication error Communication error 260 1 F Faulty communication to the module Communication with the expansion mod ule is faulty All outputs on the exp...

Page 227: ...put Yes Yes Overvoltage strength 2 3 Uin rated 1 3 ms 2 3 Uin rated 1 3 ms Line supply buffering at Iout rated min 15 ms1 2 15 ms1 2 Power failure buffering At Uin 400 V At Uin 400 V Rated line frequency 50 60 Hz 50 60 Hz Line frequency range 47 63 Hz 47 63 Hz Input current at rated value of input voltage 400 V 1 4 A 2 75 A Input current at rated value of input voltage 500 V 1 1 A 2 2 A Inrush cur...

Page 228: ...l tolerance static 3 3 3 3 Static line regula tion approx 0 2 0 2 0 2 0 2 Static load regu lation approx 0 1 0 1 0 1 0 1 Residual ripple in the load range peak peak max 100 mV 100 mV 100 mV 100 mV Spikes peak peak max bandwidth ap prox 20 MHz 200 mV 200 mV 200 mV 200 mV Adjustment range Remark 5 28 V Derating 24 V 4 Iout V 5 28 V Derating 24 V 4 Iout V 5 28 V Derating 24 V 4 Iout V 5 28 V Derating...

Page 229: ...tact rating 60 V DC 0 3 A for OK Relay contact change over contact rating 60 V DC 0 3 A for OK Via relay contact basic device Via relay contact basic device Response when switching on off No overshoot of Uout Soft Start Starting delay max 1 s 1 s 1 s 1 s Voltage rise time of the out put volt age maximum 500 ms 500 ms 500 ms 500 ms Switching in of the outputs All outputs are simultaneously switched...

Page 230: ...00 0CY0 Output active power typical 480 W 960 W 480 W2 960 W2 Overload capabil ity Complete system can be overloaded up to 150 for 5 s min Complete system can be overloaded up to 150 for 5 s min 1 Can be expanded using a maximum of 4 expansion modules 2 Using the SITOP CNX8600 expansion module it is not possible to increase the maximum output power of the complete system SITOP PSU8600 Image 9 2 St...

Page 231: ... a function of the input voltage Image 9 3 Output current as a function of the input voltage only the basic device SITOP PSU8600 6EP3436 8MB00 2CY0 Image 9 4 Output current as a function of the input voltage power supply system SITOP PSU8600 6EP3436 8MB00 2CY0 with a minimum of one expansion module SITOP CNX8600 ...

Page 232: ...07 7 76 Image 9 5 Output current as a function of the input voltage only the basic device SITOP PSU8600 6EP3437 8MB00 2CY0 Image 9 6 Output current as a function of the input voltage power supply system SITOP PSU8600 6EP3437 8MB00 2CY0 with a minimum of one expansion module SITOP CNX8600 ...

Page 233: ...perature Image 9 7 Output power as a function of the ambient temperature for SITOP PSU8600 6EP3436 8MB00 2CY0 Image 9 8 Output power as a function of the ambient temperature for SITOP PSU8600 6EP3437 8MB00 2CY0 The output power characteristics in the diagram above were plotted for a voltage of 24 V and identical load currents at all outputs ...

Page 234: ...vice 6EP3437 8MB00 2CY0 Expansion module 6EP4436 8XB00 0CY0 Expansion module 6EP4437 8XB00 0CY0 Efficiency at Uout rated Iout rated approx 93 93 97 97 Power loss at Uout rated Iout rated approx 34 W 72 W 15 W 30 W Power loss for no load operation Typ 12 W Typ 20 W Image 9 9 Efficiency of the basic device 6EP 3436 8MB00 2CY0 at Uout rated Iout rated ...

Page 235: ...P4436 8XB00 0CY0 Expansion module 6EP4437 8XB00 0CY0 Dynamic line regulation Vin rated 15 maximum 0 1 0 1 0 1 0 1 Dyn load regula tion Iout 50 100 50 Uout typ 0 4 0 4 0 4 0 4 Regulation time maximum 10 ms 10 ms 10 ms 10 ms 9 5 Protection and monitoring Basic device 6EP3436 8MB00 2CY0 Basic device 6EP3437 8MB00 2CY0 Expansion module 6EP4436 8XB00 0CY0 Expansion module 6EP4437 8XB00 0CY0 Output over...

Page 236: ...set Non isolated 24 V input signal level high for 15 V Non isolated 24 V input signal level high for 15 V Via remote reset basic device Via remote reset basic device Characteristic for constant current operation Iout limit 1 5 Iout thresh old permissible for 5 s then Iout threshold continu ously Iout limit 1 5 Iout thresh old permissible for 5 s then Iout threshold continu ously Iout limit 1 5 Iou...

Page 237: ... 2 5 mm2 GROUND 3 screw terminals for 0 2 mm 2 5 mm2 Connections signaling contacts 11 12 14 signal 1 screw terminal each for 0 2 1 5 mm 11 12 14 signal 1 screw terminal each for 0 2 1 5 mm Connections auxiliary contacts RST reset Plug in terminal common with the signal with 1 screw connection for 0 2 1 5 mm RST reset Plug in terminal common with the signal with 1 screw connection for 0 2 1 5 mm C...

Page 238: ...for 0 2 1 5 mm2 Auxiliary contact connections X1 X2 control contact 1 terminal for 0 2 1 5 mm2 X1 X2 control contact 1 terminal for 0 2 1 5 mm2 System connec tion Integrated connecting plug Integrated connecting plug Integrated connecting plug Integrated connecting plug Width of the housing 60 mm 125 mm 60 mm 125 mm Height of the housing 125 mm 125 mm 125 mm 125 mm Depth of the housing 150 mm 150 ...

Page 239: ...EP3436 8MB00 2CY0 http www automation siemens com bilddb index aspx objkey G_KT01_XX_01086 6EP3437 8MB00 2CY0 http www automation siemens com bilddb index aspx objkey G_KT01_XX_01002 Expansion modules SITOP CNX8600 6EP4436 8XB00 0CY0 http www automation siemens com bilddb index aspx objkey G_KT01_XX_00996 6EP4437 8XB00 0CY0 http www automation siemens com bilddb index aspx objkey G_KT01_XX_00999 B...

Page 240: ...Technical data 9 9 Dimension drawings PSU8600power supply systems 240 Manual 04 2016 A5E35883207 7 76 ...

Page 241: ...fer modules 6EP4297 8HB00 0XY0 6EP4297 8HB10 0XY0 6EP4293 8HB00 0XY0 6EP4295 8HB00 0XY0 Primary secondary electrical isolation Yes Electrical isolation SELV output voltage Uout according to EN 60950 1 and EN 50178 Protection class EN 61140 Class I Class III Class III Degree of protection EN 60529 IP 20 Leakage current max 3 5 mA Test voltage See Table 10 1 Test voltage Page 242 See also Test volta...

Page 242: ...B Connect the input terminals with one another Connect the output terminals with PE Test C Connect the output terminals with one another and measure with respect to PE Table 10 1 Test voltage Test time Prim sec A Prim PE B Sec PE C Type test 60 s 4200 VDC 2200 VDC 700 VDC 60 s 3000 VAC 1500 VAC 500 VAC Production test 1 s 2200 VDC 2200 VDC 500 VDC 1 s 1500 VAC 1500 VAC 350 VAC Field test 1 s 2200 ...

Page 243: ...nd 2006 95 EG UL cUL CSA ap proval cULus Listed UL 508 CSA C22 2 No 107 1 File E197259 cCSAus CSA C22 2 No 60950 1 UL 60950 1 CB approval Yes Explosion protection ATEX EX II 3G Ex nA nC IIC T4 Gc ATEX EX II 3G Ex nA IIC T4 Gc ATEX EX II 3G Ex nA IIC T5 Gc cCSAus CSA C22 2 No 213 ANSI ISA 12 12 01 2007 1 IECex IECEx EPS 14 0059X SEMI F47 compli ance Yes 1 Marine approvals GL ABS being prepared RCM ...

Page 244: ...terference emission for residential areas Emitted interference EN 55022 Class B Line harmonics limit EN 61000 3 2 Class A Electrostatic dis charge EN 61000 4 2 8 kV contact 8 kV air Electromagnetic fields EN 61000 4 3 80 1000 MHz 10 V m 1 4 2 0 GHz 10 V m 2 0 2 7 GHz 1 V m High speed transient disturbance variables burst EN 61000 4 4 4 kV at line connections 2 kV at DC output Surge voltages EN 610...

Page 245: ...0 humid heat cyclic 40 70 C Humidity class Climatic class 3K3 according to EN 60721 5 95 no condensation Mechanical stress in operation Tested according to EN 60068 2 6 Vibration test Fc 3 5 mm deflection in the range 5 8 4 Hz 2 g acceleration in the range 8 4 150 Hz EN 60068 2 27 shock test Ea Acceleration 150 m s2 test duration 11 ms Damaging gases Tested according to EN 60068 2 42 sulfur dioxid...

Page 246: ...Environmental conditions PSU8600power supply systems 246 Manual 04 2016 A5E35883207 7 76 ...

Page 247: ...onent The SITOP BUF8600 buffer module stores energy using electrolytic capacitors or double layer capacitors and allows the buffer time to be extended for power failures The power supply system is integrated using an integrated connecting plug A maximum of two buffer modules can be used within a system For brief power failures the outputs of the power supply system are supplied without interruptio...

Page 248: ...fered for a longer period of time Using DC UPS with various battery modules lead acid accumulators buffer times in the range of hours can be implemented The innovative SITOP UPS1600 devices also offer new options when it comes to diagnostics and system integration They have extensive functions openly communicate via USB or Ethernet PROFINET and are completely integrated in Totally Integrated Autom...

Page 249: ...49 Environment 13 The devices are in conformance with RoHS As a rule only non silicon precipitating materials are used Disposal guidelines Packaging and packaging aids can and should always be recycled The product itself may not be disposed of as domestic refuse ...

Page 250: ...Environment PSU8600power supply systems 250 Manual 04 2016 A5E35883207 7 76 ...

Page 251: ...lies is available in the Internet at the SITOP homepage SITOP http www siemens com sitop Information material SITOP information can be downloaded from the Internet Information and download center http www siemens com sitop infomaterial CAx data 2D 3D data and circuit diagram macros can be downloaded from the Internet Siemens image database http www siemens com sitop cax Request all CAx data via th...

Page 252: ...07 7 76 Contact persons If you have any questions regarding the use of our products then contact the Siemens contact person in your regional Siemens sales office You can find these addresses as follows On the Internet http www siemens com automation partner In Catalog CA 01 ...

Reviews: