Scale parameters and functions
8.4 Calibration procedure
SIWAREX WP231
78
Manual, 07/2014, A5E31238908A-02
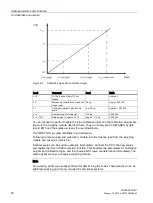
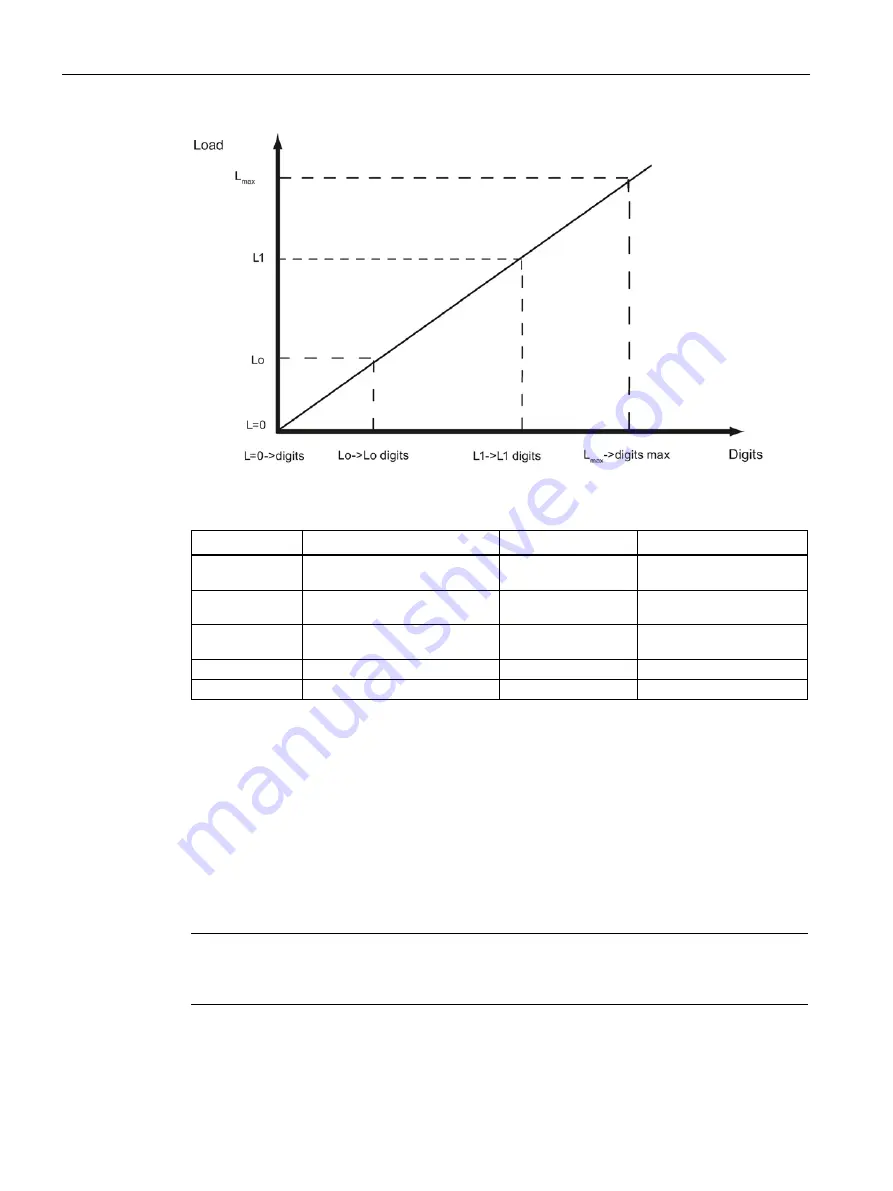
Figure 8-3
Calibration digits and calibration weight
Load
Comment
Load
Digits
L=0
100 kg load cell (2 mV/V) not
loaded
Approx. 0
L0
Mechanical installation on load cell
(dead load)
25 kg
Approx. 500 000
L1
Calibration weight 1 placed onto
scale
e.g. 60 kg
Approx. 1 200 000
L
max
Nominal weight of load cell
100 kg
2 000 000
L
max
+10%
Rated approx. 10 %
Approx. 110 kg
2 200 000
You do not need to perform calibration if the calibration digits and the calibration weights are
known to the weighing module described here. They are simply sent to SIWAREX by data
record DR 3 and the scales are ready for use immediately.
The SIWATOOL program facilitates rapid calibration.
Following commissioning and calibration, all data records must be read from the weighing
module and saved as a scale file.
Identical scales can be put into operation immediately. Connect the PC to the new scales
and enable the "Send all data records" function. This transfers the parameters for calibration
weights and calibration digits, and the characteristic curve are determined immediately. The
same applies when you change a weighing module.
Note
Two working points are usually sufficient for determining the scales' characteristic curve. An
additional working point is only required for non-linear systems.
Summary of Contents for SIWAREX WP231
Page 16: ...Safety notes 2 1 General safety instructions SIWAREX WP231 16 Manual 07 2014 A5E31238908A 02 ...
Page 132: ......
Page 174: ...Technical data 13 3 Approvals SIWAREX WP231 174 Manual 07 2014 A5E31238908A 02 ...
Page 180: ...List of abbreviations SIWAREX WP231 180 Manual 07 2014 A5E31238908A 02 ...
Page 182: ...Index SIWAREX WP231 182 Manual 07 2014 A5E31238908A 02 ...


