background image

en

14

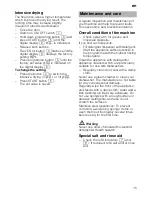
Timer programming *

* depending on model
You can delay the start of the programme 
in 1-hour steps up to 24 hours.

Close the door.

Switch  on  ON/OFF  switch 

(

.

Press  button 

8

 + until the digital 

display 

h

 jumps to 

œ

:

‹‚

.  

Press 

8

 + or – button until the 

displayed time corresponds with your 
requirements.

Press  START  button 

H

, timer 

programming is activated.

To delete timer programming, press 
the 

8

 + or – button until 

h


œ

:

‹‹

 is 

indicated on the digital display.  
You can change your programme 
selection at any time until the 
programme starts.

End of programme

The programme has ended when the 
value 

:

‹‹

 is indicated on the numerical 

display 

h

.  

Switching off the appliance

Short time after the end of the programme:

Switch off ON/OFF switch 

(

.

Turn off the tap (not applicable if Aqua-
Stop fitted).

Remove the utensils when they have 
cooled down.

ã=

Warning

At the end of the programme please open 
the door fully and not partially when 
emptying the dishwasher. Any escaping 
water vapour could damage sensitive 
worktops.

Interrupting the programme

Switch off ON/OFF switch 

(

.

The LEDs go out. The programme is 
saved. 
If the door was opened on an 
appliance which has a warm water 
connection or is heated, first leave the 
door ajar for several minutes and then 
close. Otherwise, expansion (pressure) 
may cause the appliance door to 
spring open or water to run out of the 
appliance.

To continue the programme, switch on 
the ON/OFF switch 

(

 again.

Terminating the programme 
(Reset)

Press START button

H

 for 

approx. 3 sec.
The numerical display

h


indicates

:

‹‚

.

The programme sequence lasts 
approx. 1 min. On the digital 
display

h

 is indicated

:

‹‹

.

Switch off ON/OFF switch

(

.

Changing the programme

When the START button 

H

 has been 

pressed, the programme cannot be 
changed.
The only way a programme can be 
changed is by Cancel programme (Reset).

Summary of Contents for SK76M530GB

Page 1: ...S Operating instructions en 9000442366 8908 ...

Page 2: ...2 A B C 3 4 6 7 8 1 5 Reset 3 sec 9 21 22 24 25 20 23 26 27 28 ...

Page 3: ...onal options 13 Express Wash 13 Hygiene 13 Intensive zone 13 Extra drying 13 Washing the dishes 13 Programme data 13 Aqua sensor 13 Switching on the appliance 13 Remaining running time display 13 Timer programming 14 End of programme 14 Switching off the appliance 14 Interrupting the programme 14 Terminating the programme 14 Changing the programme 14 Intensive drying 15 Maintenance and care 15 Ove...

Page 4: ...ils with sharp points must be placed in the cutlery basket with the points downwards or horizontally on the knife shelf depending on model Children in the household If fitted use the childproof lock An exact description can be found in the back of the envelope Do not allow children to play with or operate the appliance Keep children away from detergents and rinse aid These may cause chemical burns...

Page 5: ...pose of the power cord Destroy the door lock so that the door can no longer be closed Diagrams of the control panel and the interior of the appliance can be found in the envelope at the front Individual positions are referred to in the text Control panel depending on model Number depending on model Appliance interior Getting to know your appliance ON OFF switch 0 Programme buttons 8 Timer programm...

Page 6: ...will help you with this Set value can be found in the water hardness table Close the door Switch on ON OFF switch Hold down programme button and press START button H until is indicated on the digital display Release both buttons The LED for button flashes and the digital display h displays the factory setting To change the setting Press programme button 3 Each time the button is pressed the set va...

Page 7: ...component If combined detergents with a salt component are used salt can usually be omitted up to a water hardness of 21 dH 37 fH 26 Clarke 3 7 mmol l If the water hardness is over 21 dH special salt must be used Switching off salt refill indicator water softening system If the salt refill indicator X is impaired e g when using combined detergents containing salt component it can be switched off P...

Page 8: ... factory setting Do not change the amount of rinse aid unless streaks select lower setting or water stains select higher setting are left on the utensils Close the door Switch on ON OFF switch Hold down programme button and press START button H until is indicated on the digital display Release both buttons The LED for button flashes and the digital display h displays the factory setting Press prog...

Page 9: ...hich protects utensils Take glass and cutlery out of the dishwasher as soon as possible after the programme ends Loading the dishwasher Remove large food remnants It is not necessary to prerinse utensils under running water Place the utensils so that they are secure and cannot tip over all utensils with their openings face down parts with curves or indentations are at an angle thereby allowing wat...

Page 10: ...lkaline formulation with phosphate and enzymes Phosphates bond the lime in the water Enzymes break down starch and remove protein Phosphate free detergents are less frequent These have a slightly weaker lime bonding capacity and require a higher dosage To remove coloured stains e g tea tomato sauce oxygen based bleaching agents are usually used Note To ensure a good washing result always follow th...

Page 11: ...t also rinse aid and salt replacement substances 3in1 and depending on the combination 4in1 5in1 etc additional components such as glass protection or stainless steel cleaner Combination detergents function only up to a specific degree of hardness usually 21 dH Over this limit salt and rinse aid must be added As soon as combined detergents are used the rinse programme is adjusted automatically to ...

Page 12: ...ional options Programme sequence pots and pans non sensitive utensils and cutlery very adhesive burned in or dried on food remnants containing starch or protein Intensive 70 all Prerinse Clean 70 Intermediate rinse Final rinse 65 Dry Á Auto 45 65 Is optimised according to the soiling with the aid of sensors mixed utensils and cutlery part dried common household food remnants á à Eco 50 Prerinse Cl...

Page 13: ...the water hardness set value Different influencing factors such as e g water temperature or line pressure may result in deviations Aqua sensor depending on model The Aqua sensor is an optical measuring device light barrier which measures the turbidity of the rinsing water The Aqua sensor is used according to the programme If the Aqua sensor is active clean rinsing water can be transferred to the n...

Page 14: ...when they have cooled down ã Warning At the end of the programme please open the door fully and not partially when emptying the dishwasher Any escaping water vapour could damage sensitive worktops Interrupting the programme Switch off ON OFF switch The LEDs go out The programme is saved If the door was opened on an appliance which has a warm water connection or is heated first leave the door ajar ...

Page 15: ...d limescale deposits If you find such deposits Fill detergent dispenser with detergent Start the appliance without utensils in the programme with the highest rinsing temperature Clean the appliance with detergents appliance cleaners which are particularly suitable for use with dishwashers Regularly clean door seal with a damp cloth Never use a steam cleaner to clean your dishwasher The manufacture...

Page 16: ...linder as illustrated and take out filter system Remove any residue and clean filters under running water Re install filter system in reverse sequence and ensure that the arrow marks are opposite each other after closing the filter system Spray arm Limescale and dirt from the rinsing water may block nozzles and the bearing assemblies of the spray arm 1 Check outlet nozzles on the spray arm for blo...

Page 17: ...on the digital display h an error code to always disconnect the appliance from the power supply and then turn off the tap You can rectify certain faults yourself see following fault description for all other faults please contact customer service and state the indicated fault XX ã Warning Don t forget Repairs may be carried out by technicians only If a component has to be replaced ensure that only...

Page 18: ...s not lit Refill indicator s switched off Adequate salt rinse aid available Refill indicator for special salt X is lit No salt Refill with special salt Sensor does not detect salt tablets Use different special salt during the wash cycle Unusual foam formation Handwash liquid in the rinse aid dispenser Spilled rinse aid causes excessive frothing therefore please remove with a cloth Appliance stops ...

Page 19: ...lery Cutlery not rust resistant Salt content in the rinsing water too high as salt dispenser lock not fastened firmly or salt was spilled while being refilled Utensils not dry Appliance door opened too early and utensils taken out too early Programme selected without drying Too little unsuitable rinse aid Activate intensive drying The combined detergent used has a poor drying performance Use rinse...

Page 20: ...the power cord may be replaced by customer service only If the dishwasher is installed in a high sided unit the unit must be secured properly Do not install the appliance near heat sources radiators heat storage tanks cookers or other appliances which generate much heat and install it under a hob only in consideration of the stipulated safety clearances After installing the appliance ensure that t...

Page 21: ...hen replacing the appliance always use a new water supply hose Water pressure at least 0 05 MPa 0 5 bar maximum 1 MPa 10 bar At a higher water pressure connect pressure reducing valve ahead Inlet rate minimum 10 litres minute Water temperature cold water preferred hot water max temperature 60 C Electrical connection Connect the appliance to an alternating current only ranging from 220 V to 240 V a...

Page 22: ...g holiday home empty the appliance completely see Transportation Turn off the tap disconnect supply hose and drain water Both the packaging of new appliances and the old appliances themselves contain valuable raw materials and recyclable materials Please dispose of the individual parts separated according to type Please ask your dealer or inquire at your local authority about current means of disp...

Page 23: ...k door lock To open the door move lever to right and pull door handle Always close the appliance door completely when you leave the appliance This is the only way you can protect your children from potential dangers ...

Page 24: ...of the appliance If our Aqua Stop system is defective and causes water damage we will make good the damage for private users To ensure water damage protection the appliance must be connectedto the power supply In addition to warranty claims against the seller based on the purchase contract and in addition to our appliance warranty we will pay damages under the following conditions 1 2 3 4 AQUA STO...

Reviews: