background image

Back tamper switch installation 

The back tamper switch (Fig.1 item 26) is required 
for SSF Larmklass 2 and EN Alarm Grade 3. 
The back tamper switch is delivered with SPCP333 
or is available as an optional extra (SPCY130). 

Mounting the wall fixing plate 

¾


Mount the SPC enclosure in the appropriate 
position on the wall using all three fixings (see 
Fig. 8 item 1). 

¾


Draw a line around the inside of the back 
tamper cutout (see Fig. 8 item 2) to provide a 
guide for the wall plate on the fixing wall. 

¾


Remove the enclosure from the wall. 

¾


Place the wall plate (Fig 9, item 1) on the wall 
centring it precisely around the rectangle 
previously drawn (Fig. 9, item 2). 

¾


Ensure all four flanges on the wall plate are 
flush with the wall. 

¾


Mark the four fixings on the wall plate. 

¾


Drill and use suitable screws (max. 4 mm) for 
the wall substrate. 

¾


Fit the wall plate to the wall. 

Fitting the back tamper switch  

¾


Insert the tamper switch (Fig. 10 item 2) into 
the back of the enclosure so that the plunger 
faces outwards. (Fig. 10 item 1) 

¾


Fit the enclosure back onto the wall using the 
three fixings previously removed. 

¾


Visually check to ensure there is a flush finish 
between the wall plate and the enclosure 
metalwork. 


WARNING: 
If the wall fixing plate is not accurately aligned then 
the enclosure will not sit properly on its fixings. 

Wiring the back tamper switch 

¾


Connect one end of the tamper leads to 
terminal block CN4 (Fig.1 item 25). 

¾


Plug the two connectors at the other ends of 
the leads onto the COM (common) and NO 
(normally open) spade connectors on the back 
tamper switch.  

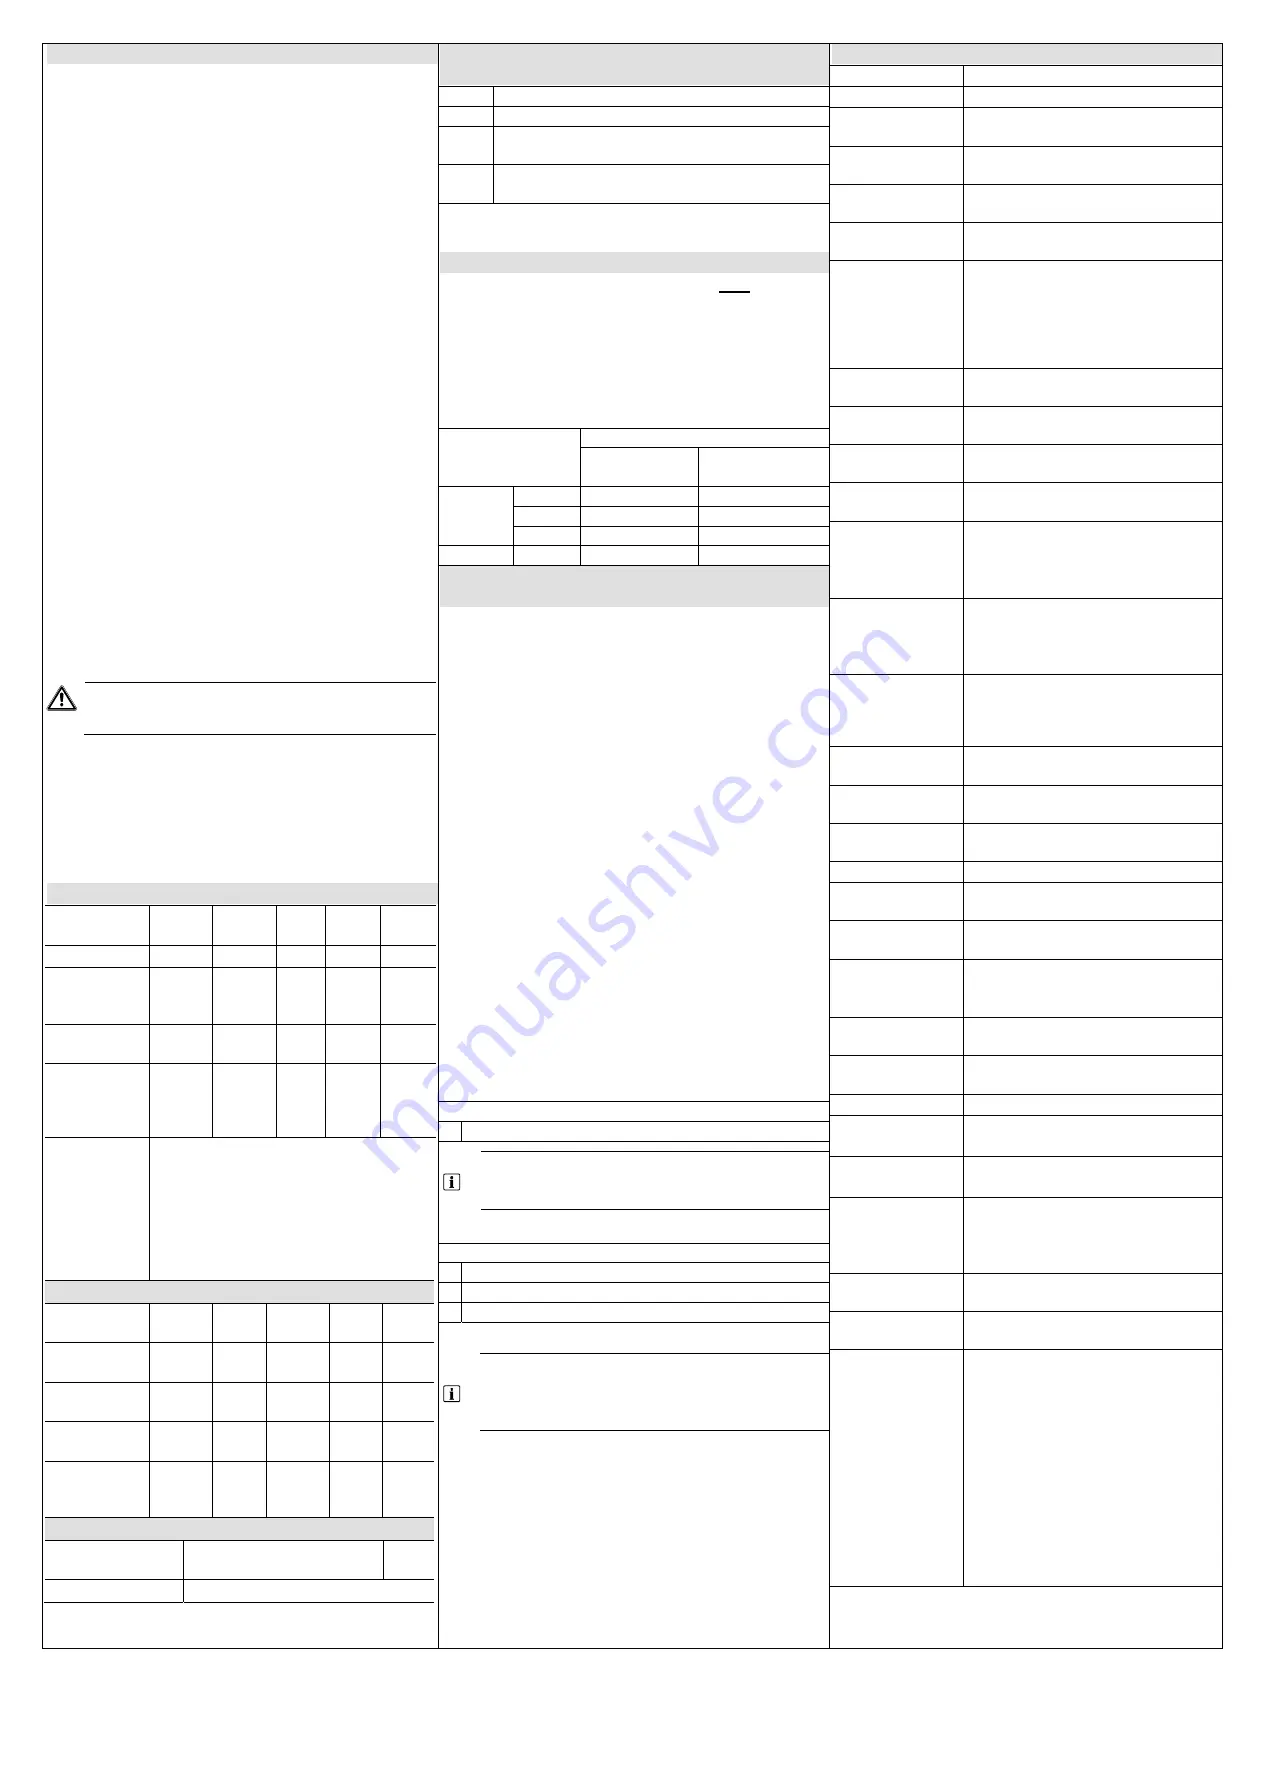
Appendix A: LED Status 

Condition 

Mains 

green 

Battery 

green 

Fuse 

red 

Limit

*

red 

Status

green 

Normal On 

On 

Off 

Off 

On 

Mains OK, 
battery 
charging 

On Flash   

  On 

Mains fail, 
battery OK 

Off On      On 

Mains OK, 
and battery 
not installed 
or faulty. 

On Off      On 

Mains fail, 
and battery 
not installed, 
faulty or in 
deep 
discharge 
protection 
mode. 

All LEDs off 


Output 1 fuse 
open 


Single 

Flash 

 On 

Output 2 fuse 
open 


Double 

Flash 

 On 

Expander 
fuse open 


Triple 

Flash 

 On 

More than 
one fuse open 


On 


On 

Current 
exceeded on 
any output 


On 

On 


PSU switcher 
failure 

Off Flash

Battery link missing 

All LEDs flash together 

* Current limit 


Appendix B: Battery link position (Fig. 1, 
item 8) 

Link


Description


DTX


Do not use.


17 Ah


Select this option if a 17Ah battery is fitted to 
the PSU


 7 Ah


Select this option if a 7Ah battery is fitted to 
the PSU. 

Note:

 Only one of the above links can be fitted to 

this header. 

A

ppendix C: Choosing the stand-by battery  

The table below shows the maximum total current 
(in mA) that can be drawn from all outputs for EN 
compliance. Note that other limits apply, for 
example, the maximum current that can be drawn 
from each of outputs 1 and 2 is 750 mA.  
Available current in mA =  
1000 * (0.85 * battery capacity in Ah) / (standby 
time in hours) - 77 mA 


Battery Capacity


7 Ah 

(Grade 2) 

17 Ah 

(Grade 3) 

Standby

Time 

(hours)


12


419 1127 

24


171 525 

30


121 405 


60


Not to be used 

164 

Appendix D: Fitting additional expanders in 
the SPC hinged enclosure 

The enclosure can accommodate: 

  1 x Battery (17 Ah max.) 

  1 x PSU Expander (SPCP330) 

  3 x I/O Expanders (optional)


To access the expanders and the PSU, open the 
front lid to view the hinged mounting bracket. The 
boards are secured to the hinged mounting bracket 
by four mounting pillars. 
To access or install a PSU in this enclosure: 

¾


With an appropriate screwdriver, loosen (but do 
not remove) the top two securing screws on the 
mounting bracket. 

¾


Gently push the mounting bracket in an upward 
direction until the screws are free from contact 
with the bracket. 

¾


Slowly but firmly pull the mounting bracket out 
until it rotates down and is secured by the 
resting pins  

¾


The underside of the mounting bracket and the 
enclosure provides space for additional 
expanders to be installed (secured by four 
mounting pillars). 

The PSU is secured to the front of the enclosure by 
mounting pillars. 

See Fig. 6: Mounted PSU


1

Battery


Please ensure that battery flaps are used to 
hold the battery securely when mounted in 
the cabinet. 


See Fig. 7: Rotated views


1

Battery


2

Expanders


3

SPC controller or PSU 


When installing the SPCP330 (PSU and 
Expander), ensure that the 4-pin cable is 
securely attached to the connector on the 
expander and to the PSU beneath. 


Technical data 

Power supply 

Type A (EN50131-1) 

Mains voltage 

230 V AC, +10 to -15 %, 50 Hz  

Mains fuse 

500 mA T (replacable part on mains 
terminal block) 

Power 
consumption  

Max. 220 mA at 230 V AC 

Operating 
Current  

Max. 117 mA at 12 V DC (all relays 
activated) 

Quiescent 
Current 

Max. 77 mA at 12 V DC 

Output Voltage 

11-14 V DC in normal conditions 
(mains powered and fully charged 
battery), min. 9.5 V DC when powered 
by secondary device (before system 
shut down to battery deep discharge 
protection) 

Low voltage 
trigger 

7.5 V DC 

Over voltage 
protection 

15 V DC 

Peak to Peak 
ripple 

Max. 5% of output voltage 

Auxiliary power 
(nominal) 

Max. 1500 mA at 12 V DC (750 mA 
per output) 

Battery type 

SPCP332: YUASA NP7-12FR (7 Ah) 
SPCP333: YUASA NP17-12FR 
(17 Ah) 
(battery not supplied with product) 

Battery charger 

SPCP332: 72h for 80 % of battery 
capacity 
SPCP333: 24h for 80 % of battery 
capacity 

Battery 
protection 

Current limited to 2 A (fuse protected), 
deep discharge protection at 10.5 V 
DC +/- 3 % (fault at deep discharge 
v 0.5 V DC) 

Number of on-
board zones 

EOL resistor 

Dual 4K7 (default), other resistor 
combinations configurable 

Number of on-
board relays 

2 (single-pole changeover, 30 V DC / 
max. 1 A resistive switching current) 

Field bus 

X-BUS on RS-485 (307 kb/s) 

Calibration 

No calibration checks required 
(calibrated at manufacturing) 

Serviceable 
parts 

No serviceable parts available 

Tamper contact 

SPCP332: Front spring tamper, back 
tamper 
SPCP333: Front spring tamper 

Operating 
temperature 

0 to +40 °C 

Relative 
humidity 

Max. 90 % (non-condensing) 

Colour 

RAL 9003 (signal white) 

Dimensions  
(W x H x D) 

SPCP332: 264 x 357 x 81 mm 
SPCP333: 326 x 415 x 114 mm 

Weight 

SPCP332: 4.7 kg  
SPCP333: 6.3 kg 

Housing 

SPCP332: Small metal housing (>1.2 
mm mild steel) 
SPCP333: Hinged metal housing 
(>1.2 mm mild steel) 

Housing can 
contain up to 

SPCP333: 3 additional expanders  
(size 150 x 82 mm) 

Environmental 
Class 

Class II Indoor General 

Standards 

SPCP332


Certified according: 
EN50131-1:2006 (Grade 2, Class II 
Indoor General),  
TS50131-3:2003 (Grade 2),  
EN50131-6:2008 (Grade 2), 
SSF 1014 ed.3:2005 (Larmklass 1) 

SPCP333


EN50131-1:2006 (Grade 3, Class II 
Indoor General),  
TS50131-3:2003 (Grade 3),  
EN50131-6:2008 (Grade 3),  
SSF 1014 ed.3:2005 (Larmklass 2) 


Summary of Contents for SPCP332

Page 1: ...sione it Nätenhet PSU med expansionsenhet sv PSU strom versorgungseinheit mit erweiterungsmodul de Module d alimentation électrique avec transpondeur fr STEP A6V10216041 Edition 01 03 2011 1 1 2 3 4 7 5 0 9 8 6 N PE L 0 V 12 V 0 V 12 V OUT PUT 2 OUTPUT 1 BATTERY 1 2 3 4 5 6 7 8 9 10 11 18 19 20 21 22 23 24 26 25 1 2 3 4 7 5 0 9 8 6 12 13 14 15 16 17 DTX 17Ah 7Ah 3 1 2 3 4 5 6 2 2A 2B 1A 1B SHLD SH...

Page 2: ...ever when wiring for Star configuration this fitting should be removed For more information see section Wiring the X BUS Interface 25 Back tamper terminal block Fit a link across this block if tamper switch is not used 26 Back tamper switch See section on Back tamper switch installation When connecting a battery to the PSU ensure that the positive and negative leads are connected to their respecti...

Page 3: ...he expanders and the PSU open the front lid to view the hinged mounting bracket The boards are secured to the hinged mounting bracket by four mounting pillars To access or install a PSU in this enclosure With an appropriate screwdriver loosen but do not remove the top two securing screws on the mounting bracket Gently push the mounting bracket in an upward direction until the screws are free from ...

Page 4: ...er de terminación este jumper siempre está colocado por defecto Sin embargo cuando se realiza el cableado para la configuración en estrella se debe retirar dicho jumper Para más información consulte el apartado Cableado de la interfaz X BUS 25 Bloque de terminales de tamper trasero Fije un vínculo en este bloque si no se utiliza el interruptor de tamper 26 Interruptor de tamper trasero Consulte la...

Page 5: ...de expansión de fuente de alimentación SPCP330 3 x módulos de expansión de E S opcional Para acceder a los módulos de expansión y a la fuente de alimentación abra la tapa frontal para ver el soporte de montaje con bisagras Las tarjetas están fijadas al soporte de montaje con bisagras mediante cuatro columnas de montaje Para instalar o acceder a una fuente de alimentación en esta carcasa Con un des...

Page 6: ...okud je v malém pouzdře je nutné osadit přemostění 24 Zakončovací můstek Tento můstek je standardně vždy nasazen Při zapojení hvězdicové konfigurace je však nutné můstek odstranit Více informací najdete v části Zapojení rozhraní X BUS 25 Svorkovnice zadního sabotážního kontaktu Pokud není spínač sabotážního kontaktu používán osaďte svorkovnici můstkem 26 Zadní sabotážní kontakt Viz část Instalace ...

Page 7: ...ěsného krytu SPC Kryt může obsahovat 1x baterii max 17 Ah 1x expandér PSU SPCP330 3x vstupní výstupní expandéry volitelné Chcete li získat přístup k expandérům a PSU otevřete přední kryt uvidíte závěsnou montážní konzolu Desky jsou k závěsné montážní konzole připevněny čtyřmi montážními kolíky Přístup nebo instalace jednotky PSU do tohoto pouzdra Pomocí vhodného šroubováku povolte ale nevyjímejte ...

Page 8: ...ie pominięcia zabezpieczenia 24 Zworka terminacji Ta zworka jest domyślnie zawsze zamontowana Jednak wykonanie podłączeń w konfiguracji gwiazdy wymaga jej zdjęcia Dodatkowe informacje znajdują się w punkcie Podłączenie magistrali X BUS 25 Łączówka tylnego zabezpieczenia antysabotażowego Należy zamocować zworkę na łączówce jeśli przełącznik sabotażowy nie jest używany 26 Tylny przełącznik sabotażow...

Page 9: ...jścia W celu uzyskania dostępu do modułów rozszerzenia i zasilacza należy otworzyć przednią pokrywę tak aby widoczny był zawiasowy wspornik Płytki są zabezpieczone do zawiasowego wspornika montażowego za pomocą czterech kołków Montaż zasilacza w obudowie lub uzyskiwanie do niego dostępu Za pomocą odpowiedniego śrubokręta poluzować ale nie wykręcać dwa górne wkręty zabezpieczające na wsporniku mont...

Page 10: ...uctor de şuntare ca implicit este permanent montat Totuşi când se realizează o configuraţie în stea acest conductor de şuntare trebuie scos Pentru mai multe informaţii vezi secţiunea Racordarea interfeţei X BUS 25 Bloc terminal comutator siguranţă spate Montaţi o linie peste acest bloc în cazul când comutatorul de siguranţă nu este utilizat 26 Comutatorul tamper spate Vezi secţiunea Instalarea com...

Page 11: ... max 17 Ah 1 x extensie PSU SPCP330 3 x extensii I O opţional Pentru a accesa extensiile şi PSU deschideţi capacul frontal pentru a vedea consola de montaj rabatabilă Plăcile sunt fixate de consola de montaj rabatabilă prin patru tije de montaj Pentru a accesa sau pentru a instala o PSU în această cutie Cu o şurubelniţă adecvată slăbiţi dar nu scoateţi cele două şuruburi superioare de fixare de pe...

Page 12: ...mper is standaard altijd aangebracht Maar bij de bedrading voor een sterconfiguratie moet de jumper worden verwijderd Zie voor meer informatie de sectie Bedrading van X BUS interface 25 Klemmenstrook achterste sabotageschakelaar Sluit een koppeling aan over deze strook als de sabotageschakelaar niet wordt gebruikt 26 Achterste sabotageschakelaar Zie sectie Installatie van achterste sabotageschakel...

Page 13: ...tbreiding SPCP330 3 x I O uitbreiding optioneel Als u het voorpaneel opent ziet u de montagebeugel met scharniermechanisme en hebt u toegang tot de uitbreidingen en de PSU De printplaten zijn met vier montagevoetjes bevestigd aan de montagebeugel Toegang tot een PSU of een PSU installeren in de behuizing Draai met een passende schroevendraaier de twee bovenste borgschroeven los maar verwijder ze n...

Page 14: ...en kleine behuizing gemonteerd wordt 24 Afsluitjumper Deze jumper wordt standaard altijd aangebracht Bij een bedrading voor een sterconfiguratie moet deze fitting echter verwijderd worden Zie voor meer informatie de paragraaf Bekabeling van X BUS interface 25 Klemmenblok sabotageset achteraan Maak een koppeling via dit blok als geen sabotageschakelaar gebruikt wordt 26 Sabotageschakelaar achteraan...

Page 15: ...ge van extra expanders in SPC behuizing met scharniermechanisme Deze behuizing biedt plaats aan 1 x accu 17 Ah max 1 x PSU Expander SPCP330 3 x I O Expanders in optie Als u het voorpaneel opent ziet u de montagebeugel met scharniermechanisme en hebt u toegang tot de expanders en de PSU De printplaten zijn aan de scharnierende montagebeugel bevestigd met vier montagevoetjes Toegang tot een PSU of e...

Page 16: ...ne lasken er alltid montert som standard Men når det kables for en stjernekonfigurering bør denne fjernes For ytterligere informasjon se avsnitt Kabling av X BUS grensesnittet 25 Terminalblokk for bakre sabotasjebryter Fest en link over denne blokken hvis sabotasjebryteren ikke brukes 26 Bakre sabotasjebryter Se avsnittet om Installasjon av bakre sabotasjebryter Når et batteri koples til PSU en sø...

Page 17: ...spandere og PSU åpne frontdekselet for å se den hengslete monteringsbraketten Panelene er festet til den hengslete monteringsbraketten med fire monteringsstøtter For å komme til eller installere en PSU i dette kabinettet Med en passende skrutrekker løsnes men ikke fjernes de to toppskruene på monteringsbraketten Skyv monteringsbraketten forsiktig oppover til skruene ikke lenger har kontakt med bra...

Page 18: ...zioni vedi sezione Cablaggio dell interfaccia X BUS 25 Blocco interruttore tamper posteriore fissate un collegamento a questo blocco se l interruttore tamper non è in uso 26 Interruttore tamper posteriore Vedi sezione Installazione interruttore tamper posteriore Quando collegate una batteria alla PSU accertatevi che i cavi positivo e negativo siano connessi ai rispettivi terminali della PSU Verifi...

Page 19: ...n cardini Questo alloggiamento può contenere 1 x batteria max 17Ah 1 x espansione PSU SPCP330 3 x espansioni I O opzionale Per accedere alle espansioni e alla PSU aprire il coperchio frontale per visualizzare il supporto di montaggio con cardini I pannelli sono fissati al supporto di montaggio con cardini per mezzo di quattro pilastri di montaggio Per accedere o installare una PSU in questo allogg...

Page 20: ...mineringsbygling Denna bygling är alltid inkopplad som standard Den ska tas bort då man drar ledningar för stjärnkonfiguration För mer information se avsnitt Koppling av X BUS gränssnittet 25 Kopplingsplint för det bakre ingreppslarmet Montera en länk mellan dessa plintar om den bakre sabotagebrytaren inte används 26 Bakre sabotagebrytare Se avsnittet Installation av den bakre sabotagebrytaren När...

Page 21: ...enheterna och nätenheten genom att öppna framluckan för att se det ledade monteringsfästet Korten sätts fast i det ledade monteringsfästet med fyra monteringspelare För att komma åt eller installera en nätenhet i detta utrymme Lossa men ta inte bort de två översta fastsättningsskruvarna på monteringsfästet med en lämplig skruvmejsel Tryck försiktigt monteringsfästet uppåt tills skruvarna inte läng...

Page 22: ...ss Jumper Dieser Jumper ist standardmäßig immer gesteckt muss jedoch bei einer Sternkonfiguration entfernt werden Weitere Informationen enthält der Abschnitt Verdrahtung der X BUS Schnittstelle 25 Klemmenblock des rückwärtigen Sabotageschutzes Jumper über den Block setzen wenn der Sabotagekontakt nicht verwendet wird 26 Rückwärtiger Sabotagekontakt Siehe Abschnitt Installation des rückwärtigen Sab...

Page 23: ...tte In diesem Gehäuse kann Folgendes untergebracht werden 1 x Batterie max 17 Ah 1 x PSU Erweiterungsmodul SPCP330 3 x E A Erweiterungsmodul optional Um Zugang zu den Erweiterungsmodulen und der PSU zu erhalten öffnen Sie die Frontklappe so dass Sie die Montagehalterung sehen Die Karten sind mit vier Montagezapfen auf der Montageplatte befestigt Installation oder Zugriff auf eine PSU in diesem Geh...

Page 24: ... cavalier par défaut est toujours en place Toutefois en cas de câblage pour configuration en étoile il faut le retirer Pour plus d informations voir la section Câblage de l interface X BUS 25 Bornier du commutateur antisabotage arrière Placez un lien sur ce bornier si le commutateur antisabotage n est pas utilisé 26 commutateur antisabotage Voir la section sur l installation du commutateur antisab...

Page 25: ...x 1 x module d alimentation pour transpondeur SPCP330 3 x transpondeurs E S en option Pour accéder aux transpondeurs et au module d alimentation ouvrez le couvercle frontal pour voir l équerre de montage sur gond Les cartes sont fixés à l équerre de montage sur gond par quatre piliers de montage Pour accéder à un module d alimentation ou pour l installer dans ce boîtier Avec un tournevis adéquat d...

Reviews: