Document No. 129-253
Installation Instructions
May 8, 2019
Page 2 of 5
Siemens Industry, Inc.
Installation
If you are mounting an actuator on a new valve, begin with
the instructions
Mounting an Actuator on a Valve.
Removing the actuator from a valve
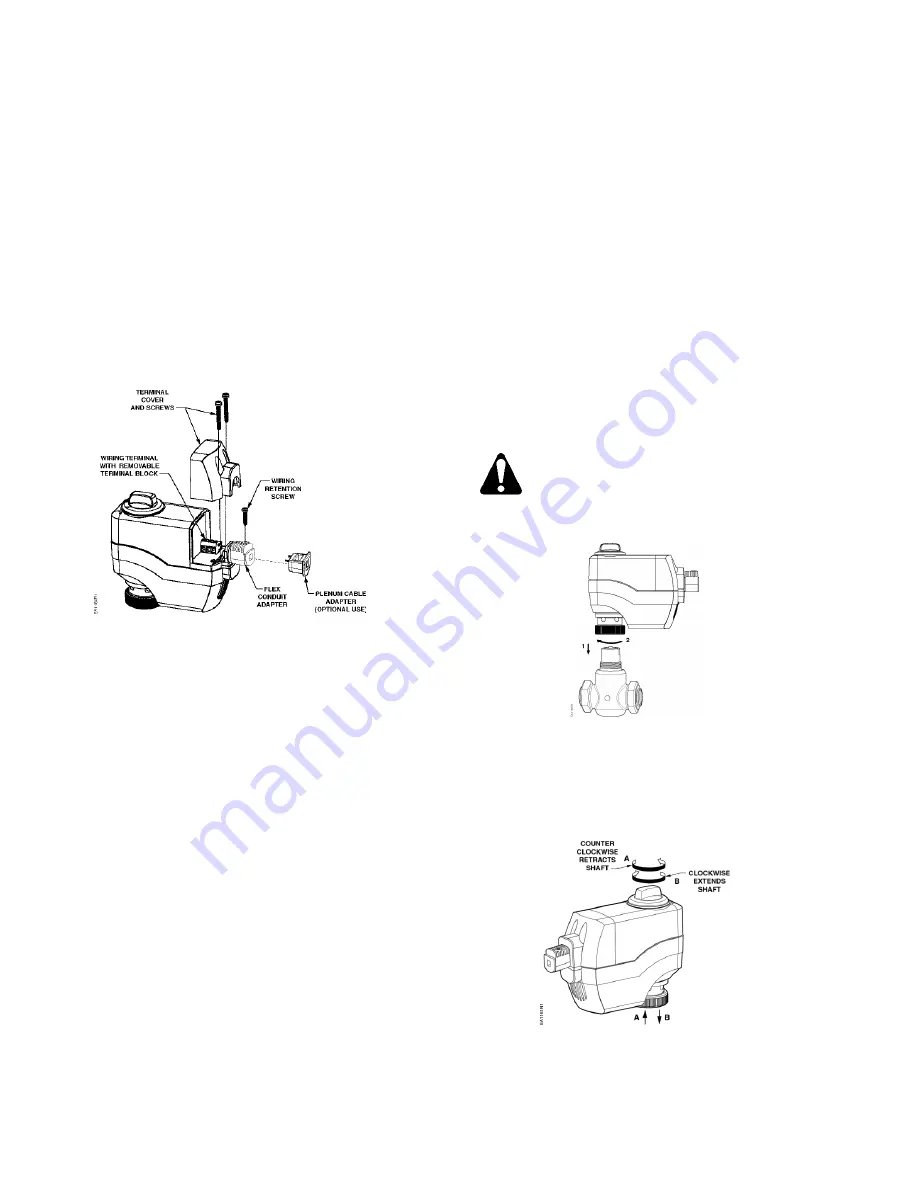
1. Remove the terminal cover (Figure 2) using a Phillips
head screwdriver.
2. Identify and disconnect wiring from the terminals.
3. Remove wiring retention screw.
4. Do one of the following:
•
Remove plenum cable adapter and plenum cable;
or
•
Remove flex conduit.
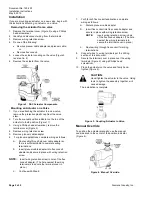
5. Loosen the actuator coupling on the valve (Figure 3,
reverse No. 2).
6. Remove the actuator from the valve.
Figure 2. SSC Actuator Components.
Mounting an Actuator on a Valve
1. If you are attaching the actuator to a new valve,
remove the protective plastic cap from the valve
stem.
2. Turn the manual position indicator on the top of the
actuator to the
0
position (Figure 11).
3. Using a Phillips head screwdriver, remove the
terminal cover (Figure 2).
4. Remove wiring retention screw.
5. Remove plenum cable adapter.
6.
For plenum applications, complete wiring as follows:
a.
Route cable through plenum cable adapter so
there is sufficient cable to complete wiring
terminations.
b.
Insert plenum cable adapter into flex conduit
adapter and secure in place with wiring retention
screw.
NOTE:
Insert wiring retention screw in hole of the flex
conduit adapter. (The hole nearest the wiring
terminals is to secure the terminal cover in
place.)
c.
Continue with Step 8.
7.
For 3/8-inch flex conduit applications, complete
wiring as follows:
a.
Discard plenum cable adapter.
b.
Insert flex conduit into flex conduit adapter and
secure in place with wiring retention screw.
NOTE:
Insert wiring retention screw in hole
of the flex conduit adapter. (The hole
nearest the wiring terminals is to
secure the terminal cover in place.)
c.
Route wiring through flex conduit for wiring
terminations.
8.
Connect wires to wiring terminals per the
Wiring
section of this document.
9.
Secure the terminal cover in place over the wiring
terminals (Figure 2) using a Phillips head
screwdriver,
10. Place the actuator on the valve and firmly hand-
tighten (Figure 3).
CAUTION:
Hand-tighten the actuator to the valve. Using
tools to tighten the assembly together, will
cause damage.
The installation is complete.
Figure 3. Coupling Actuator to Valve.
Manual Override
To position the actuator manually, use the manual
override knob in the center of the position indicator
(Figure 4).
Figure 4. Manual Override.


